MIXING & EFFECTS
Fruity Limiter + Compressor + Gate
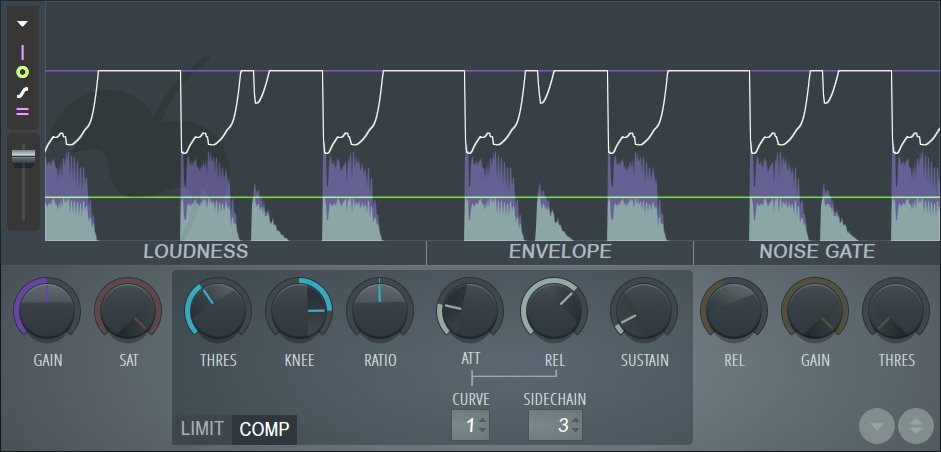
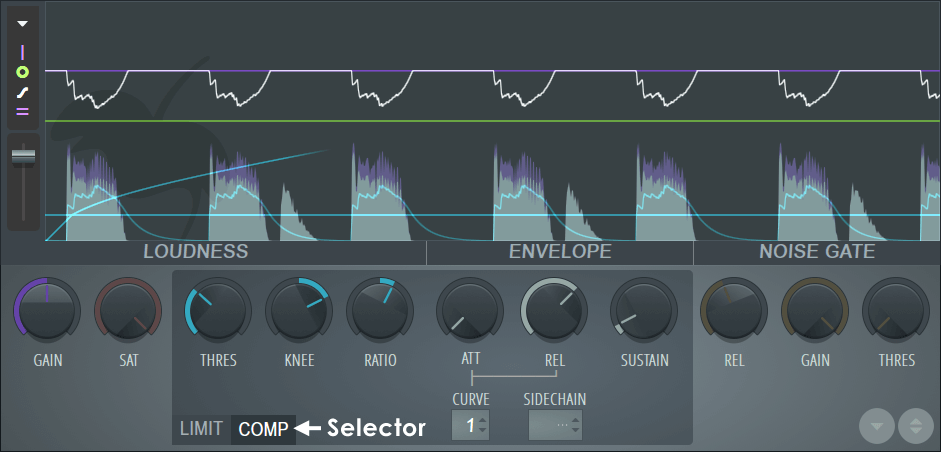
The Fruity Limiter is a powerful single band Compressor (with sidechain), Limiter & Gate. To access the relevant limiter and compressor controls, switch between LIMIT and COMP tabs on the plugin interface (as shown below).
When to use: Fruity Limiter is ideal for maximizing & limiting complete mixes, compressing & limiting individual sounds or doing basic 'noise gate' duty. Closely related alternatives are Maximus (multiband compressor/limiter/maximizer), the Fruity Compressor, Fruity Multiband Compressor and Soundgoodizer.
There is a video series available - ![]() Compression & Limiting video tutorials.
Compression & Limiting video tutorials.
Overview
Click on the following links to jump to the section of interest:
Signal Flow
The signal flow goes from the input to the Compressor (COMP), Gain, Limiter (with integrated Noise Gate), Saturation (SAT) and finally to the plugin output.

NOTE: To use the Compressor or Limiter in isolation, turn the Limiter CEIL or Compressor THRESH to their maximum value respectively. In the case of the Limiter also set ATT to 0.
Compressor Controls
Compression is a form of automated gain control that reduces the dynamic range of sounds. When the input signal exceeds a predetermined threshold the rate of increase is slowed (or even stopped) beyond that point. The art of setting a compressor is mainly in fine-tuning the magnitude, speed and timing of the automated gain changes so that the compression process does not introduce artifacts. How can reducing the amplitude peaks make the sound seem louder? To understand this we need to consider the way our hearing interprets the start (attack) and body (sustain) portion of sounds. It transpires that the attack (first ~10 ms) is used mainly to form impressions of timbre, clarity, crispness and punch, while the sustain contributes most to the perception of loudness. The sustain is most important because loudness perception comes from an integration (averaging) of the preceding 600-1000 ms to any given moment. Attack transients (of very short duration) simply don't have as much weight (due to their short duration) as the sustain portion of the sound. Lowering the amplitude of the peak transients, frees up headroom to raise the gain of the sustained portions of the signal (after compression), it is this step that increases loudness. However, as we alluded to earlier, compression represents a trade-off between dynamics and loudness, welcome to the loudness wars!
Video tutorials: ![]() Compression video tutorials
Compression video tutorials
Loudness
These controls affect the input and compression thresholds for Fruity Limiter.
- GAIN (Purple) - Post compression output (makeup) gain. NOTE: this gain is post-Compressor and pre-Limiter.
- THRESH (Blue) - Compressor threshold. Sets the level above which the signal will be compressed. To disable the compressor stage set the threshold level to the maximum (0 dB) level.
- RATIO (Blue) - Compression ratio. Sets the amount of compression to be applied once the threshold is exceeded.
- KNEE (Blue) - Compression rate. Sets the transition between no and full compression. The compression ratio can be set to increase gradually (soft knee) or rapidly (hard knee). The compression envelope will display while the knob is held.
NOTE: For the compression stage to become active you must lower the THRESH (Threshold) below the input peaks and increase the RATIO and optionally KNEE controls.
Envelope
- ATT (Attack time) - Adjusts how quickly the compression envelope responds to the start of the signal (in ms). NOTE: The ATT control also sets a 'look-ahead' delay for the Limiter section and so affects the latency of Fruity Limiter. The purpose is to allow the limiter algorithm to see transients before they arrive, so they can be reacted to instantly. As it's impossible to look into the future, realtime processing is delayed so the incoming audio-stream can be previewed. The ATT control for the compressor channel does not affect look-ahead.
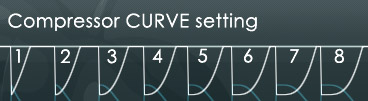
- CURVE (Attack & Release curve tension) - Select from curve 1 (immediate attack/release) to 8 (slow attack/release). This control sets both the Attack and Release curves.
NOTE: in the example below the attack was set to 1 ms and release 550 ms so only the release curve is visibly affected by the CURVE setting. At shorter release (REL) times the tension
effect will be much less visible on the display, but can be very useful for tuning out distortion. At longer release times, as shown below, the curve setting can be used to good effect timing/tuning
side-chain pumping effects to get the right feeling to the volume 'bounce-back'.
- Sidechain - This selector works in conjunction with the Mixer Sidechain (Track Send) routing. Sidechain options will not be
available until one or more sidechain tracks are set in the Mixer (except if Fruity Limiter is on the Master Mixer track, when all tracks will be available). The Sidechain is sent
FROM the Sidechain source Mixer track TO the Fruity Limiter Mixer track (
 Sidechain video tutorial):
- 1. Select the Mixer track that carries the signal to be used as a Sidechain source.
- 2. Right-click the Track Send / Sidechain Enable Switch on the Mixer track that carries Fruity Limiter (Sidechain destination).
- 3. Select Sidechain to this track from the pop-up menu or 'Sidechain to this track only' if you want to mute the sidechain audio source by deselecting the source track's send to Master. NOTE: You can send multiple side-chain sources to the Fruity Limiter's Mixer track if needed.
- 4. Right-click the SIDECHAIN selector on Fruity limiter's COMP tab and choose the Mixer track you want to receive sidechain audio from. NOTE: Fruity limiter's compression envelope will now be controlled by the sidechain Mixer track rather than the audio passing through Fruity Limiter's own Mixer track.
- 5. Lower the Threshold below the input peaks and increase the Ratio and optionally Knee controls to engage the compression stage.
- REL - Release time (in ms), this is the main influence for the compression envelope release time. Set this too low and the sound may become distorted.
- SUSTAIN - Specifically, this sets the duration over which the input is averaged (RMS), from 0 to 1000 ms. The effect is to control compressor sustain time and prevents the compression envelope from releasing too early.
NOTE: You don't need to be overly concerned about compressor transients peaking over 0 dB since the limiter section can catch these.
Limiter Controls
Limiting is a form of heavy compression (generally used to describe compression ratios greater than 10:1). The purpose is usually to 'limit' the output level to a set maximum level, usually 0 dB, to avoid clipping in a final mix down. The Limiter can be used to maximize the level of a track dramatically, without introducing noticeable distortion and so limiting is a favorite effect used in mastering. While louder often sounds better, we draw your attention to the excellent Wikipedia article on loudness wars!
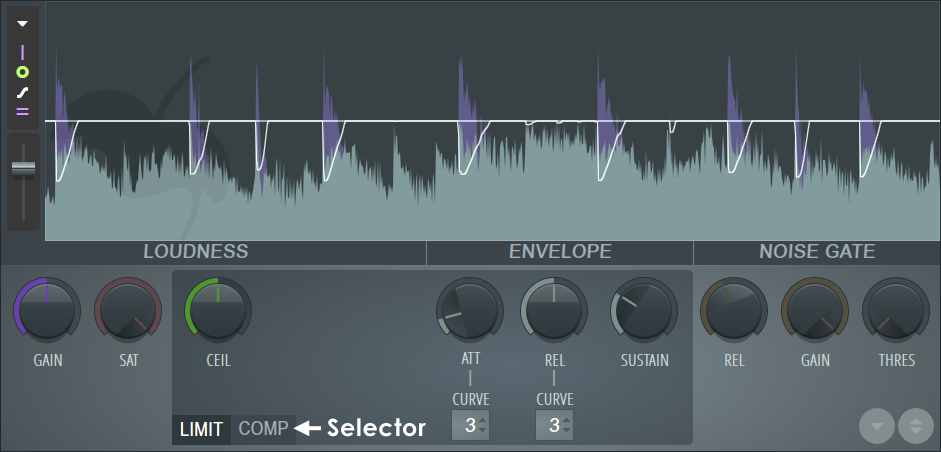
NOTE: The limiter section can be effectively bypassed by turning the ceiling (CEIL) to max and attack (ATT) to minimum.
Loudness
These controls affect the input and limit thresholds for Fruity Limiter.
- GAIN (Purple) - Limiter input gain. NOTE: this gain is post-Compressor and pre-Limiter.
- SAT (Saturation) - Controls the threshold level, signals reaching into the red region will be saturated. To lower the threshold, and so increase the saturation turn SAT left. Set by ear. Saturation (pleasing to some) is a type of amplitude distortion, usually associated with Valve / Tube Amplifiers, tape or analog circuitry. Generally, as a waveform exceeds the maximum amplitude that an analog system can carry, its shape is rounded or bent. This bending is a mild distortion that progressively increases as the input approaches the maximum (0 dB). TIP: For an alternative saturation sound allow the input to peak over the limit threshold, then blend in some 'Soft-clipping ' from the saturation. Over-limiting adds its own kind of saturation effect that interacts nicely with the formal saturation process.
- CEIL (Ceiling) - Limiter ceiling. Sets the level above which the signal will be limited. While it is not possible to disable the limiter stage completely, setting the ceiling level to the maximum (+12 dB) should effectively prevent limiter engaging.
NOTE: For the Limiter to work the input signal must exceed the limiter threshold (CEIL). Your options are to lower the CEIL level, increase the GAIN level or increase the signal level entering the plugin.
Envelope
- ATT (Attack time) - Adjusts how quickly the limiting envelope responds to the start of the signal (in ms). NOTE: The Limiter attack time is linked to a 'look-ahead' delay function that adds a delay to the plugins processed audio (hover your mouse over Fruity Limiters FX slot, to see the look ahead delay in the FL Studio Hint Panel). To avoid issues caused by plugin latency, such as phasing when you mix Fruity Limiter's output with the dry input signal, set the attack to 0 ms OR when using Attack settings greater than 0 ms, enable the 'Plugin delay compensation > Automatic' option from the Mixer menu.
- CURVE (Attack & Release curve tension) - Select from curve 1 (immediate attack/release) to 8 (slow attack/release). NOTE: See the Compressor section for a more detailed explanation of the CURVE 'tension' effect.
- REL - Release time (in ms). There are two release controls, this is the main influence for the compression envelope release time. Set this too low and the sound may become distorted.
- SUSTAIN - Specifically, this sets the duration over which the input peaks are averaged (RMS), from 0 to 1000 ms. The effect is to control limiter sustain time and prevents the envelope from releasing too early.
NOTE: In order to trap transient signals before they pass through the Limiter a look-ahead time greater than 0 is needed. If 0 latency is desired then you can set the limiter's attack to zero and then adjust the compressor's attack to achieve the same effect (or as close as possible).
Analysis Display
The analysis display is a valuable analysis tool to observe how the various plugin settings interact with the input / output sounds. Click on the display to Pause the display.
Display Controls & Options
 Options:
- 0.2 dB compressor safety - Adds -0.2 dB of extra headroom to the compression section to help avoid over 0 dB peaks.
- Plugin information - Who, what and when of the plugin. No why tho. That's why you are reading this :)
 Show input peaks - Display the input level graph.
 Show output peaks - Display the output level graph. Where the input (purple) and output (green) peaks overlap the color is gray.
 Show analysis & gain envelopes - Displays the analysis (blue) and gain (white) envelopes applied to the selected band (white = compression envelope).
 Show level markers - Displays the GAIN (purple), CEIL (green) & THRESH (blue) level settings. In the default position the lines overlap at 0 dB and
show as a single white line.
Show level markers - Displays the GAIN (purple), CEIL (green) & THRESH (blue) level settings. In the default position the lines overlap at 0 dB and
show as a single white line.
 Speed - Scroll speed slider (up is faster, down is slower).
To PAUSE the display, click on the display area. Once paused, you can continue to change display modes to examine data of interest.
NOTE: The limiter works on peak levels and the compressor on RMS (average) levels. The blue signal trace is the RMS input signal.
Noise Gate
These controls affect the gating function in Fruity Limiter.
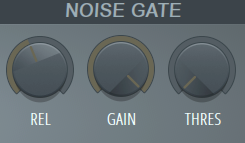
Controls
- GAIN (Noise gain) - Adjusts the signal level passing through the gate in the closed condition (the default 100%, i.e. no gating). Turn to the left for more gating effect.
- THRESH (Noise threshold) - Gate threshold. When the input level passes the Noise threshold the gate opens (immediately). The gate release is triggered when the signal falls below this same threshold to stop the signal.
- REL - (Noise release time). Longer release times cause the gate to close slowly, short release times cause abrupt closures. This acts in the same way as the release in an ADSR envelope.
NOTE: The Gate is useful to suppress the noise that sometimes becomes audible on the tail-end of heavily compressed sounds where high levels of make-up (post compression) gain are used. It can also be put to creative uses, such as the classic 'gated snare' sound. Place a long heavy reverb on a snare, then set the gate Gain to minimum, the Release high and the Threshold to open on the initial snare hit. Tune release length to match the BPM of the track.
Comparison Bank

In the bottom right corner of the plugin you will find:
- Store in spare state (Down arrow symbol) - Saves the current state to the comparison bank.
- Flip with spare state (A/B compare) - Selecting this control will allow you to make A/B comparisons between the stored and current settings. Useful for hearing the effect of a tweak more clearly.
Plugin Credits
Didier Dambrin: Plugin & Interface.
Miroslav Krajcovic: Vectorial UI.
Frederic Vanmol: VST Port.
Laurent de Soras: Saturation algorithm.
Robert Bristow-Johnson: Filter algorithm.
Thanks to: The music-dsp mailing list.