MIXING & EFFECTS
Fruity Multiband Compressor
Fruity Multiband Compressor is a three band stereo compressor using ButterWorth IIR or LinearPhase FIR filters to separate the incoming signal into three bands for processing. Limiter functionality is also included. A related plugin is Maximus.
Compression is the process of automatically scaling the output volume so that the quiet parts are louder and the loud parts don't clip. It's like automatically adjusting a volume knob, keeping the volume level within a set min/max range. Compression is one of the most important effects in modern music. It is used to give kick drums 'thump' and make bass 'fat'. Importantly, it can make a mix sound much louder than it is. In particular, multiband compression is a highly useful tool for mastering applications since the complex sound (wide frequency content) of a complete track can have varying amounts and types of compression applied to different parts of the frequency spectrum.
When to use: Use the Fruity Multiband Compressor in the Master Mixer Track for the final mix while mastering. If you need to compress individual Kick or Bass sounds (for example) we recommend the Fruity Compressor or Fruity Limiter as they are easier to set for individual sounds.

Parameters
The controls for the Fruity Multiband Compressor affect the relationship between input and output volume for (up to) 3 frequency bands selected by the user. The Multiband Compressor is a variable-knee compressor with built-in peak limiting. Functions are discussed from left to right on the plugin:
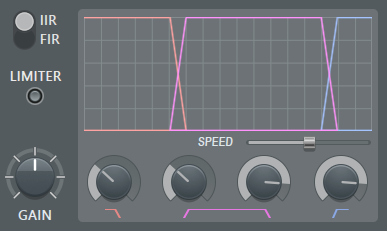
Input & Filtering
- IN/OUT (Peak Meter) - Located below the peak meter, this switch (
 ) displays either the incoming or outgoing signal strength. Hover your mouse pointer over the peak meter and look at the
Hint Bar to see exact values.
) displays either the incoming or outgoing signal strength. Hover your mouse pointer over the peak meter and look at the
Hint Bar to see exact values.
- IIR/FIR (Filter type) - Select either an IIR (ButterWorth IIR, 24dB/oct) or a FIR (LinearPhase) filter. FIR is recommended for mastering applications.
- LIMITER - When selected (ON) the output of the Multiband Compressor will not exceed 0 dB.
- SPEED - Controls the scroll rate of the peak/filter cutoff display. When the slider is set to 0 (far left) the peak display will be turned off and only the filter cutoff graph will be displayed.
- Filter cutoff - There are four knobs below the Speed slider for selecting the filter cutoff. When you touch any of these the display will change to show the cutoff graph. From left to right: Lowpass upper limit,
Midband lower limit, Midband upper limit and Highpass lower cutoff. The frequencies defined by these cutoffs as Low, Mid and High are then fed to the LOW BAND, MID BAND and HIGH BAND compressors. IMPORTANT NOTE: The cutoff knobs will snap when the bands are prefectly crossed. That is, the frequencies of the upper and lower band are all passed. It is possible to set these so that frequencies between bands are excluded from the mix. That is, not present at all, rather than not compressed. Pay careful attention to these settings as you may or may not want this.
Low, Mid & High Band Compressors
Each of the three bands (LOW, MID and HIGH) have these same controls:
- A/M/B - Next to the LOW, MID and HIGH BAND labels, this switch lets you select the state as Active
(
 ): compressor activated,
Muted (
): compressor activated,
Muted ( ): band sound
muted, or Bypass (
): band sound
muted, or Bypass ( ): band sound passed without alteration.
- Threshold - Sets the dB level at which the compressor kicks in. Range: 0.0 to -60.0 dB. Should be adjusted according to the relative input level and the type of audio material. Once the threshold is reached, compression will reduce the gain of the input signal according to the current Ratio, Type, Attack and Release settings.
- Ratio - From 1:1 (max. left) to ∞:1 (max. right). Controls the amount of compression (gain reduction) that will be applied to the signal once the threshold level is reached. The ratio denotes the difference in dB between input and output levels, i.e. how much the signal above threshold level will be compressed. For example, a ratio of 4:1 means that when the input level increases by 4dB, the output level of the signal above threshold will increase by 1dB.
- KNEE Left 0%=Soft, Right 100%=Hard. While attack controls how fast a compressor acts, the knee characteristics control the rate at which the full amount of compression is applied. Soft means there is a gradual increase from no to full compression as the input volume increases, while hard means the transition from no to full compression is instant once a predefined input level is exceeded.
- Attack - 0.1 to 100 ms, controls the time it takes to reach full compression once the threshold level has been exceeded. Fast attack means that compression will be instantaneous, while slow attack means the compression is increased gradually, allowing for more variations in the signal than the fast setting. Attack should be adjusted according to the type of audio material you are using.
- Release - 10 ms to 1000 ms, controls the amount of time the compressor takes to stop once the level has fallen below threshold. Short release times will make the compression more flexible and able to adapt to the input signal, but may cause fast changes in gain that may sound unpleasant. Longer release times produce a more even signal with less distortion, but make it harder to maximize the overall compression because small variations in signal level will be ignored.
- Gain - From -∞dB to 17 dB, controls the amount of gain to be added or subtracted from the compressed output signal. The gain should be adjusted to normalize the signal amplitude after compression, or to control the amount of limiting. This parameter has an effect during Active and Bypass modes.
- IN/OUT (Peak Meter) - Below the peak meter, this switch () is used to display either the incoming or outgoing signal strength.
- C (Compression Meter) - Displays the amount of gain reduction. Hover your mouse pointer over the peak meter and look at the Hint Bar to see exact values.
Plugin Credits:
Code: slim slow slider
Interface Design: Didier Dambrin