MIXING & EFFECTS
Fruity Parametric EQ 2
Fruity Parametric EQ 2 is an advanced 7-Band parametric equalizer plugin with Standard (Infinite Impulse Response [IIR]) and an advanced Linear Phase (Fast Fourier Transform [FFT]) mode that allows fast parameter changes not normally possible with conventional FFT filters.
Equalizing is the process of increasing or decreasing the loudness of specific frequencies. The Band type (shape), center frequency and width of each Band are fully adjustable. You can choose from: High Shelf, Low Shelf, Peaking, Band Pass, Notch, Low Pass, High Pass or Band Pass filters for each Band independently. There is also a global gain slider to adjust the overall level.
When to use: Parametric EQ 2 is a good choice whenever precise control over EQ is required (e.g. Mastering and controlling or enhancing specific frequencies at an instrument level). Alternatively, if screen space is tight use Fruity Parametric EQ, or for a graphic EQ, try EQUO. NOTE: If you require even more precise control over EQ you can click and drag on the plugin window to resize Parametric EQ2 or use the off-line Equalize Tool in Edison provides the greatest precision of all the EQ plugins.
Introductory Video
Parameters
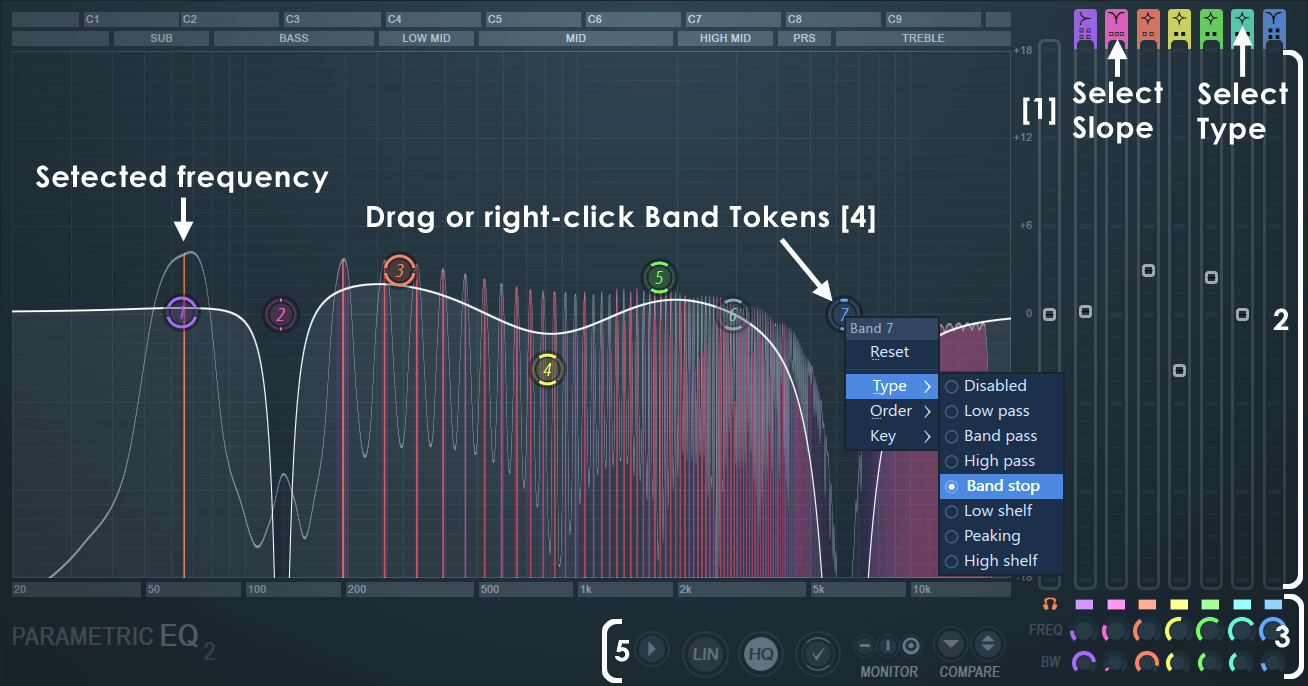
- Band Type & Filter Slope Selectors - Note that the upper section shows different shapes (Band Type) with dots below each shape (Filter Slope).
- Band Type - (Left-Click) and drag up/down to change the filter type between OFF and:
- Low Pass - Filters high frequencies starting around the cutoff.
- Band Pass - Allows a narrow band to pass either side of the cutoff.
- High Pass - Filters low frequencies starting at the cutoff.
- Notch - Cuts frequencies around the cutoff
- Low Shelf - Similar to a bass EQ.
- Peaking - The default, affects only frequencies around the cutoff.
- High Shelf - Like a treble EQ.
- Filter Slope - (Left-Click) and drag up/down on the dot/s below each band shape to select filter slope:
- Drag Down - Steep 4 (-24 dB/Oct), Steep 6 (-36 dB/Oct)& Steep 8 (-48 dB/Oct).
- Center - 2 (-12 dB/Oct).
- Drag Up - Gentle 4 (-24 dB/Oct), Gentle 6 (-36 dB/Oct) & Gentle 8 (-48 dB/Oct).
Steep and Gentle filters have the same slope but differ around the cutoff frequency. Gentle filters have a more gradual acceleration into the main slope, and so filter more leading into the cutoff frequency compared to the Steep type. Gentle varies between -6 dB (Gentle 4) and -12 dB (Gentle 8) at the cutoff while Steep is always around -3 dB at the cutoff.
NOTE: The Band Tokens can also be Right-Clicked to show menus for Filter Type, Order (slope type) and Key (note frequencies).
- Band Type - (Left-Click) and drag up/down to change the filter type between OFF and:
- EQ Faders - Adjust the equalization level by sliding up/down. The Band Tokens can also be directly clicked & dragged. Note that Low Pass, Band Pass, High Pass and Notch filters don't use this parameter (so the slider is disabled).
- Lower fader controls:
- Band solo on shift (Headphones icon) - When selected, holding (Shift) and clicking the Band Tokens will momentarily solo the Band. (Right-Click) to set Adaptive or Bandpass solo modes. See Options and settings for full details.
- Mute/Solo (switches) - Left-Click Disable. Right-Click Solo (Ctrl+Click).
- FREQ - Controls the Center frequency of the band. Can be Automated.
- BW - Bandwidth of the EQ Band.
- Band Token - Most Band EQ manipulations can be made by clicking on a Band Token and dragging with the mouse. Mouse wheel controls band-width.
- Bandwidth - Several methods. 1. Shift+Click and move mouse left/right on Bands; 2. Click the mouse-wheel and do the same, OR 3. Scroll the mouse-wheel while hovering over the token.
- Reset Band - Alt+Click a Band to reset a Band.
- Fine Adjustment - Ctrl+Click a Band to make fine adjustments (same for all knobs and sliders).
- Main Level - (Left-Click) outside the Bands to adjust the main level control (the cursor will change from pointer to a cross).
- Filter Type, Order & Key - Right-Click on the token to open a menu of Type (Low Pass, Band Pass, High Pass, Band Cut, Low Shelf, Peaking and High Shelf), Order / (slope = 12 to 48 dB/Octave) and Key that center the frequency band of the Token to the fundamental frequency of the selected note.
- Options and Settings - From left to right:
- Options (menu):
- Lock spare state - Prevents the comparison temporary save state from being overwritten.
- Band solo on shift - When selected, holding (Shift) and clicking the Band Tokens will momentarily solo the Band. Use this to identify target frequencies in the audio you want to affect. Move the Mouse vertically to change bandwidth while in this mode. Choose Adaptive or Bandpass solo modes:
- Bandpass - A Bandpass filter (Steep 8) is used to solo selected Band Tokens.
- Adaptive - Different filter solo types are used depending on the target Band filter type:
- Low pass > High pass - Solo the frequencies being removed.
- Bandpass > Band pass - Solo the frequencies selected.
- High pass > Low pass - Solo the frequencies being removed.
- Band stop > Band pass - Solo the frequencies being removed.
- Low shelf - Low pass - Solo the frequencies being adjusted.
- Peaking > Bandpass - Solo the frequencies being adjusted.
- High shelf - High pass - Solo the frequencies being adjusted.
- Inherit bandwidth - Changes made to the bandwidth during Band solo will be applied to the active band on Shift release.
NOTE: There is a Headphone icon to enable or disable Band solo on shift, next to the Band solo icons in section (3) noted above. (Right-Click) to change 'Solo mode'.
- Minimum phase mod speed - When HQ filter mode is engaged, fast frequency band movements may cause crackling. This controls smooth the maximum parameter modulation slew-rate for the Minimum phase filters (the default mode).
- Linear phase mod speed - Higher values use more CPU. Maximum parameter modulation slew-rate. EQ 2 features a proprietary engine based on advanced FFT filtering, that allows fast parameter changes (cutoff frequency and level), not possible with conventional FFT Linear Phase filters. Choose Normal, Fast, Faster or Ultra. Resist the temptation to use Ultra because it sounds cool!
- Phase rotation - View the phase rotation caused by the normal (IIR) filter mode. The range is +/- 180 degrees rotation, with no rotation at the center. Use the +/- 18 dB fader labels on the right side of the display as a guide to +/- 180 degrees. Both dB and Degrees scales are aligned. A phase rotation means the frequency remains audible, but the phase of its cycle changes. Normally we are not sensitive to static phase changes caused by filters, but it does have implications when mixing signals, as discussed below.
How to use - The Phase rotation line will allow you to see if you need to adjust the overall phase of a bass frequency you are layering with another bass frequency for example, avoid opposite phase values for the frequencies you are interested in preserving. Same phase reinforces, opposite phases cancel. Steep filters may also show the rotation wrap around (jump from one side of the scale to the other). Switching to Linear Phase (LIN) mode will also avoid this problem.
NOTE: Phase rotations are a normal phenomenon of IIR filters and characteristic of analog filters. If this section confuses you at all, we suggest switching the phase line off as it will only make you worry about things you have been happily ignoring for years without anyone noticing your mixes have phase rotations. This only affects frequency cancellations and reinforcements when mixing audio, and the number and frequency location of these events is constantly changing and largely unpredictable in the course of a mix. If something sounds good, it is good!
- Monitor input - Choose the source for the background visualization.
- MID - Center panned signal. Technically the MID signal = Left Channel + Right Channels / 2. NOTE: SIDE signals are invisible or less visible in this mode, as adding the L and R Channels will cancel out any differences between the L and R Channels. See Fruity Stereo Shaper for a detailed discussion of MID signals.
- SIDE - Stereo signals. Technically the SIDE signal = Left Channel - Right Channel. NOTE: SIDE visualization is useful if you are mixing a phase inverted L or R Channel into the other side. MID will not display in these circumstances, as the center panned (Mono) information cancels to zero. See Fruity Stereo Shaper for a detailed discussion of SIDE signals.
- Left / Right - Left or Right Channel.
- Histogram Enabled - Show a frequency histogram display on the background. In this display the line (creating a series of peaks), represents the level of frequencies from 20 Hz to 20 kHz.
- Range - Lowest dB activity metered. Choose from -60, -90 or -120 dB.
- Pivot slope - Choose slopes of 1.5, 3, 4.5 and 6 dB/octave. By default this is set to 4.5 dB per octave. These slopes 'pivot' or rotate the spectrum around 1 kHz, visually decreasing the peak-height of low frequencies and increasing the peak-height of high frequencies. For each doubling in frequency (an octave), the visual height of frequencies in the spectrogram will be 4.5 dB lower below 1 kHz and 4.5 dB higher above 1 kHz. This is nothing more than a visual de-emphasis of low frequencies and visual emphasis of high frequencies. At a setting of 4.5 dB, for a mix where all frequencies sound similarly loud, the frequency histogram display will look relatively flat. In actuality this mix emphasizes low frequencies and de-emphasizes the high frequencies. A setting most useful for referencing the frequency balance of your final master mix.
Use 1.5, 3 dB settings if you find you are aiming for a mix with less bass and more highs. The setting of 6 dB/oct is for sound-design, this will display the frequencies of a basic saw-wave oscillator as flat. When set to 0 dB 'white noise' will look flat. In other words, this is an accurate representation of the actual levels in the input signal.
- Frequency precision - The number of bands used in the frequency spectrum. Higher settings come at the expense of visual display latency (although plugin audio latency remains unaffected).
- Time smoothing - Depending on the Average mode setting, Time smoothing has different effects on peak reactivity and persistence.
- Average mode OFF: The spectrum reacts to peaks. Smoothing sets how slowly the frequency peaks fall over time.
- Average mode ON: The spectrum shows the average of peaks over time. Smoothing sets how long the averaging time window is.
- Average mode (RMS) - Shows the average peak level rather than the instantaneous peak level.
- Heatmap Enabled - Shows the intensity of frequencies from 20 Hz to 20 kHz as changes in the intensity of vertical line. You can think of this as the 'top-down' view of the Frequency Histogram view (above).
- High precision - Shows more precise vertical lines. Switch this off to use an alternative algorithm that tends to blur the lowest frequency bands, but has the advantage it can be easier to identify the center frequency of these low frequency bands.
- Enhanced frequency - Thinner lines are used to represent frequency.
- Heatmap position - When the Heatmap is used together with the Frquency Histogram view, the Heatmap can be displayed above (Top) below (Bottom) or over (Full) the Histogram.
- About - Shows version details and credits.
- LIN (Linear phase) - Fast Fourier Transform (FFT) filters are used so equalizations may be made without affecting the phase of the frequencies. When selected, all filter bands run in Linear Phase mode. In this mode the filters will not rotate the phase of different frequencies, but it needs to apply latency. Normally automatic plugin delay compensation in the mixer will align the audio output. When disabled, Standard mode is used for all bands with Infinite Impulse Response (IIR) filters. These have the advantage of near instantaneous processing, with the disadvantage, phases may be altered.
LIN (button) Right-Click - Precision setting (Lowest to Highest). Higher precision settings allow steeper filter slopes but need a higher overall processing latency.
- HQ (High Quality) - The filter curve more closely matches an 'analog style' EQ in the highest frequencies, allowing adjustments closer to 20 kHz while preserving the slope and or levels of the desired filter curve. The operation of this function depends on whether Standard or Linear Phase (LIN) mode is engaged:
- Standard mode - HQ mode here operates by using 2X oversampling, at the expense of increased CPU load.
- Linear Phase mode - The same 'analog style' curve is achieved without the need for 2X oversampling.
HQ (button) Right-Click options include:
- Legacy - Uses a Polyphase downsampling filter, which has the advantage of no latency but there is additional phase rotation above 15 kHz and inter-sample peaks (ISP) can increase the output peak levels.
- Enhanced - Uses a Finite Impulse Response (FIR) down sampling filter, without additional phase rotation and more accurate output peak levels, at the expense of 1 millisecond latency. This mode is only normally necessary where you want to mix the EQ'd and dry input signal at some point.
- View Band tokens (✔) - Turns the tokens ON when selected, OFF when deselected.
- Monitor (icons) - Turns the spectral monitoring ON/OFF or shows the spectrum of the plugin output.
- ➖ - Disable monitoring.
- ❙ - Monitor the Input signal (pre-Equalization)
- O - Monitor the Output signal (post-Equalization)
- Compare - Click the first down-arrow to save the current EQ settings to a spare bank. Click the up/down arrow control to swap between the saved bank and the main bank. Tweaking any parameter in the spare bank will cause it to become the main bank again. Use this to compare EQ settings. Note that the comparison bank is saved along with the main bank, so keep this in mind if you are creating presets.
- Options (menu):
Notes
Disabled Bands - When the filter type is set to 'off', peaking/shelf Bands that are not amplified will not use CPU resources.
Need more Bands? - You can stack more than one instance of Parametric EQ 2 in a Mixer track to gain more EQ channels - two instances provide 14 Bands of Parametric EQ!
Plugin Credits
Code & GUI: Didier Dambrin, Daniel Schaack and Miroslav Krajcovic.
Thanks to: Robert Bristow-Johnson for his EQ Cookbook and Daniel for his large brain.