RECORDING
Note / MIDI Recording
![]()
Setup
- Connecting your controller - For help installing an external keyboard/pad controller see the MIDI Settings Wizard or MIDI Settings page.
- Filtering MIDI data - The Transport Panel Record Button has a recording filter (Right-Click) which can be selected to record Audio, Note or Automation data. Make sure the Note option is selected. You may want to turn off the Note recording if, for example, you want to play along with a project while you are recording automation data without retaining the notes.
- Timing issues - The Audio Settings Playback tracking: Offset control can be used to correct note-start timing errors caused by system issues/latencies. Make sure input quantizing caused by the Global Snap is not the problem before fiddling with this control.
NOTE: If you don't have a MIDI keyboard controller you can also use your typing keyboard as a MIDI note keyboard. Simply select the 'Typing keyboard to piano keyboard' option. Then follow the steps below:
Recording note data
While this may look like a lot of complicated steps, it covers all the note recording options. Once set, the next time you want to record notes it should be a case of steps 1, 6 and 8. Three mouse clicks.
- Select the Pattern - The note data will be recorded into the selected Pattern. You can only record into one pattern at a time. NOTE: You have
the following two options as to how to record your MIDI data:
- In Pattern mode - MIDI data will be recorded into the currently selected pattern and appear in the selected Channels Piano roll preview window. Double-click the preview to display the Piano roll.
- In Song mode - The Pattern Clip will be automatically placed at the point where Playback started from after recording is stopped. If you have a specific Playlist track that you want the Clip to appear on, place an empty Pattern Clip for the pattern being recorded in the Playlist at the point where you plan to start recording. The Pattern Clip will automatically expand to fit any data recorded, so don't worry about its length.
- Input quantizing - Input quantizing aligns notes to a precise timing, on beats or exact fractions of beats. Activate from Global Snap selector on the Snap Panel. To enable input quantizing set to - 'Step', 'Beat' or 'Bar'. To disable input quantizing set to - 'Line', 'Cell' or '(none)'.
You can further customize how notes are quantized with the Record-button Right-Click menu:
- Note start time - Note start time is quantized when one of the Global Snap settings that quantizes input is used.
- Note end time - Note end time is quantized when one of the Global Snap settings that quantizes input is used.
- Leave note duration - Leaves note duration as played. Logic dictates this option is not compatible with all other quantize combinations.
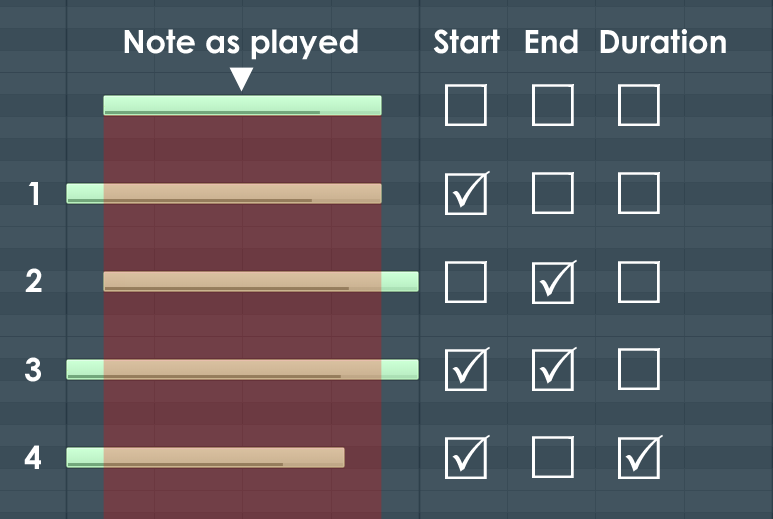
- Quantize start time only.
- Quantize end time only.
- Quantize start and end time.
- Quantize start time but maintain the original duration by shifting the note forward.
- Record to step sequencer - MIDI notes will be input quantized to steps and appear as steps (zero-length notes).
- Automations - Automation quantization.
- Turn on the Note recording filter - Right-Click the Record button and make sure 'Note' is selected as a recording type (all data types with a tick will be recorded).
- Piano roll or Stepsequencer? - Usually you will want to record into a Piano roll. The Toolbar option 'Step Editing' should be off.
- Recording countdown - If you want a 'count in' select the Recording Countdown option on the Toobar shortcut icons.
- Arm for recording - Select the Record button in the Transport panel. It will turn red to show it is ready to record.
- Select an Instrument Channel - Click on the Channel button of the instrument you want to record notes for. The selected Instrument Channel will also receive the note data and the instrument will respond to the controller keyboard.
- Press the Play button - FL Studio will play the project and record any note events received from your controller keyboard. When recording it's generally a good idea to turn on the Recording Countdown feature so that you have at least one bar lead-in metronome.
Where is my note data stored?
Generally note/score data is saved to a Piano roll. You may need to click on the channel and open the Piano roll to see your data. It is also possible to record the melody into the Step Sequencer (see the Toolbar page, 'Step Editing' option) associated with the instrument channel.
NOTE: If you are in Song mode recorded patterns will automatically appear in the Playlist clip-tracks after pressing stop.
Score Logger
Always on: Never lose the perfect performance again. A three minute buffer records all note activity from external controllers and Typing Keyboard to Piano. This can be dumped to the Piano roll at any time with the Dump score log to selected pattern command on the Tools Menu. Perfect for retrieving those inspired improvised performances from the 4th dimension.Automation
For recording mouse or external controller movements, see the section on Automation Recording.
Cancelling a recording session
You can cancel a recording session (so it does not apply the recorded notes and automation events) in two ways. The first one is to choose Cancel Current Recording command from Help menu, but note that you should do this while recording, BEFORE pressing the Stop button. If you press it, you can still undo the whole recording session by choosing Undo from the Edit Menu. If you had recorded mixer tracks during the last session, you will be prompted if you agree that the files are erased (i.e. undone). Be careful, because once you undo audio recording, the files can not be restored and you will have to record them again if needed.