PIANO ROLL
Piano roll Menu 
The Piano roll Menu provides a number of important functions for working with the Piano roll, such as opening tools, converting color groups, etc.

NOTE: The Tool menu (spanner), shares its items with the Main Menu > Tools section.
Options
- File - File load/save/copy options.
- Open score... - Lets you load notes from an .fsc file in the Piano roll.
- Save score as... - Save all notes in the current Piano roll as a .fsc file. Drag n drop - By Left-clicking and dragging on this menu
a score can be saved to the Browser or copied to another Piano roll.
- Import MIDI file... (Ctrl+M) - Shows the Import MIDI Data dialog, to import notes from MIDI files to the Piano roll. Importing MIDI from the Piano roll only adds notes. To import controller data (cutoff, resonance, etc.) from a MIDI file, launch the Import MIDI Data dialog box from a separate Event Editor window.
- Export as MIDI file... (Shift+Ctrl+M) - Saves the current Piano roll data to a single MIDI file (.mid). To export the entire project as a MIDI file use the Export Project Dialog MIDI option.
- Paste from MIDI clipboard... (Shift+Ctrl+V) - Similar to the Import MIDI file option, but uses the MIDI clipboard data rather than a MIDI file. You can paste data from any sequencer that can copy to MIDI clipboard format.
- Copy to MIDI clipboard... Copies the data to the MIDI clipboard. You can paste data into any sequencer that supports MIDI clipboard format.
- Export as score sheet... - Exports the selected Piano roll data to standard music notation in .pdf format. A dialog will appear that asks you to give the Score Sheet a Title, Time Signature, Key and to Preview the result after export. By default Score Sheets are saved to ... Documents/Image-Line/FL Studio/Presets/Scores/, although you can choose this at the time of export.
- Edit - Many of these functions are also available from the tools and keyboard shortcuts. Most operations will work on the selection or whole Piano roll if nothing is selected.
- Cut (Ctrl+X) - Cuts selected notes/slides to clipboard.
- Copy (Ctrl+C) - Copies selected notes/slides to clipboard.
- Paste (Ctrl+V) - Pastes notes from the clipboard. Notes are pasted starting from the leftmost bar that is visible in the Piano roll window.
- Duplicate (Ctrl+B) - Duplicate the selection to the right of the current location. If no selection is made all notes are duplicated.
- Delete (Del) - Deletes selected notes/slides. NOTE: the Tool bar icon
 . If no selection is made - deletes all notes, slides and events in the Piano roll.
- Shift left (Shift+Left-arrow) - Moves notes one grid/snap unit left.
- Shift right (Shift+Right-arrow) - Moves notes one grid/snap unit right.
- Rotate left (Shift+Ctrl+Left-arrow) - Moved notes, with wrapping, one grid/snap unit left in the bar/bars.
- Rotate right (Shift+Ctrl+Right-arrow) - Moves notes, with wrapping, one grid/snap unit right in the bar/bars.
- Transpose up (Shift+Up-arrow) - Transposes notes one semi-tone up.
- Transpose down (Shift+Down-arrow) - Transposes notes one semi-tone down.
- Transpose one octave up (Ctrl+Up-arrow) - Transposes notes one octave up.
- Transpose one octave down (Ctrl+Down-arrow) - Transposes notes one octave down.
- Discard lengths (Shift+D) - Reduces selected note lengths to the minimum size allowed by the Snap setting.
- Allow resizing from left (Ctrl+Alt+Home) - Note start position can be moved independent of the end. Hold (Alt) to override the snap settings.
- Change color (Alt+C) - Changes the color of selected notes/slides in the current note color (if nothing is selected, applies to all).
- Mute / Unmute - Mute/unmute the selected notes. NOTE: the Tool bar icon

- Insert space (Ctrl+Ins) - Creates empty space that matches the current selection start and length by shifting all following notes and events forward.
- Slice & insert space (Ctrl+Alt+Ins) - Slices notes at the start of the time-selection and adds empty space that matches the selection.
- Delete space (Ctrl+Del) - Erases notes and events in the selection and shifts back the remaining notes and events to close the gap.
- Trim selection - Erases notes outside of the unselected area, and moves the selected notes to the beginning.
- Insert current controller value (Ctrl+I) - Initializes the integrated event editor with the current value of the corresponding automated control. If you have selected a time slice in the event editor graph, the current values is inserted at the beginning of the selection instead.
- Turn into automation clip - Converts the currently selected Event data into an Automation clip.
- Tools
- Riff machine (Alt+E) - Opens the Riff machine "auto-hit-song" generator, but shhhhhh don't tell anyone you used it!
- Quick legato (Ctrl+L) - Performs a quick 'legato' to the sequence in the Piano roll (applies only to the selection if any). This tool is a quick preset for the Articulate tool (see below).
- Articulate (Alt+L)- Opens the Articulate tool dialog which allows you to apply staccato, portato, legato and similar effects to the sequence in the Piano roll (applied only to the selection if any).
- Quick quantize (Ctrl+Q) - Applies basic quantize to all selected notes/slides according to the global snap setting in the Snap Panel (if nothing is selected, applies to all). Quantizing auto-aligns notes to the Piano roll grid.
- Quick quantize start times (Shift+Q) - Applies basic quantize to all selected notes/slides start times according to the global snap setting in the Snap Panel (if nothing is selected, applies to all). Quantizing auto-aligns notes to the Piano roll grid.
- Quantize (Alt+Q) - More advanced version of the quantize feature. Opens the Quantizer settings dialog. Quantizing auto-aligns notes to the Piano roll grid.
- Quick chop (Ctrl+U) - Slices long notes into many shorter, based on the Snap settings (if no notes are selected, applies to all).
- Chop (Alt+U) - More advanced version of the chop feature. Opens the Chopper settings dialog.
- Glue (Ctrl+G) - Glue contiguous (touching) notes together. If you have F10 > General > Click-and-hold & special gesture functions selected. Place the cursor between 2 neighbor notes, so the resize cursor appears, then click and hold to glue them.
- Arpeggiate (Alt+A) - A powerful arpeggiator based on specialized score presets. See Arpeggiator for more information.
- Strum (Alt+S) - Shifts the timing and velocity of the individual notes in chords to simulate 'strumming', as in guitar playing and some other string instruments. See the Strum settings dialog.
- Flam (Alt+F) - Flamming is the technique of playing two drum hits in very close succession to blur the attack a little. Applies the 'flam' effect to the score (applies only to the selection if any). See Flam for more information.
- Claw machine (Alt+W) - Slices and re-times note sequences (applies only to the selection if any). See Claw machine for more information.
- Limit (Alt+K) - Transpose the score and limit the range of notes to a user-specified key range. See the Piano roll Limit Tool for more information.
- Flip (Alt+Y) - Flips the score either vertically and horizontally. See Piano roll Flip tool for more information.
- Randomize (Alt+R) - Opens the Piano roll Randomizer tool that generates random note sequences based on a specific scale and/or randomizes the note levels (including those of existing notes).
- Scale levels (Alt+X)- Multiply/offset/invert the events in the integrated event editor, as well as map events to a logarithmic or exponential scales. See the Scale Levels tool for more information.
- LFO (Alt+O) - Opens the LFO tool, that creates LFO-shaped event data in the integrated event editor. NOTE: This feature only enabled when a compatible property/event is selected in the editor, instead of a note property type.
- Script... - Run scripts to process Piano roll data.
- Run last script again (Ctrl+Alt+Y) - Repeat the last script used.
- Script list - Shows the installed Scripts. When you run a script, if it has options, a UI will open so you can set them.
NOTE: Scripts are written in Python and located in several locations (Installed, Downloaded and User created) noted here. To learn about the Application Programming Interface (API) for Scripts, see the file Piano roll script API. The reference contains the commands scripts can use to control the Piano roll and note data in it. For example; A script can perform action such as scanning the Piano roll for any notes tuned to C4 (Note number 48) and increase their velocities to 100%.
- Stamp
 - The stamp tool allows you to add chords & note-patterns from a menu.
- Select - chords, scales, percussion patterns from the menu.
- Only one - After the stamp tool is used, it reverts to standard note entry mode.
- View
Grid
- Grid Color (Ctrl+Alt+G) - Opens the Color dialog box to choose a color for Piano roll's grid. Please be tasteful, Gol went to a lot of effort to make FL Studio look cool, and now you think you can do better? Ha!
- Grid contrast - Choose High, Medium or Low contrast for the Grid.
- Invert grid - Changes the Piano roll bar-grid lines from light to dark.
- Time segments - Change the vertical Playlist light/dark background shading according to the option selected. The default is '4 Bars'.
Content
- Keep labels on screen - Note names/labels will slide along the note as the Piano roll plays so as to remain visible.
- Shadow - Ads a subtle shadow beneath Notes.
- Rounded - Rounds the shape of notes.
- Note colors (palette) - You can save and load complete note color palettes as shown below.
- Edit palette - Opens the palette editor below. Click to select note colors and customize them as desired, then save the palette as a preset. For more on working with the Colors options see the Color selector.
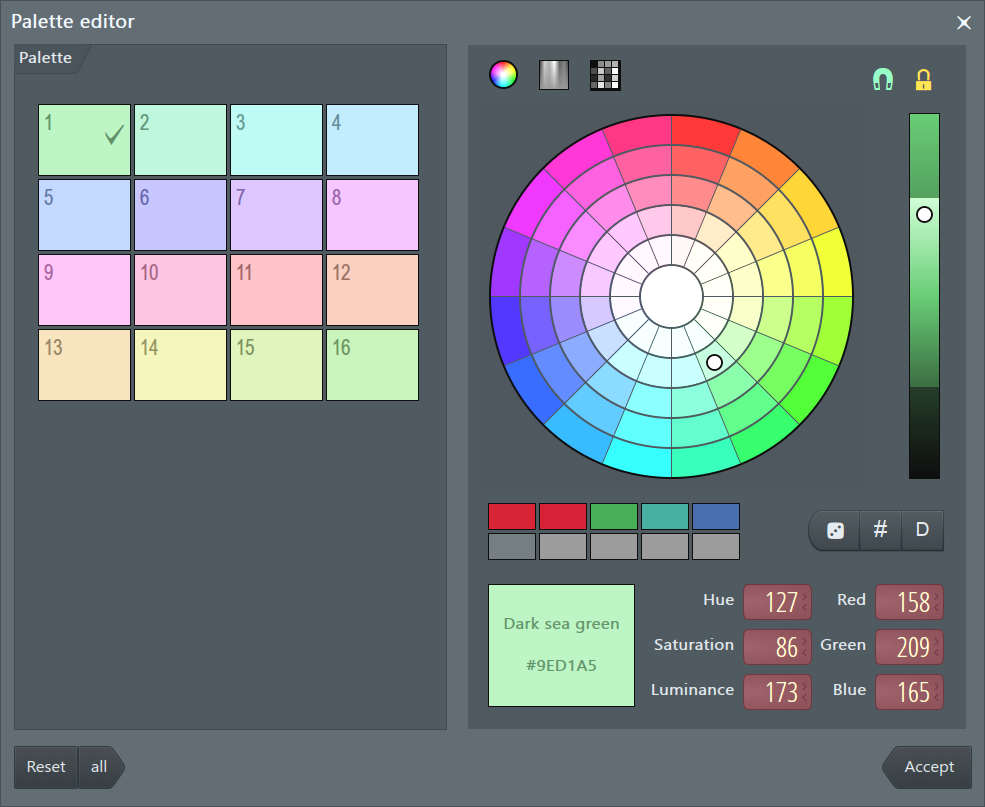
NOTE: Clicking the Reset button resets the last changed color, the all button will return the entire palette to the FL Studio defaults.
- Save preset as - Save the current palette to the User data folder ...\Documents\Image-Line\FL Studio\Presets\Note color presets (*.ncp).
- Browse presets - Load a palette from the User data folder ...\Documents\Image-Line\FL Studio\Presets\Note color presets (*.ncp).
- Edit palette - Opens the palette editor below. Click to select note colors and customize them as desired, then save the palette as a preset. For more on working with the Colors options see the Color selector.
Time
- Incremental scrolling - The scroll-position will scroll incrementally, rather than jumping to the precise location, when you click on the Scroll Bar rail.
- Precise time indicator - A vertical line is used to show playback and edit position.
- Mini piano roll preview - Shows a context aware preview of notes in the Piano roll, on the Scroll bar.
Helpers
- Note grid highlights (Alt+B) - Extends the Keyboard key shading onto the Piano roll edit area as a background contrast effect.
- Scale highlighting - Choose a scale root (C through to B) and scale type (Major, Minor etc) to show on the Piano roll background. NOTE: Selecting options with a (Right-Click) will keep the menu open.
- Default - No shading.
- Black notes - The black notes are shaded darker on the Piano roll background.
- Automatic - Detect the score scale. The Piano roll is shaded to reflect the detected scale based on the notes you are using. The scale name is shown in the Hint Bar. The scale detection algorithm performs an 'average' detection based on either the whole score (if nothing is selected) or on the selection. Several notes are required before auto-detection can begin. See also the 'Stamp tool' (above).
NOTE: Create custom scales - Scales are based on *.fsc files located in the FL Studio install folder under ..\Data\Patches\Scores\Reference scales. You can drag and drop any *.fsc file on the Piano roll and edit the notes between C5 and B5 (inclusive) to create a new scale based on a C root note. Save from the Piano roll menu option 'File > Save score as' back to the 'Reference scales' folder using a new name that describes your custom scale. Finally, restart FL Studio to use the new scale.
- Note length in properties - Displays a horizontal line equal to the length of notes in the note properties window.
- Ghost channels (Alt+V) - The Piano roll shows notes from all channels in the selected Pattern as grey semi-transparent notes. Double Right-Click Ghost Notes to swap to their Channel.
- Editable ghosts (Ctrl+Alt+V) - Allows direct interaction with Ghost Notes.
- Background waveform (Alt+N) - When a waveform has been dragged and dropped on the Piano roll, displays the waveform to aid note alignment with audio events.
Piano roll
- Keyboard style - The preview keyboard shows on the left side of the Piano roll. Choose a visual style:
- Classic - Realistic keyboard. Well, sort of realistic. OK, it's 'realistic' in comparison to the other options.
- Modern - Minimalist keys for that 'Zen' feel.
- Flat - Black keys extend to the Piano roll grid (compatible with black-key labelling).
- List - Used with Key labelling plugins such as Fruity Slicer, Slices etc (compatible with black-key labelling).
- Keyboard labels - Change how keys are labeled. NOTE: Only 'Flat' and 'List' are compatible with black-key labels.
- None - No labelling, you are a keyboard virtuoso!
- All notes - All keys are labelled. NOTE: There is also a 'White notes only' switch below that will make this option a lie.
- Root notes - Label only the root notes of the selected scale.
- Highlighted notes - Labels notes in the highlighted scale. NOTE: Don't forget that pesky 'White notes only' switch below.
- White notes only - Restricts labelling to white notes only.
- Swap panels - Swaps the upper and lower Piano roll workspaces.
- Flip separator (Shift+Enter) - Show/hide the note Event Editor panel. Right-Clicking on the separator will also flip the state.
- Snap
 - Snap determines how notes and events move relative to the Piano roll grid and how quantization aligns items. NOTES: 1. Holding the Alt key temporarily sets snap to 'none'. 2. There is a Global Snap selector on the Snap Panel that is used when this local Snap is set to 'Main'. 3. Scroll speed will slow when snap settings other than 'Line' are used. The options are:
- Main - Snap is set to the Global snap value.
- Line - Notes snap to the nearest grid-line, notice that the grid changes resolution as the Piano roll is Zoomed horizontally.
- Cell - Notes snap to the start of the grid-cell they fall in.
- (none) - No snapping. Movement is limited only by the Project Timebase (PPQ) setting (F11). NOTE: Snapping can be temporarily disabled by holding the Alt key when dragging notes.
- Steps 1/6 to 1 (step) - Absolute grid values equal to the nominated fraction of a step.
- Beats 1/6 to 1 (beat) - Absolute beats values equal to the nominated fraction of a beat.
- Bar - 1 bar.
- Events - Relative to existing events (including Ghost notes). Useful to show the boundaries of sliced events when they are butted against each other, as events surrounding the selected event change color.
- Markers - Snap to Time Markers.
Converting from Steps/Beats to note values:
Snap Setting Notation 1/4 Step 64th notes 1/2 Step 32nd notes 1/4 Beat 16th notes 1/3 Beat Triplets 1/2 Beat 8th notes 1 Beat Quarter notes Bar Whole note NOTE: The Global snap setting can be used for MIDI input quantizing. That is, notes played on a controller keyboard will snap to the value selected there during a MIDI recording. The options (none), Line & Cell are not input quantized.
- Select - Learning these shortcuts and you will look like a wizard to any bystanders:
- Deselect - (Ctrl+D) - Undo any selection.
- Select all - (Ctrl+A) - Select all notes in the Piano roll.
- Select one at random (Shift+R) - Select more notes random.
- Select more at random (Shift+M) - Select a note at random.
- Select by color (Shift+C) - Selects all notes and slides that have the same color as currently selected in the Color Group Selector.
- Select odd (Shift+O) - Selects 'swung' notes. That is notes off the main beat-grid.
- Select muted - Select all notes that have been muted (by the mute selection tool). NOTE: You can use the shortcuts (Alt+M) and (Alt+Shift+M) to Mute and Unmute selections.
- Select overlapping notes - Select, possibly, unintentionally duplicated notes that are stacked on top of each other. NOTE: F10 > General > Click-and-hold & special gesture functions will duplicate notes if you click-and-hold them, and can lead to this situation.
- Invert selection (Shift+I) - Notes that were selected will be deselected and notes that were deselected will be selected.
- Selection time around selection (Ctrl+Enter) - Sets the time-line selection to match the length of the currently selected notes.
- Select previous time (Ctrl+Left arrow) - Shifts a selection made by Ctrl+Left-click and swiping the time-bar, by its own width to the left.
- Select next time (Ctrl+Right arrow) - Shifts a selection made by Ctrl+Left-click and swiping the time-bar, by its own width to the right.
- Magic lasso - Select notes by moving your mouse pointer in a loop that encloses the notes you want to select (no clicking required, it's 'magic' remember). Make sure you have no notes selected before you perform the lasso action. Right-Click the empty Piano roll to deselect all notes and make another selection.
- Group - Make a selection then use the following:
- Group - (Shift+G) - Group selected notes. Selecting, moving or deleting any note from a group will cause all others notes in the group to be selected, moved or deleted, etc. Any number of groupings may be created. To group notes: make a selection using the
 Select tool, then use the Group function. Activated / deactivate grouping: Use the Note / Pattern Grouping switch on the Toobar shortcut icons. Deselecting the Note / Pattern Grouping switch will disable note grouping behavior until the switch is reactivated.
- Ungroup - (Alt+G) - Ungroups any notes that are part of the currently selected group.
- Group - (Shift+G) - Group selected notes. Selecting, moving or deleting any note from a group will cause all others notes in the group to be selected, moved or deleted, etc. Any number of groupings may be created. To group notes: make a selection using the
- Zoom
 - Right-Click the zoom icon to open a menu of quick zoom options:
- Zoom in/ Zoom out (Page up / Page down) - Zoom centers on the Cursor position.
- Quick-zoom 1, 2 & 3 (Shift+1, 2, 3) - Three handy zoom levels.
- Zoom out far (Shift+4) - Minimum horizontal zoom.
- On Selection (Shift+5 - Zoom to time-line selection. The command will be disabled if no time region is selected in the timeline.
- Time markers - Markers can be used to label parts of your score (such as 'chorus' for example). When set to type Pattern length (Right-Click a marker) they will re-define the length of the Pattern. Options are:
- Add one (Alt+T) - Add a time marker above the time-line. Type a name for the marker and press Enter. The marker can be dragged into the correct location after naming. If the Piano roll already has markers, then Right-Click a marker and select Add new marker from the pop-up menu.
- Add auto (Ctrl+T) - Adds a Time Marker to the Piano roll named 'Auto'. Ready to right-click and edit.
- Add two - Make a time-line selection and use this option. Markers will be added at the start and end of the selection.
- Add one every - Select from Bar, 2 bars, 4 bars or 8 bars. You must make a time-line selection first.
- Delete - Delete the marker/s in the time-line selection. If no selection is made then all markers are deleted.
- Target channel - Displays a list of channels which can accept Piano roll data. Use this to quickly change the channel you are working on without closing and opening another Piano roll.
- Target control - Displays a list of controls/automation data to display in the integrated event editor. This menu is replicated on the Piano roll toolbar.
- Auto Locate Channel - The Piano roll will automatically display the first non-empty channel when switching between patterns. This menu is replicated on the Piano roll toolbar.
- Auto Smoothing - Automation events are automatically interpolated and smoothed upon mouse button release.
- Preview notes during playback - Allows notes as they are placed or clicked to be heard during playback. When deselected playback disables note preview except for the preview keyboards.
- Center (Shift+0) - Scrolls the grid so the playing position marker appears in the middle. Useful when you want to see the playing position in a long sequence. NOTE: Does not work with the numerical keypad, only the numbers above the typing keys.
- Detached - The window is 'detached' from the main environment of FL Studio and can be maximized on a second monitor (in a dual monitor setup).