MENU BAR
File Menu

The File menu ( F3) contains commands for managing files:
Commands
- New - Starts a new, empty project using the last selected template as a start point. You will be prompted to save any changes made to the current project.
- New from template - Contains a submenu with a selection of different templates - Genre, Minimal, Other and Utility. To set the default Template when opening new projects, use the General Settings > Default template option.
- Open ( Ctrl+O) - Opens an existing project. The Open File dialog is enhanced with a Favorites section.
- Save (Ctrl+S) - Updates the project by overwriting the last saved copy on disk. If the current project has not been saved you will see the Project Folder Dialog or if you 'Skip' that a name dialog will open prior to saving. For a list of available save formats, see the File Formats page.
- Save as (Shift+Ctrl+S) - Saves the current as a different name and/or format. For a list of available save formats, see the File Formats page. The Save File dialog is enhanced with a Favorites section.
- Save new version (Ctrl+N)- Saves the current project as a file with a unique name. For example, if you have a project called MyProj, this command saves a file named MyProj_2. Next time it will be called MyProj_3, etc. This feature is useful for saving versions of the project without overwriting the original file.
- Save to new project folder (Ctrl+N) - Saves the current project into a new project folder. The project must already be using a project folder for this option to be available.
- Save as template ... - Saves the current project to the Templates list. You can also manually save custom Template projects in your User data folder\FL Studio\Projects\Templates.
- Import - Loads files that are not FL Studio native projects. For a complete list of file types you can import, see the Open/Import File Formats page. The Import File dialog is enhanced with a Favorites section.
- Export - Converts the current project to various file formats. For a complete list of file types you can export to, see the
File Formats page.
- Wave file (Ctrl+R) - The Wave format is a widely used uncompressed audio format used in distributing production quality audio. If you plan to burn a standard Audio CD then you will need to export 44.1 kHz 16-Bit Wave (.wav) files. NOTE: FL Studio does not burn CDs.
- mp3 file (Shift+Ctrl+R) - mp3 (Mpeg Audio Layer 3) is a compressed audio format useful for sharing music over the internet and compatible mp3 players. While .mp3 audio quality can be excellent (@ rates of 224 kbps and above) it is not recommended for archiving production quality audio.
- ogg file - (Shift+Ctrl+R) - ogg (Ogg Vorbis) is an open-source compressed audio format useful for sharing music over the internet and compatible Ogg players. While Ogg audio quality can be excellent (@ rates of 224 kbps and above) it is not recommended for archiving production quality audio.
- MIDI file (Shift+Ctrl+M) - MIDI (Musical Instrument Digital Interface) format saves musical note (score) and control data associated with projects. NOTE: MIDI does not contain nor save audio. Your PC may make sound when you run a MIDI file as many audio devices can interpret and play MIDI data.
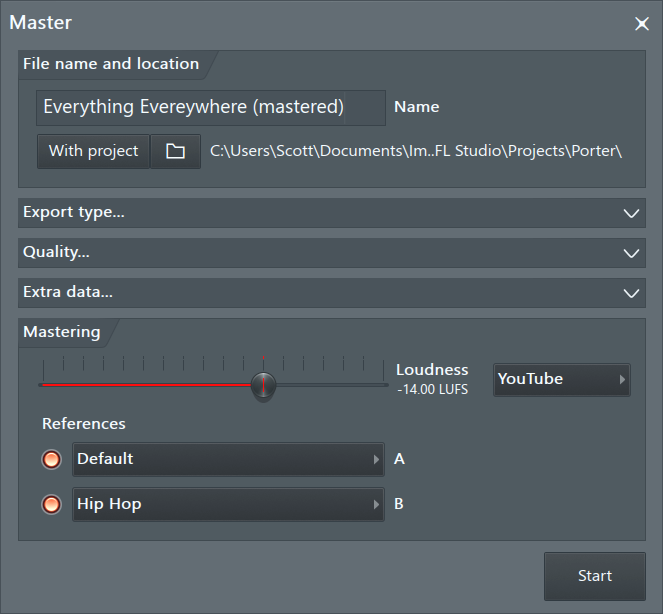
- Master (FL Cloud) - Uses an AI-powered system to master your mix compliant to the loudness (LUFS) specifications of all major digital streaming platforms. Also avalibale under for FL Cloud are automatic genre detection to optimize results according to your style of music. NOTE Requires an internet connection.
- Mastering Settings - The included FL Cloud mastering provides access to the 'Default' preset. This is generally a good setting for all musical styles. Under the Master section you can choose level presets for most major distribution platforms or manually set the Loudness (LUFS) target level.

- Export type, Quality, Extra data... - These settings are the same as found on the Export dialog.
- Loudness (LUFS) - Use the slider to set the target or choose a preset from the menu to the right. LUFS (Loudness Unit Full Scale) is a measure designed to indicate how the human ear responds to loudness. LUFS has been adopted, industry wide, as a way of forcing the loudness of music, within media platforms like Spotify and YouTube, to be equivalent. Meaning, consumers don't have to keep reaching for the volume control, being blasted by one track and hardly hearing the next. If you try to mix your music louder than a platform expects, they will turn it down for you, so this is why the LUFS loudness target is important when considering distribution. You can master your track to meet the target LUFS for the platform. The loudness you hear is the same as the consumers will hear on that platform. For more information on mixing and mastering in FL Studio see Making tracks louder! (and good).
- References - FL Cloud includes a free mastering preset 'Default', which is a great option for all music styles. FL Cloud subscriber have access to more options, including the ability to auto-detect or select the genre of your track, and choose up to two mastering presets for comparison. The 'Reference' setting will target the mastering style to match those generally used in commercial releases of the genre selected.
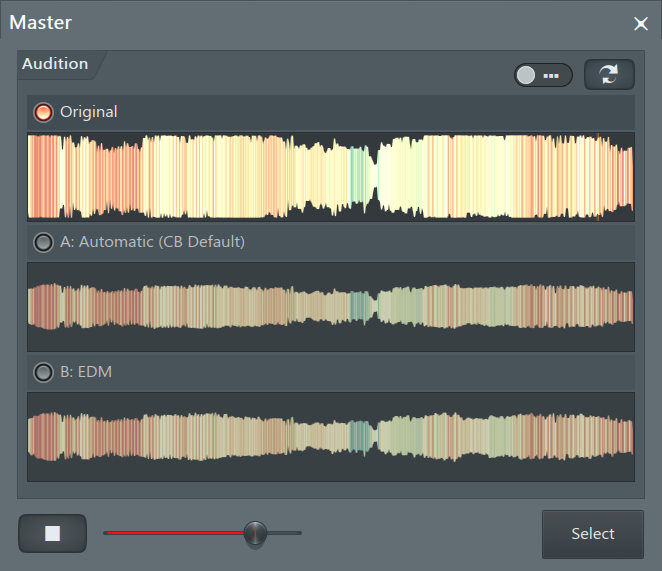
- Comparison window - After the render is completed you will be able to compare the original to the mastered version/s. The two controls at the top of the panel (left to right) include, a focus switch to show only one waveform. A switch track icon. This can be useful if you avert your gaze from the panel and click this switch a few times so you forget what you are listening to. Then keep clicking and listening, only returning your attention to the windows after you have selected your favorite render.

- Mastering Settings - The included FL Cloud mastering provides access to the 'Default' preset. This is generally a good setting for all musical styles. Under the Master section you can choose level presets for most major distribution platforms or manually set the Loudness (LUFS) target level.
- Upload to cloud - Provides the option to upload your audio to various Social Media websites.
- All playlist tracks - Sequentially renders each Playlist track to an audio file. There is also a Split Mixer Tracks function that does a similar thing, but creates a separate audio file for each Mixer track. NOTES: Pay attention to the Render dialog > Miscellaneous > Enable master effects option prior to using this feature. If you intend to use the Playlist tracks in another DAW you probably also want Master effects on. See the section on 'Bouncing to Audio / Freezing' for full details on this feature. There are some caveats associated with Mixer Effects rendering as expected.
- From song start - Create an audio track for each Playlist track from the start of the Playlist.
- From track start - Create an audio track for each Playlist track from the start of the data in the Playlist Track. This will result in uneven length 'stems' (files).
- Time selection - Create an audio track for each Playlist for the selected time range.
- All playlist track groups - Same as the above, but creates only one audio file for Grouped Playlist Tracks (the parent and sub-track audio is combined).
- Video - Opens the ZGameEditor Video Wizard for visualizer rendering.
- Zipped loop package (.zip format) - This saves both the .flp (project data) and samples associated with the project in a standard ZIP file format. This is a great way to archive your important projects so that you don't lose the sounds associated with it. NOTE: As an alternative 'archive' method, you can also use the option 'Copy used samples to the project folder' under the Project Settings if Project Folders are used.
- Project bones - Use this command as a shortcut to export all generator/effects settings as presets (*.fst files) and score/automation data as score files (*.fsc files) used in the current project. This is useful for merging components from one project into another. Also, a *.nfo file will be created in the folder you selected to store the preset/score data, that is used by the Browser.
- Project data files - Saves copies of all samples, presets and other plugin data used in the current project into a single folder of your choice.
Command line options - See here.
- Recent projects (Alt/cmd+ 1 to 0 (10)) - Appears as a list of the 10 most recently opened projects at the bottom of the File menu, with the most recent one at the top. Hover mouse to the 'More' option to show up to 50 recent projects.
- Revert to last backup - Loads the last backup (see Backup Settings).
- Exit - Closes FL Studio, prompting you to save any changes to your current project.