PIANO ROLL
Chord Progression Tool
Chord Progressions are important because they are the harmonic foundation for the emotions evoked by your music. Just like colors inspire feelings about a painting, the sequence of Chords can create a powerful emotional journey. Individual Chords might have their own character, but it's their combination, the Chord Progression, that paints the emotional landscape. Some Progressions feel bright and joyful, while others evoke feelings of darkness and mystery. By weaving between these, composers can create a variety of moods.
But what exactly are Chords, these building blocks of emotion? At first glance Chords are just stacks of notes played together. However, something special happens when the right notes combine in the right sequence of Chords. For beginners, finding these harmonious combinations by trial-and-error can be frustrating. That's why the Chord Progression tool will always give you the right notes to create musical Chords and then the right Chords in the sequence to create an emotion. It's musical theory condensed into a few mouse clicks! See 'Tips on using the tool' below to get started.
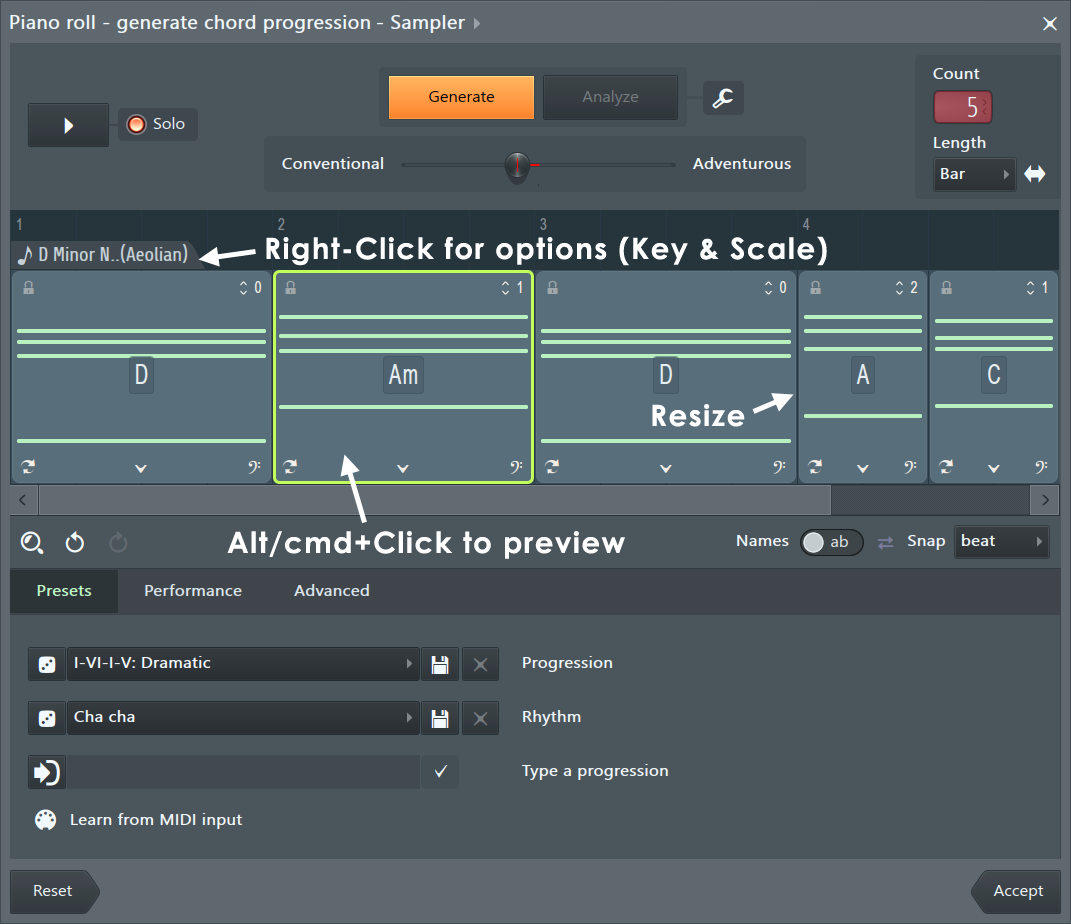
Chord Progressions that sound good, are not random. They often follow patterns based on musical Scales. Understanding Scales, covered in the Scales & Keys (Key Signatures) section of the manual, will help you to better follow how the Chord Progression tool works. NOTE: You can set the note Scale as indicated from the (Right-Click) options for Key & Scale as indicated in the image above.
Tips on using the tool
First thing, Chord Progressions work best with sustained sounds like a Piano or 'Pad' style synth. The instrument used must be polyphonic, set to play more than one note at a time. You can always change the sound later. Then ...
- The first Progression - When you open the tool you will get a 4 Chord Progression. Press Play to hear it or (Alt/cmd+Click) click on Chords to preview them in any order. NOTE: FL Studio will also switch to Pattern mode if not already set. The Chord Progression Tool requires this to work correctly.
- Tweaking the results - Familiarize yourself with the options...
- Click re-Generate if you don't like what you hear. NOTE: The tool will keep track of any notes already in the Piano roll of the Pattern you are working with and its own previous suggestions. Click 'Reset' to start over if you feel stuck in a rut with the suggested Chords. Also consider clearing any notes in the Piano roll.
- Use the 'Conventional - Adventurous' slider to make changes to the type of Progression you get. Conventional will be more commonly used in popular music while Adventurous will lean into Jazz style Chords with complex textures. NOTE: When set to the extreme 'Adventurous' end, you won't get Progressions commonly heard on in popular music. Adventurous does what it says :)
- You can change Chords individually by clicking the 'Show alternative Chords' (down arrow) at the bottom of Chord and selecting an alternative from the pop-up list. Again use (Alt/cmd+Click) to preview the options.
- To reorder Chords, (Right-Click) and use the Swap option to create a different sequence.
- Click the Lock icon to keep Chords you don't want replaced with Generate.
- Advanced controls - (Right-Click) a Chord for more options, check them out below. To change the Tonic note and Scale (Right-Click) the Tab above the first Chord in the sequence. Major Scales will tend to sound happier and more up-beat than minor Scales.
- Moving on - Click 'Accept' and the Progression will be added to the selected Pattern. Build on this to create a full track in the Playlist. TIP: One of the quickest ways to build a great melody is to use notes from the existing Chords in each bar. Even entry of notes from this set will work. Give it a try, then refine. Bass lines similarly may start as simply as the lowest note in each Chord with a rhythm you like.
NOTE: When you use the tool it will snap your Piano roll to a key. This will ensure notes you add later are in harmony with the Chord Progression provided if you select Snap to Key.
Controls
Top Panel Options
- Play button - Start and stop playback. Use (Alt/cmd+Click) to preview Chords with the mouse.
- Solo - Only play the Chord notes (i.e. not any pre-existing Piano roll notes).
- Generate - Runs the main AI generative model and will take into account existing Chords or notes in the Piano roll it's used on. Any Chord which are not locked (padlock icon) will be regenerated. The model takes into account overall harmonic coherence, Chord-to-Chord transitions, sub-sequences for long Progressions, metric position, extensions and bass line.
- Analyze - This runs a different AI analysis model which aims to find the best matching Chord sequence for existing Piano roll notes. It is a deterministic model, so regenerating will have no effect while Piano roll notes remain the same.
- Generate Options (Spanner icon):
- Notes - This determines which parts of a Chord will have notes created on generation or analysis. Note - if both of these are off, Chords will be shown but no notes created. This could be used to analyse the Chords on one channel and then the same Chords could be used to create notes for a different instrument on another channel.
- Main - Generate the main Chord notes.
- Bass - Generate the bass notes for the Chord. TIP: Run Analyze with Bass notes only to create a bass line that matches existing Piano roll content.
- Non chord notes - How the pre-existing Piano roll notes (i.e. before the tool was opened) will be treated
- Replace all - Remove pre-existing notes (Analyze will still pre-existing notes for the analysis).
- Replace clashing - Remove any notes that lie within the region of generated Chord notes. Those regions are determined by the Main and Bass options above.
- Keep - Keep existing Piano roll notes and furthermore instruct the AI model to aim to generate Chords that will accompany those notes coherently.
- Snap - Keep existing Piano roll notes, but snap any which are outside of Chord notes to the nearest in-Chord note.TIP: - This can be used as a creative tool to match a static arpeggiated (or melodic) sequence to a Chord Progression.
- Count - The number of Chords in the Progression. Use this to quickly add or remove Chords from the end of the Progression. Any added Chords will be generated automatically.
- Octave - Set which octave the Chords are placed on.
- Length - This determines the initial length of any Chords added to the end of the Progression. It also informs the AI model as to the length of a basic metric unit within the Progression.
Chord Viewer
This is where you can manipulate the Chord Progression by moving, swapping, resizing, adding, removing and altering Chords.
- Preview a Chord - (Alt/cmd+Click) plays the Chord. This is a good way to quickly experiment with different ordering.
- (Right-Click) Chord Options:
- Preview - Play the Chord.
- Chord options - (Right+Click) a Chord.
- Preview from this chord - Play the Progression from this Chord onwards.
- Lock (also accessible via the padlock icon) - When selected, this Chord will not be regenerated when Generate or Analyze are hit.
- Regenerate - Instruct the AI model to regenerate only this Chord, taking into account any neighboring Chords.
- Show alternatives - Show a set of AI-generated alternative options for this Chord that would fit well in the Progression.
- Add passing chord - Split this Chord and in the first of the split positions regenerate to create a Chord that leads on to this one.
- Inversion - Also accessible via the arrows on the top right of the Chord). Cycle the Main Chord notes up or down by 1. The current inversion state is shown on the top right of the Chord.
- Transpose - shift this Chord (Main or Bass part) up or down by a semitone or octave.
- Main notes - Toggle the Main Chord notes on or off.
- Bass note - Toggle the bass note on or off.
- Fixed bass - Here you can manually fix the bass note of a Chord. It will be changed for the current Chord, and when this Chord is regenerated the chosen bass note will remain.
- Extensions - Alter the number of extensions for this Chord.
- Color - Change the color of the Chord notes.
- Select chord - Manually select a different Chord.
- Type in chord name… - opens up a window to type in the name of a replacement Chord.
- Performance - add a performance to this Chord (Arpeggiation, Chop Pattern or Strum/Humanization).
- Voicing - Alter how the Chord’s notes are spread out
- Block - notes will be compacted into a condensed voicing.
- Open - notes will be more spread out so no two notes are too close together.
- Octave - the lowest Chord note will be repeated an octave above.
- Stacked - Chord notes will be repeated over 2 octaves. TIP: This can be used to create 'power chords', particularly when the number of extensions is turned down.
- Snap existing notes - Snap pre-existing Piano roll notes to note classes that are in this Chord (similar to the generation option, but will not regenerate the Chord).
- Note linking - Choose ...
- Link - Non-Chord Piano roll notes (i.e. ones that existed before you opened the Tool) will be swapped in for Chord notes for the duration of this Chord. TIP: This is how you can take in a pre-written Pattern from Piano roll notes and copy & paste it to other Chords using the Performance panel.
- Unlink - Detach all currently rendered notes from the Chord and place in the Piano roll as non-Chord notes. You are now free to bring back Chord notes and manipulate this Chord independently of the notes you unlinked.
- Copy - copy this Chord to the clipboard.
- Paste - paste in a Chord from the clipboard to replace this Chord.
- Delete - remove this Chord.
On-Chord Controls
- Zoom (magnifying glass) - Zoom in/out so all Chords fit across the viewer.
- Undo/redo - Undo or redo actions.
- Names - Toggle Chord names between absolute (standard letter names) and relative (scale-relative Roman numeral names).
- Snap - Set a snap resolution for Chord movements.
- Shunt - When selected, if you move a Chord into an adjacent Chord it will shunt that (and any others) across, rather than being blocked.
Presets
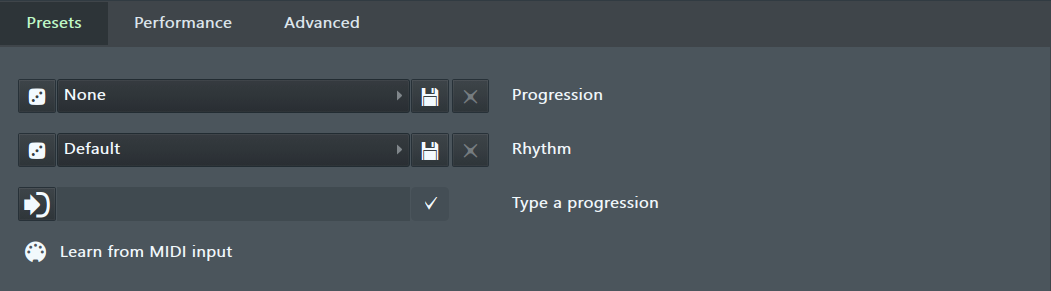
- Progression - Choose Progressions from a preset list. This list has been curated from a range of popular Progressions. NOTE: A 4-Chord preset will be applied over repeating metric time intervals if you have more or fewer than 4 Chords present. Repeating chunks occur in blocks of (4 x Length). Extra chords will be generated to complement the preset and where there are too few chords available, some of the preset Chords will be omitted.
- Random (Dice icon) - Randomly apply one of the Progression presets.
- Save (Disk icon) - This will open a dialog to name a new User Progression preset from your existing Chord sequence.
- Delete (X icon) - If you have a User Chord Progression preset selected, this will remove it from the list.
- Rhythm - Apply a rhythm to the Chord sequence in blocks (of 4 x Length). Chords may be added if necessary, and extra Chords in each block will split rhythm sections. NOTE: There is a Random option (dice) that will generate a new chord rhythm.
- Type in progression - Type or paste a sequence of chords into the text box, delineated by commas, dashes, or spaces. Chords can be given by their names (e.g. C, G, Am, F), capital letters only, or their Roman numerals (e.g. I, V, vi, IV). Roman numeral Chords will be created according to the specified root note. The sequence will begin from the first selected Chord.
- =- Keep the current Chord at this position
- . - Repeat the previous Chord in the text (not the previous existing Chord)
- ? - Regenerate at this position.
- Valid separators - [|-, ]
- Get Current Progression (In arrow icon) - Fill the text box with the Chords from the current Progression. TIP: Use this as a quick way to edit individual Chords.
- Accept (Tick icon) - Render this Progression of Chords. If no Chord is selected, they will fill up from the first Chord. If Chords are selected, these will be altered in order, but if the typed Progression is longer then additional Chords will be altered or added to complete the Progression.
- Learn from MIDI input - Select a Chord to replace in the Progression, click the MIDI icon (notice the selected Chord turns red) and play a replacement Chord on your controller.
Performance
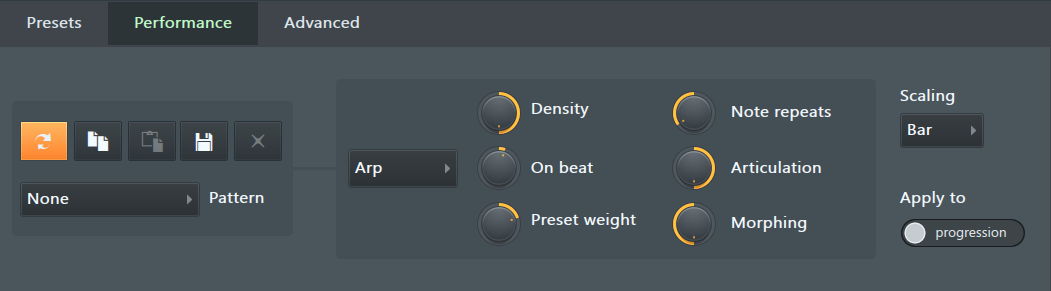
- Regenerate - Create a new variation based on the current settings. NOTE: This will replace the Pattern associated with each affected Chord with the one currently selected in the Pattern combo box.
- Copy - Copy the performance of the selected Chord/s to the clipboard. NOTE: From Arp and Chop, this process will create a single Pattern with the same length as the Scaling setting. If the Chord/s selected last for longer than this time interval, a hybrid Pattern will be generated which is still only of a single Scaling time length. However, for Humanize the Pattern will take into account the full context of all selected Chords and will assign parameter values accordingly. TIP: If you want to learn from your own Pattern of notes that you create in the Piano roll, create the Pattern before opening the tool, then at the relevant Chord(s) select Note linking > Link in the (Right+Click) Chord options. Now your original Piano roll notes will be the Chord notes, so you can use them to Learn the Pattern.
- Paste - Paste the performance to the selected Chord/s.
- Save pattern - Save the Performance Pattern of the selected Chord/s as a User pattern. TIPS: If you want to apply the controls on the right to a Performance pattern you Copied, to morph its properties, you would need to save it first and select it from the Pattern selector menu, otherwise it will be overwritten by whatever is currently selected. See Copy for notes on how content spanning longer than a single Scaling time length is handled.
- Delete Pattern - If a User Performance Pattern is selected in the combo box below, delete it from the menu.
- Pattern selector - These act as seeds for the (Re)Generation of Performances. In the case of Arp and Chop, these are sequence patterns and are independent of the controls on the right. In the case of Humanize, the parameter settings are saved with the Pattern. NOTE: When an Arp or Chop Pattern is selected, it will be rendered as-is without applying the parameters on the right. If Regenerate is hit or any parameter knobs are moved, the parameters will then be applied to morph the Pattern accordingly.
- Performance type - Select one of the following manipulations of the Chords...
- Arp - Arpeggiate the main notes in the Chord. The lowest note will be sustained.
- Density - Higher density means more notes (or held portions) in the Arpeggio, rather than rests.
- Note repeats - How frequently consecutive notes are repeated.
- On beat - How closely notes in the Arpeggio begin on the beat. TIP: This control is related to the Density setting.
- Articulation - Note length as a proportion of the maximum generated from the Pattern.
- Pattern bias - How closely the Arpeggio reflects the selected Pattern.
- Morphing - When morphing is higher, the Arpeggio changes across the Chord Progression.
- Chop - Rhythmic divisions of the Chords.
- Density - Higher density means more chops relative to the Scaling option.
- Sub cycles - Higher values encourage repeated sub-Patterns within each Scaling time interval.
- On beat - Higher values encourage Chops to begin on the Beat, lower values encourage chops to begin off the Beat. TIP: If you want a more syncopated rhythm, turn this parameter down.
- Onset skew - Lower values encourage a higher density of Chops towards the start of each Scaling time interval, and towards the end for higher parameter values.
- Pattern bias - How closely the chopping reflects the selected Pattern.
- Preset weight - How closely the chopping reflects the selected preset.
- Morphing - When morphing is higher, the chop pattern changes more across the chord progression.
- Humanize - Note onset and offset variations designed to mimic human playing and strumming. NOTE: For Humanize, Scaling acts in a similar way to Length for Chord Generation, in that it determines the length of a single time interval within a loop, and a full phrase is considered to be of length (Scaling * Lengths per loop). Lengths per loop can be changed in the Advanced section.
- Timing depth - The degree to which note start times are altered.
- Dynamics depth - The degree to which note velocities are altered.
- Strum time - Higher values spread out the strum more.
- Strum curve - Alter the strum speed over time.
- Phrasing weight - The degree to which phrasing over a time interval of (Scaling * Lengths per loop) affects the dynamics.
- Phrasing offset - Phrasing works by applying a (morphed) sinusoidal push-pull to dynamics over a looped time interval. Altering the offset determines where in those loops the note velocities will tend to increase or decrease.
- Arp - Arpeggiate the main notes in the Chord. The lowest note will be sustained.
- Scaling - This sets the time period for a single repeating chunk of the Pattern. Each Performance is created by applying the base Pattern by looping over time chunks of this length. . Choose from Beats to Bars for this time unit.
- Apply to - Choose whole Progression or just the Selection of Chords.
Advanced
These parameters influence how the Generation model works.
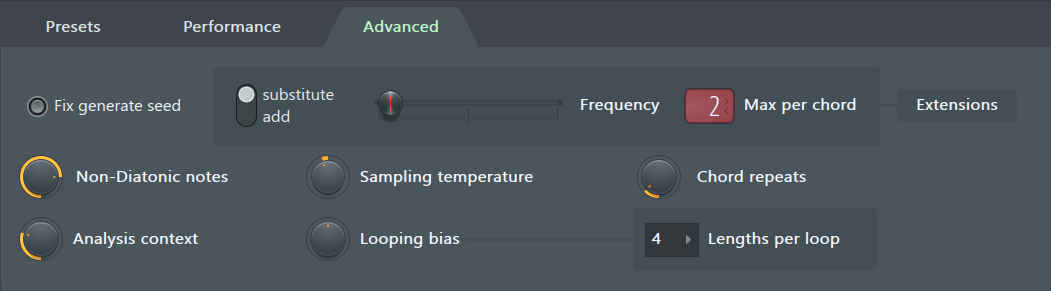
- Fix generate seed - Select to maintain consistency as you tweak parameters. When deselected the AI Model will use different randomization seeds and results can differ greatly as you change settings.
- Extensions - These are additional 'extra' notes added to the Chords:
- substitute / add (switch) - Either substitute (replace) basic chord notes with the alterations, or add them as extra notes.
- Frequency (slider) - Control how often extensions are added.
- Max - The maximum allowed number of extensions that can be added to a single Chord.
- Non-Diatonic notes - Increase this to encourage chords (and extension notes) that are more out-of-scale.
- Sampling temperature - Controls how 'common' the Chords in the progressions are. Decrease to encourage the AI to choose common Chord transitions. Increase to generate more unusual and less-common progressions with more dissonances and unusual transitions.
- Chord repeats - Higher values encourage more repeated Chords within each time loop. When set to minimum this will ensure two auto-generated adjacent chords are different.
- Analysis context - Larger values allow the AI to place more importance on the longer-term Chord transition sequence as opposed to precisely matching Chords only to the notes that exist.. At a value of zero it will only consider notes during the Chord’s time interval and will not pay any attention to surrounding Chords.
- Looping bias - The AI model generates a Chord then makes a decision about the next chord based on the context of the Chords present. Turning Looping bias clockwise encourages the AI model to use similar or related Chords on each generation loop (of time interval Length x Lengths per loop). Turning it counter-clockwise makes the AI model 'experiment' with different chords on each generation loop for more variety. NOTE: This knob only has an effect if the Progression time is long enough to have multiple loops (chord progressions).
- Length per loop - Select the number of time intervals of size Length (changed in the top panel) that make up a single Generation Loop. This provides the AI models (Generate / Analyze / Humanize) with a metric context. For example, Chords Progressions will tend to resolve towards the end of a Loop, and Humanization can be encouraged to create dynamics phrasings of the Loop length.
Shortcuts
In Piano roll:
- (Alt/cmd+P) - Open tool (might conflict with something else, please let me know if you find anything).
In the tool itself:
- (Mouse wheel) - Horizontal scroll.
- (Ctrl+Mouse wheel) - Horizontal zoom.
- (Shift+Mouse wheel) - Change hovered Chord inversion.
- (Alt/cmd+Mouse wheel) - Transpose hovered Chord.
- (Space) - Preview.
- (BackSpace) - Switch snapping.
- (Alt/cmd+S) - Switch Shunt on/off.
- (Shift+Z) - Zoom out.
- (Ctrl+A) - Select all.
- (Ctrl+D) - Deselect all.
- (Ctrl+C/Ctrl+V) - Copy/paste.
- (Ctrl+Z/Ctrl+Alt/cmd+Z) - Undo/redo.
- (Ctrl+Right-Click) - Zoom out full.
- (Alt/cmd+Click) - Preview Chord.
- (Ctrl+G)- Generate a new Progression
- (Shift+Double-Click) - Add a passing Chord.
- (Ctrl+Click & Drag) - Select multiple Chords.
- (Double-Click) On Chord - Show Chord Alternatives.
- (Double-Click) On empty space - Create new Chord.
- (Shift) During resizing - Move next Chord's starting point if it's touching current Chord's end point.
- (Alt) During moving/resizing - Ignore snap setting.
- (Del) - Delete selected Chords.
Chord Progressions and Harmony
We recommend watching the following video if you want to learn more about the role of Chord Progressions in music ...
Credits: Code (Tolly Collins, Pierre & Dario Sanfilippo).
User Interface: Miroslav Krajcovic.
- Notes - This determines which parts of a Chord will have notes created on generation or analysis. Note - if both of these are off, Chords will be shown but no notes created. This could be used to analyse the Chords on one channel and then the same Chords could be used to create notes for a different instrument on another channel.