INSTRUMENTS / GENERATORS
Dashboard: Tutorial
This page covers some basics about building, modifying and employing interfaces in Dashboard.

Building or Modifying Panels
The Dashboard interfaces are built of separate components, for example, knobs, switches, sliders, buttons, etc. Dashboard contains a standard set of components you can employ in your projects, and the advanced users can also define their own components with the provided Component API.
To modify an existing panel or create a new one from scratch, you need to
enter in design mode (turn off the lock switch - ![]() ).
This mode allows you to create new instances of the available components and
modify their properties.
).
This mode allows you to create new instances of the available components and
modify their properties.
Add a New Component
To add a new component, open the menu (the arrow icon button next to the lock switch) and select Add Control. You will see a submenu containing all available controls grouped by type. Select a control from one of the groups and it appears on the grid.
Adjust the Size and Position of a Component
 In
design mode, you can find out if a component is selected by the presence of
the "arrow" icons (as shown on the picture).
To reposition a component, Left-click on its surface and drag it to a new location on the panel.
Some of the components are resizable as well. In this case you will see an additional handle at the bottom right corner of the selected control. Drag that handle to resize the control.
You can change scale and size by directly manipulating the component properties as well, see the next section.
Adjust the Component Properties (Component Inspector)
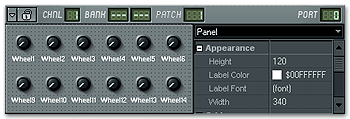
In design mode, you can see an additional panel displayed on the right side of the window of the Dashboard plugin. This panel is the component inspector, which allows you to select a component for editing and modify its properties.
- Select a Control - The combo box at the top of the component inspector contains a list of available components on the current Dashboard panel. Select a component from the list to select it in the panel as well & to display its properties in the inspector.
- Modify Component Properties - The inspector displays a list of properties available for the selected control, grouped by meaning. Click the + icon next to the name of each group to expand it and reveal the properties inside. You can freely edit the properties.
For more information on the specific properties for each component type, see Components & Properties.
Using Complete Panels.
As soon as the panel is locked (![]() )
it can be used as a standard interface as you would use in any other plugin.
All rules that apply to the regular FL Studio controls, apply here as well
(Right-click menu, CTRL+drag for slow motion, etc).
)
it can be used as a standard interface as you would use in any other plugin.
All rules that apply to the regular FL Studio controls, apply here as well
(Right-click menu, CTRL+drag for slow motion, etc).