VISUAL EFFECT
ZGameEditor Visualizer
ZGameEditor Visualizer is a visualization effect plugin with movie render capability. ZGameEditor Visualizer is based on the free open source ZGameEditor that can be used to create visualization objects for the plugin. ![]() Video Tutorials here
Video Tutorials here
Using ZGameEditor Visualizer
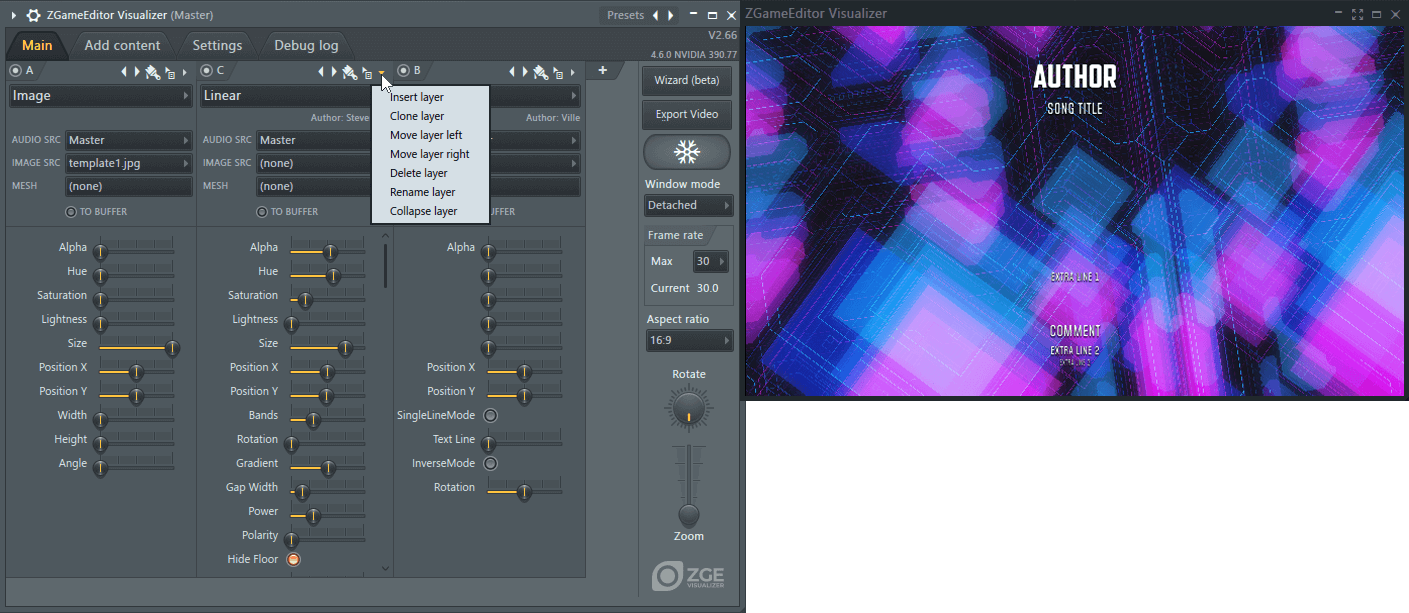
You can add up to 100 layers. The left-most layer will be the lowest layer in the stack and the right-most the top. So it's a good idea to build your effect from the background to the foreground. Where layers process others, layers to the right process those on their left. You can reorder layers with the menu on the right side of each layers header.
Depending on the objects selected various controls will become available and may be automated, respond to audio or in some cases accept MIDI input.
- A, B, C... - Layer switch. Disable/Enable layers. You can add up to 100 layers. You can change the name of the layer using the 'Layer menu' as shown below.
- Layer icons - From left to right:
- Effect preset - Step forward/backward through the Effects list.
- Color selector - When the layer contains Hue, Saturation and Color controls, you can use this to set these by working with the color selector.
- Move layer - Click and hold, then drag left/right from here, to move the position of a layer.
- Layer menu:
- Insert layer - Add a layer before the selected layer.
- Clone layer - Clone the selected layer.
- Move layer left/right - Yes you can, but its easier to click-and-drag on the 'Move layer' icon.
- Rename layer - Give the layer a name. Replaces A, B, C...etc.
- Collapse layer - Shrinks the width of layers. Makes it easier to manage large projects. To expand, just click the collapsed layer.
- Effects - Choose from the included effects, or make your own. See Create custom effects with ZGameEditor.
- Background - Background image effects
- Foreground - Foreground image effects.
- Background - Effects designed to be used primarily as background.
- Blend - Effects used to blend other layers creatively.
- Canvas effects - Moving textures designed as background canvasses.
- Feedback - Video/image feedback style effects.
- Hardware - DMX lighting control. Make sure to enable your DMX controller under Settings > Enable DMX output.
- Image effects - Effects based on images added under the Add Content > Images tab. Images can include Bitmaps (pictures), Videos and WebCams.
- Misc - Misc effects.
- Object Arrays - Arrays of 3D objects.
- Particles - Effects based on particle physics.
- Peak effects - Effects designed to respond to audio peak input.
- Physics - Algorithmic physics effects.
- Postprocess - Effects applied to other input layers (to the left of this effects layer). Send source layers To Buffer and select it under Image Src.
- Scenes - 3D Scenes under your control.
- Terrain - 3D terrain.
- Text - Text is added under Add Content > Text. Lines can be selected separately with the 'Text line' controls on the Text effects layers. See Add content > HTML and Text below for more information.
- Tunnel - Tunnel style effects.
- Audio Source - Select any Mixer track that is sent to or sidechained to the Mixer Track hosting ZGameEditor.
- Image Source - Select images here that have been added under the Add Content > Images tab. Images can include Bitmaps (pictures), Videos, WebCams and 'To buffer' layers. NOTE: You can drag, from any operating system browser, and drop images or video on the plugin to automatically create a Layer.
- Mesh - Select 3D meshes here that have been added under the Add Content > Meshes tab.
- To buffer - The image generated from that layer, and all layers in front of it (to the left of the 'To buffer' layer), or until another 'To buffer' layer is encountered, is stored in an image Buffer. That buffer can then be used as input to another layer using the 'Image source' drop down. The layer following a 'To buffer' layer starts from a clean slate, the image is cleared and you can build up another composite image of layers. Repeat this for as many buffers as you need. Then, create the layers to form the final image.
- Main Workspace (Right-Click) Options:
- Collapse all layers - Close/shrinks all layers.
- Expand all layers - Opens/expands all layers.
- Auto-collapse layers - Closes any layers not beingh edited. Click to switch open layers.
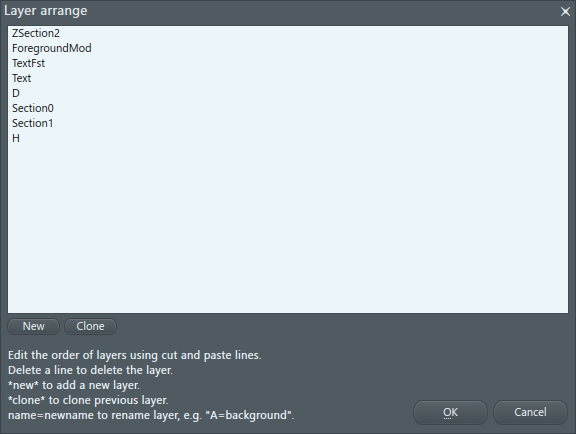
- Layer arrangement editor (Alt+L) - Opens a window where the layers can be edited using a text editor. This can save time when making big changes to a preset, such as deleting many layers or rearranging the order of layers.
- Save still image - Saves a png format image of the selected content. If a video is in preview, the current preview location will be used on save.
- Show background pattern in preview - Show a background pattern in the preview window. This is useful when working with transparent content to see which parts are transparent.
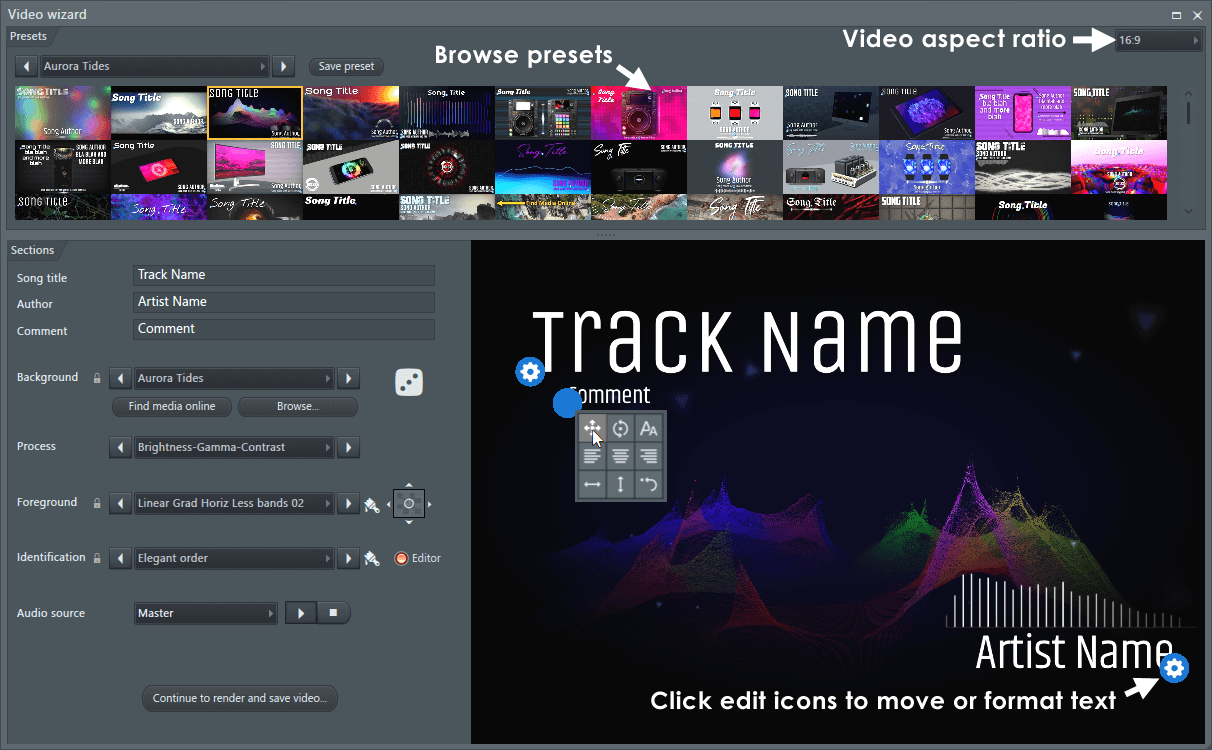
- Presets - Choose from one of the templates shown in the Presets Panel by clicking on the images OR use the drop-down menu top left to select or step through presets.
- Save preset - Rename and save the preset as a new version.
- Background - Background process, choose from all available.
- Find media online - Browse copyright free, high quality images and videos from Pexels.com.
- Browse... - Browse your computer for content.
- Randomize (Dice icon) - The dice icon in the top-right corner randomly chooses values. Click when you are looking for inspiration, then tweak the preset.
- Process - Applies an effect process to the Background layer.
- Foreground - Overlay effects. Play the project to see them in action
- Color (Brush icon) - Change the color and hue of the Foreground object.
- Move foreground (X/Y pad icon) - Click and drag to move the position of the Foreground object.
- Identification - Text overlay options. Choose a preset.
- Editor - Shows Gear icons on the text objects. Click the blue gear icons to make changes to the Text objects: Move, Rotate, Font size, Justification (left, Middle, Right), Horizontal center, Vertical center and Undo.
- Audio source - Choose the Mixer Track you want to use for visualization animations. Press Play/Stop to make preview changes.
- Continue to render and save video - Opens the Video export settings ready for rendering the video:
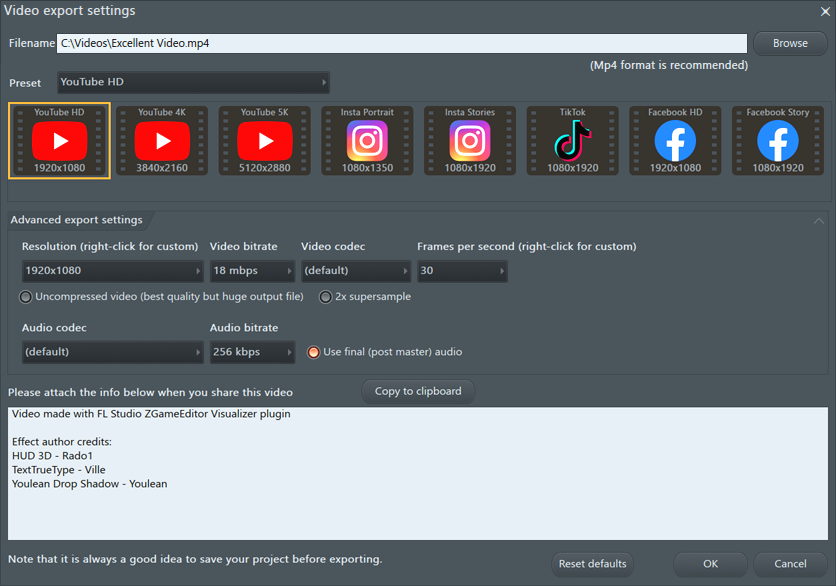
Export a video:
- From the Main Tab click Export to Video.
- Preset - For YouTube choose either YouTube HD (1920x1080) or the YouTube 4K (3840x2160. If you are exporting to a vertical format use Instagram (1080x1920) or TikTok (1080x1920) presets. NOTES: 4K videos files are approximately 4X the size of 1080p video files.
- Advanced export settings (option) - Further customize the video render. If you use one of the branded presets, you can be assured your video will be rendered to the suggested settings for that platform. NOTE: Exceeding the platform quality will not, likely, result in better quality videos as they will re-encode them to match the suggested format.
- Resolution - Choose a predefined resolution or (Right-Click) to set a custom resolution.
- Bit rate - Amount of data / space the video will use. Higher values mean better quality but larger file sizes. TIP: Use the presets as a guide to bit-rates recommended by YouTube, Faceboor or Instagram. There is usually little quality to be gained by exceeding default bit rates. But this also depends on the amount of motion in, and complexity of the video.
- Uncompressed video - Raw video will have no compression artifacts but will be 100's GB in size. You have been warned! Don't do it. Seriously. Stay away from the button...
- 2x supersample (option) - Choose for the highest quality. The video is generated at twice the final resolution and then down sampled to the chosen resolution. This reduces 'aliasing' and gives better quality at the expense of extended rendering time during export.
- Frames per second - If your video has a lot of detailed and or fast motion, consider switching the Advanced export settings > Frames per second to 60. NOTE: 60 fps video files are approximately 2X the size of 30 fps video files.
- Audio codec - (default) will use a compressed format such as MP3. Use FLAC when you require lossless audio for use in another video editor.
- Audio bit rate - Higher bit-rates are better quality. This setting does not apply to FLAC, which is lossless.
- Use final (post master) audio - Export the post FX Master Mixer Track with the video. When deselected the audio from the current Mixer Track and FX slot will be used.
- Advanced export settings (option) - Further customize the video render. If you use one of the branded presets, you can be assured your video will be rendered to the suggested settings for that platform. NOTE: Exceeding the platform quality will not, likely, result in better quality videos as they will re-encode them to match the suggested format.
- Click OK and then START on the FL Studio Export dialog pop-up.
- Attached - The video window is attached to the ZGameEditor Visualizer plugin.
- Detached - The video window is free-floating, over the top of FL Studio and other windows.
- Wallpaper - The video window is applied to the FL Studio background wallpaper.
NOTE: Most sliders and knobs associated with the effects can be 'Right-clicked' to use create automation clips and edit events. Many effects will also make use of Image and Mesh input.
TIP: If you are unsure which settings produce the best visual effects try selecting Presets - R 'Randomize' above the effect category menu. Often this results in something interesting that you can continue to develop.
Keyboard Shortcuts
| Action | Windows | macOS |
|---|---|---|
| Select Layer | Left/Right (arrows) | Left/Right (arrows) |
| Move Layer | Shift + Left/Right (arrows) | Shift + Left/Right (arrows) |
| Collapse / Expand Layer | C | C |
| Copy Layer | Ctrl + C | command + C |
| Paste Layer | Ctrl + V | command + V |
| Solo Layer | S | S |
| Delete Layer | Del | D |
| Insert Layer | Ins | I |
| Export Video | X | X |
Video Tutorials
See all ![]() Video Tutorials here
Video Tutorials here
Options
Add Content
Custom content you can add here includes Pictures, HTML, Text, Meshes and Video. The content is then available from the Image Src and Mesh selectors at the top of the Effect interface for each layer.
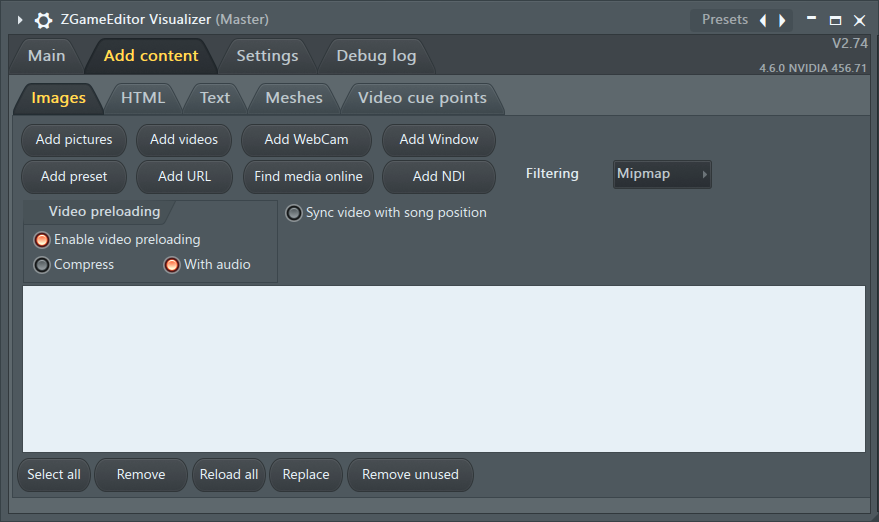
NOTE: You can drag and drop video and images directly on the main Layer Window and it will also be listed here.
- Images - Most image and video formats are supported. If an effect can use images, select them from the Image Src field at the top of the Effect column. Click the button and browse to the location of the content. The location will then be listed in the field below. Use the sub-tabs here to load:
- Add Pictures - Images in popular formats are supported (.bmp, .gif, .jpg, .png etc).
- Add Videos - Any video format, supported by your computer, should work.
- Add WebCam - Any webcam/s connected to your computer will appear here.
- Add Window - Choose from FL Studio Windows such as the Playlist or Mixer as source video.
- Add Preset - Use ZGameEditor presets (projects) as source video.
- Add URL - A link to any streamable video file on the web.
- Find online media - Browse copyright free, high quality images and videos from Pexels.com.
- Filtering - Choose how images are blended with the background when the Alpha controls are used.
- Video preloading - Options associated with preloading video to RAM.
- Enable video preloading - Preload video to RAM. This will significantly reduce CPU load and responsiveness when using CUE points to jump around or automation to animate the video playback position.
- Compress - Reduces the amount of RAM needed with a small increase in CPU load.
- With audio - Preload the video's audio and also by extension, include the audio in the video in playback.
- Sync video with song position - Will start any video playback with the start of the project. When this is disabled, the video will play continuously as a loop.
- Lower controls:
- Select all - Selects all content.
- Remove - Removes selected content.
- Remove all - Removes all content.
- Replace - Replaces selected content so that presets using the original content work with the new content.
- Remove unused - Removes any content that is not used in the project.
- HTML - HTML code entered here works in conjunction with the Text > TextTrueType effect. The code determines the appearance of the text in accordance with HTML text formatting. There is some example HTML options on the HTML tab itself (right side) or your can
 watch this video.
- Example code:
<p align="center">[textline] - How to use: Enter the exact code above on the HTML tab. Select the Text > TrueTypeText effect. Switch on SingleLineMode and automate the line shown with the Text Line control. You can use additional HTML formatting (bold, italics, text-size etc) as desired.
- Example code:
- Text - Enter the text to be displayed by the Text > TextTrueType, MeshText and TextDraw effects. From these effects, use the Text Line control to step through lines entered on the Text tab.
- Meshes - Include .3ds format 3D meshes that can be loaded and used as objects by some effects.
- Video cue points - Set up to 70 cue points in the video by entering a list of time-offsets in seconds (including decimals if needed). The simplest way to add a video is by selecting 'Image Effects > Image' from the list and choosing the Video from the Img Src menu.
- Setup - Match the MIDI IN Port on the Settings tab to a MIDI Out Port (and Channel).
- Trigger cue points - Notes played on the MIDI Out Channel will trigger playback from the set cue points. Cue-points start from note C5 (C5 = the first cue-point in the list) and are mapped progressively to each cue-point down the list as you progress up the keyboard.
- Special functions - You can put the cue points play and stop anywhere in the list.
Settings
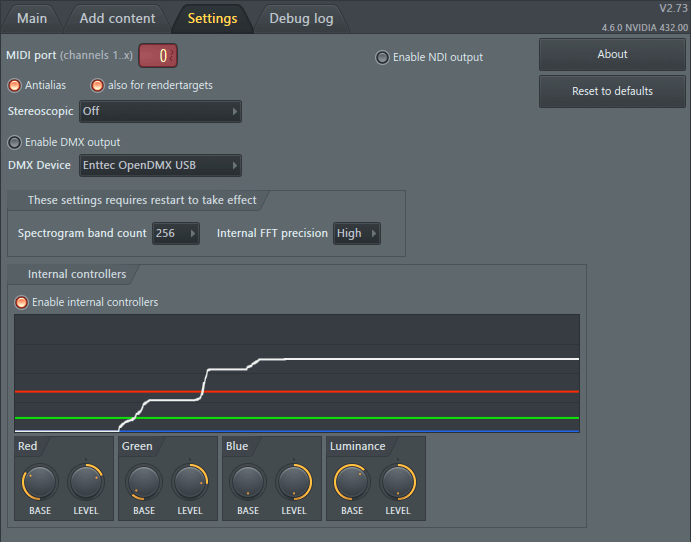
- MIDI port - Some effects respond to MIDI input & control. Set the port between 0 to 255. A setting of '...' is disabled. Once MIDI Out and ZGameEditor Ports are matched to the same value.
- MIDI Channel: Where you have more than one Effect that responds to MIDI, the first 16 Layers with MIDI effects will be linked to Channels 1 to 16. Use MIDI Note colors to control MIDI Channels OR separate MIDI Outs set appropriately.
- Reset defaults - Press when you have created a complete mess of the settings and want your sanity back.
- Enable NDI output - Enables ZGameEditor Visualizer to output broadcast quality video to NDI connected devices, that is frame-accurate and suitable for switching in a live production environment.
- Antialias - Uses Open GL 4x oversampling for smoother graphics.
- also for render targets - Applies anti-aliasing to render targets (buffers). This is a troubleshooting option, keep it on unless you encounter errors.
- Stereoscopic - Switches side-by-side stereoscopic mode on/off for 3D effects when images are fused.
- Enable DMX output - Connects ZGameEditor to your DMX device. DMX is the equivalent of MIDI, for lighting control. Its a lot of fun and DMX devices are surprisingly inexpensive, try eBay.
- DMX Device - Several DMX output devices, with sightly different computer communication protocols are listed.
- Spectrogram band count - Number of bands made available to effects that use frequency-spectrogram automation. More = higher CPU but more complex/interesting results.
- Internal FFT precision - Number of spectral bands the processed audio is divided into. More gives higher accuracy at the expense of lag/latency.
- Internal Controllers - When 'Enable internal controllers' is selected, the video output from the plugin is analyzed to produce four internal control sources. These include: Values for the Red, Green, Blue (RGB) components of the video and Luminance. In each case the average value for each component in the video is calculated, per frame, and the output published to the respective controller. For example, a 100% red video will produce Red = 1, Green = 0, Blue = 0 and Luminance = 0.2 (approx). Each control output has the following modifiers:
- Base - Offset to the calculated value.
- Level - Multipler for the calculated value.
Controlling the effects
There are three types of control available. How the presets respond to these controls will depend on the design of the visual objects. See below for details on making your own.
Audio Control
Objects will generally have their parameters linked to respond to audio input. Often this is analyzed in terms of frequency to cause the low, mid and high frequencies to cause different visual effects. NOTE: Link a Fruity Peak Controller from key Mixer tracks and/or Fruity Envelope Controller from Piano roll/Pattern Clips to target parameters/sliders for more advanced control.
Automation Control
Right-click plugin target controls and select Edit events, Create automation clip or Link to controller.
MIDI Input Control
- Load a MIDI Out Channel to the project.
- Match the PORT number on MIDI Out to the MIDI input port on ZGameEditor Visualizer.
- Notes & control data on the MIDI Out Channel will now be available to control parameters in ZGameEditor Visualizer.
Create custom effects with ZGameEditor
Place *.zgeproj objects in C:\Program Files (x86)\Image-Line\FL Studio\Plugins\Fruity\Effects\ZGameEditor Visualizer\Effects. To make the objects you will need to download and install the ZGameEditor here.
Watch the video tutorials below to learn how to use the ZGameEditor:
- 01 - Getting Started
- 02 - Designer Layout
- 03 - Project Tree
- 04 - Real-Time Preview
- 05 - Component Properties
- 06 - Build Executable
- 07 - Texture Mapping
- 08 - Bitmap Font
- 09 - Keyboard Input
- 10 - Play Sound
- 11 - Audio Editor
- 12 - Import 3DS
- 13 - Writing Expressions
- 14 - Create Model
- 15 - Spawning Clones
- 16 - Collision Detection
- 17 - Compress Build
Plugin Credits: Ville Krumlinde (ZGameEditor Visualizer), FFMpeg libraries (Video codecs), Steven Magyar (development testing).