RECORDING
Recording with USB Microphones and Headsets 


![]()
This section covers the special issues raised by USB microphones.
The problem: If you use the F10 - Audio Settings to select your USB microphone, then you can't hear sound from FL Studio and if you select your audio device you can't record your microphone. As most audio device drivers only support one audio device, you can select either to your USB microphone or audio interface but not both. You need both!
- The solution Windows: FL Studio ASIO or ASIO4ALL allow you to select independent input and output audio devices within the same audio device driver. After these steps you can review the normal recording procedure.
- The solution macOS: Create an Aggregate Audio Device to includes the input from your USB Mic and Outputs from your regular audio interface. After these steps you can review the normal recording procedure.
NOTE: While there is no technical reason for a USB microphone to be inferior to a traditional analog-output microphone, USB mics can compromise your positioning, routing and monitoring options. If you haven't purchased a mic yet, we recommend using a traditional analog mic connected to FL Studio through a external audio device for the widest compatibility and utility in the studio. This includes longer cable runs, direct monitoring (although some USB mics feature this, so look for it) and the option to use the highest quality microphones and mic preamps.
Using a USB Microphone or Headset
Note about latency: USB microphones generally only allow you to hear the sound being recorded after it has passed through FL Studio. Some USB microphones do have a headphone jack and can operate as an audio output device. If this is not the case, the latency of USB microphones depends on the Buffer Length setting. There can be a troublesome delay between the sound made and it being reproduced from your speakers or headphones. For example, low latency monitoring is particularly important to vocalists as high latencies cause a distracting echo effect. The only solution to this problem is to lower your buffer length settings (there are limits), disable the Mics send-to-Master Mixer track or obtain a new audio device with Direct Monitoring.
Windows: FL Studio ASIO
Use the FL Studio ASIO driver if you want to record a single USB input. If you need to record multiple input devices simultaneously, use ASIO4ALL (next section below).
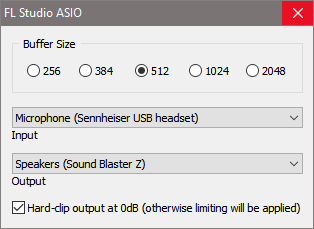
- Open FL Studio ASIO driver:

- select your USB mic on the Input field and your Audio Interface on the Output field.
NOTE: If you don't see your audio devices listed, you may need to set up the default Windows Input/Output devices as shown here.
- Set the Latency to 512 ms OR less. Usually lower is better.
- Success? If you have set the input correctly, your USB microphone should appear as an Mixer IN option on any selected Mixer track, while the audio out from the mixer (Master track) should be routed to your audio device, as usual.
- Return here to follow the normal recording procedure.
Windows: ASIO4ALL
ASIO4ALL is a 3rd party audio driver. Not all audio devices are compatible with it, but most are. The aim is to set your USB mic as the ASIO input device and your audio device as the ASIO output device. ASIO4ALL has the advantage, over FL Studio ASIO, of allowing you to all input and output devices detected by Windows. Activated devices will show on the Mixer INPUT menu. You can even record from several different input devices at the same time on separate Mixer tracks.
- ASIO4ALL - The default FL Studio installation includes ASIO4ALL, if not, Download ASIO4ALL here and install it.
- Select the ASIO4ALL driver - In FL Studio press F10 to open the Settings window and open the audio settings options. Select 'ASIO4ALL v2' in the Output window.
- Open the ASIO4ALL driver settings - Click on 'Show ASIO Panel' in the 'ASIO properties' section to open the ASIO4ALL driver window.

- Select the 'Advanced' options - ASIO4ALL should open in Advanced mode (as shown below) if not, click on the Spanner in the lower right of the window to change between modes.

NOTE: If any of the inputs/outputs of the devices in the 'WDM Device List' have
 against them, it means they are unavailable.
 means beyond logic. See the ASIO4ALL System Settings page for details on
troubleshooting ASIO4ALL input/output issues.
means beyond logic. See the ASIO4ALL System Settings page for details on
troubleshooting ASIO4ALL input/output issues.
- Select the input (ASIO mic) and output devices (your regular audio device) - In the example above the host PC has a Scarlett 6i6 Soundblaster Z and a Sennheiser USB Headset (with mic), your options will probably differ. Enable all the devices you wish to use (at the highest level in the list) and then expand the options for each device by clicking on the [+] tree-view symbol to the left of each device name. You must (at least) ensure that the input associated with your USB Microphone/Headset and the output on your audio device are both enabled. In the picture shown above, the lighted blue buttons and arrows show the active devices and active inputs/outputs. Disabling unused inputs/outputs is not necessary, but it will simplify the number of options that appear in the Mixer input / output menus. If you are unsure what input you need, just make sure all inputs and outputs are enabled at all levels.
- Success? If you have set ASIO4ALL correctly, your USB microphone should appear as an Mixer IN option on any selected Mixer track, while the audio out from the mixer (Master track) should be routed to your audio device, as usual.
- Return here to follow the normal recording procedure.
macOS: Aggregated Device
An Aggregate Device lets you use audio inputs and outputs from different devices at the same time (this is not possible in macOS by default). For example, you can use a USB microphone for input and Bluetooth headphones for output.
NOTE: Aggregating a single Audio Interface can also fix issues with crackling, especially when recording. Make sure the sample rate set below (Step 3) and FL Studio (Step 7) match.
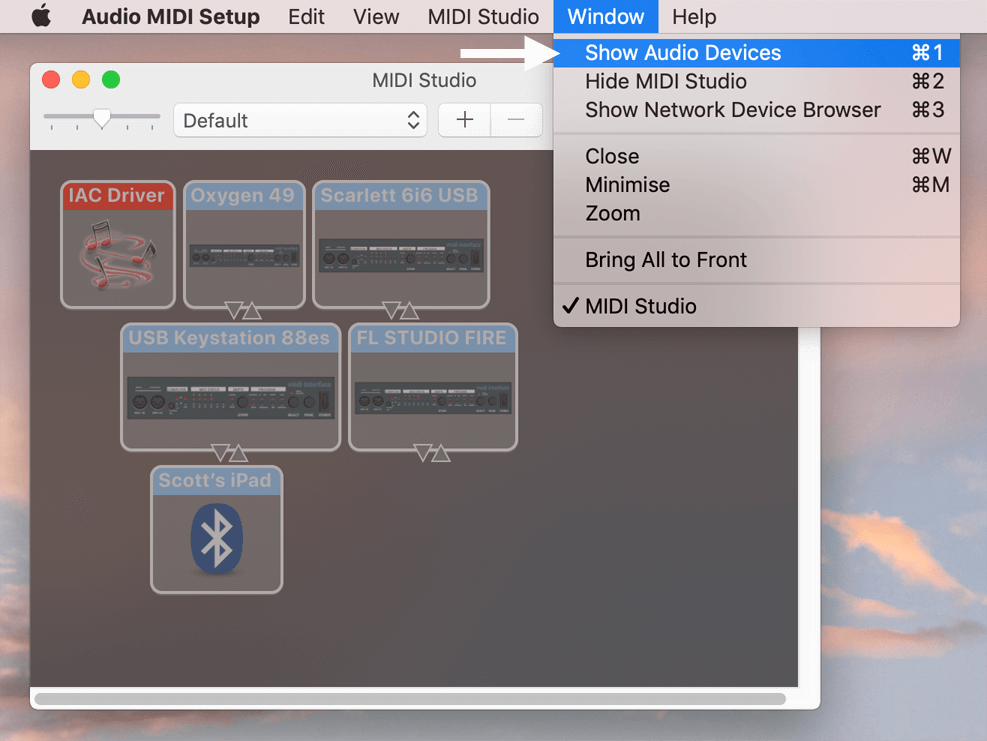
- From the Finder, search 'Utilities'. Open the folder and then the application 'Audio MIDI Setup'
If you don't see this window, select Window > Show Audio Devices. The one showing below is 'MIDI Studio'.
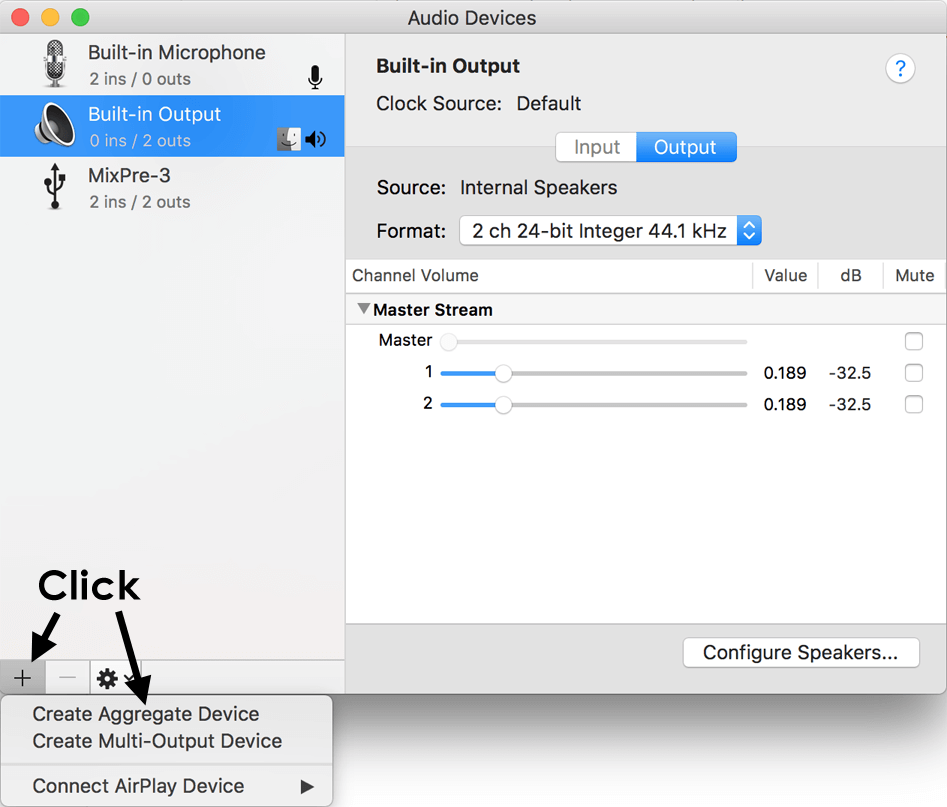
- At the bottom-left corner of the Audio Devices window, click the '+' to add a new device
- Select 'Create Aggregate Device'
- In the list of devices, on the left-hand side of the window, there will be a new 'Aggregate Device' option. Click it.
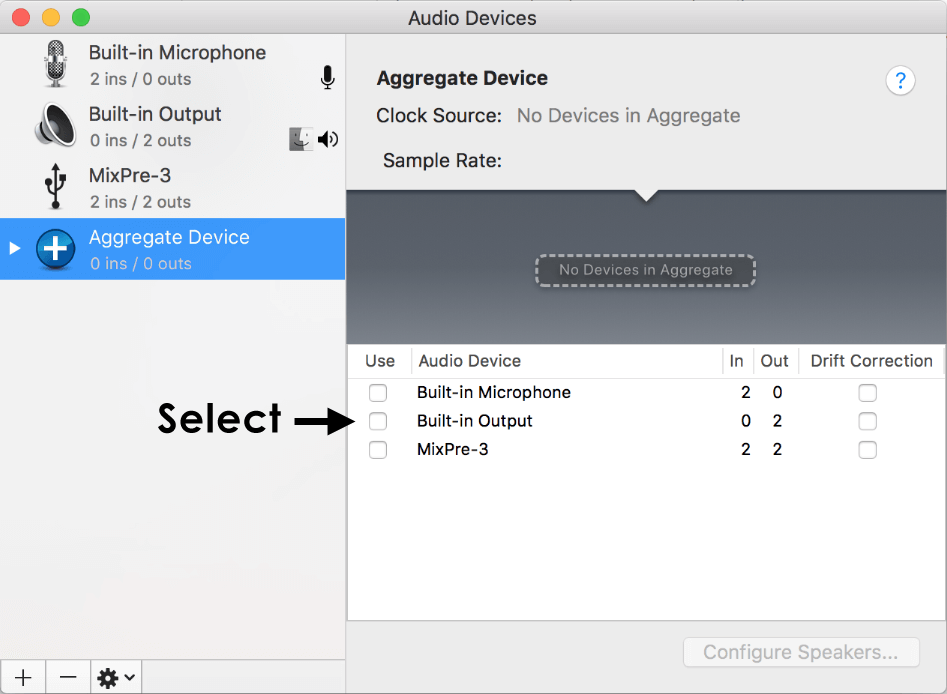
- On the right side of the window, in the 'Use' column, click each device you want in the Aggregated Device. For example your Audio Interface and USB Mic. If you are Aggregating to improve FL Studio performance or stability, then feel free to select all the devices in the list. Renaming (Optional) - Click the Inputs/Outputs above in the subdevices section to rename them.

NOTE: For full details on the options here, see this Apple Support Page.
- macOS microphone permissions - From macOS 10.14 (Mojave) onward, FL Studio must have permission to access your microphone. Open 'System Preferences > Security & Privacy > Microphone'. Enable microphone access for FL Studio.
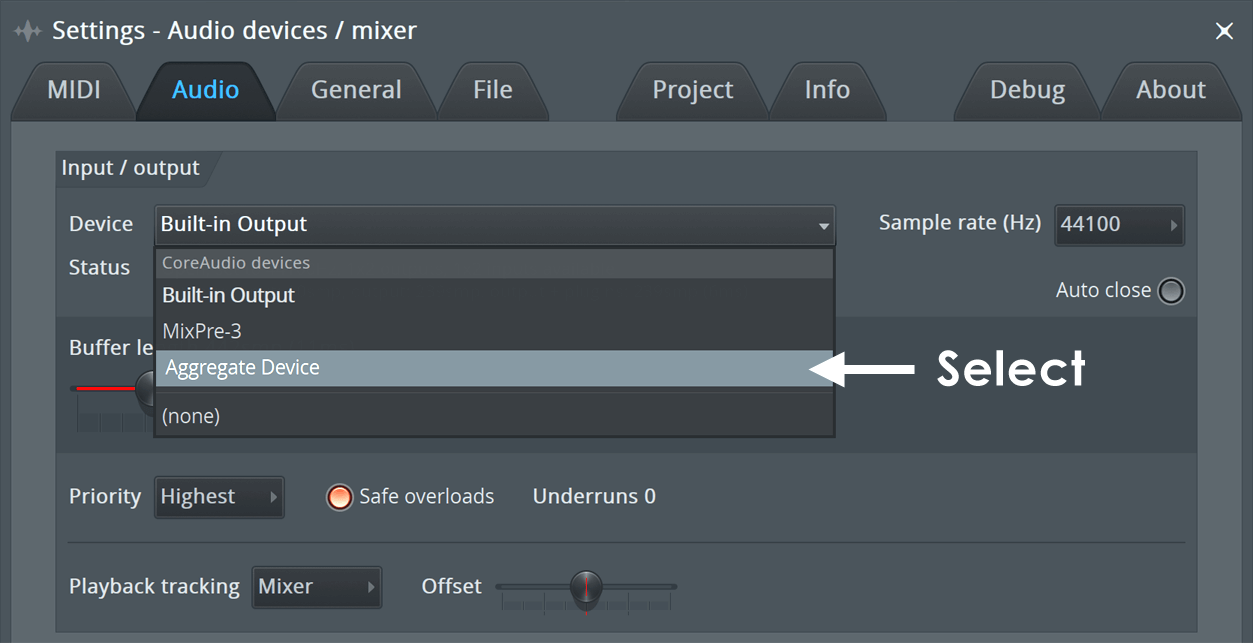
- Switch to FL Studio.
- Options > Audio Settings > Device > select your new 'Aggregate Device'
- Open the FL Studio Mixer
- Select the Master Track.
- At the bottom of the Master Track Properties panel, select the Outputs you want from your Audio Interface inside the Aggregate Device.
- To use your Mic, select an Insert Mixer Track Properties. At the top, select the Input drop-down menu and choose the mic input from your Aggregate Device (renaming your Mic USB Mic helps here).
- Return here to follow the normal recording procedure.
NOTE: The highest latency of the selected devices will be used by the aggregated driver.