FL Studio Mobile
FL Studio Mobile - Home Panel Settings
The Home Panel contains administrative settings grouped according to the SONGS, SETTINGS, SHOP and SHARE tabs.
Parameters
Tap Home (Button) > Settings to access the following:
NOTE: Not all features are available on all operating systems.
SETTINGS
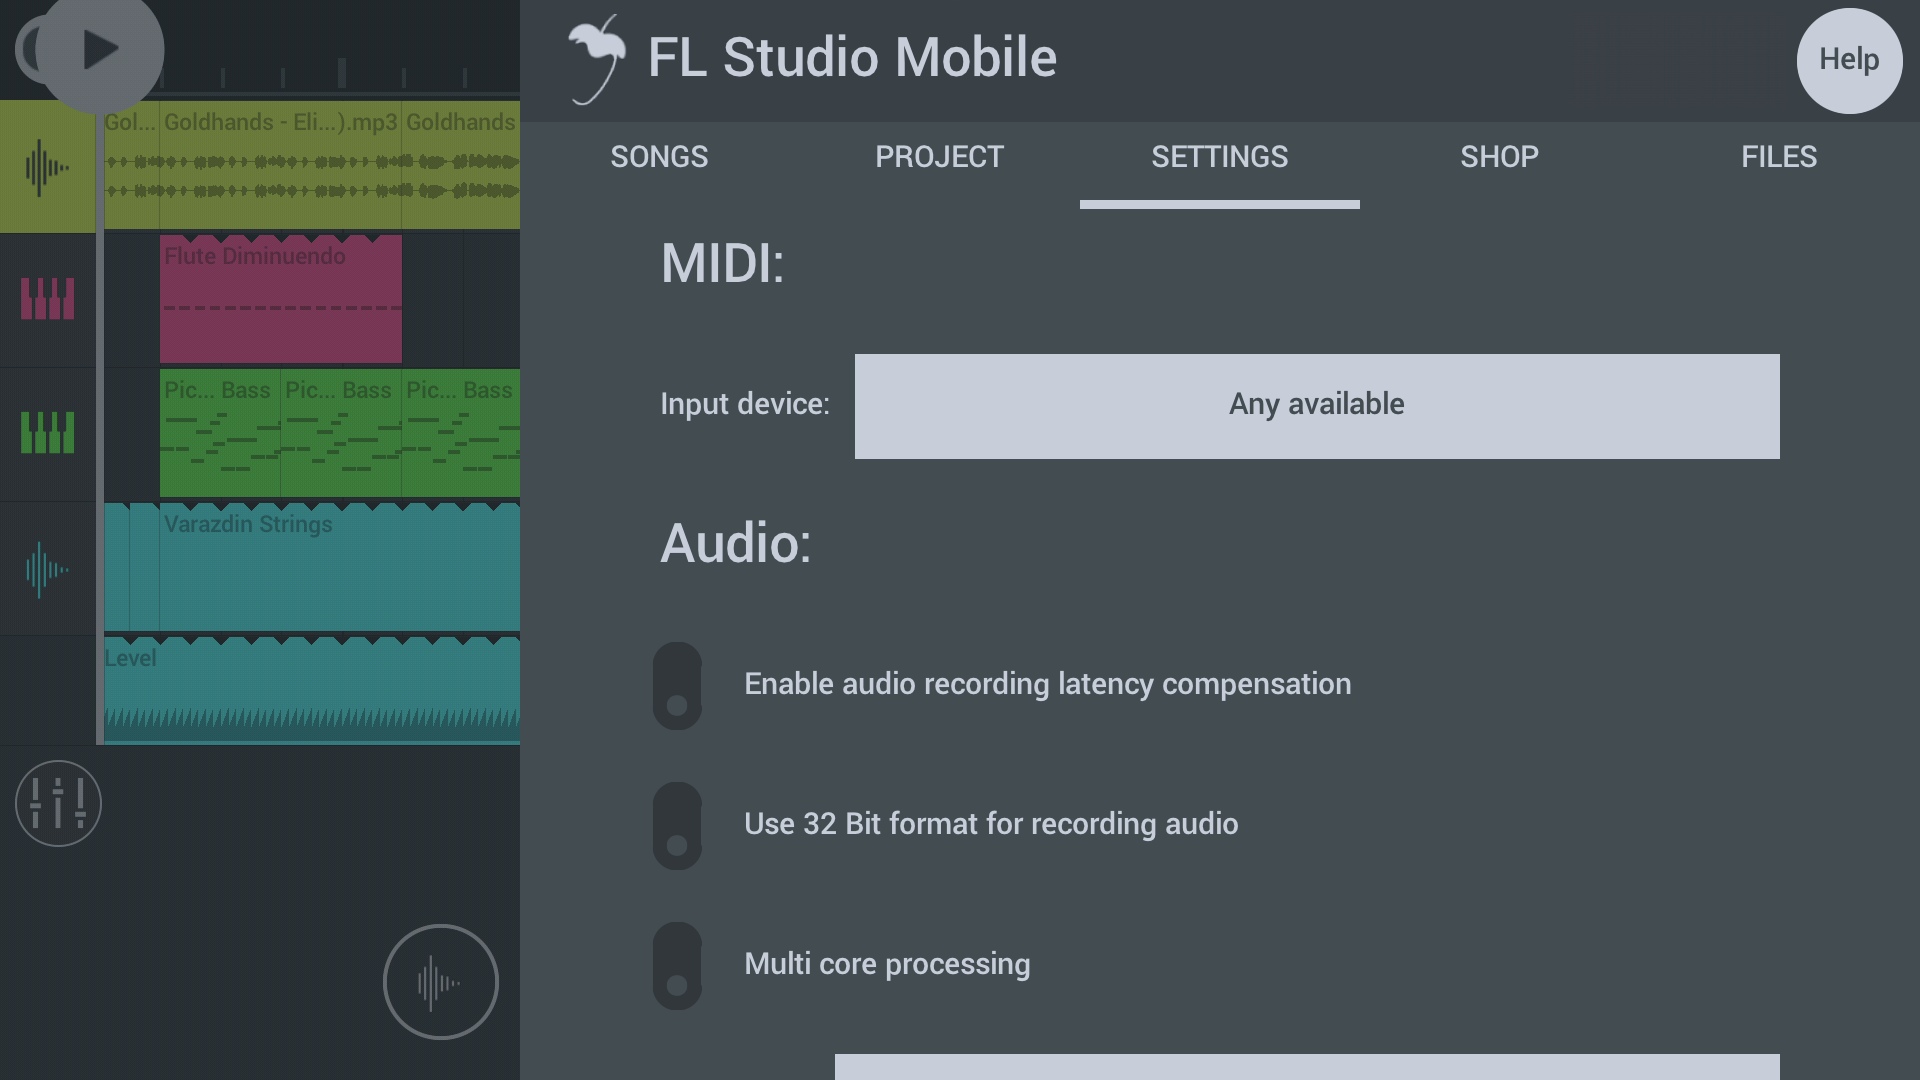
MIDI
- MIDI Device - When a external MIDI device is detected you can tap the button to use it. MIDI controllers will play instruments in the selected Playlist track.
- Scan Bluetooth MIDI devices - Select this to connect to Bluetooth MIDI devices. Afterward they will be available in the MIDI Device list above the Bluetooth scan control. On Android this will open a Location Access permission. Location Access permission. This is required by Google (See 'LE Beacons note), as it's possible to guess your location from nearby Bluetooth devices. We ONLY use Bluetooth for MIDI keyboards and we DO NOT try to guess your location or send any data to our servers
NOTE: For more information on working with MIDI Controllers on mobile devices see here.
Audio
- Recording Source - Select the audio input, when multiple inputs are available. On mobile devices with stereo microphones you will see 'Recording Source Stereo' and the option to select the Left or Right Channel (Mic). This is sometimes necessary when one mic is inferior to the other. This can happen if a mic is designed primarily used for noise-cancellation duties and not capturing the voice. When an Audio Interface is connected (on mobile devices, via adapters), other input options will be available. You may need to try them all to find the input you are looking for, if they are not explicitly and correctly identified. Input options on iOS also includes Audiobus inputs.
- Enable audio recording latency compensation - Ensures recorded audio is correctly aligned with the Playlist. For example, if you record the sound of FL Studio Mobile playing it's own kick track, latency calibration will ensure the kick recorded from the microphone is tightly aligned with the sequenced kick. This is necessary because on mobile devices there is usually a significant delay between the time when a sound was generated in the Playlist, to when it is audible from the speakers. This device audio latency is usually between 40 and 200 ms. If you are singing or playing in-time with the live audio, you are actually performing between 40 to 200 ms behind the sequenced events making the sound. Without latency compensation recordings made in time with live output will lag behind the internal sequencing. The compensation process removes a slice of audio, equal to the detected round-trip audio delay, from the start of the recording. This is the most accurate method to calibrate device latency.
Calibrate - Aligns externally recorded audio with the correct Playlist position. To perform a calibration, FL Studio Mobile will try to record it's own output. The process measures the output-to-input delay by recording a single 'beep' sound and comparing where it ends up relative to the Playlist where it was initiated. NOTE: Not necessary on iOS devices.
- Using an internal microphone - 1. Seek a quiet location. 2. Disconnect headphones. 3 Turn up the volume to around 80-100% 4. Tap Calibrate.
- Using an external microphone - 1. Seek a quiet location. 2. Turn up the volume to around 50%. 3. Hold the mic close to a speaker or against one of your headphone speakers. 4. Tap Calibrate.
If the calibration fails - This usually means the calibration beep was not detected. Troubleshooting:
- Turn up the volume.
- Do not to move, bump or scuff your device while calibrating.
- Do you know where the microphone is located on your device and is it is free and clear to receive audio (remove any covers from your device for example).
- Is as quiet as possible when you tap Calibrate. This won't work on a bus! :)
- If you are using a multi-input Audio Interface does the Input selector match the microphone you are using.
- Use 32 Bit format for recording audio (OS dependent) - Switches from 16 Bit wav to 32 Bit floating-point wav files for all created, .wav format, audio files. NOTE: This format preserves the highest quality when post-processing the audio in another application such as FL Studio for the PC. Only use 32 Bit when you have a specific reason to do so. If you are not sure, use 16 Bit. 32 Bit .wav won't work in many consumer-level media players.
- Enable background audio (iOS) - Allows the App to play when minimized.
- Multi core processing - This is a CPU option to reduce audio glitches and or crackling. Multi-core ON may actually be worse than OFF depending on the device used. Try both positions.
- Enable low latency mode - Tries to provide the lowest audio latency to improve touch-to-audio responsiveness. This may result in CPU overload or crackling on some systems. NOTE: Applies to Android 'Native' and Windows 'Multitrack' 'Sound mode' only. See below:
- Sound mode (Android) - This is an audio-engine option to reduce audio glitches and or crackling:
- Fast - Lowest latency for devices that can handle this setting. Latency is the delay between tapping on the Keyboard and hearing sound.
- Safe - Can reduce audio glitching at the expense of increased latency.
- Ultrasafe - Longest latency, but has the widest compatibility with devices.
- Native - Lowest latency using the latest audio protocols (Oboe). Recommended for all devices running Android 9 and up. Works with 'Low latency mode' (see above).
Android Troubleshooting: There are two options relating to audio performance, Multi core processing and Sound mode. Together these give 8 possible combinations. Try them all and see if any combination solves your issues: ON/FAST, ON/SAFE, ON/ULTRASAFE & ON/NATIVE or OFF/FAST, OFF/SAFE, OFF/ULTRASAFE & OFF/NATIVE.
- Sound mode (Windows) - This mode will determine if Multitrack audio recording is available:
- Standard - General purpose sound mode with the widest compatibility with audio devices.
- Multitrack - Allows multiple inputs to be selected in the recording input section. Works with 'Low latency mode' (see above).
Application
- Metronome level - Adjust metronome level. The Metronome is accessed from the TMP button on the Transport Panel.
- Enable multitrack recording - When the device has multiple Audio Inputs. This allows recording more than one input at a time.
- Enable count-in when recording - Select to skip the metronome count-in when recording.
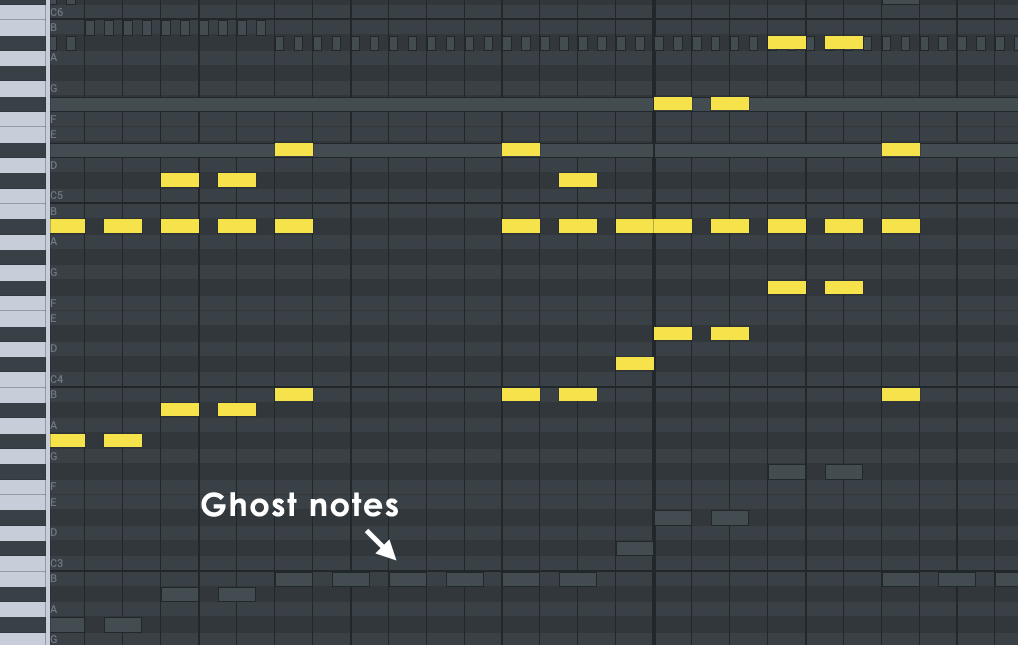
- Enable ghost notes - These are 'shadow' notes from other Clips playing at the same time location in the Playlist. Use them as a guide to write scores in key with other Clips, already in use.
- Enable sharing files with nearby devices - Activates WiFi File Sharing on the FILES tab. Normally you can leave this on. It means FL Studio Mobile will poll the network periodically to see if other instances are in use on other devices. When they are, they will appear as destination options for your data. NOTE: When connecting to desktop operating systems (Windows/OS X/macOS) you may see a security pop-up for your firewall. Allow FL Studio Mobile access.
- Set middle C to C4 - When deselected middle C is C5. As there is no standard for note octaves C4 and C5 may be the same pitch in different DAW software. Choose the octave numbering system you prefer.
User Interface
- Theme - Choose alternative color schemes.
- Scaling - Change the size of the controls to better suit your use-case or device. NOTE: You must restart FL Studio Mobile for this setting to take effect. Troubleshooting: If a scaling option makes the UI unusable, delete the uiscale file located in ..\FLM User Files.
- Continuous scrolling during playback - The Playlist will scroll to keep the Playhead in view.
- Show key names on keyboard - Shows the note names (C, D, E, F, G, A and B) on the on-screen Keyboard.
- Show CPU and RAM meters - Shows a CPU meter (lower-right) on Playlist transport bar. Long-tap the meter to show the full analysis including:
- Utilization - Realtime audio is generated in short segments known as 'buffers' (about 5-20 ms in length depending on your settings). When you press play, no sound is heard until the first audio-buffer is generated and work starts on the second buffer. In other words, you are always listening to audio created 1 buffer in the past. The meter shows the percentage of time required to fill each audio buffer, compared to the buffers length. For example; 20% means it took 20% of the time available to fill the buffer. For a 20 ms buffer that would mean it took 4 ms to fill the buffer with audio. 90% means it took 90% of the time available to fill the buffer (18 ms for a 20 ms buffer). Very close to running out of time! Once it takes more time to fill a buffer than is available, there will be gaps in the audio because the next buffer of audio is not ready in time. When this happens you hear audio glitches or stuttering. This is known as a buffer 'underrun' (see below).
- Peak - When this meter reaches 100% the meter will turn red and the audio output will glitch or crackle.
- Underruns - Records how many times the audio buffer ran out of audio. This is usually heard as a glitch, stuttering or crackling in the audio. See here for some options you can use to improve audio performance. For Android there are some additional Troubleshooting options that can reduce underruns. NOTE: Some underruns are normal during startup and are not a problem. If you are on
- Show scale keys on keyboard - When the Keyboard is not scale locked, will highlight the keys in the scale. Out of scale keys are grayed out.
- Show range labels on keyboard - If an instrument module reports an active Keyboard range, this is indicated with colored lines bounding the highest and lowest keys with playable samples (e.g. Slicer). When multiple instances of the Module are in the Rack this option shows number tabs on the Keyboard to indicate which range is related to which Module. Numbered: #1, 2, 3 ..., according to the order in the Rack.
Advanced
- Enable developer log - Technical support may ask you to enable this and send in the results if you are reporting bugs.
- Restore demo songs - The Demo songs can be deleted. Use this to restore them. In some cases they also may not show on installation, here too you can use this to restore them.
- Restore default settings - Set everything listed above to the default installation state.