FL Studio Mobile
Comb Filter
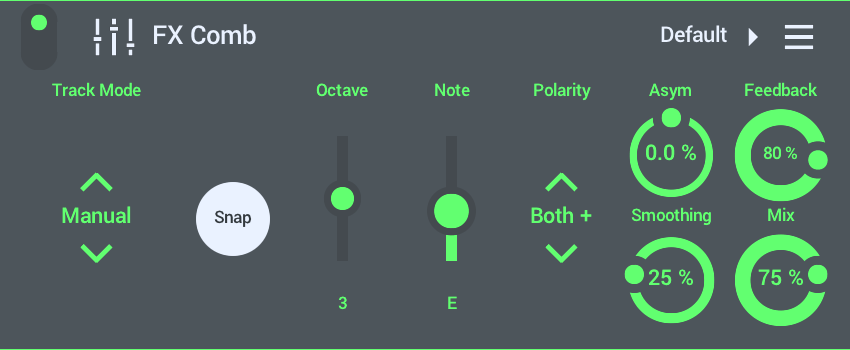
A comb filter effect created by mixing a delayed copy of the input signal with itself. This causes constructive and destructive interference depending on where the waveforms add or subtract relative to each other. If the delay is short and is modulated a 'flanging' or 'phasing' sound is created (e.g, Set 'Tracking' - Manual, 'Snap' - off and change the 'Frequency' value). The Comb Filter in FL Studio Mobile also includes the ability to link the delay to the Pitch of the incoming audio, or lowest MIDI note. Comb filters are used to create many of the bass heavy sounds you may hear in Drum and Bass, Dubstep or EDM to create 'metallic', 'resonant' or 'rubbery' sounding textures.
To load presets tap the 'Default' (upper right) and choose from the Presets List.
Parameters
- Track Mode - Choose how the feedback Delay is set (or Tracked). A note about how Delay can have a 'Pitch'. Normally a Comb filter uses a very short (a few ms) delay of fixed duration. This creates notches in the frequency response. If you modulate a very short delay, by a small amount, the notches move and create the classic 'phaser' sound. However, if you use a longer delay, and with high feedback, the delay itself starts to 'ring' or 'resonate' with its own pitch. If you lock this pitch to match the incoming audio's pitch, you can create a unique rubbery and or resonant sound. This is the purpose of the extra 'Track Mode' controls:
- Manual - Delay is set by the Frequency slider (appears when this option is selected).
- Snap - When selected the delay's resonant 'Frequency' (or pitch) will snap to the newly appearing 'Octave' and 'Note' controls.
- MIDI Note - The delay frequency is set by the last detected, lowest, Piano roll or MIDI Note. When selected an 'Octave' slider allows you to set the octave of the delays pitch.
- Audio Pitch - The delay frequency is set by the last detected pitch from incoming audio. When selected an 'Octave' slider allows you to set the octave offset for the delay frequency. NOTE: This won't work with polyphonic and percussive audio. It requires a monophonic and clearly pitched input. Normally use 'Lowest MIDI Note'.
- Manual - Delay is set by the Frequency slider (appears when this option is selected).
- Polarity - Choose to invert the Left, Right or Both Channels of the delayed feedback signal. 'Left' & 'Right' will create a wider stereo effect. 'Both' creates a slightly more dissonant and gritty sound.
- Asym (Asymmetry) - Will slightly detune the Left Channels' delay time vs the right. This creates a stereo / unison-like effect. The detune kept within a whole tone at the most.
- Feedback - The level of the delayed signal fed back into the delay loop. Higher settings cause a resonant or 'ringing' effect.
- Smoothing - Rate at which pitch tracking will apply from 0% (instant) to 100% (slow) changes. 100% Smoothing creates a portamento (pitch glides) between notes.
- Mix - From 0% (Dry) to 100% (FX).
Use Cases
Comb filters are used to create many of the bass heavy sounds you may hear in Drum and Bass, Dubstep or EDM. They can make dull or dry signals sound metallic or industrial.