FL Studio Mobile
Channel Rack
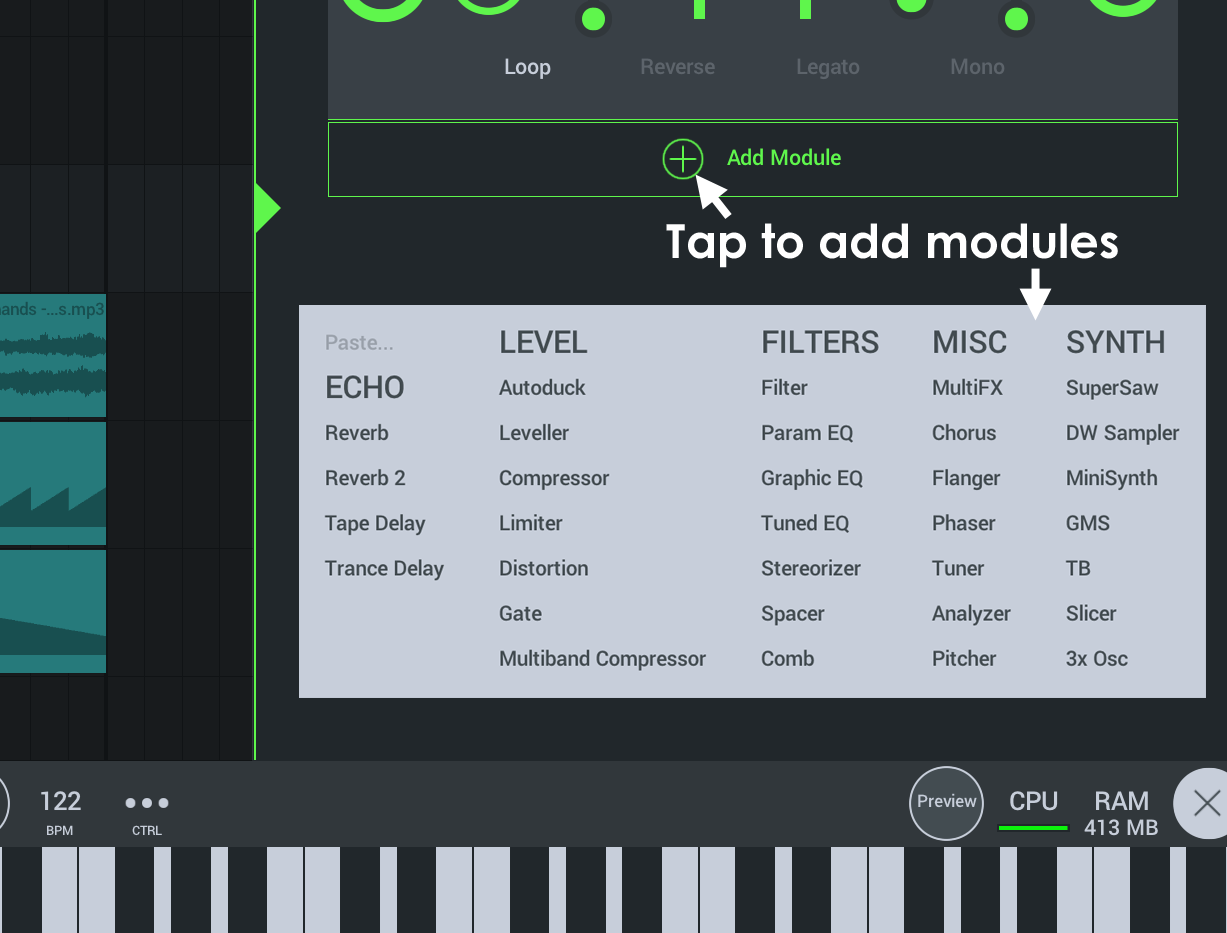
Each Playlist track has its own 'Channel Rack'. This holds the Instruments and Effect plugins for that Playlist Track. Rack modules stack and you can use both instrument AND effects modules.
Channel Rack
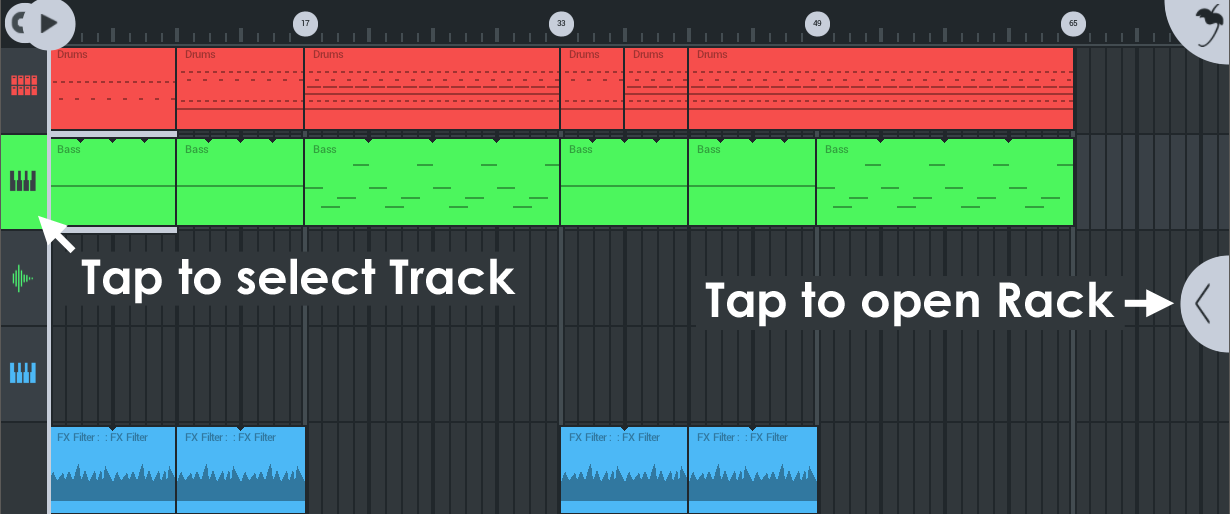
To open the Channel Rack, select the Track in the Playlist then tap the Channel Rack open control on the right side of the Playlist.
- Channels - There are three main types of Playlist Channels, Instrument (the Channel Rack will hold both instruments and FX modules), Audio and FX (the Channel Rack for these last two holds only FX modules).
- Processing order - The order of the instruments and effects in the rack determines processing order (top first, bottom last). For example; If you load DirectWave > Distortion > MiniSynth > Reverb. The Playlist Pattern Clips will play both DirectWave + MiniSynth together. However, DirectWave will pass through the Distortion + Reverb effects, while MiniSynth will have only Reverb effect.
You can also create FX Racks for grouped sub-mixes. See Audio Routing below.
Working With Plugin Modules
Plugins have two menu items on the upper right, as shown below. The left menu allows you to open presets. The right menu allows you to reorder, copy and delete plugin modules.
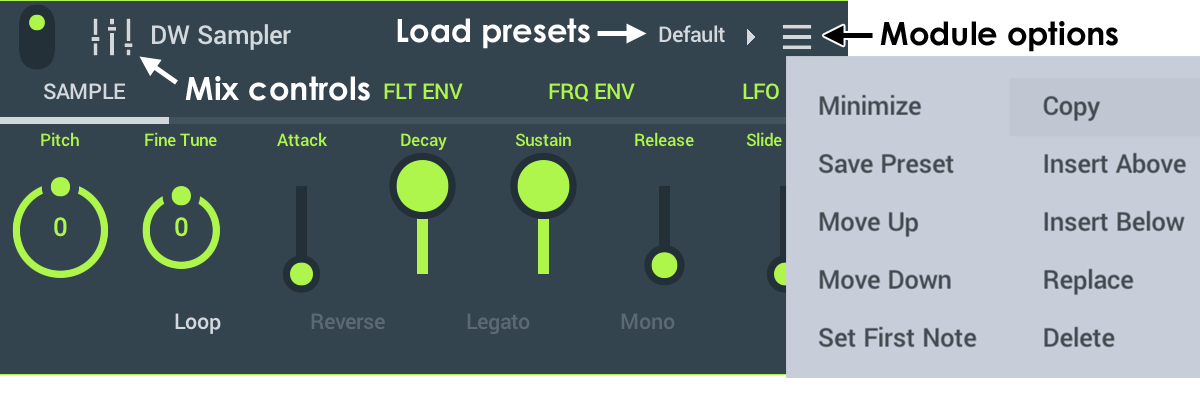
- Module menu options: Depends on the module loaded which options are available.
- Minimize - Collapse the height of the Module. When a Module is minimized, this item will show 'Maximize'.
- Save Preset - Save the current settings as a preset.
- Move Up - Moves the position of the Module up 1 position.
- Move Down - Moves the position of the Module down 1 position
- Set first note (Slicer) - Sets the lowest key on the Keyboard Range that the module will play on.
- Set Range - Sets the Keyboard Range the module will respond to. Select the option then play the Lower and Upper notes of the range the module should respond to.
- Copy - Copy the Module including the selected preset. NOTE: To copy and paste a module, from one rack to another, open the Module menu, tap Copy, then select the new Rack and use the (+) button at the bottom and use Paste.
- Insert Above - Add a Module above the selected one.
- Insert Below - Add a Module below the selected one.
- Replace - Swap in a replacement module.
- Delete - Remove the module.
- Mix options
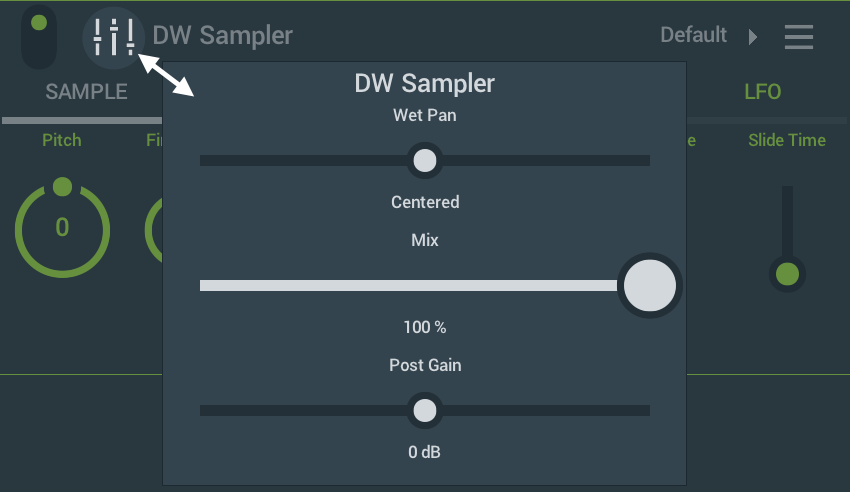
NOTE: If these settings are at their default (100% Mix, 0 dB Post Gain), the icon will be gray (shown above). If the settings have been changed from the default, the icon will indicate by matching the Channel Rack color.
- Wet Pan - When panned left, the Left channel is Wet (100% effect) and the Right channel is Dry (no effect) and vice versa. This allows for advanced Mid/Side effect chains to be created.
- Mix - The level of the audio from the selected Module. This does not affect audio from Modules prior to the selected Module.
- Post Gain - The level of all audio prior to and including the selected Module.
Instrument Modules
There are 5 instruments and one drum sampler:
- 3x Osc - Is a our most powerful 3 x Oscillator, subtractive synthesizer for Mobile. Presets from the Desktop Version are compatible.
- DirectWave - This is a multi-sample based player. It can load DirectWave (FL Studio PC format) .dwp files. This is also how you can access your purchased sample-based instruments and custom samples/instruments.
- MiniSynth - MiniSynth is a fully featured synthesizer with a low processor overhead and great sound. Load the presets or create your own sounds from scratch. There are 6 tabs covering the synthesizer controls.
- Slicer - Slice audio files and play them from the Piano roll. This is a specialized sample playback instrument specifically designed to work with percussion and other loop files.
- GMS (Groove Machine Synth) - Additional purchase, see the Shop page. Groove Machine Synth is a multitimbral hybrid synthesizer & FX channel from the FL Studio (PC), Groove Machine plugin.
- Transistor Bass - Additional purchase, see the Shop page. Transistor bass is a monophonic bass-line style synth for creating resonant-style basslines and leads.
- Drum Sampler - While not an instrument that you can load in the rack, there is a Drum Sampler Playlist Track type. This holds the Step Sequencer and a multi-channel drum sample player.
Effect Modules
There are many effects available to you. NOTE: To save CPU load, and where you want the effect to apply to all tracks, rather than putting the same effect on every track, add a single effect to the Master FX track. All audio passes though this final track.
- Analyzer - Visualize your audio including the Frequency Spectrum, Waveforms (Scope), Loudness (according to various standards), Stereo imaging and Pitch.
- Autoduck - Ducking is a form of automated volume dipping. Use this to create 'sidechain' style effects.
- Pitcher - Real-time pitch-correction, manipulation module that can correct pitch errors in recorded audio or create special effects.
- Chorus - Chorus creates a thicker/lusher sound by detuning multiple voices within the sound.
- Comb - Comb Filter will pitch-tracking for additional creative effects.
- Compressor - Compression is a form of (very fast) automated volume control that reduces the difference between loud and soft sounds. That is, the difference in level between the peaks and troughs of the audio waveform. When the input signal exceeds the threshold the gain, or rate at which the signal level is allowed to increase, is reduced. In other words, the waveform amplitude is 'compressed'.
- Distortion - The amplifier simulates distortion type 'overdrive' typical of guitar amplifiers. It allows high-overdrive even if a track's volume is quiet.
- Equalizer (Parametric) - Equalizing is the process of increasing or decreasing the loudness of specific frequencies. An advanced 4-Band parametric equalizer. The Band type (shape), center frequency and width of each Band are fully adjustable. You can choose from: High Shelf, Low Shelf and Peaking.
- Filter - Filters are similar to Equalizers, however they are designed more for creative (automated) effects. Sweeping a filter-cutoff frequency is a very common technique used in electronic dance music (EDM).
- Flanger - Similar to the Chorus effect Flanging allows you to enrich the stereo panorama of your mix.
- Gate - Automated on/off-style volume envelope with control over opening and closing dynamics, hold-open time and with the added advantage of separate (asynchronous) open and close threshold triggering.
- Graphic EQ - Equalizing is the process of increasing or decreasing the loudness of specific frequencies. This is an 8-band equalizer with sliders set to convenient frequency ranges for general equalizing duties.
- Tuned EQ - Equalizing is the process of increasing or decreasing the loudness of specific frequencies. This is an 8-band equalizer with the ability to center sliders on notes in the scale for general equalizing duties.
- IAA/Audiobus - Input/Output module for working with Inter App Audio and Audiobus (iOS only).
- Leveller - A precise volume control. Use leveller to monitor levels and to make precise changes to level and stereo panning.
- Limiter - Limiting is a form of heavy compression (generally used to describe compression ratios greater than 10:1). The purpose is to 'limit' the output level to a set maximum level, usually 0 dB, to avoid clipping in a final mix down. The Limiter can be used to maximize the level of a track dramatically, without introducing noticeable distortion and so limiting is a favorite effect used in mastering.
- Multi FX - Combines Delay, Reverb, Low Pass Filter, High-Pass Filter, Flanger, Phaser, Panner and Vox filter. These are controlled by and X/Y pad. Useful for combined-effects and automation.
- Multiband Compressor - Three-band mastering compression & dynamics processor.
- Parametric EQ - Allows the most accurate equalization of the loudness of specific frequencies in the sound by continuous frequency positioning of the bands.
- Phaser - Phasing modulates the relative phase of the dual-voice oscillators. Oscillator voices are delayed by different amounts, causing a moving frequency cancellation effect that you will recognize even if you don't really understand how it works ;)
- Reverb - Reverb simulates a room of a certain type (Hall/Canyon/Room) and size.
- Stereoizer - Stereoizer creates stereo effects from mono sources. Use it to create a 'wider' sounding mix.
- Spacer - Use Spacer to enhance the stereo image of mono input sounds. Use it to create a 'wider' sounding mix.
- Tape Delay - Delay is an echo style effect and is particularly effective for out-of-tempo experimental delay sounds.
- Trance Delay - Delay is an echo style effect and is particularly effective when played in sync with the main tempo of the track.
Routing Audio Between Racks
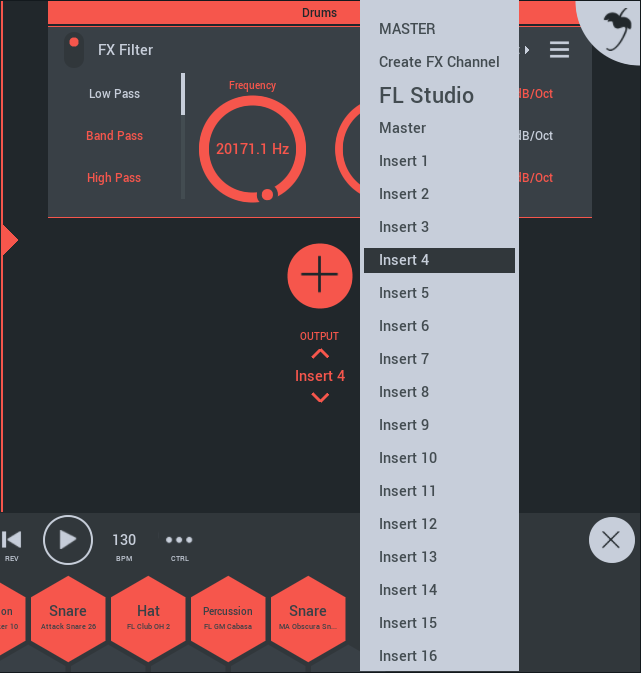
By default all Channel Racks are routed to the Master Effects Track. This is an audio-only track that you can only use effects in its Rack. Use the Output control, at the bottom of Channel Racks, to send audio from the selected Channel to any other Effects Channel in the project. You can also create new Effects Channels. Effects Channels are designed to process audio, so only Effects modules will be available to add to these Channel Racks from the (+) button. Use Effects Channels to create sub-mixes for grouped Effects processing.
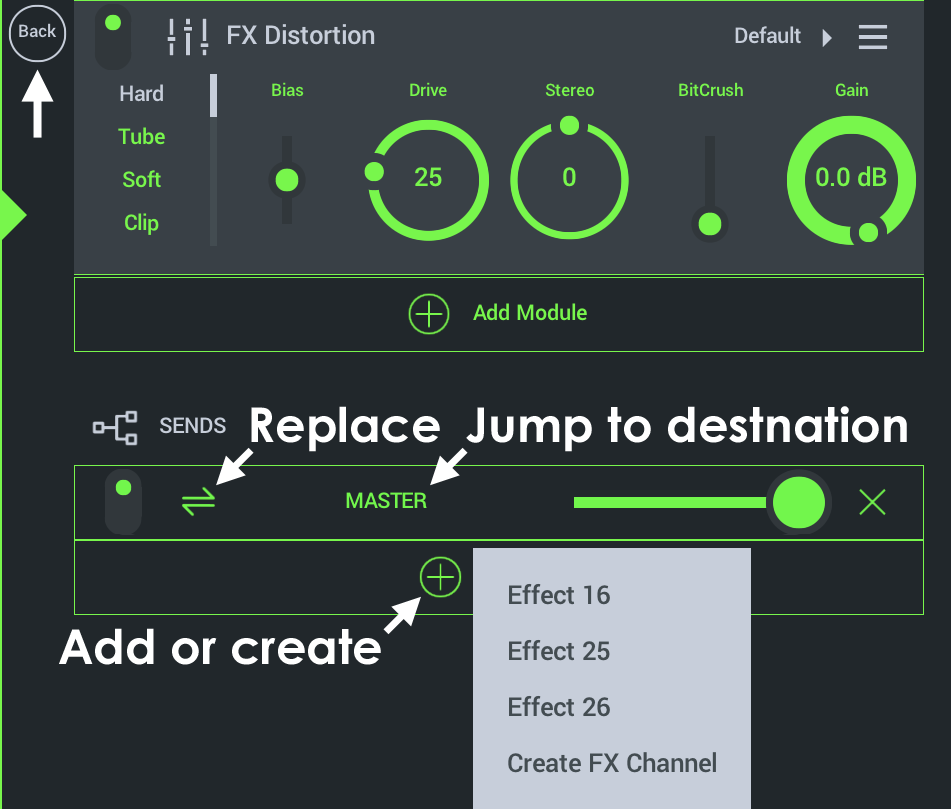
Tap the control below the Add Module button (+), to access:
- Send Controls - The following options are available on sends, left to right ...
- Mute switch - Deselect to disable the send.
- Add Send (Double-arrow icon) - Add an unused send. This will only show Sends that have not yet been added to the current Channel Rack plus the 'Create FX Channel' option (see below).
- Send name (Master and other sends) - Tap the send name to jump to the destination Rack. Note the Back button to jump back to the last visited Rack. The Master is always available, as it is added to all projects, by design.
- Add Send Button (+) - Options include:
- Create FX Channel - Adds an FX Channel to the Playlist. Load FX modules on an FX Channel, and route multiple tracks to it for group FX processing.
- Other sends - Select from an existing list of Effects Channels to add it to the selected Rack.
NOTE: You can chain FX chains by sending from one FX Channel to the next.
FL Studio Plugin Version Routing
When using FL Studio Mobile as a plugin in the desktop version of FL Studio, you can also choose to send any Racks output to any FL Studio Mixer track.