MIXING & EFFECTS
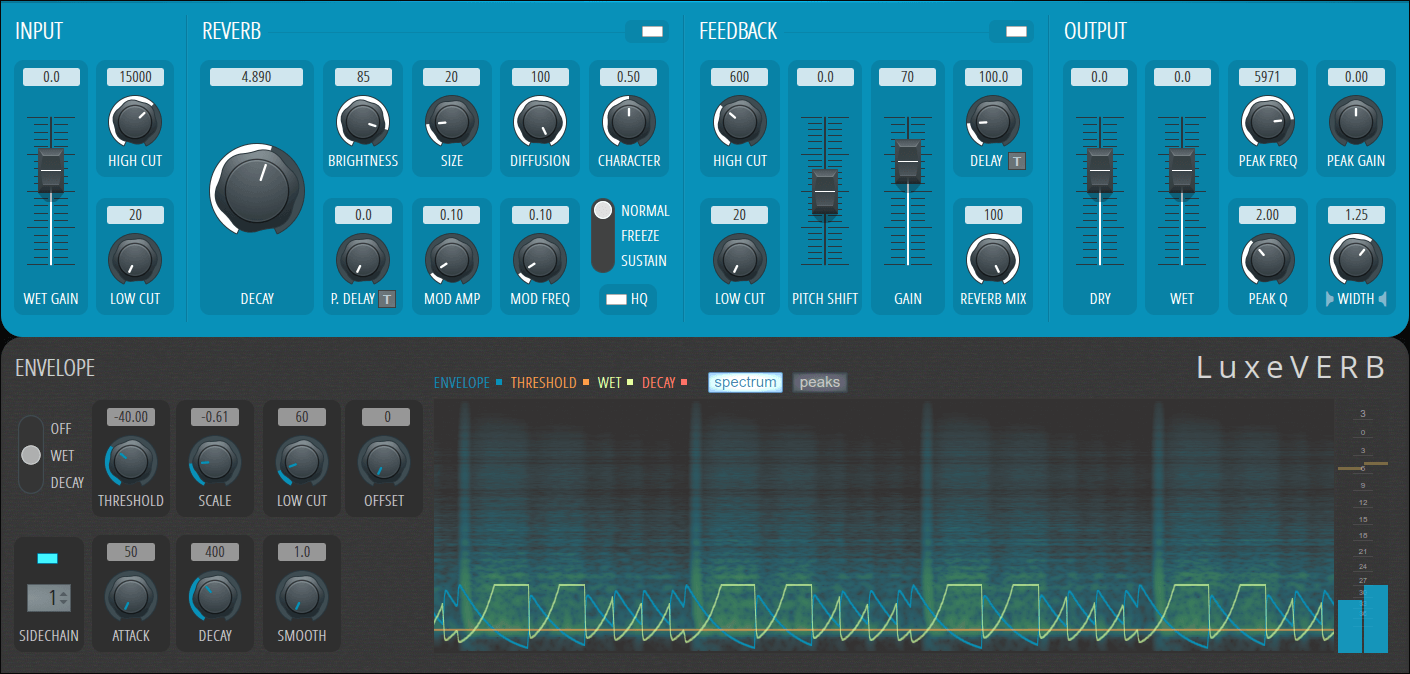
LuxeVerb 
LuxeVerb is an advanced algorithmic reverb with a luxurious and malleable sound that is capable of simulating realistic acoustic spaces of all sizes, mimicking electromechanical reverb devices, and creating 'otherworldly' reverb effects incorporating pitch shifting and automatic control of dynamics. Alternatives to LuxeVerb are Fruity Reeverb 2, Fruity Reeverb and Fruity Convolver.
NOTE: Drag vertically on the lower edge of the window to hide/show the Envelope and Display panel.
Parameters
Input
- Wet Gain - Level control for the input to the reverb path (wet signal chain). Great for 'Reverb throws' where you create bursts of reverb. NOTE: This control will flash red when the internal input limiter is triggered. This means the input signal is too loud & should be reduced by turning this control down.
- High Cut - Removes high frequencies being input to the reverb. Cutoff frequency in Hz. NOTE: This filter is included in feedback path (when Reverb Mix is used).
- Low Cut - Removes low frequencies being input to the reverb. Cutoff frequency in Hz. Generally used to avoid applying the reverb to the low frequencies of the signal, in order to avoid muddying up the mix. NOTE: This filter is included in feedback path (when Reverb Mix is used). It's particularly useful when pitching-down is used to remove low-frequencies to avoid excessive low frequency 'rumble'.
Reverb
Note the section LED switch, top-right, that can disable the Reverb section.
- Decay - Overall duration of reverb tail. Approximately in seconds to the -60 dB level.
- Brightness - Presence of high frequencies in the reverb tail. Set to 100% for the brightest sound (analogous to an acoustic space with hard surfaces), and reduce in order dampen the high frequencies (make the surfaces soft/absorbing in the space).
- Size - Spacing of the echo arrivals in the reverb response. While this corresponds to the overall dimensions of the hypothetical acoustic space, note that this control has no effect on the decay time of the reverb tail (which is controlled exclusively by Decay). Use small values (0 – 10) to simulate an electromechanical or plate-like response, moderate values (10 – 50) for a more 'acoustic' response, and large values (> 50) for cavernous and exaggerated responses
- Diffusion - Mixes in an more 'diffusers' before the reverb that break up the regularity and predictability of echoes. Analogous to putting furniture/objects into an acoustic space in order to scatter the sound. Use this to smooth out the early part of the reverb response, to avoid the presence of distinct echoes.
- Character - Determines the structure of the echoes that make up the reverb response. Set midway (0.5) for the smoothest and most diffuse reverb tail. Use smaller values (< 0.5) for a 'grittier' reverb, where individual echos are more prominent. Using larger values (> 0.5) causes the reverb arrivals to bunch up, creating a fuzzy-echo effect. NOTE: The overall effect of this control is more pronounced when the Size control is high.
- P.Delay (Pre Delay) - Overall pre-delay on the input to the reverb, in milliseconds.
- T - Tempo sync. Pre-delay will be tempo-synced, in steps.
- Mod Amp - Amplitude of modulation of delay line lengths in the reverb model. This control produces a chorus-like effect in the reverb tail. NOTE: The Character control has an effect on how noticeable the modulation is. Mots noticeable when Character is all the way down or all the way up, less noticeable when it's at 0.5.
- Mod Freq - Frequency of modulation of delay line lengths in reverb architecture. Using higher values will cause the modulation to be faster and more noticeable.
- Freeze Mode - Allows for infinite length reverb tails. Chose one of the three modes. TIP: This switch is intended for Automation. Keyboard Controller will allow you to trigger Freeze or Sustain from a Piano roll.
- Normal - Freeze Modes disabled, for a standard reverb decay.
- Freeze - Cuts the input to the reverb and sustains the sound at the moment Freeze was selected. The sound will sustain until Freeze is deselected.
- Sustain - Similar to Freeze, but the input to the reverb is left open, so the sound will continue to build, based on the input. signal.
- HQ (High Quality) - Toggles between interpolation modes. HQ On – Higher fidelity with more sustained high frequencies, at the expense of some additional CPU usage. HQ Off – Interpolation is grittier and the high frequencies die out more quickly. NOTE: The effect of HQ Off is more prominent when Freeze or Sustain are in use, since the high frequencies will slowly die out over time.
Feedback
The Feedback section includes a pitch shifter and various other tools for creating 'shimmer' and related reverberation effects. Feedback is injected into the signal chain after the Input Low / High Cut filters, pre-delay and diffusion step of the reverb (i.e. the part controlled by the Diffusion knob), but before the remainder of the reverb engine. The main components of the reverb engine are included in the feedback loop. NOTE: The section LED switch, top-right, that can disable the Feedback section to save CPU when feedback is not needed.
- High Cut - Removes high frequencies with the cutoff frequency in Hz. This is useful for keeping the output from getting too shrill when pitching up in the feedback path.
- Low Cut - Removes low frequencies with the cutoff frequency in Hz. This is useful for keeping the output from getting too boomy and muddy when pitching down in the feedback path. NOTE: The combined Low Cut and High Cut controls define the frequency band within which the feedback path operates, which can be useful for keeping the pitch-shifting effects from taking over the entire mix since they will eventually fall outside the set frequency 'band'.
- Pitch Shift - The reverb can be fed back into a delayed feedback loop with pitch-shifting, from -12 to +12 semitones. Using +12 results in ethereal rising sounds, 0 is a normal feedback signal, -12 sounds ominous and dark. Settings in between will vary between these two states. Think about how the set semitone shift will interact as the feedback builds (5 semitones will sound very different to 1 semitone).
- Gain - Amount of gain applied to feedback path. When set to 0, there is no feedback used. More is better! Until it isn't.
- Delay - Delay is applied to the output before being fed back into the loop. Works well with pitch-shifted signals (time is in ms or beats depending on the T setting).
- T - Tempo sync. Feedback will be delayed and tempo-synced, in steps.
- Reverb Mix - The mix of wet (reverberated) / dry (non-reverberated) feed back into the loop. The higher the mix (more wet), the more smoothed out the feedback signal will become over time as passes repeatedly through the reverb.
Output
- Dry - Output gain applied to dry (non-reverberated) signal (in dB).
- Wet - Output gain applied to wet (reverberated) signal (in dB).
- Peak Freq - Peaking filter center frequency, applied to wet signal at end of chain. Resonance frequency is in Hz.
- Peak Gain - Gain applied to wet signal at end of chain. Peak gain is in dB.
- Peak Q - Quality factor for the resonance of the peaking filter. Inversely related to the bandwidth of the resonance in octaves: setting to 1 results in an octave-wide peaking filter, setting to 2 results in a half-octave-wide filter, etc. The higher the value, the narrower the resonance (peak) of the filter.
- Width - Stereo width or separation of the wet signal. Set to 0 for a mono wet signal. 1.25 will give the default output of the reverb. While > 1.25 will widen the stereo effect of the wet output.
Envelope
The Envelope section allows you to modulate the Reverb > Decay or Output > Wet parameter based on the plugins dry input or a sidechain signal. Both modulation targets are intended to allow you to control how the reverb output decays or is modulated. Use this section to create 'Gated' or 'Sidechain' reverb sounds.
- Mode - Determines modulation destination for the output signal of the envelope follower:
- Off - Standard reverb behavior, no target modulation.
- Wet - The Output section > Wet level is modulated.
- Decay - The Reverb section > Decay time is modulated.
TIP: Modulations are relative to the set value of the Wet & Decay controls. Its normal to include adjustments of the target controls in conjunction with the Envelope section to achieve the exact sound you are looking for. Don't try to do it all with the Envelope.
- Side Chain (switch) - Toggles the sidechain input to the envelope follower. Right-click the control to directly select an Input Mixer Track. NOTE: Available sidechain inputs depend on the Mixer track sends to LuxeVerb's Mixer track.
- Threshold - Sets the threshold (in dB) above which the envelope signal causes modulation. similar to the way that a standard compressor works.
- Scale - Controls how much the input signal envelope as applied to the modulation target. Positive values lead to 'gated reverb', where the reverb tail bursts through or negative values that lead to 'sidechain reverb' where the reverb tail dips (or ducks). This is normally used to allow space for percussion to punch through.
- Low Cut - Applies a low-cut filter to the input of the envelope follower, in order to remove low frequencies. Cutoff frequency in Hz. Can be useful to have the Envelope follow transients which tend to be higher in frequency. Low frequencies can confuse the envelope follower, which this control can help to avoid.
- Offset - When set to 0, the modulation is mono-polar. If > 0 then the modulation is bipolar.
- Attack - Controls the attack time on the envelope follower. TIP: Normally leave this set to minimum.
- Decay - Controls the release time of the envelope follower. Smaller values lead to the target value (Wet or Decay) returning to the set value quickly after the input signal level decays, whereas larger values cause the envelope follower to slowly drift back down to the input signal amplitude level.
- Smooth - Smoothing applied to the envelope input signal (smoothing time in ms). Turn this up if you want to follow the general trend of the input signal level, rather than following all of the minor fluctuations.
- Display - Includes a range of analysis tools so you can better understand the processing including:
- Analysis envelopes: Curves corresponding to Wet or Decay will show depending on the position of the Mode switch (see above).
- Envelope (Blue) - Input signal envelope. This will either show the plugin's input signal, or the sidechain signal when the Sidechain switch is selected. Inspection of this curve is very useful for seeing the direct effect of the various envelope follower controls (Low Cut, Offset, Attack, Decay, and Smooth).
- Threshold (Orange) - Trigger level to start muldulating the Wet/Decay target. If the Envelope (Blue) curve never rises above the Threshold (Orange) line, there won't be an activation of Wet/Decay modulation.
- Wet (Green) - Envelope showing modulation of the Output > Wet setting. When there is no input the envelope will reflect the controls current value. NOTE: The Mode switch determines if Wet or Decay is modulated, and so which line is active in the display.
- Decay (Red) - Envelope showing modulation of the Reverb > Decay setting. When there is no input the envelope will reflect the controls current value. NOTE: The Mode switch determines if Decay or Wet is modulated, and so which line is active in the display.
- View mode - Plots a representation of the wet (reverberated) signal output of LuxeVerb underneath the analysis envelopes.
- Output peak meter - Far right. Includes peak-hold display.
- Analysis envelopes: Curves corresponding to Wet or Decay will show depending on the position of the Mode switch (see above).
Plugin Credits
Code: Kyle Spratt.
Code optimization: Daniel Schaack.
GUI: Miroslav Krajcovic.