INSTRUMENTS / GENERATORS
Pad Harmonics Tool
The Pad Harmonics Tool provides an interface for creating specialized 'pad' harmonic spectra for Ogun's Timbre equalization targets. Think of the Pad Harmonics Tool as a harmonic 'sculptor' that operates within a set of rules that improve the probability of producing pleasing spectra.
To open the Pad Harmonic tool
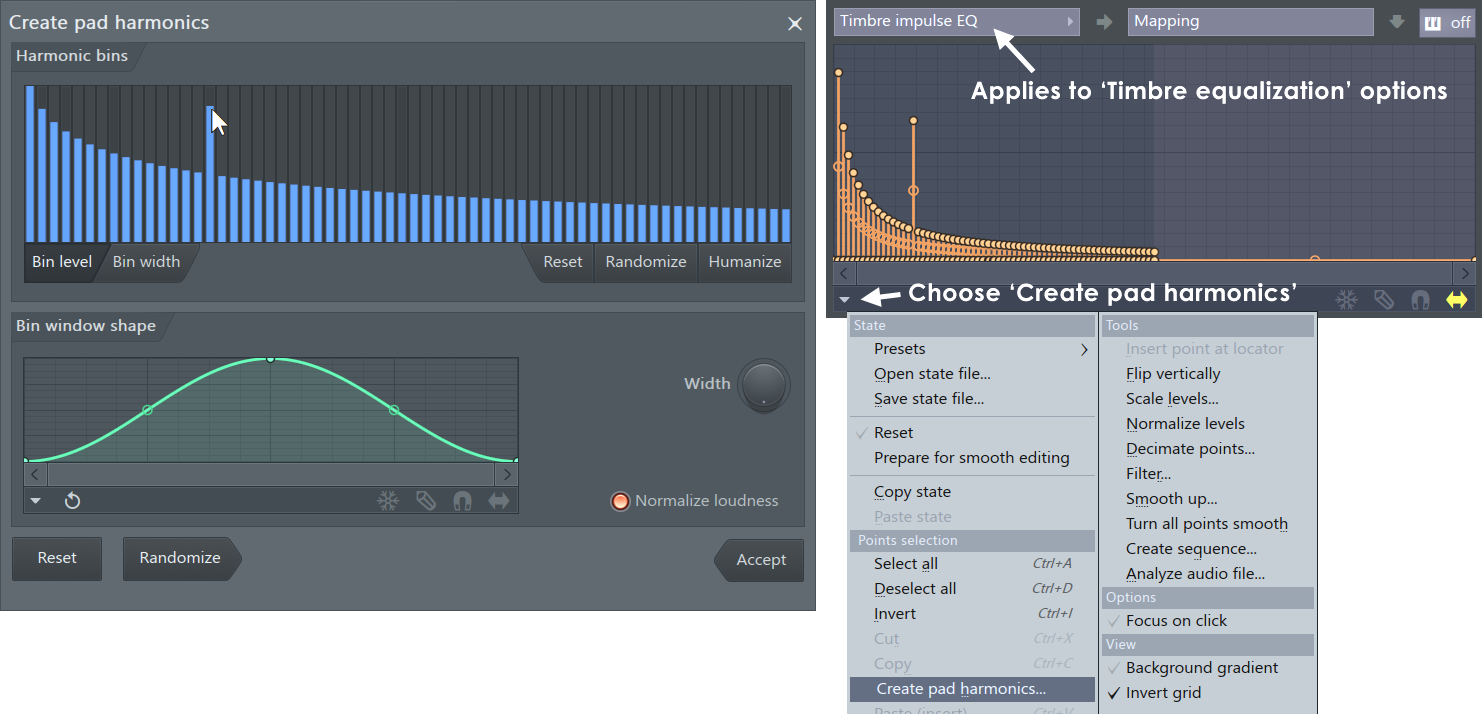
First select a Timbre equalization curve in the Articulation Editor ('Timbre impulse EQ' is a good place to start), then select the options menu item 'Create pad harmonics' (shown above right). Remember the rest of Ogun's synthesis & effects controls will determine your ability to hear changes made by this tool to the spectra. The Default patch is a good starting point for ground-up patch creation using the tool.
Options
Harmonic bins
Each 'bin' in the Harmonic bins window is centered on a predetermined harmonic, the series was chosen for its ability to create musically pleasing results. The bin can then be filled with a group of harmonics (controlled by the Bin width bars, Bin window shape & Width knob) detuned around that harmonic.
Editing harmonics bin levels - Left-click on any bin and drag the bin level to a new value (as shown above) or Right-click and drag diagonally to create ramps.
- Bin level - Bars represent the level (volume) of the harmonics in the bin. Left-click and drag up/down to adjust.
- Bin width - Bars control a 'Multiplier value' (0 to 100%) with respect to the Width knob in the 'Bin window shape section'. When set to 0 (off) the Width knob will have no effect on the bins harmonic band-width.
Each Bin mode has the following buttons:
- Reset - Reset the harmonic series to the default state.
- Randomize - Randomize bin levels.
- Humanize - Adds a touch of randomization to the current bin levels.
Bin window shape
- Graph - The lower graph controls the shape of each harmonic bin, and when the Width settings allow it, the way bins overlaps with neighbors.
- Width - Width modulation or 'multiplier' function, set from (0 to 100%). Bin values then decide how the 'Width' knob setting in the Bin window shape section will modulate the bin width. Wider bins generally sound more 'airy' while narrower bins sound more pure and tonal.
- Normalize loudness - Scales bin levels (most effective when all the bins have randomized to a low level).
Action buttons
- Reset - Revert to default settings.
- Randomize - Create random harmonic series within the rules of the 'PADsynth harmonics' system.
- Accept - Apply the harmonic series to the selected Timbre equalization target.
Pad Harmonics Tutorial
In this section we will explore some of the controls in the Pad Harmonics tool. Before starting it is useful to note that Ogun allows changes made in the tool to be previewed live, before accepting them. Even after a Timbre change has been accepted, the Pad harmonic tool will open in the same state next time it is opened. The last features allows you to accept a change, make some other changes synthesis controls in Ogun and re-open the tool to continue tweaking harmonics from where you left off. This functionality provides a convenient method for ground-up patch creation with the PADsynthesis tool.
Using the tool
This section is a quick run-through the controls on the Pad Harmonics tool.
- Usually when programming using the Pad Harmonics tool you would start from the 'Default (pad)' patch, however in this case open the Ogun 'Default' patch. This patch sounds like noise (all harmonics equally active). We are starting here so that you can clearly see the difference between the 'noise' harmonic map and a 'Pad harmonic' map.
- Note the Rich slider is set to 9 (8191 harmonics). This is a good control to come back to later and experiment with more or less harmonics in the Timbre equalization envelopes.
- Select the Timbre impulse EQ Articulator Editor target. The editor is shown in the screen-shot above-right, if you are not sure, it is probably a good time to remind yourself what the Timbre equalization targets do.
- Open the Pad Harmonics tool from the Options menu (as shown above) and click the Reset button (the tool remembers its last state and surely you have been fiddling with it!).
- Drag the tool out of the way of Ogun so you can see the Timbre impulse EQ. This will allow you to see what happens to the Timbre impulse EQ envelope as you tweak the Pad Harmonics tool. You may need to close the tool from time to time and zoom the Timbre impulse EQ envelope to get a better view.
- Play notes in Ogun and note the sound is a 'raspy' saw-like sound. Not a bad start, this is due to the particular harmonic series being manipulated by the Bin level & width editor.
- Turn the Pad tool Width knob to the left and notice the harmonic bins become narrower and the sound more 'pure' in tone. Turning the Width knob to the right and the sound becomes more airy and 'choir' like.
- Graph shapes, note how the overall EQ Mapping shape matches the Bin width graph in the Pad Harmonics tool. Make some radical changes to the shape of the Bin width graph and note how the EQ Mapping graph follows to match.
- Try clicking Randomize bin levels until you achieve a pleasing sound.
- Accept the harmonic series when you have found a setting that you like.
- You can now work on Ogun's other synthesis controls to fine-tune the sound. Remember it's usually best to start with the 'Default (pad)' patch as it has other synthesis settings that work well with the tool.
NOTE: The Autogun plugin and the WildoEnGin are based on the PADsynth algorithm (see credits). Click the dice button to create a random PADsynth patch.
Making a 'Pad Harmonic' cross-fade patch
In this section we will make a Ogun patch with a unique attack and decay spectrum using the Pad Harmonics tool.
- Open the Ogun 'Default (pad)' patch. This patch patch has been designed as the starting point for patches made with the Pad Harmonics tool.
- Turn the ALT DECAY switch (above the 1->2 slider) ON. Since this patch will be based on separate 'Attack' (Timbre impulse EQ) then 'Decay' (Timbre decay EQ) spectra. Turning this switch ON will set the Timbre decay EQ to be an explicit decay harmonic spectrum, rather than as a 'decay-time' multiplier, when the switch is OFF.
- Push the DECcay slider all the way to the top. This will allow you to hear only the Attack EQ spectrum.
- Select the Timbre impulse EQ Articulator Editor target. This is the 'attack' sound harmonic spectrum.
- From the Articulator Editor Options menu select Create pad harmonics to open the tool.
- Click the Randomize button until you hear an attack spectrum you like and Accept the spectrum.
- Drag the DECcay slider all the way to the bottom. This will allow you to hear (nearly) only the Decay EQ spectrum.
- Select the Timbre decay EQ Articulator Editor target. This is the notes 'decay' sound harmonic spectrum (when Alt Decay is ON).
- Open the Create pad harmonics to tool and press randomize until you hear another sound you like, try to make it different from the Attack sound selected previously (preferably less 'chuffy' and more tonal), try lowering the Width knob. Accept when done.
- Raise the DECcay slider to about 500 ms (see the hint window). When you play notes you should now have a unique attack and decay sound when a note is held. Fine-tune the Decay slider to taste.
- If desired, you can set a unique Timbre release EQ.
- Repeat the above steps, adding your own experimentation, and you are on your way to Ogun PAD heaven.
Credits
Algorithm: The Pad Harmonics tool is inspired by PADsynth by Nasca Octavian Paul.
GUI & Ogun programming: Didier Dambrin.