INSTRUMENTS / GENERATORS
Ogun Synthesis Controls
This section covers the Synthesis controls. Please check the Programming section for more details:

Click on the following sections to open
Main Page
Master Controls
Synthesis Controls
Ogun creates complex waveforms by combining sine-waves of harmonic multiples of the fundamental frequency. Ogun can accurately simulate lush metallic textures by generating up to 32,767 harmonics and offers creative control primarily through the Timbre controls and harmonic EQ curves (Harmonic mappings).
Programming & Resynthesis Tips
To see a list of programming tips see the Tutorial page.
TIMBRE
The Timbre section controls the harmonic spectrum and serves the same purpose as an Oscillator in Subtractive synthesis. In essence, the controls described below change the weighting, or probability, that each harmonic in the spectra will sound. In order to add natural motion to sounds the harmonic spectrum can then be re-shaped by the Harmonic mapping envelopes (see the Articulator section below):
- DECLICK - Attack click removal.
-
ALT DECAY - Sets an explicit decay EQ target. When selected the Timbre impulse EQ (attack harmonic spectrum) morphs towards the decay EQ mapping, the time taken is controlled by the decay time (DEC slider). Once the decay target EQ is reached the mapping will sustain, so we recommend using long decay times, unison, filters, effects & envelopes to add interest to the sound. NOTE: This is in contrast to the Alt Decay - deselected state, where the decay EQ mapping acts as a release envelope 'harmonic multiplier'.
- RICH - Richness controls the number of harmonics activated. Use 256 (see the hint bar) or less for tuned presets and 256 or more for noisy/metallic sounds. Settings between 31 to 32,767 harmonics are possible (in 11 steps). NOTE: The pitch of a given note drops with increased Rich setting as the root note is rescaled downward, to make use of the increased harmonic bandwidth.
- PRE - Timbre pre-decay. Morphs toward a 'Metallic' EQ mapping. Use, in combination with fullness, to obtain more metallic sounds. NOTE: If the current timbre is resynthesized (Seed 1 set to '----'), then the PREdecay (& FULLness) won't have any effect.
- DEC - Timbre decay time. Combines with the Decay mapping (see the Editor section, below), that defines per-harmonic decay time. NOTE: See ALT DECAY option above.
- REL - Timbre release time. Combines with the Release mapping (see the Editor section, below), defining per-harmonic release time.
- FULL - Timbre fullness. This slider blends between the output of the Seeded harmonic spectrum (-100, see below) and the full harmonic spectrum (+100), as limited by the Rich control.
- 1->2 - Timbre morphing or randomness (when Seed 2 = '----'). This controls the relative weighting of the spectra represented by Seed 1 and Seed 2. To hear Seed 2 push all the way to the top, to hear Seed 1 drag the control to the bottom.
- SEED 1 / SEED 2 - Timbre Seed 1 & timbre Seed 2, generate two independent weightings for the harmonic spectra, and can be important factors in Ogun's final timbre (within the upper limit of the Rich setting
and Timbre equalization mappings). There are some special conditions:
- When Seed 1 is set to '----' - all harmonics are activated.
- When Seed 2 is set to '----' - Seed 2 harmonics are randomized each time a key is played. If the Timbre morphing slider (1->2) is set greater than 0%, then Seed 2 will morph Seed 1 values randomly each time a key is played. NOTE: The FULL slider must also be less than 100% to hear this randomization.
- Numerical seed settings - When Timbre seed 1 or 2 are set to numerical values, the harmonic spectra remain fixed, as long as the seed value remains constant. NOTE: The 'Key to seed 1' option will modify Seed 1 by Key number. A particular seed value always will create the same harmonic spectrum weighting (values between 1 and 9999 are possible).
Resynthesis
An easy way to create new and complex timbres is to use the Resynthesis functions on the Options Menu OR samples (.wav) can be dragged from a browser and dropped onto the appropriate target in Ogun (drop samples onto the TIMBRE control panel). NOTE: Ogun can also analyze the volume envelope if the same samples are dropped onto the Volume envelope articulator part.
The resynthesizer engine uses the start of the sample to create a Timbre impulse EQ mapping and the end of the sample to generate a Timbre decay EQ mapping. When these maps are multiplied by the full spectrum (note Seed 1 = '----') and by morphing from the impulse to decay harmonic mappings (under the control of the DECay slider), the approximate harmonic motion of the input sample is replicated.
Rules
- Note pitch meta-data - Ogun will use embedded MIDI note data to set the pitch of the sample. Edison can be used to set the pitch meta-data in the .wav file. By default (if nothing is set) C5 will be used.
- Seeds - Seed 1 is set to '----' (all harmonics on) and Timbre morph (1->2) to zero.
- EQ scaling - EQ scaling is set to linear.
- Richness - Ogun will only analyze harmonics up to the Richness limit.
- Alt decay - If ALT DECAY is OFF, Ogun will produce a morph-to EQ target. However, if the analyzed sample does not have a decay then the Decay morph target will probably be best described as 'experimental' i.e. won't work as expected.
UNISON
Unison is an effect similar to Chorus. Unison differs in that the effect is applied per-key (per voice). Multiple copies of each voice are detuned and panned to create a thicker audio texture.
- ORD (Order) - Number of Unison voices (ranges from 1 to 9).
- PAN - Relative panning of the Unison voices.
- VOL - Unison volume relative to the original voice.
- PITCH - Pitch detune of the Unison voices.
- PHS (Phase) - Phase spread of the unison voices.
FILTER
- FLAT - Alternate resonance / bandwidth / mode.
- LP - Low pass filter.
- BP - Band pass filter.
- BS - Band stop filter.
- HP - High pass filter.
- OFF - Filter mode: Off.
- x1 - Shallow filter slope.
- x2 - Medium filter slope.
- x3 - Steep filter slope.
- CUT - Filter frequency cut-point.
- RES - Filter resonance frequency.
Articulator Editor
The Articulator editor panel provides access to the full suite of modulation parameters in Ogun. Select the Modulation Target and the Articulation Part (modulation source). Depending on the Modulation Target there will be a number of Articulation Parts as shown below:
Envelope and LFO display time on the horizontal axis and relative value on the vertical axis.
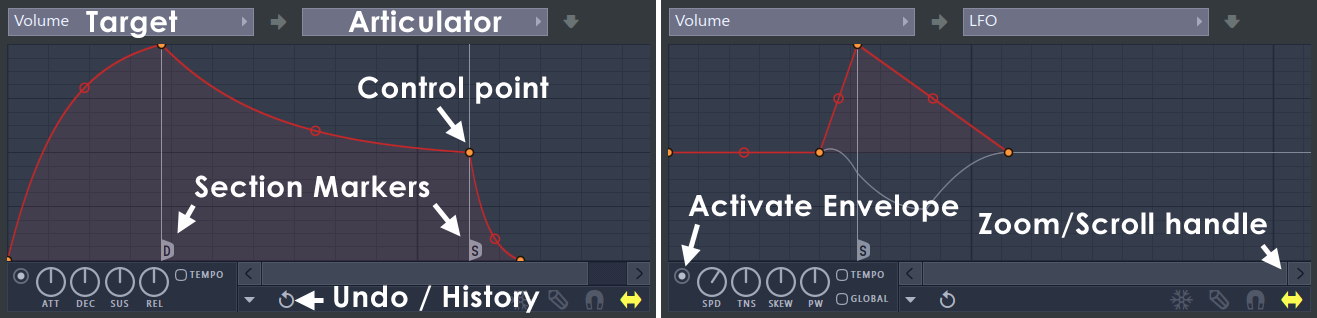
Note that the ATT, DEC, SUS and REL knobs make RELATIVE changes to the ADSR envelope, snapping back after release. While the envelope will appear as it did prior to the change, the envelope will sound according to the relative changes made (as seen in the Hint Bar while the knob is adjusted). Right-clicking the nodes will give options, in particular Sustain loop start & Sustain loop end points can be set to loop the envelope during the sustain action. LFO waveform: The waveform is represented by the light blue line, not the red control lines, these are used to shape the LFO waveform.
Mapping displays the input value on the horizontal axis and relative output value on the vertical axis.
All envelopes are fully user-adjustable. Right-clicking the nodes will show edit options. Node controls (relevant to all Articulation parts) change the behavior of the node movement and placement. Note that Snap will force nodes to snap to the Map grid. Clicking and dragging with Step mode on will drop nodes at each grid line crossed (shift in this mode will create steps).
The Editor Targets (modulation targets) and Articulation parts (modulation sources) are as follows:
- Articulation targets - Choose the modulation target here:
- Volume - Note volume.
- Filter frequency - Filter cutoff frequency envelope.
- Filter resonance - Filter resonance frequency.
- Pitch - Voice pitch.
- Unison pitch - Unison detuning.
- Articulator part - For each of the above modulation targets choose the following Articulation parts (modulation sources):
- Envelope - Volume envelope. The horizontal axis is time and the vertical axis modulation level. Remember to activate the envelope as shown above.
- LFO - Low Frequency Oscillator envelope. The horizontal axis is time and the vertical axis modulation level. Remember to activate the envelope as shown above.
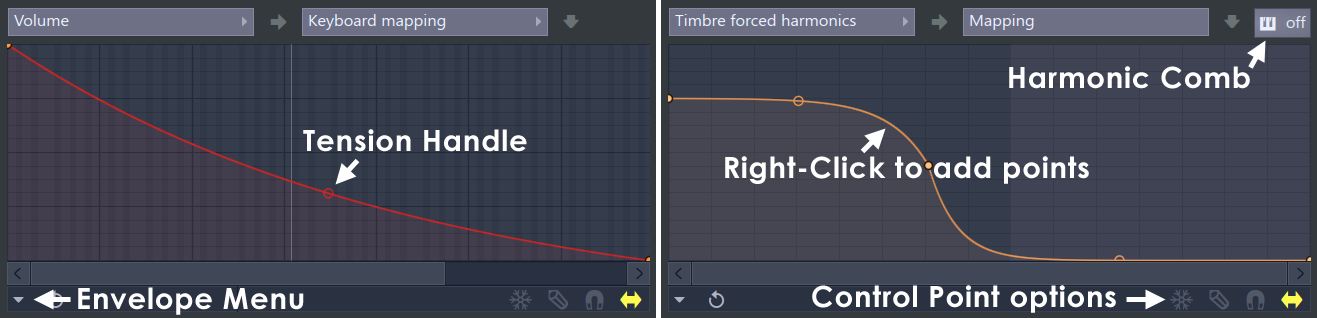
- Keyboard mapping - MIDI Key modifier envelope. The horizontal axis is MIDI key number and the vertical axis modulation level. Live MIDI key input values are shown as a vertical white line. Example use: Link to the Filter frequency target in order to brighten / darken sounds as they are played up and down the keyboard.
- Velocity mapping - The horizontal axis is keyboard velocity, the vertical axis modulation level. Live MIDI key input values are shown as a vertical white line. Example use: Link to the Filter frequency target in order to brighten / darken sounds as keys are played harder (the envelope will need to slope upward from left to right to achieve this effect).
- Modulation X & Y mappings - The horizontal axis is modulation X / Y value, the vertical axis modulation level. Live X / Y value tweaks are shown as a vertical white line. Example use: Link to X & Y Articulation parts to the Filter resonance and Filter cutoff targets respectively. X & Y envelopes will need slopes to have any effect.
- Mapping targets - Map the following modulation targets:
- Unison phase - Relative phasing of the Unison voices.
- Timbre pre-decay - Pre-articulation of the Timbre value (number of harmonics active).
- Timbre decay time - Decay time for the Timbre value (number of harmonics active).
- Timbre release time - Release time for the Timbre value (number of harmonics active).
- Timbre fullness - Balance of the full (all harmonics on) to Seeded (randomized) harmonics.
- Timbre morphing - Morphing between Seed 1 & Seed 2 harmonic spectra (the same function as the 1->2 slider)
- Timbre rotation - Shifts the seeded timbre (pre equalization) left & right depending on the Articulation part. Harmonics that fall off the end are wrapped back to the opposite side if the spectrum. Movement is linear, not in octaves.
- Timbre EQ shifting - Shifts the EQ mapping to the left or right as determined by the Articulation part. Movement is linear, not in octaves.
- Articulator part (Mapping) - For each of the above modulation targets choose the following Articulation parts (modulation sources):
- Keyboard mapping - MIDI Key modifier envelope. The horizontal axis is MIDI key number and the vertical axis modulation level. Live MIDI key input values are shown as a vertical white line.
- Velocity mapping - The horizontal axis is keyboard velocity, the vertical axis modulation level. Live MIDI key input values are shown as a vertical white line.
- Modulation X & Y mappings The horizontal axis is modulation X / Y value, the vertical axis modulation level. Live X / Y value tweaks are shown as a vertical white line.
- Timbre equalization targets - These mapping envelopes modify the harmonic spectra generated by Seed 1 & Seed 2 and either set explicit harmonic levels (based on the envelope shape) or per-harmonic
decay times. They have a powerful effect on the timbre (sound) of the patch. The equalization curves also interact with the relevant TIMBRE sliders. For example, if you would like the high harmonics to sustain longer than the low harmonics then the Timbre sustain EQ curve should be set sloping
upward from left to right.
- Timbre forced harmonics - Forces harmonics on at the level set by the EQ curve. This mapping curve is used to override the randomness in the spectra created by Seed 1 & 2. In particular if the spectra has a given harmonic set to 0, the mapping curve can force harmonics to the explicit value of the 'forced' curve. This is an important feature when creating pitched sounds as the lower harmonics (1 to 5) play a fundamental (pun intended) role in the perception of pitch.
- Timbre impulse EQ - This curve sets an explicit Harmonic EQ curve for the note start. It will modify the existing spectral values created by Seed 1 & 2 for the note start.
- Timbre decay EQ - The function of this harmonic EQ curve depends on the ALT DECAY switch:
- Alt Decay is OFF then this mapping acts as a 'Decay-time' multiplier for the affected harmonics. Harmonics will decay toward 0 under the influence of the Timbre decay EQ * DECay slider.
- Alt Decay is ON the Timbre decay EQ mapping sets an explicit decay spectrum. The Timbre impulse EQ (attack harmonic spectrum) morphs towards the Timbre decay EQ mapping, the time taken is controlled by the decay time (DEC slider).
- Timbre release EQ - Sets a unique 'Release-time' for the affected harmonics on note release. It is possible to force the Decay EQ to run straight into the Release EQ mapping by setting the Option menu item Link timbre release to volume decay ON.
- Articulator part - There is only one Articulator part for the above targets, the Harmonic EQ mapping.
- Harmonic comb - A harmonic comb filter that can selectively remove (every 2nd, 3rd, 4th or 5th) harmonics or keep (every 3rd, 4th or 5th) harmonics.
The following controls can be found along the bottom of the Editor window, depending on the Articulation part selected.
- Enable Envelope / LFO - Enables the envelope. Off by default.
Envelope
- ATT - Attack multiplier. Note this knob snaps back after an adjustment.
- DEC - Decay multiplier. Note this knob snaps back after an adjustment.
- SUS - Sustain multiplier. Note this knob snaps back after an adjustment.
- REL - Release multiplier. Note this knob snaps back after an adjustment.
LFO
- SPD - LFO speed multiplier. Note this knob snaps back after an adjustment.
- TENS - LFO tension multiplier. Note this knob snaps back after an adjustment.
- SK - LFO skew multiplier. Note this knob snaps back after an adjustment.
- PW - LFO pulse width multiplier. Note this knob snaps back after an adjustment.
Other controls:
- Tempo - Tempo-based time.
- Global - Global / retriggered LFO phase.
- Zoom / Scroll Slider - Located above the FREEZE, STEP, etc. buttons. Zoom: Click on the handle to zoom OR hover mouse over bar and scroll the mouse-wheel. Scroll: Click on the bar and drag left/right to scroll OR click the arrow buttons at the ends of the slider.
- Options - Click the forward-arrow to select:
- Open state file... - Opens pre-saved Editor state files (envelopes, etc).
- Save state file... - Save an Editor state.
- Copy state - Copies the current Editor settings to be copied to another location.
- Paste state - Paste the Editor state data in the clipboard.
- Reset - Reset to default state.
- Prepare for smooth editing - Creates a smooth tension between existing points.
- Select all - Selects all points for simultaneous adjusting.
- Deselect all - Deselects all points.
- Invert - Selects all points except currently selected.
- Cut - Cuts points.
- Copy - Copies points.
- Paste (insert) - Inserts copied points after a selected point.
- Paste (replace) - Replaces selected points with copied points.
- Duplicate - Duplicates selected points.
- Delete - Deletes selected points.
- Bipolar LFO tension - Changes the tension knob effect (below the envelope) . Selected: tension adjustments are made symmetrically around the zero line (bipolar). Deselected: tension adjustments are made relative to the waveform maxima and minima (unipolar).
- Make all loop - Includes all points into a loop.
- Insert point at locator - Inserts a point at the position of the locator.
- Flip vertically - Inverts the current envelope.
- Scale levels - Opens the Scale Level tool.
- Normalize levels - Scales the envelope so the highest and/or lowest levels reach +/- 100%.
- Decimate points - Opens a simple tool that allows manipulation of the number of control points in the envelope (useful in conjunction with Analyze audio file).
- Filter - Opens the Envelope Filter tool (useful in conjunction with Analyze audio file).
- Smooth up - Opens the Smooth Up tool that allows smoothing of the envelope shape (useful in conjunction with Analyze audio file).
- Smooth up abrupt changes - Quick removal of 'spikey' or sudden changes in the envelope.
- Turn all points smooth - Preset filter to quickly filter the envelope.
- Create pad harmonics - Opens the Pad harmonics tool.
- Create sequence - Opens the Envelope sequencer.
- Analyze audio file... - Creates an envelope that mirrors the volume amplitude profile of the analyzed sound.
- Focus on click - When on, clicking on the envelope editor will focus the control and thus steal keyboard focus from other controls.
- Background gradient - Turn the background gradient on/off.
- Invert grid - Flips the background colors.
- FREEZE - Freeze editing. Useful to get a view of complex envelopes by masking the points & handles
- STEP - Step editing (hold the shift key for pulsed mode). A new point will be automatically added at each graph interval while click-n-dragging. Step editing also works with snapping OFF, for full control with final point decimation (points will be masked while drawing as there are too many to display sensibly).
- SNAP - Snap to grid. Nodes snap to the background grid.
- SLIDE - Slide remaining points. Points after the selected node will maintain their relative position, sliding to accommodate the movement of the active node.
Effects Controls
Programming Ogun
Plugin Credits -
Code & GUI: Didier Dambrin.