CHANNEL SETTINGS
Main Plugin Wrapper Controls
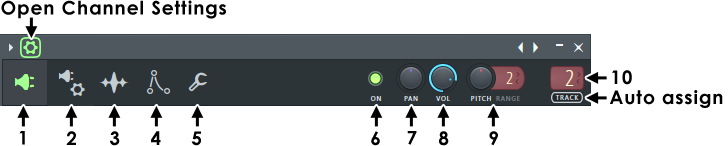
To open, click on the Channel button in the Channel Rack and then the Additional Settings, cog icon, as shown below. The Main Channel Settings are located along the top of each Wrapper window associated with a the plugin.
NOTE: The tabs available under the Channel Settings depend on the plugin type being hosted.
Controls
|
|
Wrapper settings - opens and closes the additional settings details as discussed below. |
|
|
1. Plugin GUI - Switch to the Plugin interface. Use this tab to return to the plugin interface after editing other tabs in the Channel Settings. |
|
|
2. VST/AU Wrapper Settings - Advanced wrapper settings only available when using a VST/AU plugin. |
|
|
3. Sample Settings - Sample settings are available when using a Sampler Channel, Audio Clip and some legacy native plugins. |
|
|
4. Envelope / Instrument Settings - The Envelope/Instrument settings are only available when using a Sampler Channel, Audio Clip or some legacy native plugins. |
|
|
5. Miscellaneous Settings - The Miscellaneous Channel settings tab contains various note and filter/based settings and so is available for all Instrument Channels, including VST/AU plugins |
- 6. ON - Channel/FX Mute switch. Deselect to disable (mute) the Channel or Effect. Click again to enable it. Solo - Right-Click the LED and, from the popup menu, select Solo. Repeat this action to unsolo the target (and unmute all). NOTE: In the case of Instrument Channels, live MIDI input to the Channel will continue to play. The switch applies only to Stepsequencer and Piano roll playback.
- 7. PAN - Sets the channel panning (left/right positioning of the sound in the stereo space). NOTE: This control replicates the pan next to the Channel Button.
- 8. VOL/MIX LEVEL - Sets the Channel Volume or Effect Mix Level depending on the class of plugin in use. NOTE: In the case of Instrument Channels, VOL replicates the volume next to the Channel Button and for Effects the Mix control on the right side of Effects Slots.
- 9. PITCH / RANGE - PITCH controls the Pitch/Pitch-bend for the Channel. Use the RANGE to set the maximum range in semitones the knob will bend notes (100 cents = 1 semitone). NOTE: Automate this knob to create slides and pitch bends for VST/AU instruments. NOTE: If a Channel Sampler does not respond to pitch (plays one note), Right-Click the Sampler Channel Settings > Sample Tab Time stretching (Time) knob and select (none).
- 10. Mixer track selector - Shows the Mixer track the channel is assigned to. By default, all new instrument Channels are routed to the Master Mixer track
(the LCD displays "--"). This control doesn't appear for Channels that hold generators that don't output audio.
- Left-click and drag up/down to set a Mixer Track number.
- Double-click the FX Selector to open the Mixer window with the Mixer track selected.
- Auto-assign - Click the TRACK label to auto-assign the plugin to the next empty Mixer track.
NOTE: An efficient way to route one or more Channels to Mixer tracks is to:
A. Left or Right-Click the Channel Selector LED's to the right side of each Channel you want to route (Right-Clicking allows multiple selections).
B. Right-Click the target Mixer track and select 'Link selected channels > to this track' from the pop-up menu. OR use 'Link selected channels > starting from this track' to assign multiple Channels to multiple Mixer tracks.
Instrument and Audio Track Mixer routing - Channels stay linked to the selected Mixer Track as the routing selector is changed. The selector dims to indicate that it is part of a grouping. Mixer Tracks then move instead of re-routing when the control is adjusted. When grouped routing automation is not possible. To re-route an Instrument or Audio track group, first Right-click the Playlist Track header and choose Track mode > Unassigned, then to re-route the Instrument Channels as needed.