PLAYLIST
The Playlist
The Playlist sequences (plays) all elements of the project to make the final song. The Playlist window is a stack of multi-purpose 'Clip Tracks' that can hold Pattern Clips, Audio Clips and Automation Clips. Unlike most other sequencers, the Playlist tracks are not bound to a single instrument, audio recording or even Clip type. You can put any Clip type anywhere and even overlay Clips. Clips function like notes in the Piano roll. When the play-head reaches a Clip, FL Studio plays whatever the Clip instructs it to do. This also means Clip Tracks are not bound to Mixer tracks, rather Channel Rack to Mixer routing of instruments used by Clips decides the Mixer track/s that are used.
By default Instrument Channels are bound to Mixer tracks, not Playlist tracks. For example, a single Pattern Clip on a single Playlist track, could trigger every Channel Rack instrument, and so all Mixer tracks if they were routed accordingly. If you want to simulate traditional sequencer workflow you can use 'Track Mode'. Do this by dropping Instruments or Samples on Playlist Track headers to create a link from the Instrument Channel <> Playlist <> Mixer. Any Change to name or color will ripple through this chain. Playlist tracks linked this way are known as Instrument or Audio Tracks depending on what the Channel Instrument is, an Instrument or Audio Clip. NOTE: This is mainly a visual/organizational feature, and the Instrument Channel will still respond to Pattern Clips on other Playlist tracks.

|
Working with Playlist Tracks
- Track Selector - Playlist tracks are selectable by clicking the selector (see above). Use (Ctrl+Up/Down Arrows) to change the selected track. (Ctrl+Alt+Up/Down Arrow) to extend the selection.
- Clip Data - Pattern Clips can hold two types of data, MIDI notes and/or controller movements (stored as 'event automation').
- Channel Rack > Playlist > Mixer Linking - Drop instruments on Playlist Track headers to create a link between the three windows. See a video tutorial here.
Playlist Controls
-
Tool Bar icons - Along the top of the Mixer window:

Playlist Menu - Includes: Edit, Tools, View, Snap, Select, Group, Zoom, Time Marker, Clip Source, Performance Mode, playhead and Detach options. 
Playlist Snap - Snap determines how Clips will move and quantization aligns events relative to the background grid. For a detailed list of Snap options see the Piano roll menu > Snap section. NOTES: 1. Holding the Alt key temporarily sets snap to 'none'. 2. There is a Global Snap selector on the Snap Panel that is used when this local Snap is set to 'Main'. 3. Scroll speed will slow when snap settings other than 'Line' are used. 4. If items are placing off-grid after changing snap, select them and use the Quantize command (Alt+Q). This will reset the grid offset of the last touched Clip, which is remembered. 
Add clips by Draw mode (P) - Left-click to add the currently selected Clip. Left-click-and-drag to reposition the clip before releasing it. Right-Click to delete Clips. Right-Click and drag to delete multiple clips. Right-Click and hold on the background to open the slice tool (F10 > General settings > Click and hold functions on). Modifier keys: (Shift) add in Paint mode. (Ctrl) to make a selection. (Alt) to add in Draw mode with snap set to 'none'. 
Add clips by Paint mode (B) - Left-click to adds the currently selected Clip. Click-and-drag to paint multiple clips. Right-Click to delete Clips. Right-Click and drag to delete multiple clips. Right-Click and hold on the background to open the slice tool. Modifier keys: (Shift) to copy the selected Clip. (Ctrl) to make a selection. (Alt) and click on a Clip to move it with snap set to 'none'. 
Delete (D) - Click or Click-and-drag to delete Clips. Modifier keys: Hold (Shift) to make a selection, then press (Delete). 
Mute (T) - The mute tool mutes individual Clips. This is independent of the Track mute switch which has no effect on Muted Clips. Left-click on clips to mute them. Left-click and drag to mute multiple clips. Right-Click to delete Clips. Right-Click and hold on the background to open the slice tool. Modifier keys: (Ctrl) to make a selection. (Alt) and click on a Clip to move it with snap set to 'none'. 
Slip Edit (S) - Left-click on the content of Clips to slide them left or right relative to the time-line while retaining the start/end points of the Clip. NOTE: Slip Editing is used where the Clip has been sliced, or resized, shorter than the original length. 
Slice (C). Click and drag vertically to make a slice through the clip OR use (Right-Shift) to Slice without the need to drag vertically or switch to the Slice Tool. NOTE: The Settings > Project > Advanced > Play truncated notes in clips option can be useful when slicing Clips. Modifier keys: (Shift) slice without dragging. (Ctrl) to make a selection. (Shift+Alt) Slice without dragging and with snap set to 'none'. 
Select (E) - Either Left-click on Clips or Left-click and drag to make group selections. Modifier keys: (Shift) add to or remove from selection. 
Zoom to selection (Shift+Z) - When in Paint mode, use (Ctrl+Right-Click) and drag to make a zoom-to selection. Right-Click again to swap between zoom and unzoomed modes.Right-Click to open a menu of quick zoom options: - Zoom in/ Zoom out (Page up / Page down) - Zoom centers on the Cursor position.
- Quick-zoom 1, 2 & 3 (Shift+1, 2, 3) - Three handy zoom levels.
- Zoom out (Shift+4) - Switches between 'zoom out' and previous zoom level.
- On Selection (Shift+5) - Zoom to content selection.

Play selected (Y) - Click the clips you want to play. Click position will set the start location. 
Play / Pause - Left-click to start/pauses playback. Right-Click (while playing) to stop and return to the last set start position. Right-Click (while stopped) to return the playhead to the start of the song. NOTE: There is an option on the Right-Click main transport Stop button Remember seek time for the start position to be remembered. - Arrangements - An 'Arrangement' is the layout of Audio, Automation and Pattern Clips in the Playlist. Use the drop-down 'Arrangements menu' on the Playlist Title Bar to manage multiple versions of the project (working ideas, sound design, versions etc). The menu options include:
- Clone - Copy the current arrangement to a new arrangement.
- Rename - Rename the current arrangement.
- Delete - Deletes the current arrangement.
- Merge with - Select another arrangement to Merge with the current Arrangement. This will open a pop-up window with more options:
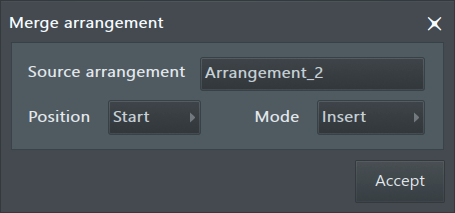
- Source arrangement - Select the arrangement to be merged into the current arrangement. NOTE: The source Arrangement remains intact after a Merge.
- Position - Start: Merge from the start of the Playlist, Current: Merge from the start of the current selection, End: Append to the end of the current Playlist data.
- Mode - Insert: The inserted data moves the existing data to the right. Merge: The merged data is blended with the destination data. Replace: The source data replaces destination arrangement.
- Add one - Add an empty Arrangement to the project.
NOTES: Arrangements share the Channel Rack and Mixer layout, so be careful not to delete Channels, Effects or Mixer tracks/routing used by other Arrangements. Likewise, don't change level settings of the Mixer or Channel unless you want it to affect all Arrangements.
- Clip Source Menu, Picker Panel and Project Picker (indicated above) - Left-click - The menu at the top of the Playlist shows Clips available to be placed in the Clip Tracks area. Right-Click - to open the Project Picker (Ctrl+F8). Once a Clip is selected it can be added to the Playlist by Left-clicking on an empty Clip Track space. Alternatively Right-Click the Clip Focus icons to see menu-selections of Clips unique to each type.
- Play Position Marker (indicated above) - Displays the current playback position, can be (Left-clicked & dragged). You can Left-click to reposition this marker while the song is stopped or playing. NOTE: There is an option on the Right-Click main transport Stop button Remember seek time for the start position to be remembered.
- Song Loop (uses Time Markers) - Right-Click a Time Marker and select the option 'Song loop'. See below for more information on adding Time Markers. The 'Song loop' marker (note the down facing arrow) defines the repeat point for a playing project, repeats are not played when a song is rendered although the marker can be used to define render length. TIP: The Repeat Marker is ignored during rendering except for the special case where the marker is set beyond the end of the last Playlist data. This will force the project to be rendered to the point set by the marker, useful for ensuring decaying effect sounds are captured. LIVE: The song markers can also be used to control live playback & performance. NOTE: There is a Loop Recording option on the Toolbar shortcut icons.
- Timeline Selection (indicated above) - (Ctrl+Left-click) & drag in the bar-ruler area to make a vertical selection across all tracks. (Shift+Left-click) & drag to copy-move selection. The Timeline Selections will play in loop mode or render as a single section. Actually we cheated a bit with the screen shot, while only the selected portion of the Playlist will play, any portions of a Clip outside the selected area will also turn red (i.e. be selected), but these out-of-bounds clip-parts won't play. NOTE: See here to learn more about using the time-line selections to add or delete time sections of the Playlist.
- Horizontal Zoom / Timeline Zoom (indicated above) - Left-click and drag on the left or right edge of the horizontal scroll handle. Alternatively place the Mouse cursor over the location to zoom and (Ctrl+Mouse-wheel). Maximum Zoom/Snap resolution may be increased by changing the Project Timebase (PPQ) setting (F11), in the General Project settings. The default PPQ should provide adequate zoom/resolution for most projects. NOTE: Click the (Middle-Mouse-Button) and drag in the Playlist to scroll vertically and horizontally at the same time.
- Vertical Zoom (indicated above) - Left-click and drag the track height control up/down to change the vertical zoom of all Playlist tracks. You can resize individual tracks by dragging on the dividers between tracks in the name area (as indicated above 'Drag here'). (Ctrl+Right-Click) on an empty Playlist track area to zoom to full view. (Ctrl+Right-Click) again to return to the previous Zoom and location.
- Window controls (indicated above) - Maximizes/minimizes the Playlist. The playlist can also be detached from the FL Studio desktop from the Main Menu > Detached option.
- Clip Focus & Options Selector (indicated above, top left) - Left-click: each tab to bring that Clip type to the top of any stack that includes Audio, Automation or Pattern Clips. Each tab contains some edit options unique to each Clip type. Right-Click: each tab to select Clips of that category to be added to the Playlist (this is an alternative to the Clip Source menu).
- Time Markers (indicated above) - Add by selecting (Alt+T) or ' Time markers > Add time marker' . Left-click, hold & drag a marker to reposition it. Once the first Time marker is added to a project, it can be Right-Clicked to Add a new marker, Delete it or Rename. Time markers can also be used for selections & live jumping (see below).
- Track Mute / Solo (indicated above) - Applies to all Clips on the Playlist track/lane.
- Mute/Unmute - (Left-Click) the Mute icon.
- Solo/Unsolo - (Ctrl+Left-Click) OR (Right+Click) on the Mute icon. NOTE: The General Settings > 'Restore previous state after solo' option will preserve the pattern of muted and unmuted items prior to a Solo action.
- Mute/Solo a track group - (Alt+Click) the Mute icon for any member of the group. Groups are defined by the Right-Click 'Group with above track' option.
- Lock state - (Shift+Click) a Mute icon.
- Clip Menus (indicated above) - The Clip Menu can be found at the top-left corner of each Clip. Click to open. Options may vary depending on Clip type.
- Clip Tracks - While there are three different Clip types: Audio Clips (holding audio recordings), Automation Clips (automation data) and Pattern Clips (note & event-automation data). You can put any Clip type on any Playlist track, and even overlay Clips of any type. Clip Tracks are not bound to Mixer tracks, Channel Rack to Mixer routing of the instruments used by Clips determines the Mixer track/s that play. Remember, a single Pattern Clip could trigger every Channel Rack instrument, and so all Mixer tracks if they were routed accordingly. To reorder Clip Tracks, hold (Shift+Mouse-wheel) over the Clip Track label area.
- Track divider (where it says 'Drag here' above) - Resize - Click and drag vertically to resize individual tracks. Group tracks - Drag upward (and keep going) until the track groups with the one above. Do the same thing to ungroup a track OR right-click the track header area and select 'Group with above track'. Alternatively (Right-click+G) on the track to group it with the above.
Playlist Track Header Right-Click Menu
Right-Click Track Header Options (indicated below) - Right-Click the area at the front of any Playlist track for the following options:
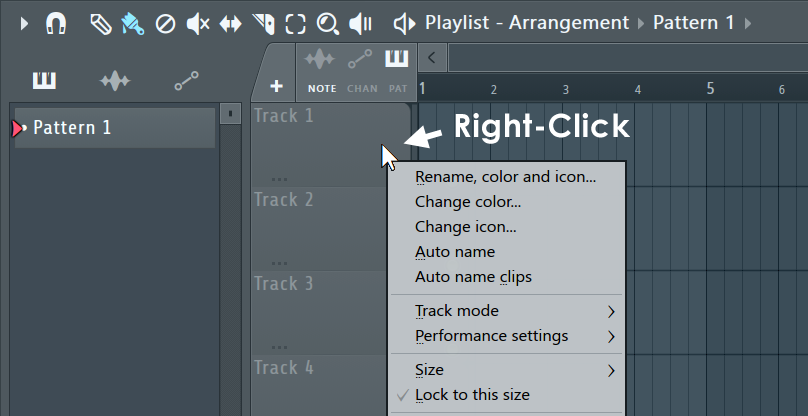
- Rename / color - Renames or re-colors the channel using the Color Selector tool. Click on the Channel name and type to rename, Left-click on the color square (shown below) to open the re-color dialog, or Right-Click to randomly assign a color from a palette pre-approved by the Image-Line Aesthetics Committee. Once the name dialog is open, press (F2) to randomly select colors OR (F3) to select the last used color.
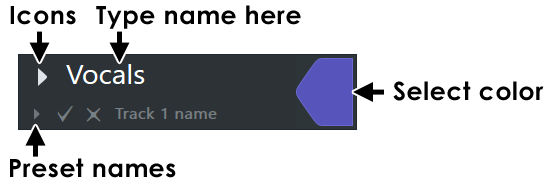
- To Set an icon - Choose from a number of preset icons to display on the Channel button. NOTE: Middle-click on existing icons to directly open the icon menu.
- Auto name - Automatically names and colors the track after the first Pattern Clip in the track.
- Auto name clips - All Clips are renamed and colored based on the Track's name and color.
- Track Mode - Speed workflow by grouping a Channel Instrument, Playlist Track and Mixer track so changes to the name, color and or icon of any member in the group will ripple throughout the chain.
To create a group - Right-Click Playlist Track headers and choose Instrument or Audio track. Subsequent pop-ups will allow you to choose an Instrument or Mixer destination. Alternatively drop plugins or audio files on Playlist Track headers for even faster workflow. A default Pattern will also be created for Instrument tracks.
Track mode icons - The following icons will appear on all components of an Audio track or Instrument track groups:
- Audio Clips - Drop an audio file on a Playlist track to link it with a Mixer track OR Right-click a Playlist track header and choose an existing Audio Clip. Changes to the name, icon or color (Channel, Playlist Track, Mixer Track) will ripple throughout the chain. NOTES: See the Playlist Menu > Edit > Drop audio on track headers options to set the default behavior when dropping Audio files on the Playlist Track headers. Hold (Shift) when dropping multiple files on a Mixer track (not the header) to add them sequentially in the Playlist Track.
- Mixer Tracks - Selected Mixer tracks can be linked to auto-created Audio Tracks with '(Right-click) > Assign to new audio track(s)'.
- Audio recording - (Right-click) a Playlist Track to associate it with a Insert Mixer track. All audio recorded from this Mixer Track will be placed on the selected Playlist Track. If there is no room, sub-track/s to the parent will be created to hold the Audio Clips. NOTE: The (A) icon will turn red when the Mixer Track is armed for recording and the following on-track controls will be available (left to right):
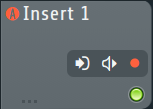
- Select audio input - Choose an Audio Input as per the Mixer Track Input Menu.
- Recording location & Monitor options - As per the Mixer Track Panel options.
- Arm recording - Arms the linked Mixer Track for recording.
- Open the plugin - Double-Click the Playtlist Track header.
- Deleting - If you delete the Channel or Playlist Track there will be an option to delete everything associated with the Instrument.
- Add plugins without opening the interface - Hold Shift to stop the plugin opening when dropping plugins on Track headers.
- Add an existing Instrument Channel - Right-click the Playlist Track and choose 'Track mode > Instrument track > Use existing > ...'. If you do this from a Playlist Track that is already named and colored, this will be preserved, along with the linked Mixer track name and color.
N/A Unassigned - The track has no associations. Use this to disassociate a linked Playlist Instrument or Audio track. Also, see 'Instrument and Audio Track Mixer routing' below. This also allows you to go back to FL Studio's original free workflow where Playlist Tracks are not associated with any Clip type or Mixer Track. 
Audio track - An Audio Track is defined when a Playlist Track is linked to a Mixer Track. This link changes how Audio Clips dropped on the track OR recorded Audio through the Insert Mixer track will behave: 
Instrument track - An instrument track is defined when a Channel Instrument is linked to a Playlist Track. Drop plugins on the Playlist Track header OR Right-click a Playlist Track header and choose a plugin instrument to associate with the track. This will link the Instrument Channel, Playlist Track (including a default Pattern) through to a Mixer track. Changes to the name, icon or color of any member (excluding the Pattern) will ripple throughout the group. The Playlist Track will be locked to the auto-created Pattern (although you can manually add other Clips). Working with Instrument / Audio Tracks:
- Hold (Shift) when dropping plugins on track headers to prevent the Plugin GUI from opening.
- Hold (Shift) when dropping multiple files on a Mixer track (not the header) to add them sequentially in the Playlist Track. This also works for standard Playlist Tracks.
- Drop Effects plugins on Instrument and Audio Playlist track headers and they will be added to the linked Mixer Track.
- Dropping Effects on one of a multi-selection of Instrument Tracks will add the Effect to all selected tracks in the group.
- Edit patterns in Piano roll - Double-Click on Pattern Clips to open the Piano roll.
- Open the Piano roll from a Clip - (Double-Click) a Pattern Clip to show the Piano toll. Hold (Alt) to show the Channel Rack.
- Open the Channel Rack from a Clip - Use (Alt + Double-Click) on a Pattern Clip to open the Channel Rack and Instrument. Don't hold (Alt) to show the Piano roll.
- Edit patterns in Channel Rack - Double-Click on Pattern Clips
- Instrument and Audio Track Mixer routing - Instrument Track Channels stay linked to the selected Mixer Track as the routing selector is changed. The selector dims to indicate that it is part of a grouping. Mixer Tracks then move instead of re-routing when the control is adjusted. When grouped, routing automation is not possible. To re-route an Instrument or Audio track group, first Right-click the Playlist Track header and choose Track mode > Unassigned, then to re-route the Instrument Channels as needed. Audio Track Audio Clips will re-route.
- From track start (Ctrl+Alt+C) - Consolidated Audio Clip starts at the first Clip in the track.
- From song start (Ctrl+Alt+Shift+C) - Consolidated Audio Clip starts from the beginning of the Playlist. Use this method when you are creating song-length 'stems' to share with other projects. There will be no confusion where the Clip should be placed (at the start of Bar 1).
NOTE: You can use this feature to merge vocal or instrumental recordings into a single Audio Clip, or to reduce CPU load (disable Mixer Insert FX not in use afterward).
NOTE: Drag an audio file (from the Browser, for example) and drop it on the Track label area to auto-create an Audio Clip and auto-name the Clip track to match the file.
Timeline, Time Markers & Time Signatures
Time is displayed horizontally in the Playlist (in bars displayed along the top of the window). The grid resolution is determined by:
- The window's 'Snap' value (). Alternatively, select 'Main' to apply the global snap value (for all windows where snap applies) defined in the Global Snap panel.
- The Horizontal zoom. That is, the snap resolution increases as the Playlist is zoomed in, until it reaches the maximum set by the Snap value. Note how Playlist vertical grid-lines increase as the Playlist is zoomed.
- The Project 'Time Signature' (F11) setting. When 'Time settings > Set as time signature' is selected the grid will reflect the set Time Signature. When 'Time settings > Set as time division' the grid will be 4/4. This was the default prior to the introduction of Time Signatures. NOTE: Time Markers (Shift+Alt+T) can also set the Time Signature from a selected point or over a range (use a selection).
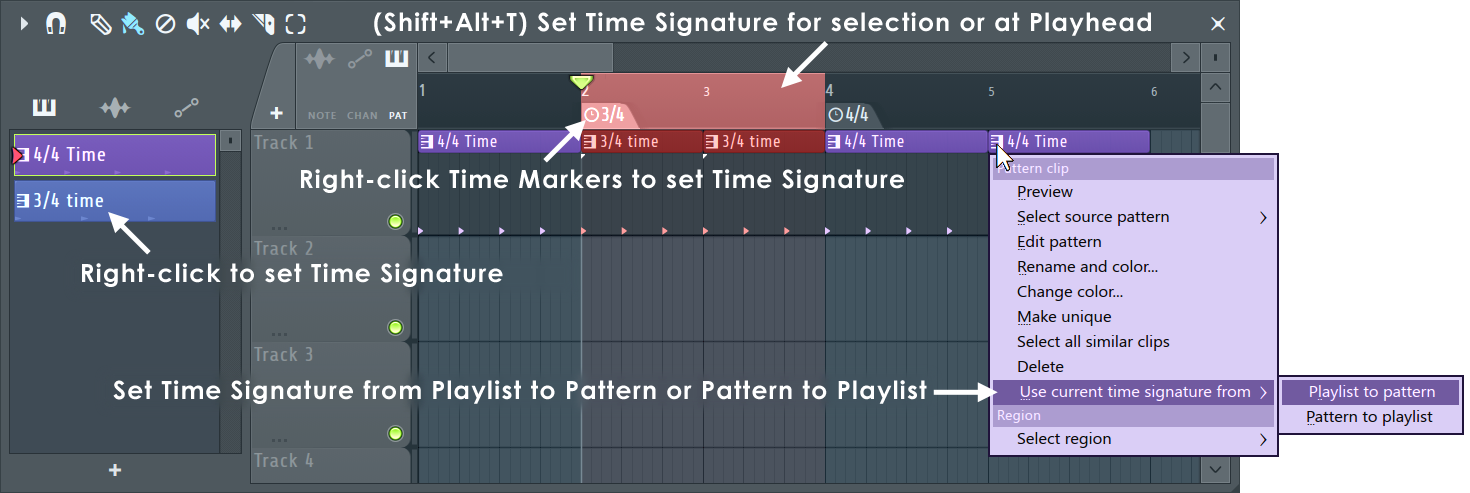
NOTE: Patterns can have independent Time Signatures to those set in the Playlist. Changing the Time Signature for any Pattern will affect all instances in the Playlist. Use the Pattern Clip Menu option 'Make unique' to avoid this, if it is a problem.
- The 'Project Timebase (PPQ) setting' (F11). Higher PPQ settings offer greater zoom levels and so higher resolution, although the default setting of 96 PPQ is adequate for most situations.
Playback - Controlled from the Main Transport controls or the Play button as indicated above.
- Relocate the playback position - Click on the upper timeline (Bar numbers) where you want the playback position indicator to start. You can use the (Home) key to reset to the song beginning. NOTE: There is an option on the Right-Click main transport Stop button Remember seek time for the start position to be remembered.
- Play notes straddling the playback position marker - When stopping and starting you can play notes that cross the playback position by opening the Audio Options and selecting 'Play truncated notes'.
Timeline markers - For information on Marker functions see the Time Marker Menu Section below. Examples include:
- Setting Time Signatures.
- Labeling parts of your song (such as 'chorus' or 'verse', for example)
- For performance ('Jump to' locators)
- Selection of regions (between markers).
- Start recording/Stop recording automation.
Patterns, Audio Clips and Automation Clips
This section covers general editing and Playlist operations. For specific details on using Audio Clips, Automation Clips and Patterns Clips, please see the following pages:
NOTE: Audio, Automation and Pattern Clips can share the same Playlist tracks, as shown above and will overlap, with transparency, to aid with the grouping of related Clips.
Playlist Clip Focus
The Clip focus selector, below, is used to focus Clip types. This is particularly useful when Clips are stacked, the focused Clip is brought to the top for selection and editing. To select all Clips in a layered stack, use (Ctrl+Left-click), then they can be moved together. NOTE: Use (M) to cycle modes when Typing keyboard to piano (Ctrl+T) is off.

NOTE: The + icon to the left of the Clip Focus selectors allows you to add Instrument Tracks and Audio Tracks to the Playlist from a pop-up menu. (Right-Click) to quick-add an Audio Track. (Middle-Click) to open the 'More plugins' menu.
Audio
- Audio Icon - (Left-Click) - Focus Audio Clips. Select and (Right-Click) - Show Audio Clip Menu. Below the icon are the following options (left to right):
- Show Fades (Shift+F) - Show the Audio Clip Fade and Gain controls. (Right-Click) open context menu:
- Create new clips with manual fades - Set all newly created Audio Clips with a manual Crossfade setting.
- Snap fade handles - Fade handles move and snap to the Playliust grid (snap setting).
- Show fade previews - When Audio Clip Envelopes are used, the waveform will reflect level changes caused by the envelope.
- Show gain scale - Determines if the audio will scale visually as Clip gain is adjusted.
- Show gain value - Shows the gain value badge at all times, if the value was changed from the default dB.
- Zero-Cross - Slicing & resize edits will be made at the nearest zero-crossing to the slice point. Useful to avoid clicks at the slice location. NOTE: This setting will naturally interfere with your ability to specify exact slice locations.
- Stretch (Shift+M) - When the left or right edge of the Clip is selected and dragged the Clip will be stretched according to the Audio Clip Time stretching settings. To maintain pitch while the sample length is stretched, select an option other than 'Resample' in the Stretch Method field. See the section Working with the stretch/pitch functions for more details on synchronizing/beatmatching Audio Clips to the project tempo.
- Show Fades (Shift+F) - Show the Audio Clip Fade and Gain controls. (Right-Click) open context menu:
Automation
- Automation Icon - (Left-Click) - Focus Automation Clips. Select and (Right-Click) - Show Audio Clip Menu. Below the icon are the following options (left to right):
- Right-Click tab - Show Automation Clip Menu.
- Step - Sets the automation Clip curve editor in 'step editing' mode. Left-click and drag in the Clip to create a "free hand" curve where a new control point is defined for every step in the timeline (steps depend on the current snap settings). Hold SHIFT while dragging to draw "pulse" lines (straight vertical/horizontal lines only). Note that each new segment created this way uses the last tension set while adding a segment.
- Slide - Preserves the relative distance between a dragged control point and all control points following it.
Patterns (notes & events)
- Audio Icon - (Left-Click) - Focus Patten Clips. Select and (Right-Click) - Show Audio Clip Menu. Below the icon are the following options (left to right):
- Note - Uses the parent pattern's (notes & event) colors. Note color is set from within the Piano roll. Event data defaults to pink, so anyone uncomfortable about being seen using pink in the Playlist needs to 'suck it in' and stop being a 'big cry baby' about it. Alternatively, change the note color for the channel.
- Chan - Uses the parent channel's color settings (Right-Click the channel button and use the color selector on the Channel re-name pop-up panel).
- Pat - Uses the parent pattern's color settings.
Picker Panel
The Picker Panel (Alt+P) is a Pattern, Audio and Automation Clip manager / browser. It shows all Clips in the project, accessed with the filter switches at the top of the panel. Click and drag from this list to the Playlist or click to select, then click on the Playlist to place. Use it to rename and color Clips, auto-select and delete all unused Clips, freeze Patterns, reorder patterns etc. NOTE: Each Clip type has a comprehensive Right-Click menu available on the Clips in the list.

NOTE: You can transpose single or multi-selected Patterns by (Right-Click) and selecting 'Transpose'.
Controls
- Filter Switch Options (Right-Click) - Select All or Unused (not used in any Arrangement) Clips. Sort Clips by 'All', Name, Color or Mixer Track Number (Audio Clips).
- Panel Options - See the Playlist Menu > Picker Panel section for features and controls of the panel.
- Right-Click Clip menu - See the Pattern Menu for details.
Working with the Picker
- Place Clips in Playlist - (Left-Click) to select, or (Alt+Left-Click)/(Shift+Left-Click) to select multiple Clips, then drag to the Playlist. Or (Left-Click) to select Clips, then (Left-Click) to place in the Playlist.
- Select multiple clips - (Ctrl+Left-Click) individual Clips or (Shift+Left-Click) the first and last Clip in a range. It is possible to Rename, Recolor and Gradient Recolor multiple Clips this way.
- Vertical Zoom/Scroll - Use the scroll-bar to the right of the panel OR (Mouse-Wheel) over the Clips. The Zoom control is at the top of the Scroll-bar.
- Preview Clip - (Alt+Right-Click+Hold) Clips. Release hold to stop playback.
- Rearrange Clips - (Right-Click) the Filter Icons at the top and choose a sorting option. Drag and drop Clips or select Clip/s then (Shift + mouse-wheel) to move. NOTE: Rearranging the order of Pattern Clips changes their pattern number.
- Rename Clip/s - (Shift + Click) on item/s in the Picker Panel to open the Rename pop-up.
- Transpose Pattern Clip/s - Select single or multi-selected Pattern Clips and (Right-Click) to select 'Transpose'. To transpose the Project, select the Pattern filter at the top of the Picker panel. (Shift + Click) to select all Pattern Clips, then use the (Right-Click) > 'Transpose' feature.
Bouncing to Audio / Freezing
There are several Playlist Menu options for bouncing Pattern Clips and Audio Clips to audio. The method you choose will depend on what you plan to do with the audio, and most importantly, whether Playlist Automation is important to the final sound.
NOTE: This section specifically references the Playlist Menu > Consolidate ... options. Alternatively, you can use the File > Export > Wave file... option with 'Split mixer tracks' selected to export all Mixer Tracks in the project to stems at once. This will also include Automation.
Including Automation
Remember, the sound from a Pattern or Audio Clip may depend on contextual Playlist Automation. These options can be useful when manually 'Freezing' Instrument Channels and or Mixer effects to reduce CPU load OR to merge Audio Clips, as shown below:
- Tools > Export all playlist tracks - Playlist consolidation sequentially 'Solos' every Playlist track and renders them to an audio file (sometimes call a 'stem'). This has implications for some effects (See NOTES below).
- Tools > Export all playlist track groups - Same as the above, but creates only one audio file for Grouped Playlist Tracks (the parent and sub-track audio is combined).
NOTES:
- Master effects - Pay attention to the Render dialog > Miscellaneous > Enable master effects option prior to using this feature, if you intend to use the Playlist tracks in another DAW you probably also want Master effects ON.
- Sidechain effects - If you have audio-based 'sidechain' effects the sidechain source data must be in the same Playlist track/s as the instrument/s it affects. Alternatively, you will need to manually arm sidechain source and destination mixer tracks and export them with (Alt+R while) with the mixer is focused instead.
- Playlist Menu > Tools > Consolidate playlist selection - The 'selection' refers to Pattern & Audio Clips, not a time-line selection. You can choose to consolidate from the very start of the Playlist (useful when creating 'stems' for later remixing) or from the selection start (to save disk space and replace existing content). After using this option, the source Clips will be muted.
- Playlist Track Header > Right-Click > Consolidate this track - All Clips on the track are rendered to Audio. After using this option, all Clips on the Playlist Track will be muted.
NOTE: Pay attention to your Render Settings as this will decide if Master and Insert Track effects are applied.

TIP: You can consolidate both Audio Clips and Pattern Clips, at the same time into a single Audio Clip.
Excluding Automation
These options are accessible directly from the Picker Panel. The main use is where there is no contextual Playlist Automation, or you are planning to use the content in another plugin or for further manipulation. To convert Clips to Audio (Right-Click) Patterns in the Picker Panel and select:
- Quick render as audio clip - Bounces the Pattern/s to Audio Clip/s, in the Picker Panel, using the current Render Settings.
- Render as audio clip - Bounces the Pattern/s to an Audio Clip/s, in the Picker Panel, after you set the Render Settings. This and the previous option can be useful when creating samples to drop onto the Playlist as an Audio Clip or to Sampler Channels for further manipulation.
- Render and replace - Renders the selected Pattern/s to an Audio Clip (.WAV only) allowing you to set Render Settings AND replaces instances of the Pattern Clip in the Playlist with the Audio Clip. NOTE: Consider using Playlist menu > Tools > Consolidate clips to include context Automation.
NOTES: 1. Pay attention to your Render Settings. 2. As the automation of Patterns can change with Playlist position, automation is not active during Picker Panel Pattern rendering. The song start, or Playlist selection, is used to set fixed automation values for the duration of the Pattern/s. If you want to bounce a Pattern Clip to audio, with in-situ Playlist Automation, use the Consolidate options above.
Render Settings
It's important to take a moment to think about how you plan to use bounced Audio. Let's consider the Render Settings > Miscellaneous > Insert and Master FX combinations and how these can influence your workflow:
- Master OFF / Insert ON - Bouncing Instrument Channels and Insert Mixer FX to audio. Route the Audio Clip to the Master Channel. Replace the Pattern Clip instances with the matching Audio Clip/s. Optionally disable, or remove, the Insert Mixer FX and or Instrument Channels if they are not used by other Patterns.
- Master ON / Insert ON - Bouncing Instrument Channels, Master and Insert FX to audio. Replace the Pattern Clip instances with the matching Audio Clip/s and route the Audio Clip to the Master Mixer Insert Channel. Disable, or remove, the Instrument Channels (if they are not used by other Patterns), Master and Insert Mixer FX.
- Master OFF / Insert OFF - Bouncing Instrument Channels to audio. Special-use case. A caveat with this combination, when multiple Mixer Channels are used by the Pattern, their FX can't be easily re-applied to a single Audio Clip. So, how you use this option will depend on your 'special needs'. Let us know in Looptalk.
- Master ON / Insert OFF - Bouncing Instrument Channels and Master FX to audio. Another 'special-use' case, let us know in Looptalk.
NOTE: To include Master FX on individual Playlist Track renders (Stems) use the Playlist menu option - Tools > Export all playlist tracks. NOTE: See here for some important notes when working with some effect types and this feature.
Project Picker
The Project Picker can be opened by (Ctrl+F8), Right-Clicking the Clip Source selector (indicated above) or Mouse X1 button on the Playlist, Piano roll or FL Studio background wallpaper.
![]() Plugin Picker video tutorial here.
Plugin Picker video tutorial here.

- Preview items - Place the Mouse Cursor over items without clicking. When an item is previewed related Patterns or Channels display a yellow tick. For example, the image above shows that two Patterns use the Sytrus Channel previewed.
- Select items - Click on items and the Project Picker will close automatically.
- Change Category (Mouse-wheel) - Roll the Mouse-wheel when the picker is open to change category (All, Pattern or Channel view).
- Close (Esc) - Press the Escape key, Right-Click on the Project Picker background or select an item.
Working with Clips
Take the time to learn the Playlist keyboard shortcuts associated with your most common Clip operations. In particular, the shortcuts that swap between editing tools are great time savers.
Selection Methods (while in Draw or Paint mode)
Most commonly you will be in Draw (![]() ) or Paint (
) or Paint (![]() ) mode, if so holding (Shift) will swap between Paint & Draw modes, although the cursor does not change in appearance. Further, holding the ( Ctrl) key will temporarily enable Select mode:
) mode, if so holding (Shift) will swap between Paint & Draw modes, although the cursor does not change in appearance. Further, holding the ( Ctrl) key will temporarily enable Select mode:
- Select a rectangular area in the audio or pattern tracks - Hold (Ctrl) & drag to define the selection area with the left Mouse button.
- Add to existing selection - Hold (Ctrl+Shift) while making a rectangular selection to add to the existing selection.
- Select a group of pattern tracks - Hold (Ctrl) & drag up/down inside the pattern name area on the left side of the screen.
- Select a time region - Hold (Ctrl) & drag left/right inside the timeline area.
- Select a marked time region - Double-Click a time marker in the timeline to select the time region from this marker to the next one (or to the end of the song if is the last one).
- Select the region between markers - Click (Ctrl+Left-click) on the left edge of the left-most marker bounding the region to be selected.
Universal Clip Editing Methods
- Snap settings () - Snap controls how Clips move on the Playlist grid and many of the other editing functions below. Set this to 'line' if you want the Clips to snap to bar boundaries or to 'none' if you want to freely position & slice Clips.
- Inserting Clips - To insert a Clip, select the Clip you want to place from the Clip Source menu (indicated above) OR Right-Click the Clip focus selectors (indicated above) to choose Clips of the type selected. Next, in Draw () or Paint () mode, Left-click on an empty area of a Clips track where you want to place the Clip. Paint mode
allows you to paint multiple instances of the Clip at once (hold the Mouse button & drag).
- Insert time into the Playlist (shift Clips to the right) - Hold (Ctrl), click and drag on the time-line at the top of the Playlist starting from the point you want to insert space into the timeline AND for the duration of the insertion you want. With (Ctrl) still held press the (Insert) key on your keyboard. Insert time into the Playlist (slice and move Clips to the right) - Make a time selection as above, then hold (Ctrl+Alt) and press the (Insert) key on your keyboard. The slice point will be at the start of the selection.
- Delete a time selection - Hold (Ctrl), click and drag on the time-line at the top of the Playlist to select the region to be deleted. Press (Ctrl+Del) to delete all patterns in the current selection and move Clips to the right of the selection into the gap.
- Select Clips - To make a selection of more than one Clip. Use the Select tool and click and drag a rectangle around the Clips to be selected. To add Clips to this selection hold the (Shift) key and make further selections.
OR if you are in Draw or Paint mode, hold (Ctrl) key and you will drop into Select mode while the (Ctrl) key is held. Holding the (Ctrl+Shift) keys will allow you to add and remove Clips to / from an existing selection.
OR use the Magic lasso feature. Move your Mouse pointer in a loop that encloses the Clips you want to select (no clicking required, it's 'magic' remember). Make sure you have no Clips selected before you perform the lasso action (Right-Click the empty Playlist to deselect all Clips and make another selection).
- Zoom to area - (Ctrl+Right-Click) and drag over a selection of the Playlist. Un-Zoom area - (Ctrl+Right-Click) anywhere on the Playlist (don't drag).
- Zoom to a Clip - (Ctrl+Shift+Right-Click) on a Clip will maximize the zoom of the Playlist to the selected Clip. To Un-Zoom Clip - (Ctrl+Right-Click) anywhere on the Playlist (don't drag in this mode since that is how to zoom to selection).
- Delete/Erase a Clip - Right-Click the target Clip or use the left Mouse button if you are in erase () mode.
- Copy/Paste Clips - Make a selection, release the Mouse and any keys held, then hold the (Shift) key, then click on the selection and drag. A copy of the selection will follow the Mouse cursor. Release the selection when the Clips are in the alternative location. NOTE: In 'Slice tool' mode this will initiate a slice, not copy. OR Make a selection, press (Ctrl+C) to copy, then scroll the Playlist so that the starting bar for the paste location is at the left edge of the Playlist and press (Ctrl+V).
- Duplicate selection - Make a selection and press (Ctrl+B). The selection, or all Clips if no selection is made, will be duplicated to the right of the original selection. To define a specific repeat interval, make a time-line selection equal to the complete interval to be duplicated and press (Ctrl+B). NOTE: The time-line selection and note selection can be made independently. The repeat interval is set by the time-line selection, the Clips duplicated by the Clip selection. In this way, Clips outside the time-line selection can be duplicated according to the time-line interval.
- Slicing Clips - Use the Slice tool (), go to a Clip, click and hold the left Mouse button, then drag vertically through the Clip/s to be sliced. OR...
- No drag slicing - In Slice tool mode, hold (Right-Shift), then click and hold on the Clip, position the knife horizontally and release the Mouse where you want to slice. NOTE: In other tool modes this will initiate a copy-drag, not slice.
- Slicing in Paint or Draw mode - You can drop into slice mode by holding (Alt + Right-Shift), then click and hold on the Clip, position the knife horizontally and release the Mouse where you want to slice. If you want snapping release the (Alt) key after you have clicked on the Clip, then horizontally position the knife (now with snapping) and release the Mouse button where you want to slice. You can engage and disengage the (Alt) key while dragging horizontally if you change your mind about snap mode.
NOTES: For Audio Clips the Zero-cross setting on the Clip Focus selector and Snap (
) setting will influence precisely
where the Clip will slice. Hold the (Alt) key to temporarily disable snap for precision slicing.
If you don't feel the maximum zoom provides enough resolution, increase the PPQ setting in the Project > General options.
- Resizing & Slip-editing Clips - Resized or sliced Clips are just a window over the original data (data still exists outside the visible Clip boundaries). You can either move the start/end positions of the Clip without moving the data in the Clip OR reposition the data while maintaining the start/end positions.
In Draw (
) or Paint () mode hold (Shift) and drag on the start or end of the Clip. Automation Clips need to be resized by dragging on the Clip Title Bar (that also holds the Clip Menu). This is because the lower clip area is used to edit Control Points. To 'slip edit' the data within the window, select the slip tool () (S) then Left-click and drag inside the Clip and move the Mouse left/right.
NOTES: 1. The Playlist Menu option 'Allow resizing from the left' should be enabled to allow resizing from the start. 2. The Snap settings will determine how the data slips. Hold the (Alt) key to temporarily disable snap. Perfect for aligning vocals to the beat.
- Ripple-editing - Moves the start/end of the Clip while preserving the data at the start/end by 'slipping' the data at the opposite end to extend/shorten the length of the Clip. Select the slip tool () (Shift+S) then Left-click and drag on the start/end of the Clip. NOTE: The Snap settings will determine how the data slips. Hold the (Alt) key will temporarily disable snap for fine-tuning. Perfect for aligning vocals to the beat.
- Swap Clips - Open the Clip Menu (the small icon in the top left corner of each Clip) and from the Select source channel menu, pick an alternative Clip. Hold (Shift) to preserve the Start and End points of the Clip. That is to preserve the relative position in each Clip that is changed.
- Edit Clip channel settings - To open the Channel Settings associated with a Clip, open the Clip Menu (the small icon in the top left corner of each Clip) and select Channel Settings or Double-Click the title-bar of the Clip.
- Group Clips - (Shift+G) - Grouping functions so that selecting,
moving or deleting any Clip from a group will cause all others notes in the group to be selected, moved or deleted, etc. Any number of groupings may be created. To group Clips - make a selection using the Select tool, then use the Group function. Activated / deactivate grouping: Use the Note / Pattern Grouping switch on the Toolbar shortcut icons. Deselecting the Grouping switch will disable Clip grouping behavior until the switch is reactivated.
- Move clips vertically - Make a selection and hold (Shift) and press the Up/Down arrow keys. If no selection is made then all the Clips will be moved.
- Audition a Clip - Select the Playback tool and click on the Clip of interest in the Playlist OR (Alt+Right-Click ) on the Clip in the Playlist OR Select Preview from the Clip Menu (the small down arrow at the start of each Clip) and press the Stop button in the Transport panel to stop the preview).
- Clone Clips - Open the Clip Menu (icon at the top left corner of each Clip) and select 'Make Unique'. By default, all instances of a given Clip share the same Channel or data. To make edits to the source data without affecting the other instances use the make unique feature. The Clip channel will be cloned and the clone will be assigned to the Clip that was edited, making it 'unique'. In the case of Audio Clips where you want to clone the audio file on disk, use 'Make unique as sample'. Use this when you want to physically edit/manipulate the sample data and change it in some way.
- Rescale Clip placement - Make a selection then (Right-Shift) and click on the right-side of the right-most Clip, then drag. Holding the (Alt) key will snap to 25% increments.
- Beat slicing - You can split your Clips into even pieces for each bar or beat in the timeline. Open the Clip Menu and from the Chop into menu select Bar or Beat. Beat Random) splits the Audio Clip in beats and reorders the resulting pieces in a random order.
Audio Clip Specific Features
Audio Clips have a few unique properties, as discussed on the Audio Clip page.
Automation Clip Specific Features
Automation Clips have a range of unique properties, as discussed on the Automation Clip page.
Pattern Clip Specific Features
Pattern Clips have a few unique properties, as discussed on the Pattern Clip page.
Clip Menus
Under the menu icons at the top left corner of each Clip you will find a menu with the following options, depending on the Clip type selected:

- Pattern / Audio / Automation Clip
- Preview - Previews/plays the Clip.
- Select source pattern/channel - Replaces the existing Clip with the selected source. Hold (Shift) to apply the relative start/end points of the current Clip to the new one.
- Channel settings (Audio / Automation Clips) - Opens the channel settings for the Clip.
- Edit pattern (Patterns) - If the pattern has content, opens the Piano roll. If empty, opens the Channel Rack.
- Rename and recolor - Rename and recolor the Clip.
- Change color - Change the color of the Clip.
- Make unique - Clones the original Clip so that edits on the new Clip do not affect other instances. NOTE: With Audio Clips the original audio file is re-used in the new Audio Clip channel. Alternatively use 'Make unique as sample' (see below).
- Select all similar Clips - Selects all instances of the same Clip in the Playlist.
- Delete - Deletes the Clip. Beware that the Clip may be used in other places in the Playlist.
- Use current time signature (Patterns) - Sets the Pattern to the Time Signature at the Clips current location. This will create a Time Signature Marker to match at the top of the window.
- Region
- Select region - Selects a region if existing.
- Chop (Clips) - Opens a sub-menu with chopping options. Slices the Clip into rhythmic pieces aligned with the grid. NOTE: Chopping will be applied to all selected Clips.
- Sample (Audio Clips)
- Make unique as sample - Clones the original Audio Clip AND clones the sample file on disk. Use this when you want to physically edit the sample data and change it in some way. NOTE: Hold (Shift) to skip the sample save location pop-up.
- Edit sample (E) - Opens the integrated Edison Wave Editor, or the custom wave editor you have selected in the Tools window.
- Pitch correct sample (P) - Opens the integrated Pitch Correction plugin, NewTone with the current sample. After editing, drag the sample from the editor and drop on the Channel Preview window.
- Time-warp sample - Opens the integrated Time Warping plugin, NewTime with the current sample. After editing, drag the sample from the editor and drop on the Channel Preview window.
- Extract stems from sample - Extract up to 4 tracks from any Audio Clip including Drums, Bass, Instruments and Vocals. Each stem is loaded onto a child Playlist Track relative to the Track the source Audio Clip is located on. Extraction is based on an Machine Learning 'AI' model with the results dependent on the source audio. Options include:
- Stems - Choose the audio you want to extract (Drums, Bass, Instruments and or Vocals). Each item that is selected will create a new Playlist Track.
- Muting options - Choose to Mute the source 'Audio Clip', the 'Source Track' or to 'Do nothing'. Normally you want to mute the source Audio so you can preview the component stems. When all stems are played together they should sound (more or less) identical to the source Audio Clip.
- Limit CPU usage - Since the extraction process for longer audio can take some time (minutes), and FL Studio will be unavailable for work while this happens, you can choose to limit CPU usage so your computer remains responsive for other tasks. Like watching FL Studio videos.
NOTE: The first time you use this feature, FL Studio will open a request to download the machine learning model that separates the audio into stems. Processing track-length audio can take some time to complete (minutes). FL Studio will be unresponsive while the stems are extracted. The reason is to prevent you from making changes to the project that may conflict with the creation of the Stem Tracks and their routing. Hands off! Stare at the progress bar and chill. It's relaxing...
- Detect tempo - Opens the tempo detection dialog and offers to set FL Studio to the same tempo.
- Fit to tempo - Fits the sample to the project tempo. You can also use this to lock samples to the project tempo so they stretch to fit a new tempo when it is changed.
- Automate (Audio Clips) - Opens a sub-menu with the following options:
- Volume / Pan - Create Automation Clips for the sample Volume or Pan.
- Crossfade with - Creates a crossfade Volume Automation Clip envelope for overlapping Audio Clips. The single Automation Clip created is inversely linked to the other Clip of the pair, so the crossfade is performed between both Clips with a single envelope.
Playlist Menu
The Playlist menu button ![]() has options and commands for managing the Playlist.
has options and commands for managing the Playlist.
- Edit - Many of these functions can be achieved with the edit tools along the top of the Playlist.
- Cut (Ctrl+X) - Cuts all selected pattern bars and Audio Clips to the clipboard.
- Copy (Ctrl+C) - Copies all selected pattern bars and Audio Clips to the clipboard.
- Paste (Ctrl+V) - Pastes pattern bars and Audio Clips from the clipboard.
- Duplicate (Ctrl+B) - Duplicate the selection to the right of the current location. If no selection is made all patterns are duplicated.
- Delete (Del) - Deletes all selected pattern bars and Audio Clips. If no selection is made deletes all pattern bars and Audio Clips.
- Shift left / right (Shift+Left-arrow) / (Shift+Right-arrow) - Shifts the current selection left / right by 1 snap-unit.
- Shift up / down (Shift+Up-arrow) / (Shift+Down-arrow) - Shifts current selection up / down by 1 track. If no selection is made all patterns are moved.
- Allow resizing from the left (Ctrl+Alt+Home) - Allows the start of Clips to be resized from the left (start).
- Dropping on track header locks to content - When locked to content the track will insert/paint the Clip that it is locked to.
- Drop audio on track headers - Associated with Track Mode assignment. Choose between the following options:
- As audio clips - The Playlist Track will be renamed to match the Audio file and an Audio Clip will be added to the Track. No other associations are made, this replicates default behavior prior to FL Studio 20.
- As audio tracks - The Playlist Track and auto-assigned Mixer Track are named to match the Audio file. The Audio Clip is also added to the Playlist Track. Subsequent audio files dropped on the Playlist Track will be auto-routed to the associated Mixer Track. TIP: Hold (Shift) to prevent the Channel Editor from opening.
- As instrument tracks - The Playlist Track, auto-assigned Mixer Track and Pattern will be named to match the Audio file. The Pattern will be added to the Playlist Track. The audio will be added to the Channel Rack as a Sampler Channel. This is useful when sequencing percussion, for example.
- Always ask - An annoying pop-up will offer the options above, each time audio files are dropped on the Track Headers. This will be confusing as you won't remember what the options do. You will learn to hate the pop-up and start using the options above to suit your workflow preferences.
- Mute / Unmute - Mute (silence) or un-mute the selected Clips/s or Clip groups.
- Insert space (Ctrl+Ins) - Creates an empty space that matches the current selection (Ctrl+Click-and-drag) on the bar numbers at the top of the Playlist) by shifting all the following Pattern Clips forward.
- Slice and insert space (Ctrl+Alt+Ins) - Slices at the start of the current selection and moves the sliced Clips to the end of the current selection.
- Delete space (Ctrl+Del) - Erases all patterns in the current selection and shifts Clips to the right of the deleted section, left to close the gap.
- Merge pattern clips (Ctrl+G) - Merges the selected Pattern Clips into a single Clip.
- Merge similar pattern clips (Shift+Ctrl+G) - As above, but merges similar repetitions everywhere in the Playlist. NOTE: The process creates a new 'merged' Pattern, the original Patterns still exist.
 Video Here
- Merge automation clips (Ctrl+Alt+G) - Merges selected Automation Clips. Where the Clips are on different Playlist Tracks, the first (left-most) Automation Clip in the group will be used as the starting point for the new Automation Clip. The pop-up dialog will ask for link preferences:
- Keep links of the first selected clip - The target/s of the first Automation Clip (left-most) will be automated.
- Merge all links - All targets from all Automation Clips will be automated.
- Delete all links - All targets will be forgotten. The Automation Clip will need to be re-linked.
- Automatic crossfades - See Project Settings > Playlist.
- Create new clips with manual fades - Set all newly created Audio Clips with a manual Crossfade setting.
- Snap fade handles - Fade handles move and snap to the Playliust grid (snap setting).
- Tools.
- Quick quantize start times (Ctrl+Q) - Aligns all selected patterns to the snap setting set in the () Snap Selector.
- Consolidate playlist selection - Converts the selected Pattern and Audio Clip/s to a single Audio Clip and mutes the source Clips. The consolidated Audio Clip is routed to the Master Mixer Channel. By default, all Channel Instruments / Audio Clips are captured through their respective Mixer Channels including FX, but without Master FX (so the Master FX are not applied twice). If necessary, you can change these settings on the Render Dialog pop-up that appears to confirm the action. There are two length options:
- From selection start (Ctrl+Alt+C) - Creates an Audio Clip starting at the first selected Clip or Timeline selection to the last selected Clip end.
- From song start (Shift+Ctrl+Alt+C) - Creates an Audio Clip starting from the beginning of the Playlist. Use this method when you are creating song-length 'stems' to share with other projects, as there will be no confusion where the Clip/s should be placed (at the start of Bar 1).
NOTE: You can use this feature to merge several vocal or instrumental recordings into a single Audio Clip, or to reduce CPU load.
- Export all playlist tracks - Sequentially renders each Playlist track to an audio file. NOTE: See the section on 'Bouncing to Audio / Freezing' for full details on this feature. There are some caveats associated with Mixer Effects rendering as expected. Sub-options include:
- From song start - Create an audio track for each Playlist track from the start of the Playlist.
- From track start - Create an audio track for each Playlist track from the start of the data in the Playlist Track. This will result in uneven length 'stems' (files).
- Time selection - Create an audio track for each Playlist for the selected time range.
- Export all playlist track groups - Same as the above, but creates only one WAV file for Grouped Playlist Tracks (the parent and sub-track audio is combined). NOTE: See the section on 'Bouncing to Audio / Freezing' for full details on this feature. There are some caveats associated with Mixer Effects rendering as expected. Sub-options include:
- From song start - Create an audio track for each Playlist track from the start of the Playlist.
- From track start - Create an audio track for each Playlist track from the start of the data in the Playlist Track. This will result in uneven length 'stems' (files).
- Time selection - Create an audio track for each Playlist for the selected time range.
- Clone selected playlist track(s) (Alt+B) - Duplicate existing Playlist track, with the option to clone Patterns, Audio Clips, Automation, Effects (in linked Mixer tracks) and Grouped Playlist Tracks. You can also Clone individual tracks from the Track Header (Right-Click) Menu.
- Quick quantize start times (Ctrl+Q) - Aligns all selected patterns to the snap setting set in the (
- Snap - Snap determines how events will move relative to the Playlist grid and how quantization aligns events (NOTE: holding the Alt key temporarily sets snap to 'none'). The options are:
- Main - Snap is set to the Global snap value.
- Line - Clips snap to the nearest grid-line, notice that the grid changes resolution as the Playlist is Zoomed horizontally.
- Cell - Clips snap to the start of the grid-cell they fall in.
- (none) - No snapping. Movement is limited only by the Project Timebase (PPQ) setting (F11). NOTE: Snapping can be temporarily disabled by holding the Alt key when dragging Clips.
- Steps 1/6 to 1 (step) - Absolute grid values equal to the nominated fraction of a step.
- Beats 1/6 to 1 (beat) - Absolute beats values equal to the nominated fraction of a beat.
- Bar - 1 bar.
- Events - Relative to existing events. This is useful to show the boundaries of sliced events when they are butted against each other, as events surrounding the selected event change color.
- Select - Making selections:
- Deselect (Ctrl+D) - Undo any selection.
- Select all (Ctrl+A) - Selects all Clips.
- Select by selected source (Shift+C) - Selects all Pattern Clips associated with the currently selected source Clip.
- Select muted - Select all Clips that have been muted (by the mute selection tool). NOTE: You can use the shortcuts (Alt+M) and (Alt+Shift+M) to Mute and Unmute selections.
- Select possible conflicts -
- Invert selection - (Shift+I) Inverts the selection (what was selected is now deselected and what was deselected is now selected).
- Select time around selection (Ctrl+Enter) - Sets the time-line selection to match the length of the currently selected clip(s). If no selection is made the Zoomed range will be selected.
- Select previous time (Ctrl+Left arrow) - Shifts a selection (made by Ctrl+Left-click and swiping the time-bar) by its own width to the right.
- Select next time (Ctrl+Right arrow) - Shifts a selection (made by Ctrl+Left-click and swiping the time-bar) by its own width to the left.
- Group - Make a selection then use the following:
- Group - (Shift+G) - Group selected Clips. Grouping functions so that selecting, moving or deleting any Clip in a group will cause all others notes in the group to be selected, moved or deleted, etc. Any number of groupings may be created.
To group Clips: make a selection using the () Select tool, then use the Group function. Activated / deactivate grouping: Use the Note / Pattern Grouping switch on the Toolbar shortcut icons. Deselecting the Note / Pattern Grouping switch will disable note grouping behavior until the switch is reactivated.
- Ungroup - (Alt+G) - Ungroup selected notes. Select one Clip in the group then use this function to ungroup all Clips in the group.
- Group - (Shift+G) - Group selected Clips. Grouping functions so that selecting, moving or deleting any Clip in a group will cause all others notes in the group to be selected, moved or deleted, etc. Any number of groupings may be created.
To group Clips: make a selection using the (
- Zoom - Contains a submenu with a set of quick zooming levels:
- Zoom in/ Zoom out (Page up / Page down) - Zoom centers on the Cursor position.
- Quick-zoom 1, 2 & 3 (Shift+1, 2, 3) - Three handy zoom levels.
- Zoom out far (Shift+4) - Minimum horizontal zoom.
- Zoom on selection (Shift+5) - Zoom to time-line selection. The command will be disabled if no time region is selected in the timeline.
- Zoom on performance clips (Shift+6) - Zoom to the Performance zone in the Playlist.
- Time markers - Markers can be used to label parts of your song (such as 'chorus' for example), define regions or to change live Playlist playback behavior. Playlist menu options are:
- Add marker... (Alt+T) - Add a time marker above the time-line. Type a name for the marker and press Enter. The marker can be dragged into the correct location after naming. If the project already has markers, then Right-Click a marker and select Add new marker from the pop-up menu. NOTE: Time markers are used to annotate the Playlist and can also serve as live performance points (see marker type below).
- Add auto (Ctrl+T) - Adds a time marker named 'Auto' ready to be edited.
- Add two - Make a time-line selection and use this option. Markers will be added at the start and end of the selection.
- Add one every - Select from Bar, 2 bars, 4 bars or 8 bars. You must make a time-line selection first.
- Add jump to next bar - Adds a marker of type Jump to the next bar (Skips to the next marker after that).
- Add time signature change... (Shift+Alt+T) - If a selection is made, the Time signature will apply for the selection. A second markers is added, reverting the Time signature to the setting before the selection.
- Place loop (Shift+T) - Adds a loop return Time Marker.
- Delete - Delete the marker/s in the time-line selection. If no selection is made then all markers are deleted.
- Change marker to loop - Changes the marker/s in the time-line selection to the Loop type. If no selection is made then all markers are changed to loop. Right-Click markers to choose other marker types.
- Start recording/Stop recording at selection - Adds start/stop recording markers to the selection. These automate the main Recording control on/off.
Marker/lane right-click menu:
- Add marker... (Alt+T) - Add a time marker above the time-line. Type a name for the marker and press Enter. The marker can be dragged into the correct location after naming. If the project already has markers, then Right-Click a marker and select Add new marker from the pop-up menu. NOTE: Time markers are used to annotate the Playlist and can also serve as live performance points (see marker type below).
- Add time signature... (Shift+Alt+T) - If a selection is made, the Time signature will apply for the selection. A second markers is added, reverting the Time signature to the setting before the selection.
- Place loop (Shift+T) - Adds a loop return Time Marker.
- Delete - Delete the marker/s in the time-line selection. If no selection is made then all markers are deleted.
- Rename... - Edit the name at the pop-up name dialog and press enter.
- Move content left / right - This option moves this content to the left or right of the next markers content region. A markers 'content' is defined as those Clips between the current marker and the next. NOTE: Selecting the menu option View > Time segments > Markers will display marker region/s by shading the Playlist.
Action - Set the Markers purpose:
- None - The marker has no effect. Default type used where markers are just labels.
- Start - Playback and time = 0 starts from the set point.
- Loop - Playback will return to this marker when the end of all data in the Playlist is reached. NOTE: Placing this marker type beyond the end of the last data will also cause FL Studio to render to that point.
- Marker loop - When the playback reaches the next marker playback will jump back to the Loop marker creating a loop.
- Marker skip - Playback will jump to the next marker skipping any Playlist data between them.
- Marker pause - Playback will Pause unless the preceding marker is the Loop type.
- Time signature - Set a Time signature to start from this point.
- Start recording / Stop recording - Automates the main recoding button on and off respectively.
NOTE: Check the Playlist Menu option View > Time segments > Markers to see the Playlist grid shaded by marker region.
Working with Time Markers
- Reposition a marker - Left-click and drag the marker from its left-most edge and release when desired. Markers can be dragged past existing markers without disturbing them.
- Using the time line - Right-Click on the time line to add a marker at the desired location and select 'Add marker'.
Live song jumps - You can using a MIDI keyboard, typing keyboard shortcuts (see below) or FF/RW transport keys on a multimedia keyboard to jump between time markers to create innovative live performances. ![]() Video tutorial here. To use a MIDI keyboard:
Video tutorial here. To use a MIDI keyboard:
- Set the MIDI options 'Song marker jump MIDI channel' to the same MIDI channel as your controller. NOTE: To play plugin instruments just use different MIDI channel to the 'Song marker jump MIDI channel'.
- Turn OFF the Audio Option 'Reset Plugins on Transport'. This should give a faster and less glitchy response when jumping and moving the song position marker.
- Turn ON the Audio Option 'Play truncated notes'. This ensures any notes started before a jump point, and crossing it, still play.
- Select 'Live mode' from the Playlist menu. This changes the jump-to behavior so that jumps happen on bar divisions and also shows the jump-to points (as a gray position marker).
NOTE: Link the Channel mute switches to buttons on your MIDI controller to mute and unmute instruments during a performance for added variation.
Once markers have been added and their type defined they will respond as follows:

NOTE: Keyboard shortcuts apply to the Number Pad only.
- Enable - Show/hide the Picker Panel.
- Show on right side - Moves the Picker Panel to the right side of the Playlist.
- Width - Select a predefined Picker Panel width.
- Select linked channels - Channels associated with the selected Clip will be selected in the Channel Rack.
- Select from playlist/channel rack - Clicking Clips in the Playlist will select them in the Picker Panel.
- Show empty patterns - Shows empty patterns in the Picker Panel.
- Drag to rearrange - Allows you to click and drag on Clips to rearrange them.
- Auto group patterns/channels - When using 'Clone' and 'Make Unique' commands, keeps the copies in the same Groups as the source Clips.
- Select unused - Select unused Pattern, Audio or Automation Clips. Unused Clips are those not placed in the Playlist.
- Sort - Sort Pattern, Audio or Automation Clips by Name, Color, Mixer track etc, depending on what is appropriate for the Clip type.
Multi-touch Gestures
See FL Studio User Interface > Multi-touch support
Playlist keyboard shortcuts
See the Playlist Keyboard Shortcuts page.