PLAYLIST
Automation Clips 
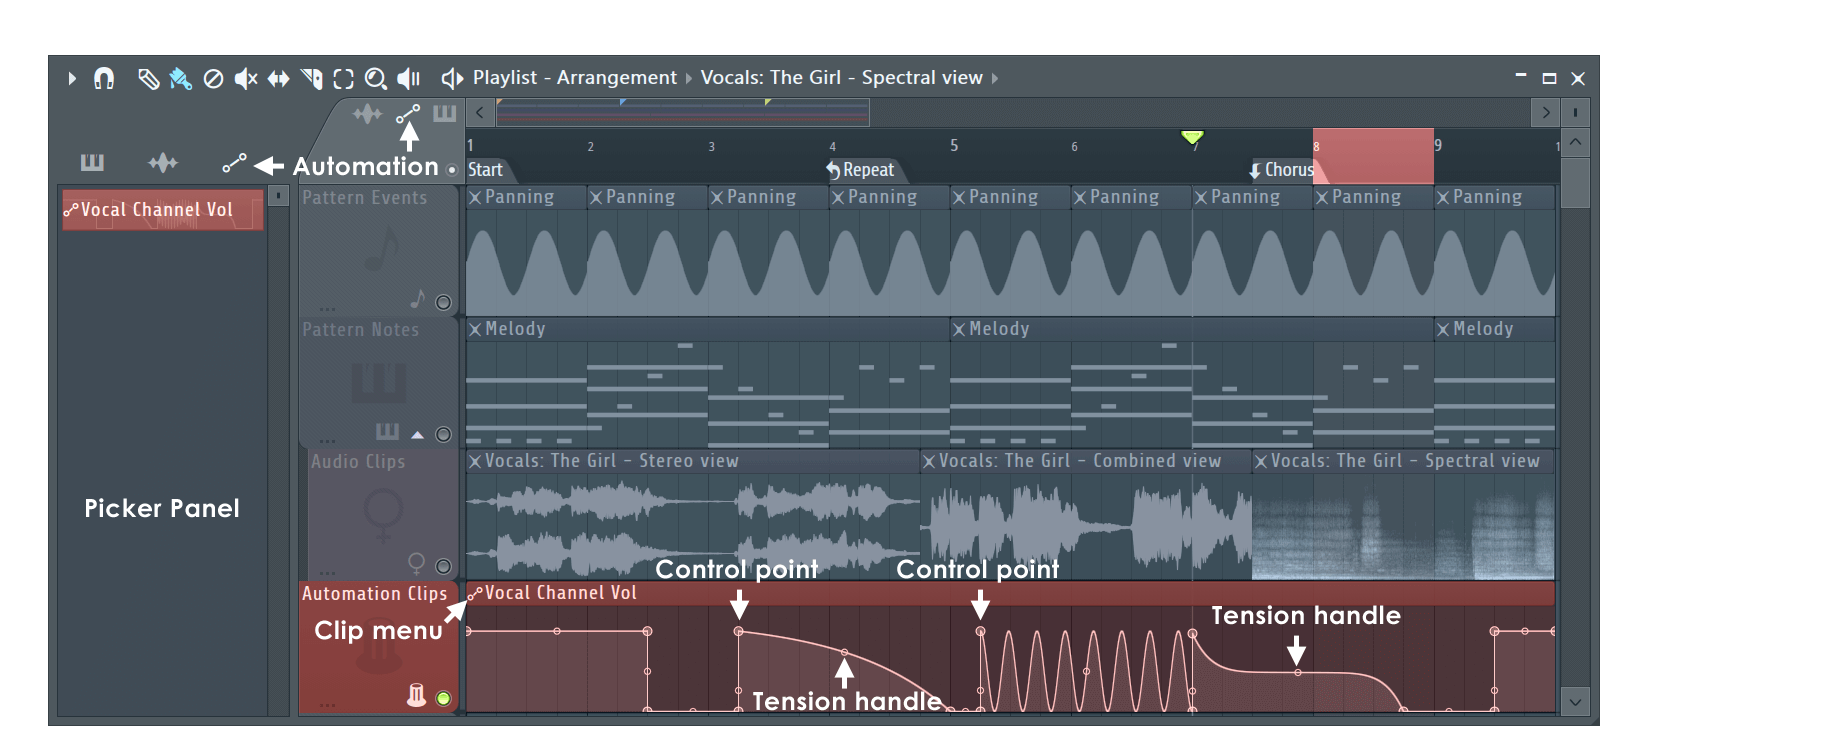
Automation Clips move (automate) linked controls on the FL Studio interface or plugins. They are closely related to Event automation and are a type of internal controller. Unlike event data they are not bound to a specific pattern and exist as a special type of Generator, loaded into a Channel. Automation Clip data can be displayed in the Playlist window as a line-graph, as shown below.
|
NOTE: Once an Automation Clip is created it will appear as an 'Internal controller' link option in the 'Link to controller' Right-Click dialog on automatable controls.
Automation Clips
See the Automation Clip Menu section for more on-Clip options.
Automation Clip Focus
The clip focus selector (shown below) is used to focus various clip types. This is particularly useful when clips are stacked, the focused clip will be brought to the top for selection and editing. Selecting CTRL+click will focus all clips so they can be moved together.

- Right-Click tab - Show Automation Clip menu.
- Step - Sets the Automation Clip curve editor in 'step editing' mode. Left-click and drag in the clip to create a "free hand" curve where a new control point is defined for every step in the timeline (steps depend on the current snap settings). Hold SHIFT while dragging to draw "pulse" lines (straight vertical/horizontal lines only). Note that each new segment created this way uses the last tension set while adding a segment.
- Slide - Preserves the relative distance between a dragged control point and all control points following it.
Creating Automation Clips
There are several ways to create an Automation Clip:
- Native FL Studio controls - Native controls, those on the FL Studio interface and Image-Line plugins, can be Right-Clicked to show a popup menu. Select 'Create automation clip'. A clip will be added to the Playlist Clip-Track area (as shown above). See Notes below.
- VST/AU plugin controls - There are two methods; Prefer 'Last tweaked' unless that does not work then use the 'Current project' method. Not all plugins support 'Last tweaked'. Both methods create an Automation Clip and place it in the Playlist for further editing. For more information on linking targets in FL Studio and plugins see the sections on Linking internal controllers and Linking hardware controllers.
- Last tweaked - Move (tweak) the target control on the VST/AU using your mouse, then, from the Tools Menu select 'Last tweaked > Create automation clip'. Alternatively, Right-click the Multi-link controllers Panel and use the similar menu options there.
- Current project - From the Browser > Current project > Generator / Effects folder, locate the Plugin and click it. This will open the list of automatable parameters. Right-Click the desired target and select 'Create automation clip'.
- Add menu - Tweak the target control and use the Add menu > Automation from last tweaked parameter.
- Convert from Event Data - All recorded automation is saved as Event Data. Convert Event Data to an Automation Clip from the 'Edit > Turn into automation clip' command in the Event Editor menu.
- Audio Clips - FL Studio also provides you with a quick way to automate the volume/pan of an Audio Clip. Open the clip menu and select either Automate > Panning or Automate > Volume. The new Automation Clip will be placed over the target Audio Clip.
NOTES:
- Time range - If you pre-select a time-range in the Playlist, the Automation Clip will be restricted to the selected range. If no range is selected then the Automation Clip will span the entire song length.
- Placement - If you are using Instrument Tracks, Automation Clips will be created as a sub-track of the parent Playlist Track. Otherwise, Automation Clips will be automatically placed on the highest empty mixer track in the viewable area of the Playlist.
Deleting Automation Clips
To Delete an Automation Clip - Delete the Automation Clip Channel OR delete the Automation Clip from the Picker panel. Deleting the Automation Clip from the Playlist will leave the Channel in place for use later in the Project.
Initialized controls - When an Automation Clip is created using the Right-click menu option, the controls value will be initialized with the current value. That is, the original value will be saved, and so remembered after the Automation Clip is deleted or unlinked. When you start the song, the control will return to this single value.
- To remove the initialization - Find it in the Browser > Current project > Patterns > Initialized controls list, then Right-Click and select 'Delete event' OR set the control to the desired starting level and Right-Click it to select 'Init song with this position'.
- To prevent initialized controls - Deselect the option General settings > Don't initialize controls automatically.
Working with Automation Clips
The following operations may be performed in the Clip Track area of the Playlist. See ![]() Video Tutorial here.
Video Tutorial here.
- Automation Clip focus
 - Selects the Automation Clip layer/s for editing.
- Step - When selected, allows you to draw relatively free-hand curves by laying down a new control point each time a Left-clicked mouse is dragged past a grid line.
- Slide - When selected, slides any grabbed control points to the right of the selected point without changing the shape. When de-selected the moved control point will move relative to the points to the right of it.
- To place the Automation Clip in the Playlist - Use the Clip selector along the top of the Playlist window to select the Automation Clip to be placed, then Left-click in the Playlist window while in
 Draw (Shift+P) or
  Paint (Shift+B) mode.
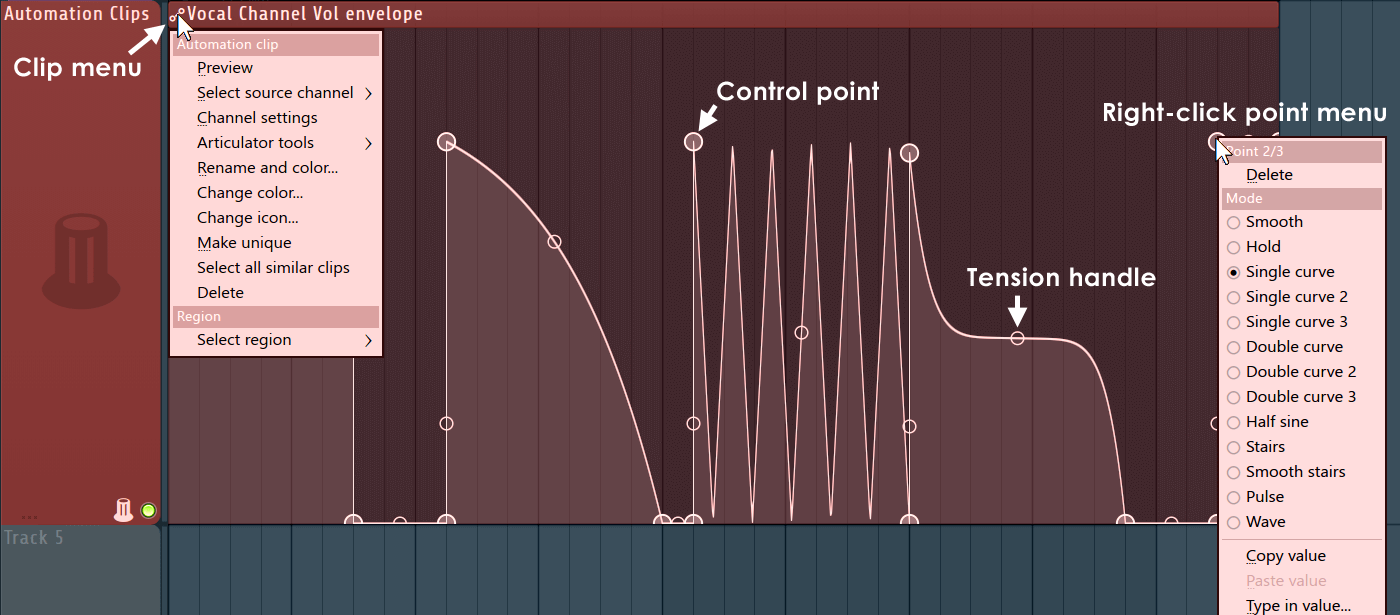
- Add control points - (Right-Click) on the clip area, continue to hold and drag to reposition the point. Hold ( Shift) while dragging to lock the vertical position, or ( Ctrl) to lock the horizontal position. Hold (Alt) to override snapping (if selected). To add a Control Point without disturbing the exiting level use (Shift+Right-Click). NOTE: If 'Snap' is on, use (Alt+Shift+Right-Click).
- Copy / Paste control point values - Right-Click the source control point and select Copy value then Right-Click the destination control point and select Paste value.
- Delete Control Points - Right-Click a control point and select Delete (make sure 'STEP' mode is off), OR quicker, hold (Right Alt) and Left-click points.
- Move control points - Left-click the control point and drag to the desired position (the point will snap to the background grid unless
 Playlist Snap Selector is set to none). Hold ( Shift) while dragging to lock the vertical position, or ( Ctrl) to lock the horizontal position. Hold ( Alt) to override snapping (if selected).
- Set precise values for control points - Right-Click the node and select 'Type in value...' and enter your value (from 0 to 1).
- Change envelope curve - Left-click a tension handle and move up/down. Holding ( Ctrl) will allow fine adjustment. Right-Click the tension handle to reset curve tension.
- Change curve type - Right-Click the right-most control point of the segment to be changed, this will open the Curve Type Menu with the following options:
- Single curve - Default mode for creating straight or curved segments (depending on the tension).
- Double curve - Smooth 'S' curves, useful for scratching effects.
- Alt single curve - Asymmetrical smooth 'S' curves, useful for scratching effects.
- Alt double curve - Asymmetrical linear, or accelerating / decelerating curves (depending on the tension).
- Hold - Single steps between points, useful for creating jumps in position.
- Stairs - Multiple steps between the control points. Left-click on the tension handle and move your mouse up/down to change the step frequency. Useful for glitch / decimation effects. Step size controls the 'graininess'.
- Smooth stairs - Multiple smooth steps between the control points. Left-click on the tension handle and move your mouse up/down to change the step frequency. Useful for changes in pitch and granular effects.
- Pulse - Square wave pulse, adjust the frequency with the tension handle.
- Wave - Sine wave pulse, adjust the frequency with the tension handle.
- Half sine - One half of a sine wave. Useful for creating start, stop and scratch effects.
- Smooth - Allows for smoothly joining points with an 'S' curve.
- Change length - Drag the last control point to stretch the clip. When Automation Clips are created they will span the length of the Playlist selection or the entire length containing data.
- Clone / Copy an Automation Clip - From the Clip menu select 'Make unique'. The new Automation clip will not be linked to any of the original clips targets.
- Restrict /change the automation range - Use the MAX & MIN knobs on the Automation Clip Channel settings to keep the automation in the sweet-spot. NOTE: The automation values will be restricted, but the Playlist display will remain unchanged.
- Slicing - Clips can be sliced
 (Alt + Right-Shift) and then re-arranged. Once a clip is sliced any data outside the visible window may be accessed with the slip editing tool
  (Shift+S). Use the Clip Menu 'Make unique' function to convert the new slice into an independent clip that can be further edited without affecting the parent clip.
- Control point & Tension handle Values - The values will display in the FL Studio hint bar when moved.
- Automation Clip targets - The envelope is usually played back along with the Playlist patterns, sending modulation data to any linked controls (one Automation Clip may feed multiple controls or multiple Automation clips can be linked to a single control).
- Triggering - Automation Clips can be triggered with the Piano roll, Step Sequencer or live with a controller keyboard. The clip will automate while the note is held. Clips do not need to be placed in the Playlist to be effective if triggered by note data.
A ![]() video tutorial is also available on the FL Studio website.
video tutorial is also available on the FL Studio website.
Automation Clip Channel Settings
The Automation Clip Settings can be used to edit Automation Envelopes, activate and edit LFO Mode or Edit Target Links.

- To Open - Double-click the Automation Clip in the Playlist. The location where you double-click will auto-locate the editor to that section.
- Zoom out - Use the 'Home' key on your keyboard or the Magnifying Glass icon in the toolbar to the right of the Options Menu.
- LFO Mode - Converts the Automation Clip to operate as an LFO. Selecting this mode will not delete any automation clip data you have edited in.
- Control Point Selection - To select a single point (Left-Click). To select multiple points (Ctrl+Click & Drag) over points. To add points to a selection (Shift+Ctrl+Click & Drag) over the points to add. To deselect a point (Middle-Click) it. To deselect all points (Left-Click) on the background grid.
Options Menu (Automation Editor & LFO)
- Copy/Paste state - Copy and paste Automation Clip data between Automation Clips.
- Flip vertically - Inverts the current envelope.
- Scale levels - Opens the Scale Level tool.
- Normalize levels - Scales the envelope so the highest and/or lowest levels reach +/- 100%.
- Decimate points - Opens a simple tool that allows manipulation of the number of control points in the envelope (useful in conjunction with Analyze audio file).
- Filter - Opens the Envelope Filter tool (useful in conjunction with Analyze audio file).
- Smooth up - Opens the Smooth Up tool that allows smoothing of the envelope shape (useful in conjunction with Analyze audio file).
- Smooth up abrupt changes - Preset filtering to remove abrupt changes (smoothing).
- Turn all points smooth - Preset filter to filter the envelope.
- Create sequence - Opens the Envelope sequencer.
- Analyze audio file... - Creates an envelope that mirrors the volume amplitude profile of the analyzed sound (you will be prompted to choose an audio file after selecting).
Target Links Panel
Add, Delete, Edit, Locate (opens target window or plugin) and Animate target links for the selected Automation Clip (see icons, left to right):
- Add - Add targets to the selected Automation Clip. Click the [+] icon and tweak any number of targets and then click it again to stop adding.
- Delete - Removes the selected target from the list.
- Edit - Opens the Remote Control settings to change the link options.
- Locate - Opens target window or plugin where the linked control resides.
- Animate - Moves the lined control making it easer to find.
- Convert to events - Blounces the Automation Clip data to Event Data, for the selected Pattern. NOTE: The Automation Clip remains untoched and linked to its target/s after this action.
Settings
- Min - Sets the minimum value the Automation Clip. This is a scaling factor that re-ranges the output from the Automation Clip.
- Max - Sets the maximum value the Automation Clip. This is a scaling factor that re-ranges the output from the Automation Clip.
- Time - Controls the speed at which the Automation Clip plays back. The number window after the Time knob is a multiplier setting.
- LFO Switch - Enables and shows a preview of the LFO and its amplitude envelope inside clips placed on the Playlist tracks. NOTE: Selecting the LFO function doesn't erase the 'main' automation envelope (although not visible). It remains available to be combined with the LFO when the Multiply switch (see below) is selected.
- Speed (SPD) - Sets the speed of the LFO.
- Tension (TENS) - Sets the LFO shape 'tension', a shape morph for tuning the exact LFO shape - starting with square (pulse), sine, triangle and 'pulse'.
- Shape Skew (AK) - Skews the LFO shape. Together with triangle shape, the skew can be used to create saw and reversed saw LFO shapes.
- Pulse Width (NW) - Sets the width of the LFO shape.
- Level (LVL) - Sets the LFO amplitude (strength). Set it to the middle position to reset level to 0 and effectively disable the LFO. Turn it left for negative amplitude (inverted values) or right for positive amplitude.
- Multiply - Allows you to combine the LFO values with the 'main' spline envelope of the Automation Clip. When the switch is enabled the two values will be multiplied, i.e. the LFO acts as an amplitude modulator for the envelope. This is useful for unipolar (one directional) properties such as cutoff frequency, volume, etc. When the switch is disabled both values are added together, i.e. like an LFO 'offsetting' the envelope. This is useful for bipolar parameters such as panning.