INSTRUMENTS / GENERATORS
FPC
FPC (Fruity Pad Controller) is a software plugin similar to the hardware Akai MPC™ unit, coded & optimized for the FL Studio platform. FPC is a self-contained multi-layer/velocity drum machine that
makes it easy to create, edit and swap drum kits on the fly. FPC supports 16 multi-layered patches for banks A and B. (![]() FPC video tutorials can be viewed here.)
FPC video tutorials can be viewed here.)
Sounds and patterns: Two easy to use drop-down menus are the Content Library to download new sound banks (sounds), and the Pattern Manager to select MIDI loops/patterns and dump them to the Piano roll.

The FPC interface consists of three main zones - Main Pad Properties (1), Layer Properties (2) and the Pad Matrix (3), as described below. The interface can be resized by Left-clicking the left or right edge of the plugin and dragging horizontally to hide/show the layer controls.
Tips and Tricks
- Larger interface - Drag on the lower-right corner.
- Load samples - Drop on Pads from the Browser or File Explorer window.
- Play sample regions - Right-click the sample preview display and choose 'Select region'.
- Random-layers - Switch on the Random layers button and overlap velocity ranges.
- Select Pads/samples - By playing them.
- Touch control - Select bank A or A+B from the Layout control (Gear icon).
Layout Control and Pattern Manager
- Layout Control - allows you to swap between three modes. 1. As shown above. 2. Pad-Bank A view. 3. Pad Banks A+B view. The two Pad-Bank modes are designed for playing FPC on a touch-screen. You can click and drag on the plugin window to resize Pads. Click the control to cycle between the three views.
- Pattern Manager - opens a tree-menu showing a list of percussion loops (MIDI data) that when selected load into the FPC channel as a Piano roll. Selecting a new pattern from the menu will replace the currently selected pattern.
1. Main Pad Properties
This panel shows the currently selected Pad. To select a Pad Left-click on down arrow to the right of the Pad Selector or Left-click the pad on the play-pads. NOTE: You can play Pads without changing the selected Pad by using the right-mouse button.

- Pad selector - (Showing Pad 1/32) The arrows allow you to change the selected Pad.
- Options - Left-click the down arrow to open the following menu:
Pads (right side menu)
- Bank A / Bank B - Quick access to all Pads (sounds) from Banks A and B.
Pad
- Rename, color and icon... - Opens the combination control for these functions. Rename or re-color the Channel. Click on the Channel name and type to rename, or Left-click on the color square (shown below) to open the re-color dialog or Right-click to randomly assign a color from a palette pre-approved by the Image-Line Aesthetics Committee. Once the name dialog is open, press (F2) to randomly select colors OR (F3) to select the last used color:

- Change color - Select a new color for the Pad.
- Change icon - Change/add an icon for the Pad.
- Load preset - Loads an FPC preset.
- Save preset - Saves an FPC preset.
- Clear pad - Reset the Pad to an empty, default state.
Import
- Import DirectWave program - FPC can only import .dwp files (DirectWave programs), not banks. The root note is used to map DW zones to FPC Pads. Only the first 32 Zones/Pads will load, root notes in excess of 32 are ignored. FPC only imports zone pan and tune along with the wave file.
Export
- Save entire kit as pad presets - Saves each Pad as a separate FPC Pad preset, allowing you to share Pads between kits.
- Save all wav files - Exports all the wave files used in the preset.
- Export kit as SFZ file - Exports kit in rgcAudio's SFZ format.
- Save for FL Studio Mobile... - Save to .dwp (Monolithic format), compatible with FL Studio Mobile's DirectWave sampler.
Notes
- Layouts - Opens a menu of preset layouts:
- default - Matches the Akai MPC™ series unless it has been overwritten with your own layout. Note that if you want a particular layout to load each time FPC is opened, you will need to 'Use current layout when changing presets' first (see below).
- padKontrol - PadKontrol preset (custom controller).
- trigger finger - Trigger Finger preset (custom controller).
- (none) - FPC will use the note layout saved in the song/preset opened.
- Use current layout when changing presets - Prevents the current note layout changing when you select a new preset.
- Save note layout - Saves the Pad to MIDI note relationships (layout).
- Load note layout - Loads the Pad to MIDI note layout presets.
- Map notes for entire bank - Starting from Pad 1 (lower left) each MIDI note that is played on your controller will be automatically linked to the next FPC Pad (Pad 1-16 or 17-32 in sequence). Clicking on the option selects the first Pad in the bank. There are three ways to cancel the auto-link process: 1. Change the note value for a Pad, 2. Change the Pad or 3. Select "Cancel Map notes..." in the Pad menu.
- Pad name box - Shows the Pad name, which you can change by Right-clicking the box and entering new name in the window that pops up.
- Volume, Pan & Pitch - Sets the Pad volume (left), Stereo Panning (middle) and Pitch (right). NOTE: When pitching samples the Mixer > Resampling quality setting will affect CPU usage.
- Mute button - Mutes the current Pad (active when green).
- Solo button - Mutes all other Pads except the current Pad (and any other solo Pads) (active when red).
- Scale volume button - This option should usually be enabled, unless you want to handle velocity changes entirely with multiple velocity-sensitive layers (see Layer Properties below).
- Bank A/B - There are two banks X16 Pads available per patch.
- Play Key/Octave - Left-click to select the base/root note for the Pad, that is the MIDI key number/pitch that will play the Pads sounds. The first box sets the key that is assigned to the Pad. The right
box sets the octave in which that key will play. The names shown in brackets beside some notes are the General MIDI standard. In other words, to build a FPC kit that is GM compliant, you need to have
the sounds listed loaded on Pads that are mapped to those keys. Other options are:
- Last hit - Assigns the last triggered MIDI controller key to the current Pad.
- Learn - Assigns the next triggered MIDI controller key to the current Pad.
- Map notes for entire bank - A 'Learn mode' that steps through all the Pads in the bank. Assigns the bottom left Pad first and works its way to the top right Pad. You will need to trigger 16 MIDI keys to assign all Pads.
- Show GM note names - Shows/hides the General MIDI note names.
- CUT Group / Cut BY - Use CUT and BY to use one Pad to cut (stop) notes playing on another Pad. The CUT box sets the cut group the selected Pad is in. The second box BY sets which group will cut the current Pad. Use these controls to make more realistic drum kits, where an open hi-hat is cut by a closed hi-hat, for example. To make a Pad cut itself, set the CUT and BY values to the same number. To change values, Left-click in the box, hold and move the mouse up and down.
- Output - The Output Offset adds a Mixer Track offset value to the selected Pad, this allows independent or grouped mixer tracks to be used by the FPC Pads. The offset is relative to the Mixer Track number the plugin is assigned to at the Channel Settings. For example, if FPC is sent to mixer track 1 and the offset for a given Pad is 2, then the sound from that Pad will appear on mixer track 3. If the plugin wrapper is set to track 5 then the Pad will appear on Mixer Track 7. To disable the offset set the display so that it shows '--'.
2. Layer Properties
Each Pad can contain multi-layer samples so that different Layers respond to specific velocity ranges. This can be useful for creating realistic acoustic drum kits. Use the Layer Properties view to create and edit the Layers of the currently selected Pad.
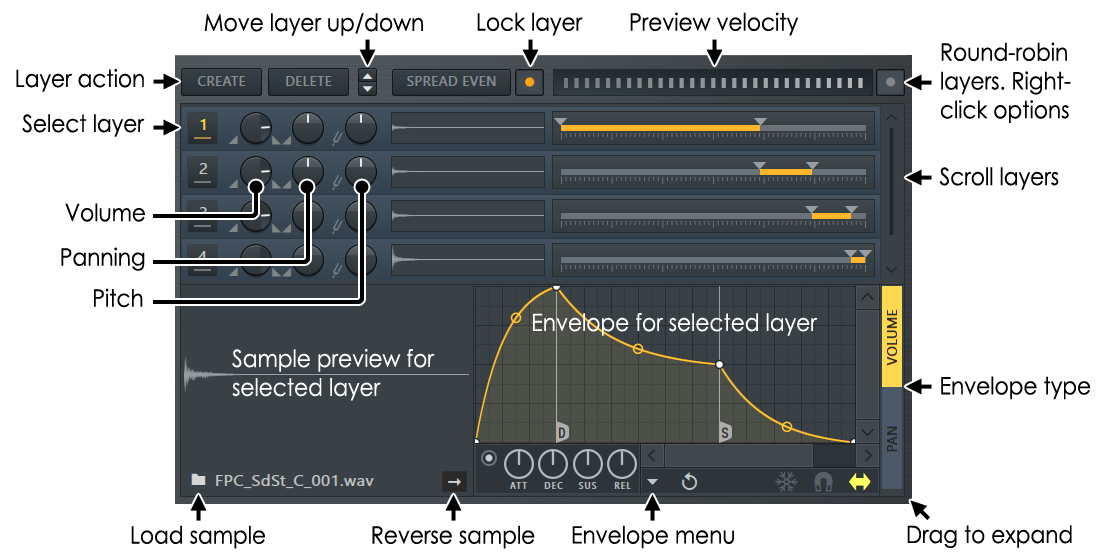
Layer Properties Controls
The controls on each Layer are (from left to right):
- Select - Click this button to mark the channel as selected. This is required for some operations, like browsing for a new sample, move up/down, delete, display in the large sample preview (in the bottom) and the reverse playback switch.
- Volume Knob - Sets the volume of the Layer.
- Pan Knob - Sets the stereo panning of the Layer.
- Layer Tune Knob - Allows you to offset the pitch up/down (faster/slower playback) from the original playback speed of the sample. The knob ranges from -1 to +1 octave pitch shift.
- Mini Sample Preview - Displays the loaded sample (if any). Click to preview the sample.
- Velocity Range - Sets the active velocity range for the Layer, i.e. the velocity values at which the Layer's sample will play. The velocity is mapped from minimum (left) to maximum (right). Drag the velocity-range end-point handles to define the active velocity region. Overlapping layers will play together when the Random layers switch is deactivated. NOTE: The Lock Layers switch must be disabled to overlap Layers.
Modifier controls
The controls along the top of the Layer properties window are used to modify Layer behavior as follows:
- Create (Layer) - Adds a new, empty Layer at the bottom of the stack (use the scroll bar down the right side of the window to access Layers that are out of view).
- Delete (Layer) - To delete a Layer, select it by clicking the Layer's Select button and then click Delete .
- Spread Even - Spreads the Layer velocity ranges evenly, from min to max input velocity, without overlap.
- Lock Layers - Locks adjacent Layer's end-point ranges together to prevent overlapping (one sample will play at a time for any given velocity).
- Velocity range preview - Click on this bar to play the Layers according to velocity input from low (left) to high (right).
- Random layers - When selected, layers with overlapping velocity ranges will be triggered according to the randomization option selected (Lock Layers must be disabled to overlap layers).
Right-click the switch to select from:
- Cycle (Round robin) - Each Layer in the velocity group will be played, in turn, each time that velocity group is played.
- Random - Layers are played at random from the velocity group.
- Random (avoid previous) - Layers are played at random from the velocity group, with the restriction that the same Layer will never be played twice in a row. Random selection can sometimes cause a singe Layer to be played repeatedly, defeating the purpose. This random option can help to avoid obvious identical hits with repeated fast playing of a Pad.
TIP: Generally the Random function is designed to select from a number of samples played at similar velocities, with subtle and natural variations between them caused by human inaccuracies or left/right hand variations. Layer randomization eliminates the artificial and mechanical sound often associated with a single sample rapidly played. You will find however by equalizing the volume of a number of Layers (use the Layer Volume knobs) played at even very different velocities, natural playing can be 'faked' with only a few sample Layers.
Working with Layers
- Load a sample - Click the Browse button (on the left in the Sample File controls (see screenshot above) and select a sample.
- Reverse - To reverse a sample, select the Layer and click the Reverseoption at the bottom of the interface.
- To reorder Layers - Select the Layer and use the Move Up/Down buttons at the top of the interface.
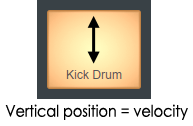
- Preview - To hear how your Pad will sound at various velocities click the Full Pad Preview bar at the velocity value you want to preview. Velocity is indicated by the vertical bars - lower velocities to the left and higher velocities to the right.
- Sample view windows (large and small) - Right-click on the sample preview windows to open a menu with the following options:
- Load - Opens file browser to load a sample into that Layer.
- Edit - Opens sample in Edison.
- Edit in new window - Opens sample in a new instance of Edison.
- Show in browser - Opens the folder in the FL Browser where the file is located and highlights the sample. Then in the Browser, F5 and F6 will cycle through samples in that folder and select them into the selected layer in FPC.
- Select region - When samples have region data embedded (some drum loops for example) you can select the region to play. Sample markers can also be selected and the sample will start playing\ from that point.
Envelopes
There is a Volume and Pan Envelope for each Pad. Use the selector on the right side of the Envelope window to change between them. Envelopes are not active until enabled, as shown below.
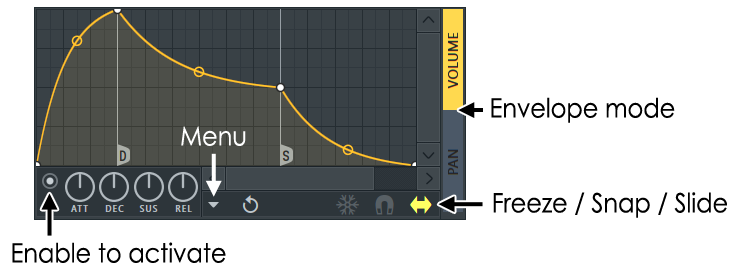
The Envelope editor provides a "classic" ADSR envelope & the power of unlimited spline segments. Left-click and drag node/curve points in order to change the Envelope shape. Right-click the envelope area to add nodes.
- Enable/Disable Switch - To use an envelope/mapping, enable the LED at the bottom left of the editor (see the hand-pointer on the screenshot above).
- Envelope Options - Click the Menu (as indicated aboove) to select from the following options:
- Open state file / Save state file - Opens/saves envelope states. Several different pre-defined state files are available.
- Copy state / Paste state - Use this to copy and paste envelopes, usually between instances of the EQ editor across open plugins.
- Undo - Undoes the last envelope edit.
- Undo history / Last reset - Shows the editing history since the last reset.
- Flip vertically - Inverts the current envelope.
- Scale levels - Opens the Scale Level tool.
- Normalize levels - Scales the envelope so the highest and/or lowest levels reach +/- 100%.
- Decimate points - Opens a simple tool that allows manipulation of the number of control points in the envelope (useful in conjunction with Analyze audio file).
- Filter - Opens the Envelope Filter tool (useful in conjunction with Analyze audio file).
- Smooth up - Opens the Smooth Up tool that allows smoothing of the envelope shape (useful in conjunction with Analyze audio file).
- Smooth up abrupt changes - Quick removal of 'spikey' or sudden changes in the envelope.
- Turn all points smooth - Preset filter to quickly filter the envelope.
- Create sequence - Opens the Envelope Sequencer tool.
- Analyze audio file - Open, analyze and replicate the volume envelope of an input sound file. Drag and drop audio files directly on the Envelope editor for automatic analysis.
- Background gradient - Flips the background gradient shading vertically.
- Freeze - Enable this switch to lock the envelope curve to its current setup. This feature is helpful in protecting the spline structure of an envelope from accidental edits (it also hides the handles, providing a clear view of the shape).
- Snap - Enable this option if you want the control points to snap to the nearest step in the timeline while dragging.
- Slide - Enable this option to preserve the relative distance between a dragged control point and all control points following it (this option is enabled by default).
3. Pads
|
- Pad numbering - Pads are numbered from bottom-left to top-right so that the bottom row are Pads 1,2, 3 and 4, the second from bottom row are 5, 6, 7 and 8 and so on, to the top right Pad 16 (i.e. Pad 1 is bottom left, Pad 16 is top right).
- Pad presets - These are sample/layer setup files. To select without previewing, click the Load preset button. The Previous and Next buttons allow you to switch between alternative setups for the Pad used (if available). Each drum kit may include several different samples for each Pad.
- MIDI key assignment - The settings for both the MIDI key assigned to each Pad and the cut groups for the Pad are set in the Main Pad Properties (1). change access to all Pads (sounds) from Banks A and B using the Bank A / Bank B switches.
Making & Saving FPC Kits
To make your own Sound Banks for FPC follow the general procedure below:
- Clear FPC - From the Wrapper menu select 'Presets > Empty' before you start building your new Kit (that is, if you want to start from a clean slate). One of the many advantages of the 'Empty' preset is that the Pads are already assigned to the appropriate General MIDI keys. Just make sure you drop your samples on the appropriate Pad.
- Sample locations - Consider the following, depending on where the samples in the FPC Kit are located:
- Samples in folders in the Browser - If you are loading the samples from the Browser, nothing extra needs to be done at this step.
- Samples dragged from Slicex or Edison - If you are dragging samples from Slicex or Edison and dropping them on FPC, then you should first set the Project General Settings Data folder to the location where you want to save your 'dragged' samples (and so save the FPC Kit samples). If you don't set the Data folder the default save location will be in the FL Studio installation folder ..\Program Files\Image-Line\FL Studio\Data\Patches\Sliced beats. Make sure any Data folder location you choose is visible from the Browser's Extra search folders, otherwise FPC will not be able to locate the samples next time you load the Kit.
- Load your samples - Drag the samples from the Browser and drop on the Pad/Layer you want.
- Set-up your Kit - Make any changes to envelopes & velocity-splits etc., as required. NOTE: you can reassign the MIDI key using the Play Key/Octave setting. Left-click to open.
- Save a FPC preset (.fst) file - Use the wrapper menu to save a .fst file (Save preset as) to the location where you want to save the FPC kit (preset).
- Reload the kit to test - When the FPC preset is loaded, FPC will locate the samples in the Browser Extra search folders.
NOTE: It is important that all samples used in the FPC Kit have unique names, otherwise FPC will load the first sample with the same file name it finds in the Browser. E.g. Don't use 'Kick1', 'Kick2' etc. It's highly likely samples with the same name exist elsewhere. Use something descriptive like 'Crunchy_Slicex_Kick1', 'Crunchy_Slicex_Kick2' etc.
Plugin Credits: Frederic Vanmol (Development programming & VST), Miroslav Krajcovic (Interface), Robert Conde (Original design).