MIXING & EFFECTS
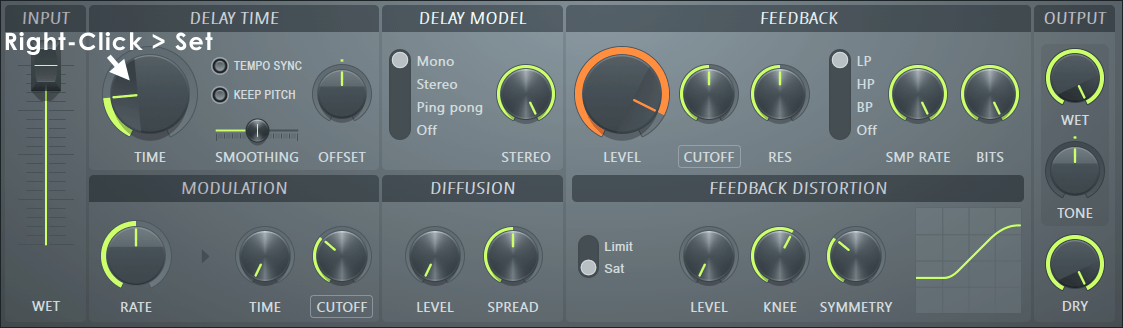
Fruity Delay 3
Fruity Delay 3 is an advanced 'analog' style delay plugin where its time can be automated and that can perform tempo-synced delay when the project BPM is changing. It includes filtering and distortion options for the delay echoes and can be driven into self-oscillation (feedback) for special effects. ![]() Delay 3 Tutorial Video.
Delay 3 Tutorial Video.
Related plugins: Fruity Delay 2 and Fruity Delay Bank.
Video Tutorial
Parameters
Input
- Wet - The input level to the delay/FX process. Automate this when you only want to apply the delay effect to a segment of the incoming audio.
Delay Time
- Time - Time delay between echoes. Range is 1 ms to 1000 ms with Tempo Sync OFF and 1/48th of a Step to 16 Steps (1 Bar) with Tempo Sync ON. NOTE: When Tempo Sync is selected, you can Right-click > Set to choose from pre-defined tempo/time values.
- Tempo Sync - Echoes keep time with the project tempo, including during tempo automation. Each dot around the knob represents one step (1/16th of a Bar). Right click the knob and go to the Set menu to choose from a list of typical musical time values.
- Keep Pitch - The pitch of echoes will not change with the Time setting. With this setting off some interesting special effects can be achieved when automating Time. NOTE: The Modulation section of the plugin will still change the pitch of the delay when Keep Pitch is ON.
- Smoothing - When Keep Pitch is off, Time changes will also affect the pitch of echoes while the Time is being manipulated. Pitch is only affected during the time change. After the time stops at the new value, pitch changes also stop. Smoothing slows down the underlying time value changes (slew rate), and so how fast pitch changes too. Use long values for smooth 'tape style' delay style changes. This is particularly useful with manual Time manipulation.
- Offset/Pan (depending on delay model) - Stereo offset or panning to create stereo delay effects. The offset value is a percentage of the set main Time value.
Delay Model
- Mono - Echoes are mono, the echoes are the sum of the Left and Right channels. The Offset control is time-delay multiplier for the Left or Right channel, depending on which way the knob is turned, to create left-right bouncing / panning effects.
- Stereo - Echoes are stereo. The Left and Right channels are separately delayed. Offset controls pre-delays for the Left and Right channels to create left-right bouncing / panning effects. Feedback is likewise per channel, so the left and right channels stereo content is maintained.
- Ping pong - Echoes are mixed stereo, with the left and right channels alternately flipped on each delay loop to create the left-right bouncing effect. If you are using a stereo source you will hear the channels swap or bounce on each echo. If you use a mono source, you will need to adjust the Pan to create stereo ping-pong effects. Pan acts the same way as panning in the FL Studio mixer to pan the input to the plugin.
- Off - No delay. In this mode the Filter, Saturation, Limiting, Sample rate, Bit reduction and Tone parameters are still active and are applied instantly. This allows you to use the plugin as a distortion, filter or Lo-Fi effect for example.
- Stereo spread (knob) - Adjusts the stereo spread of the delay signal from fully merged to mono to normal stereo.
Feedback
- Level - Level of the echo sent back into the plugin. Level can be set to values above 100% (the indicator ring will change from green through orange to red, to warn that additive feedback is now possible).
- Cutoff - Cutoff frequency of the filter types as listed below. As the filter is in the feedback loop, each echo is further filtered.
- Res(Resonance) - Resonance is a peak in amplitude (boost) around the cutoff frequency. It produces a audible 'peak' in the sound at a narrow range of frequencies, accentuating the position of the cutoff. Try higher resonance values when you are modulating the Cutoff value. The indicator ring will change color from green through orange to red indicating resonances above 75%. NOTE: Higher resonance values can increase the overall feedback, even if the main feedback level is below 100%.
- Filter Type - Choose between:
- LP (Low Pass) - Frequencies below the Cutoff value are audible.
- HP (High Pass) - Frequencies above the Cutoff value are audible.
- BP (Band Pass) - Frequencies around the Cutoff value are audible.
- Off - Filtering disabled.
- Samp Rate (Sample Rate) - Sample frequency. Lower values will reduce high-frequency fidelity and add 'aliasing' noises to echoes. Normally settings of 20 kHz or less are audible (affecting the highest frequencies first).
- Bits (Bit Depth) - Bit depth is the number of bits in the digital file used to represent the waveform amplitude. Lower values will add a crunchy, grainy quality to echoes. Normally a setting of 10 Bits or less is needed to be audible. Subtle settings can emulate vintage digital delay hardware.
Modulation
The modulation source is a sine wave shape. The target will be modulated above and below the set point accordingly:
- Rate - Modulation cycle-time (0 to 20 Hz).
- Time - Modulation amount applied to the Delay Time parameter. Use this for wow/flutter tape delay style effects or to cause flanging / chorusing when mixed with the dry signal.
- Cutoff - Modulation amount of the Feedback Cutoff parameter.
NOTE: You can of course use any internal modulation source to control any parameter on Delay 3. So get creative with Patcher. Try linking an LFO Internal controller from the Peak Controller plugin to the Time parameter for tempo synced modulation, for example.
Diffusion
- Level - Level of the smearing effect on echoes.
- Spread - Time spread of the smearing.
Smears the echoes. This can sound similar to a reverb.
Feedback Distortion
The delay echoes can be distorted on each pass, according to the following controls. Delay 3 uses a waveshaping distortion model. Learn more about waveshaping here. Waveshaping is also useful to avoid the feedback volume going so high that it clips your project or overloads the master limiter.
- Type (switch) - Choose between two distortion types:
- Limit (Limiting) - The maximum level of the input waveform is hard-limited to the set value.
- Sat (Saturation) - The maximum level of the input waveform is distorted according to the settings below. An analog or tape delay unit would naturally saturate at high feedback values, so subtle settings achieve a similar effect. Or go further for crazy saturated delays. Use the filter along with the saturation to adjust the character of the saturated delays.
- Knee - The shape of the transition from non-distorted to distorted waveform. Generally a softer (rounded) shape is more like analog 'valve' distortion and a sharp change like solid-state circuitry.
- Symmetry - Change the distortion from symmetrical, equal in the positive and negative waveform cycle, to asymmetrical, so the waveform only varies in the positive cycle.
- Level - Level at which the Limiting or Saturation starts. Increase to lower the limiter threshold so it activates at a quieter wet signal volume.
- Display - Shows the effect of the preceding controls on the input waveform. This is waveshaping, so input is shown on the vertical axis and output on the horizontal axis.
Output
- Wet - The 'effected' output from the plugin.
- Tone - Filtering on the 'wet' output from the plugin. Low-pass (left), OFF center, High-pass (right) filters on the final output. High passing the wet output can avoid a 'muddy' overpowering delay with a preponderance of frequencies.
- Dry - The input 'dry' signal to the plugin. Turn this to zero, to hear only hear the signal that has been processed by Delay 3.
Plugin Credits: Daniel Schaack (Code), Miroslav Krajcovic (GUI).