INSTRUMENTS / GENERATORS
Slicex - Wave Editor 
Slicex uses advanced beat detection algorithms to slice song/percussion samples into pieces and make them independently playable from the Piano roll or controller. If the wave file contains slice/region
data this will be automatically used instead of the beat-detection algorithm. Slicex offers playback, reordering of slices and time-stretching capabilities optimized for drum loops. Related plugins are the Fruity Slicer and
Edison.

Master Panel
Articulation Panel
Wave Editor
The Wave Editor section shares much in common with Edison so learning one will help you master the other.Section links
Transport Controls
In the top-left section of the Sample Window are several transport controls.
- Loop - Turns on loop playback.
- Play - Press to play/stop the sample playback. The space bar will also start/stop playback when the Slicex plugin is focused.
- Stop - Stop playback.
Menu Buttons
 File
File
- Open/Save options
- New - Opens a new (empty) editor window.
- Load sample (Ctrl+O) - Opens a file browser dialog in 'load' mode.
- Save sample as (Ctrl+S)
- Opens a file browser dialog in 'save' mode. The pop-up dialog has two options under the 'Save as type' field.
- Microsoft wave file (*.wav) - Standard lossless .wav file at the bit-depth and sample rate set in the Sample Properties dialog.
- Microsoft compressed wave file (*.wav) - Lossy compression formats. After initiating the save a second dialog opens to save the sample in one of many compressed formats. MS compressed wave files simply wrap the selected compression type in a *.wav file, and put information in the wave header as to what decompression method the opening program should use (not all programs read this information). FL Studio will load and decompress MS compressed wave files automatically as long as you have the appropriate codec installed.
- WavPack (*.wv) - Lossless or lossy, depending on settings, open-source compression (see the WavPack website for more details). After initiating save in this format you will be prompted for a bit-depth (lossless is the default, other settings are lossy compression modes). In 'lossless' mode expect between 30-70% reduction in file sizes, useful for archiving purposes. FL Studio will load and decompress WavPack files automatically.
- MPEG 3 audio file (*.mp3) - Mp3 is a Lossy compression format. It has gained world-wide popularity because it was one of the first on the market that provided good quality lossy compression. After initiating a save a second dialog opens to select the quality (bit-rate), this controls the tradeoff between audio quality and file size. Good listening quality on portable devices starts at about 160 kbps, use 224 kbps or 320 (max) if you want something probably indistinguishable from CD quality.
- Ogg Vorbis (*.ogg) - Lossy, open source compression format, similar in concept to mp3 (see the Vorbis or Ogg Wikipedia website for more details). After initiating a save a second dialog opens to select the quality (bit-rate), this controls the tradeoff between audio quality and file size. Use a setting of 0.50 or more if you want good quality. FL Studio will load and decompress *.ogg files automatically.
NOTE: Do not use any of the lossy formats (Microsoft compressed wave file, MPEG 3 or Ogg Vorbis) to archive project samples or loops. Use Microsoft wave files or WavPack in lossless compression mode if you want to save space. Hard disk space is cheap, samples may be irreplaceable.
- Export regions -
- For common use - Exports any regions as clean wave files. The names of the markers at the start of each region are used as file names.
- For sampler use - Exports any regions as wave files including 'middle note' data. Where set, the names of the markers at the start of each region are used as file names.
- Export display as - Exports the wave display as a .png or .jpg image.
- Recent projects - Lists the 10 most recently opened files.
 Format
- Edit properties (F2) - Opens the Sample Properties dialog where you can set the file properties.
- Resolution
- 16-Bit int - Sets the file to 16-Bit integer format. This is CD audio standard.
- 32-Bit float - Sets the file to 32-Bit floating point format. This is the native format for FL Studio audio processing.
- Channels
- Mono - Sets the file to Mono.
- Stereo - Sets the file to Stereo. Mono files will be saved with L and R channels containing the same data.
 Edit
Edit
Many of the actions in this menu work on a selected region. To select a region, Left-click in the sample window and drag horizontally. To move the start point, Left-click near the start of the region and drag to a new point. To move the end point, Left-click near the end of the region and drag to a new point. At any time you can zoom the window using the mouse-wheel.
- Undo (item) (Ctrl+Z) - The first item in this menu indicates the last action performed.
- Undo history - Displays the last 10 actions.
- Undo using mix (envelope) - Uses the All-Purpose envelope to guide the undo process. A number of options will be shown based on the actions recently made.
- Undo using mix (spectral) - Uses the All-Purpose envelope to apply the EQ curve set in the EQ tool. Apply an EQ, tweak the all-purpose envelope, use the 'Undo mix envelope' option.
- Disable undo for large samples - Turns off the undo feature. This is useful for saving memory and CPU when working on very large samples.
- Cut (Ctrl+X) - Cuts the selected region.
- Copy (Ctrl+C) - Copies the selected region.
- Paste insert (Ctrl+V) - Inserts the copied sample at the start of the selected region.
- Paste replace (Alt+V) - Replaces the selected region with the copied sample. The duration of the copied sample determines how much of the region will be replaced.
- Paste mix (Shift+V) - Mixes the copied sample with the selected region. The duration of the copied sample determines how much of the region will be mixed.
- Paste mix (envelope) (Shift+Ctrl+V) - Uses the All-Purpose envelope to decide how the sample in the clipboard buffer is mixed with the sample in the editor. The envelope controls the mix level (0 to 100%). The duration of the copied sample determines how much of the region will be mixed.
- Paste mix (spectral) - (Ctrl+Alt+V) - Paste-mixes the sample from the clipboard into the edit window according to the EQ curve set in the EQ tool. Apply an EQ, use the 'Paste mix (spectral) option.
- Paste stretch (Shift+Ctrl+T) - Pastes the copied sample via the Time Stretch / Pitch Shift Tool.
- Paste replace (drum) (Shift+T) - Opens the Paste replace drum tool. This tool reconstructs the decay portions of drum beats that may have been cropped during the slicing process and replaces the selection to the original location.
- Clear (Shift+Del) - Clears the selected region, leaving the rest of the sample unchanged. Consider this a mute function.
- Delete (Del) - Deletes the selected region. This function will change the overall length of the sample.
- Trim (Ctrl+Del) - Deletes the region outside the selection.
- Delete part after loop ( Alt+Del) - Deletes sample data after the loop end point.
- Insert silence (Ins) - Inserts silence from the region start point of a length equal to the selected region.
- Click-free (smooth) editing (C) - Switch, prevents audio clicks/pops in samples caused by edit functions. This option avoids the clicks caused by discontinuities in the sample amplitude at cut/splice points by fading, or crossfading, edit points by a few samples.
 Tools
Tools
- Envelope
- Cancel all envelopes (Alt+E) - Cancels all envelopes.
- Add points at selection (P) - Automatically adds points at the start, middle and end of a selected region for the currently selected envelope type (10).
- Add points at regions - Adds control points at the boundary of the selected region and/or where region markers are located.
- Flip vertically - Inverts the envelope points.
- Amp
- Mixdown amp envelopes (Ctrl+E) - Applies custom envelope/s to the sound.
- Amp (Alt+A) - Opens the Amplitude Tool that allows you to modify L/R channel volume, Panning and Stereo Separation.
- Reverse polarity - Inverts the phase of the waveform.
- Normalize (Ctrl+N) - increases the amplitude of the waveform so that the loudest sample is at 100% maximum possible level. The process works by determining the multiplication factor that will make the loudest sample reach 100%, then multiplies all samples by this value, rescaling them.
- Lossy normalize - Similar to the standard Normalize, the amplitude of the waveform is increased so that the loudest sample is at 100% maximum possible level. There is an additional manipulation of the waveform phase that can sometimes eek out a few more dB gain. The process is considered 'lossy' as it changes the waveform phase, although it should sound identical to the standard Normalization.
- Fade in (Ctrl+F) - Ramps up the volume from 0% to 100% using a logarithmic curve. If a region is selected the fade function will apply to that, if not, the entire sample will fade in.
- Fade out (Alt+F) - Ramps down the volume from 100% to 0% using a logarithmic curve. If a region is selected the fade function will apply to that, if not, the entire sample will fade out.
- Declick in - Smooths clicks at the beginning of a selection.
- Declick out - Smooths clicks at the end of a selection.
- Waveform
- Center - Removes DC offset. The average amplitude of the waveform is shifted to be at the zero crossing.
- Time
- Reverse (Alt+Left) - Reverses the entire wave or selection.
- Time stretch / pitch shift (Alt+T) - Opens the Time Stretch / Pitch Shift Tool to independently manipulate pitch, time and formants.
- Drum(loop) stretch (Ctrl+T) - Opens the Drum (loop) stretch tool, which restores decay portions of drum beats that may have been cropped during the slicing process.
- Claw machine (Alt+W) - Opens the Claw machine tool, that works on a tempo-sliced sample, removing beats, adding beats and/or shifting beats to create interesting new rhythms. NOTE: The sample must have a tempo set (or beatmarkers set) for the option to be available.
- Scratch (envelope) - Uses the All-Purpose envelope to apply 'scratching' effects to the sample, i.e. automate the playback direction and speed.
- Channels
- Swap channels - Swaps the left and right channels.
- Convert left channel to mono - Converts the sample to a mono file based on the left channel.
- Convert right channel to mono - Converts the sample to a mono file based on the right channel.
- Convert mono signal to mono format - Converts the file to a mono format if both left and right channels are equal.
- Synthesis
- Generate noise - Generates white noise in the selected region or whole sample if a region is not selected.
- Scripting
- Run script - Opens a menu containing the list of available scripts. You can write your own scripts using Visual Basic or Pascal, which will be compiled by the paxCompiler and run when you select the script from the menu. The paxCompiler is a true Pascal compiler that allows you to write code to perform complex DSP on your samples. Save scripts - as .pas files in the FL Studio installation directory under ..\Plugins\Fruity\Generators\Slicex\Data\Scripts. Files saved here will be visible the next time you use the 'run script' command. Dialogs - Note that while some of the demo scripts show a dialog, it isn't necessary to use them. Errors - If a script has an error, a dialog is shown explaining the error with options to 'edit' the script or 'run' it again. Writing scripts - Examine the contents of the existing scripts and read the Reference.txt file in the script directory to learn more about writing them and the functions available. You can learn more about Pascal HERE.
- Run last script - Repeats the last script run.
- Noise
- Acquire noise threshold (Alt+N) - Uses the peak of the selection as the noise/gate threshold. To use: select a region of the sample containing only noise and click this button.
- Gate noise - Forces the sections of the sample below the noise threshold (shown in green) to silence.
- Trim side noise - Trims any parts of the sample that are below the threshold volume. Set gate threshold - Left-click the peak meter (6) and move the mouse up/down to change the threshold. A green band will display (as shown in the Slicex screen shot above) in the sample view window.
- Trim all noise & slice up - Trims any parts of the sample that are below the threshold volume and slices the regions defined by the resulting gaps. Set gate threshold - Left-click the peak meter (6) and move the mouse up/down to change the threshold. A green band will display (as shown in the Slicex screen shot above) in the sample view window.
- Spectral
- Convolution reverb (Ctrl+R) - Opens the Convolution/Reverb Tool.
- Blur (Ctrl+B) - Opens the Blur Tool.
- Equalize (Ctrl+Q) - Opens the Equalize Tool.
- Clean up (denoise) (Ctrl+U) - Opens the Noise Removal Tool.
- Regions
- Normalize all regions - Normalizes the amplitude on a per-region basis. Normalization increases the volume of the waveform so that the loudest sample is at 100% of the available amplitude.
- Declick in all regions - Remove clicks from the start of regions (works by creating a very fast fade-in).
- Declick out all regions - Remove clicks from the end of regions (works by creating a very fast fade-out).
- Perfect all regions - Declicks the start and end of all regions (as described above).
- Tune loop (Ctrl+L)- Opens the Tune Loop Tool dialog that allows you access to the main loop controls for a region.
- Analysis
- Convert to score and dump to piano roll - Slices the sample, pitch-detects each slice and creates a note-score to match, dumping it to the Piano roll.
- Sequencing
- Send to Playlist as audio clip (Shift+C) - Dumps the selection to the Playlist as an Audio Clip.
- Send to selected channel - Dumps the selection to the selected Channel.
NOTE: An alternative method for exporting audio is to use the
 Drag / copy sample / move selection button on the
Sample Edit Functions shortcut toolbar.
Drag / copy sample / move selection button on the
Sample Edit Functions shortcut toolbar.
 Regions
- Regions
- Add region (Alt+M) - Adds region start and end markers at the boundaries of the defined region.
- Add marker (M) - Adds a single marker at the start of the selected region. This can be dragged to a new position by the square handle at the top of the marker.
- Set loop (Alt+L) - Defines the selected region as a loop. Special red loop markers will appear.
- Set first downbeat - Adds a Downbeat marker at the start of the selected region. The marker is used to align Audio Clips to the Playlist grid. The marker
can be dragged to a new position by the square handle at the top of the marker. Quick method:
- Manual Downbeat & Grid alignment - Right-Ctrl + Right-Shift + Click on the location in the sample where the first downbeat marker is to be set, hold and drag horizontally to fine-tune the position if needed. Then, release the mouse button and click again with the Right-Ctrl + Right-Shift keys still held (drag left/right) to adjust the grid spacing to align the grid to the beat.
- Delete (Del) - Deletes the selected region, loop or marker.
- Rename all (Ctrl+F2) - Steps through the regions in the editor allowing them to be named.
- Quick rename all (Alt+F2)- Steps through the regions in the editor providing quick name options, allowing all regions to be named.
- Auto rename all - Automatically renames all regions based on an audio analysis of the waveforms. This function is designed to work with percussion sounds and works best when there are clearly distinct hits.
- Assign trigger notes to all - Automatically steps through the regions/slices allowing you to assign trigger notes to each region. When you select the function the first slice will automatically sound, then play the MIDI controller key/pad that you want to trigger that sound. Then the next slice will play and you select the MIDI note and so-on. Trigger notes are simply the MIDI note numbers that will play the specific region. NOTE: Make sure KB INPUT is selected if you want to enable MIDI controller transport functions.
- Assign to all - Choose to automatically assign regions to: Whole Keyboard, White Notes, Black Notes or None.
- Set all cut groups to... - A pop-up will allow you to assign the same Cut Group to all slices.
- Detection
- Auto slice
- Dull auto-slicing - Few slices/regions. Auto-sclicing is based on peak detection, and so requires peaks in the sample associated with beats to work correctly.
- Medium auto-slicing (Alt+S) - More slices/regions.
- Sharp auto-slicing - The most slices/regions.
- Small grid-slicing - Slices the sample according to the small grid lines.
- Medium grid-slicing - Slices the sample according to the medium grid lines.
- Large grid-slicing - Slices the sample according to the large grid lines.
- Detect beats - Detects beats and slices according to regions assigning downbeat and regular beat markers.
- Detect pitch regions - Detects and slices according to regions of constant pitch.
- Zero-cross check all regions - Moves the region markers to the nearest zero-crossing. Removes clicks at the start and end of the regions.
- Freeze all (switch) - Prevents region editing.
- Auto slice
 View
View
- Audio
- Spectrum (S) - Selects spectrum view. This display mode shows time on the horizontal axis and frequency on the vertical axis. Brighter or more saturated colors (depending on the spectrum gradient options) represent louder frequencies.
- Dual view - Shows both the spectrum and waveform views superimposed.
- Display settings - Change the appearance of the spectrum display mode.
- Fancy mode - Smoothed waveform view.
- Coloring - Color is mapped to the predominant frequencies in the audio. Reds are lower frequencies such as bass or the sustain of kicks, blues are higher frequencies such as transients and the splash of cymbals. There is a color gradient from red to blue as there frequencies from low to high.
- Waveform channels - Note that in stereo mode L and R channels are superimposed with slightly different colors (zoom to view more clearly).
- Mono - Display a single (L/R averaged) waveform.
- Multichannel - Display all channels (superimposed).
- Left - Display Left channel.
- Right - Display Right channel.
- Spectrum max resolution - 32, 64, 128, 256, 512 1024, 2048, 4096 and 8192 bands. This is the number of vertical slices the frequency domain is divided into, higher numbers provide more detailed analysis. Resize Slicex to obtain an overall larger view.
- Natural scale - Sets the vertical scale to reflect the musical 'octave' relationship of frequencies (a logarithmic scale). This will stretch the lower frequencies to occupy a greater area and so is particularly useful when working with frequencies below 500 Hz.
- Natural weighting - Sets the color intensity gradient to better represent the way we hear frequencies. Specifically, it changes the brightness weighting from white noise, a linear relationship between frequency and display brightness to pink noise. Pink noise decreases the intensity by 3dB/Octave, making it more suitable for musical uses as the higher frequencies no longer dominate the spectral display brightness, which is closer to how we hear those same frequencies.
- Draft quality - Less visibility of details in favor of quicker graphics responsiveness.
- Medium quality - Balanced tradeoff between detail visibility and graphics responsiveness.
- High quality - Maximum visibility of details at the expense of higher CPU load.
- Spectrum gradient - 12 dB steps, Charcoal, Furnace, Deeper furnace, Glacier, Temperature, The Matrix. Choose the theme that reveals the most detail in the sound or that appeals to you.
- Regions
- Regions - Turns region markers on/off.
- Loop - Turns loop markers on/off.
- Time
- Time in samples - Displays the time-base in samples. This information is displayed to the bottom left of the peak meter (13). Right-clicking the
time display (13) opens a context menu showing -
- Deselect (Up arrow) - Deselects the current selection.
- Select before current selection - Selects the area before the current selection.
- Select after current selection - Selects the area after the current selection.
- Select zoomed part (Ctrl+A) - Selects the region defined by the visible sample.
- Select previous region (Left arrow) - Selects the previous region.
- Select next region (Right arrow) - Selects the next region.
- Time in samples - Displays the time-base in samples. This information is displayed to the bottom left of the peak meter (13). Right-clicking the
time display (13) opens a context menu showing -
- Misc
- Scroller above - Places the Zoom / Scroll bar (12) above the sample.
- Background gradient - Applies a 3D background effect to the sample edit window (7)
 Snap
Snap
- Snap to grid (1) - Envelope points and selections snap to the background grid.
- Snap to regions (2) - Envelope points and selections snap to the region markers.
- Snap to samples (3) - Envelope points and selections snap to samples.
- Snap to zero-crossing (4) - Envelope points and selections snap to zero crossings. This is the point where the waveform crosses the 0 amplitude line and is useful to avoid clicks.
- Snap to pitch period (5) - Envelope points and selections snap to the period of any pitch detected at the selection point.
 Select
- Deselect (Up arrow) - Deselects the current selection.
- Select before current selection - Selects the area before the current selection.
- Select after current selection - Selects the area after the current selection.
- Select zoomed part (Ctrl+A) - Selects the region defined by the visible sample.
- Select previous region (Left arrow) - Selects the previous region.
- Select next region (Right arrow) - Selects the next region.
 Zoom
Zoom
- Zoom in 2x (PgUp) - Zooms in 2 times.
- Zoom out 2x (PgDn) - Zooms out 2 times.
- Zoom out full (Home) - Displays the full sample.
- Zoom on selection (End) - Zooms the selection to fill the Sample Edit Window.
- Zoom on left of selection (Ctrl+Left) - Centers the Sample Edit Window on the right edge of the selection at maximum zoom.
- Zoom on right of selection (Ctrl+Right) - Centers the Sample Edit Window on the left edge of the selection at maximum zoom.
Sample Edit Functions
From left to right:
![]() Undo/undo history - Left-click to
undo the last action. Right-click to display the last 10 actions (Left-click the point in the history you wish to return to).
Undo/undo history - Left-click to
undo the last action. Right-click to display the last 10 actions (Left-click the point in the history you wish to return to).
![]() Normalize/normalize regions -
Left-click to normalize the current selection. Right-click to normalize on a per-region basis.
Normalize/normalize regions -
Left-click to normalize the current selection. Right-click to normalize on a per-region basis.
![]() Fade in/declick in - Left-click
to fade in. Right-click to smooth in (removes clicks).
Fade in/declick in - Left-click
to fade in. Right-click to smooth in (removes clicks).
![]() Fade out/declick out - Left-click
to fade out. Right-click to smooth out (removes clicks).
Fade out/declick out - Left-click
to fade out. Right-click to smooth out (removes clicks).
![]() Run script - The Script Tool
compiles and runs scripts written in Pascal, to process the wave file. Right-click to use the Run last script option. See the Tools Menu (Scripting) 'Run Script' option
(above) for more details.
Run script - The Script Tool
compiles and runs scripts written in Pascal, to process the wave file. Right-click to use the Run last script option. See the Tools Menu (Scripting) 'Run Script' option
(above) for more details.
![]() Drumloop stretch - Left-click to open the Drumloop stretch or Right-click to open the Time stretch tool .
Drumloop stretch - Left-click to open the Drumloop stretch or Right-click to open the Time stretch tool .
![]() Add / remove marker / region -
Left-click to add/remove a new marker at the start of the selected region. Right-click to add region markers bounding the selected region.
Add / remove marker / region -
Left-click to add/remove a new marker at the start of the selected region. Right-click to add region markers bounding the selected region.
![]() Auto-slice - Auto-slices the sample. Right-click to open the following slice presets:
Auto-slice - Auto-slices the sample. Right-click to open the following slice presets:
- Dull / Medium / Sharp Auto-slicing - These are three options for auto-slicing the sample with three predefined values for the slice thresholds. 'Dull' yields fewer slices, 'Sharp' more.
- Small / Medium / Large grid - Slices are based on the editor grid. Useful when the tempo has been set in the sample properties since the grid will reflect the beat-spacing.
NOTE: Since the Grid slice options are based on the Grid, then aligning the grid prior to slicing can be an accurate method for making quantized time-slices of the audio.
- Manual grid/tempo alignment using downbeat - Right-Ctrl + Right-Shift + Click on the location in the sample where the first downbeat marker is to be set, hold and drag horizontally to fine-tune the position if needed. Then, release the mouse button and click again with the Right-Ctrl + Right-Shift keys still held (drag left/right) to adjust the grid spacing to align the grid to the beat.
![]() Dump score
- Dumps the current slices to the Piano roll as a note sequence. Right-click the button to open the list of 'dump' presets:
Dump score
- Dumps the current slices to the Piano roll as a note sequence. Right-click the button to open the list of 'dump' presets:
- Normal - Writes the notes to match the beat length (adjusted to current tempo).
- Reverse - As normal, however the sequence is reversed (each individual slice is still played forward).
- Random - Each slice is placed on random location while preserving the loop groove and length. The sequence will be different each time this option is selected.
- Flatten (groove) - The loop groove is preserved (slice locations) however all slice locations are played with the first slice.
- Shift Up / Shift Down - The groove is preserved but all slices are shifter up/down with one slice.
- Quantize / Swing - As normal, however the timing is adjusted (quantized and swing). Swing holds the first note of the bar at the expense of the second note in the bar.
- Accentuate Beat - The first slice in each beat (beat as a measurement) is assigned a higher velocity.
- Pitch Up Beat - Every slice which belongs to an odd beat (1st, 3rd, etc.) is assigned a higher pitch.
- Widen Stereo - The panning alternates between medium left panning and medium right panning for each alternate slice.
- Crazy - The pan, pitch and velocity values of every slice are randomized (values will be different each time).
- Stutter (half) / Stutter (quarter) - Each slice is broken into two pieces (half) or four pieces (quarter) to create a "stuttering" effect.
- Original Length - Dumps the slices to the Piano roll to match the loop's original speed (at the current tempo).
![]() Save as.... / save as compressed...
- Opens a save file dialog with the options of .wav and compressed .wav (ogg format).
Save as.... / save as compressed...
- Opens a save file dialog with the options of .wav and compressed .wav (ogg format).
![]() Drag / copy sample / move selection - Left-click and drag the button (yes the button) to the desired
location. The selected region in the Sample Edit Window (or whole sample if no selection is made) will be copied and moved to any compatible location in FL Studio, e.g. Edison, Sampler channels, Fruity Slicer,
DirectWave, the Playlist, etc. Right-click to copy the selection to the clipboard.
Drag / copy sample / move selection - Left-click and drag the button (yes the button) to the desired
location. The selected region in the Sample Edit Window (or whole sample if no selection is made) will be copied and moved to any compatible location in FL Studio, e.g. Edison, Sampler channels, Fruity Slicer,
DirectWave, the Playlist, etc. Right-click to copy the selection to the clipboard.
Utility Bar
The tility bar runs underneath the tools and quick edit buttons.
- Sample rate - Displays sample rate in Hz. Right-click to open the Sample Properties dialog to change this value.
- Format - Click here to change between 16/32-Bit OR Mono/Stereo data files (NOTE: both the 32 to 16-Bit and Stereo to Mono are destructive processes, clicking them again will not recover the original data).
- Tempo - Displays Tempo in Beats Per Minute (BPM). Right-click to open the Sample Properties dialog to change this value.
- Deck A/B - Swap between Deck A and B as the main sample edit window.
- Title - Name of sample. Right-click to open the Sample Properties dialog to change this value.
- Length/Sel - Shows the length of the sample or selection. Right-click below the Name (on the length display area) to open a menu to swap between Samples, Time or Bars.
- Mode switches (left to right):
- Scrub - Left-click and drag (left/right) to play/scrub the sample/selection.
- Deck display - Single or dual decks.
- Wave/Spectrum view - Swap between spectrum and waveform views.
- Click-free editing - Click free editing performs a short fade in/out on slice points to avoid clicks.
- Auto-scroll - The display will track the playing section when the sample display is zoomed beyond 100%.
Sample Edit Window
Edit, set markers/loop-points, or apply envelopes to the sound:
- Edit sample - Select 'Waveform Edit Mode' (
 , bottom left of the window).
- Define a region - Left-click and drag horizontally over the region to be selected. The selection will turn red.
- Select a region - Left-click on the square tag at the top of any region markers. The selection will turn red.
- Deselect a region - Double-click in the sample window.
- Move region start/end - Click at the point where you want the new start/end of the region to be. The start/end points will automatically change to reflect the newly selected point.
- Apply Envelopes (Pan/Volume/Stereo Separation) - Select the envelope type (
 , bottom left of the window) and
Right-click to add points, Left-click to move points and tension markers.
, bottom left of the window) and
Right-click to add points, Left-click to move points and tension markers.
- Zoom - Hover over the window and scroll the mouse-wheel
- Horizontal Scroll - Hold the shift key and then scroll the mouse-wheel
- Zoom/Scroll - Click the mouse-wheel or middle mouse button and move up/down (zoom) and left/right (scroll).
Mixdown Envelopes
These envelopes are set then applied to the sound. There is no 'live-preview', (Ctrl+Z) to undo. Left-click the symbols to apply, from left to right -
- Pan - To edit the Pan envelope.
- Volume - To edit the Volume envelope.
- Stereo Separation - To edit the Stereo Separation envelope.
- All-purpose Envelope - Some tools in Slicex will use this envelope as an input. The horizontal axis represents time while the vertical axis is the modulation value, generally 0% at the
bottom to 100% at the top. There are three ways to use the envelope -
- 1. Copy the sample, apply an effect, tweak the all-purpose envelope, use the 'Paste mix using envelope' option from the Edit menu.
- 2. Apply an effect, tweak the all-purpose envelope, use the 'Undo mix envelope' option from the Edit menu.
- 3. Scratching - Select 'Scratch using envelope' from the Tools menu. In scratching, the horizontal axis represents time while the vertical axis is the sample playback position from the sample start (bottom) to the sample end (top).
Preview - As there is no 'live' preview for the 'All-purpose' envelope in Slicex, you will need to process the wave to hear envelope changes. To hear your envelopes, select the 'Tools' option and then Mixdown envelope or (Ctrl+E) to process the wave. The undo function can be used to reverse any unwanted changes.
Editing envelopes - After selecting the desired envelope type, Right-click in the 'Sample Editor Window' to add points, and Left-click to move points and tension markers. Right-click points to open a context menu that will allow you to delete points or change the curve type
Feature Switches
These switches vary, depending on the Edit mode, from left to right:
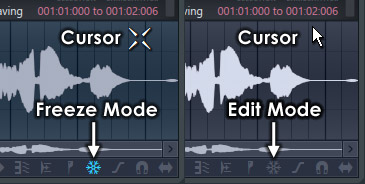
- Freeze - Prevents any changes to the sample.
- Noise T. - Enables/disables the threshold display (green horizontal band). The level can be set using the Tools > Acquire noise threshold menu function.
- Regions - Enables/disables the region marker display.
- Step - Enables the step editing mode. As a Left-clicked cursor is dragged over the window a new control point is added at each step in the timeline. Hold SHIFT while dragging to draw "pulse" lines (straight vertical/horizontal lines only). Note that each new segment created will have the most recent tension setting applied.
- Snap - Enables/disables snapping. This applies to envelopes and sample edit functions.
- Slide - Slides the selected region marker & envelope control points, without affecting the relative positions of any following points.
Note how the cursor changes depending on whether you are in Freeze or Edit mode. In Freeze mode you won't be able to make any changes.
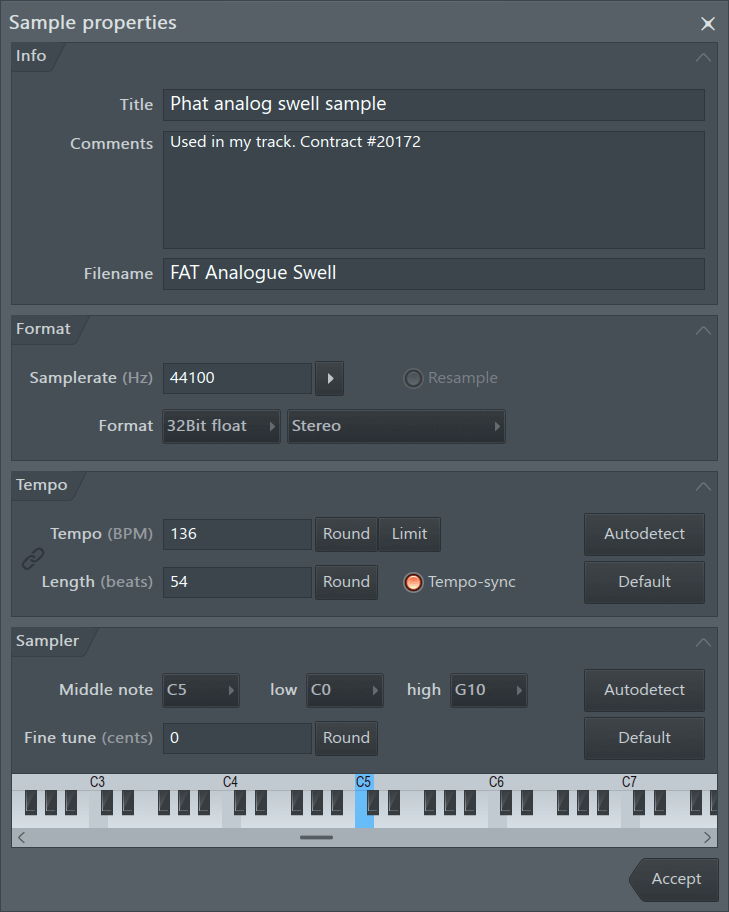
Sample Properties (F2)
This area displays the sample properties including Sample rate, Bit depth, Channel format, Tempo information and Title. Right-clicking this area or pressing F2 opens the Sample Properties dialog.
Options
Info
- Title - Name the sample.
- Comments - These comments will show in the sample properties.
Format
- Samplerate (Hz) - Set the samplerate.
- Resample (switch) - Selecting this switch forces resampling of the sample data to the desired samplerate. If this switch is off the sample rate only changes the playback samplerate (speed) without modifying the data. For example, choose to either resample data to 22kHz (data reduction), or to play existing data at 22kHz (pitch-shift).
- Format - Choose between 16-Bit integer & 32-Bit floating point formats. Mono or Stereo.
NOTE: Slicex automatically converts data to 32-Bit before applying any function that modifies the sample data. It is better to apply several edits in 32-Bit floating point, then convert to 16-Bit integer after you have completed editing the sample than to apply several edits in 16-Bit integer.
Tempo
- Tempo (BPM) - Set tempo in Beats Per Minute. If 'tempo-sync' is selected setting a tempo here will cause FL Studio to stretch/pitch-shift the sample according to this value when loaded.
- Round: Round the tempo (removes decimals).
- Limit: Correct any double/half tempo problems (range options appear when the button is selected).
- Resample (switch) - Forces a high-quality resample of the data when the sample rate is changed (recommended).
- Length (beats) / Sel (beats) - Enter the number of beats in the sample or selection. 'Sel (beats)' appears if a selection has been made. Used when slicing & beat detecting (see below).
- Round: Round the number of beats (removes decimals).
- Tempo-sync:
- Default - Set the BPM to the FL Studio project tempo.
- Quick guess - or songs with a constant tempo).
- Autodetect - Select to choose from three options:
- Quick estimation for short loops - Quick tempo-detection based on the host tempo and the length of the sample.
- Detection for songs with constant tempo - This algorithmic tempo-detection generally gives the most accurate result, but requires constant tempo tracks.
- Detection for songs with variable tempo - This algorithmic tempo-detection has been tuned for songs that don't have a constant tempo.
NOTE: An alternative tempo detection technique is to highlight a part of the audio that you know to be an exact # of beats, then, in the properties dialog, the display will show 'select (beats)' instead of 'length (beats)'. If 4 beats were highlighted (for example), enter 4, and the tempo of the song should be detected.
Sampler
These functions aid samplers that read meta-data to auto-process the sample (DirectWave and the Channel sampler for example).
- Middle note (root note) - Selects the MIDI note at which the sample will play back at the original (recorded) pitch. This data is used by samplers such as DirectWave and the Channel Sampler to automatically set the 'root' note.
- low: Set the lowest intended MIDI note the sample should play on.
- high: Set the highest intended MIDI note the sample should play on.
- Fine tune (cents) - Fine tune the intended pitch of the sample in 1/100ths of a semi-tone.
- Default - Restore default settings.
- Autodetect - Autodetect the pitch of the sample. Use on monophonic single-pitch sounds only.