MIXING & EFFECTS
Mixer Functions
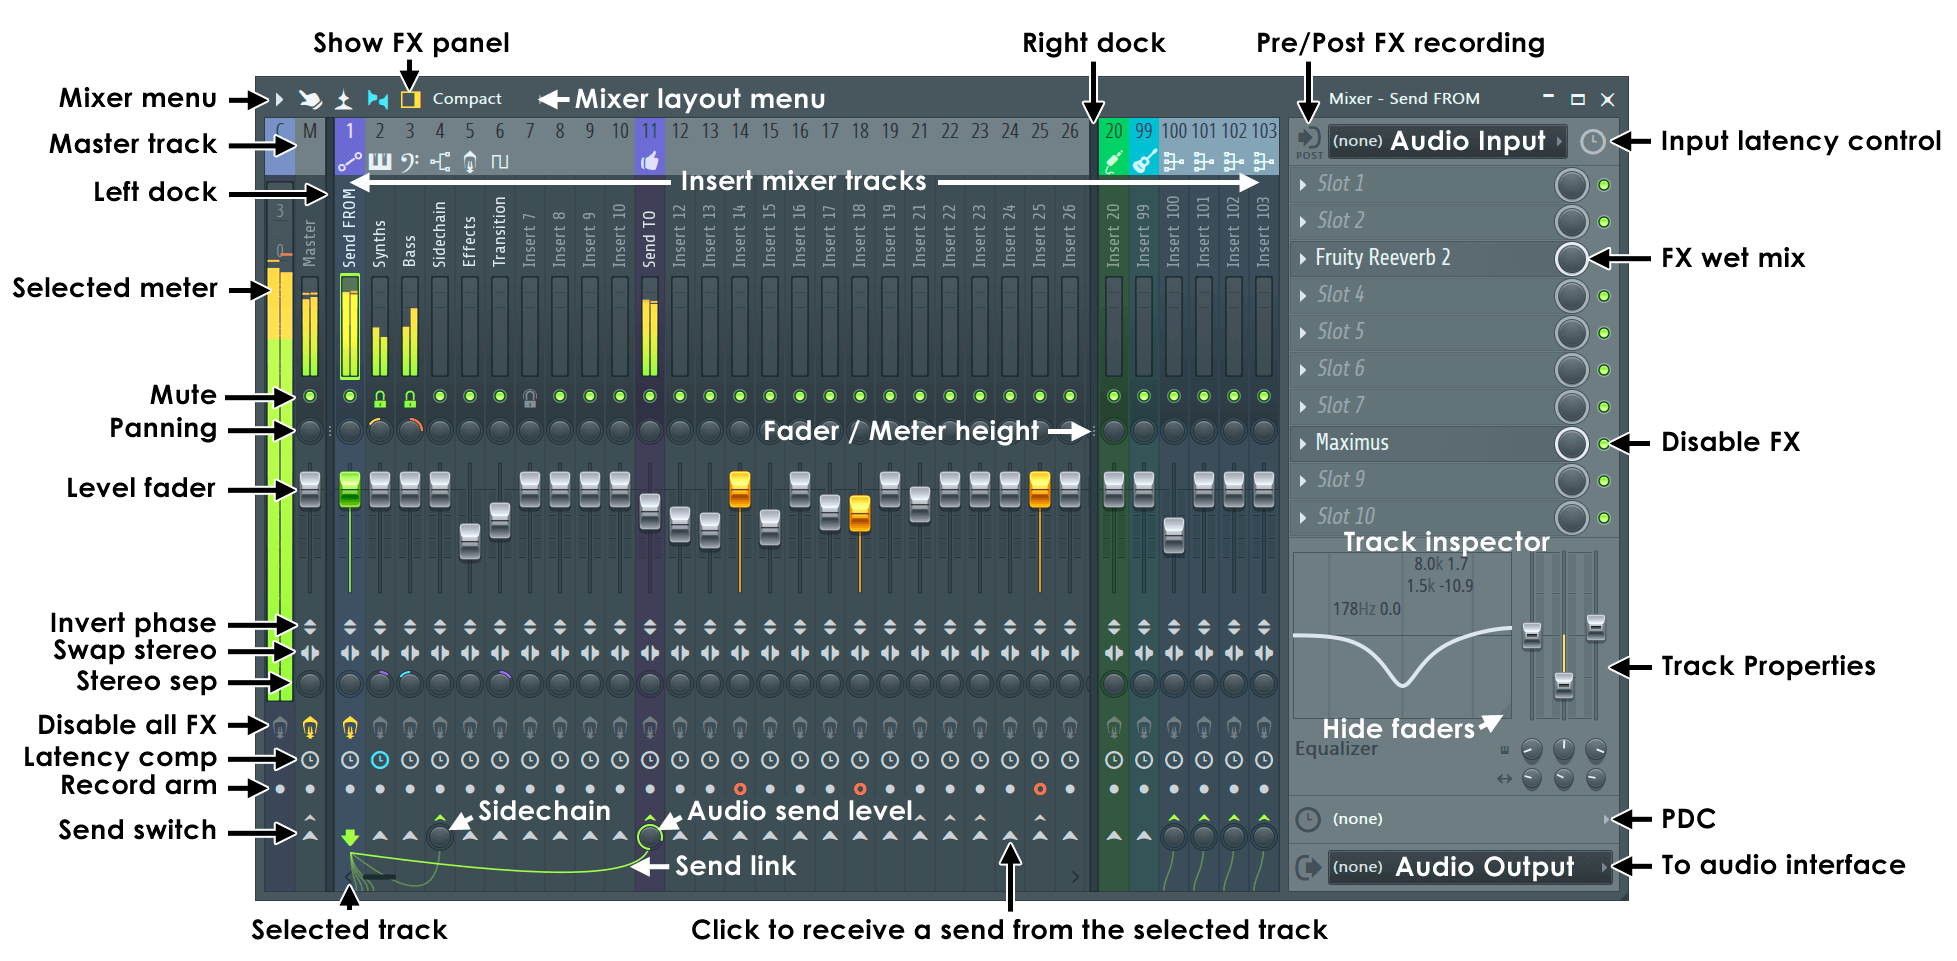
All audio in FL Studio passes through the Mixer. Unless specifically directed, newly added Channels are routed to the Master Mixer Track. There are 125 x Insert Tracks for receiving input from plugins and external audio Inputs, 1 x Current track for hosting tools like Edison and Wave Candy and a Master track for master effects processing. The Mixer has three docks for tracks (left, middle and right) and can be stretched horizontally or vertically by clicking the edges and dragging. In combination with the layout options (on the Mixer layout menu), the controls visible will change to suit the Mixers size. To see tracks outside the current view, use the Track Scroll Bar below the 'Send' switches OR roll your Mouse-wheel over the track names. Select a track by Left-clicking the pan or fader controls. Select multiple tracks by holding (Ctrl+Shift). Selected tracks are highlighted with green faders (track 1 below is selected). For a detailed description of recording audio from internal and external sources see the Audio Recording page.
NOTES: If your Mixer looks different to the above, choose the Compact view and stretch the Mixer height to match (some features will not be visible if the height is too small). Mixer Tracks vs Mixer channels - The terms Mixer Tracks and Mixer Channels are interchangeable, we use 'Tracks' to differentiate them from plugin 'Channels' in the Channel Rack. FL Studios Playlist is not bound to any 'Instrument' or 'Mixer' Track.
Mixer Controls
- Mixer icons - Along the top of the Mixer window:

Mixer menu - Contains recording, view, plugin delay compensation (PDC), linking, routing, docking renaming and coloring options, click here to learn more about the details. 
Multi-touch control - Allows multi-touch movement of faders and other Mixer controls. NOTE: Turn OFF to use multi-touch gestures, such as 2-finger tap on meters to make multiple selections. Multi-touch gestures and control are necessarily independent modes. 
Meter wave view (Alt+W) - Replaces the Mixer peak meters with waveform views. Width now equals peak level. 
Extra Mixer Track properties - Shows/hides additional Mixer Track properties. NOTE: Vertical Mixer size and Layout menu settings also determine what controls are visible so you may need to increase the mixer height if controls are not visible with this selected. 
Track inspector & FX panel - Show/hide the Mixer Track properties, including the effects slots. - Master Mixer Track - Audio in the Mixer is routed to the master Mixer Track (unless an Insert Track is routed directly to an ASIO Output). The Master track is normally the place to load 'Mastering' effects and to set final audio levels before rendering your project to an audio file (.mp3, .wav, .ogg). This also means the Master track is not a good place to record external audio Inputs. The recording will mix with all other project audio. See Levels, Mixing & Clipping to learn more about mixing with FL Studio.
-
Mixer Insert Tracks - Audio from instruments in the Channel Rack should be routed to one of the 'Insert Tracks' or the Master. Routing is set from the Channel settings, FX channel send control. If nothing is set [---], the default destination is the Master Mixer track. For each Mixer Track audio passes through any Effects loaded on the Effects Slots and then through the integrated effects (3 band parametric EQ, phase, stereo separation, volume and panning). Finally the audio is sent to the Master Mixer Track. It's also possible to route the audio of any Mixer Track directly to an ASIO Output and or to another Insert Track. Internal re-routing is a powerful feature allowing you to create advanced Mixer setups with groups and subgroups of Insert Tracks.
- Select multiple tracks (Ctrl+Shift) - Hold Ctrl + Shift and Left-click on Mixer Tracks label/meter area or left-click and drag on the same. You can now adjust all faders in the selected group.
- Track labels - Can be Middle-clicked, or Right-Click and select from the 'context menu > Rename / color' (or press F2) to rename the track or recolor it. Quick linking of channel/s: From the Channel Rack use the Channel Selector to select the channel/s you want to route, then select the desired destination Mixer Track and click (Ctrl+L). There's also an option to sequentially link Channels to tracks starting from the selected track. (Ctrl+Shift+L). NOTE: It is a good habit to name used Mixer Tracks. This is particularly important for Multiple Output Plugins as it ensures FL Studio knows the tracks are in use. This can be important for PDC calculations, split-Mixer Track rendering and automatic track assignment.
- Reorder Mixer Tracks - Select the Mixer Track to move and press (Alt+Left or Right Arrow) OR place your mouse cursor over the track to be moved and (Shift+Mouse-wheel) . All linked internal and external audio sources will move with the track.
- Send Tracks - Any Insert Track can serve as a Send track via the Send switches (shown above).
- Mono vs Stereo - The FL Studio Insert Mixer Tracks are stereo. To hear a Mixer Track in mono, turn the Stereo separation control as indicated above, to mono (fully clockwise).
- Current (C) - This is a 'utility' track that receives the currently selected Mixer Tracks Output. Use it to host an instance of Edison for easy recording of any track (e.g. use Edison with a 5 minute recording loop as an audio logger) OR to host Wave Candy visualization tools.
 Video Tutorial here. NOTE: If you add FX or change the EQ levels of the 'Current (C)' track these will apply to any selected track. This can catch you out, pay attention!
- Mixer layout menu - There are 8 view modes, from Compact to Extra large. These interact with the horizontal and vertical size you set. Extra large has a special feature showing the FX in use per track. To open an effect (Left-click) FX in the stack. To add an effect (Right-Click) an empty slot and select from the menu. (Right-Click) effects for more options such as move up/down and replace. NOTE: The Mixer menu > Compact plugin list option removes empty slots and shows the logical order. The Alt views place mixer track names under the Peak Meters.
- Mixer Track control icons:

Invert phase - Flips the sign of the waveform so positive peaks become negative peaks and vice versa. This can be used to avoid phase cancellation problems that can happen (between Mixer Tracks) when multi-mic recordings are mixed or percussion samples (such as kicks) are out of phase. When sounds are out of phase they tend to lose low frequency energy (bass) and sound thin. You can also use the PDC control to add ms delay to any track to reduce phase cancellation. 
Swap channels - Swaps the Left and Right stereo channels. Use to correct cabling errors from stereo mic recordings or to match the panning of pre-recorded audio to some visual such as a video. 
Mixer Track FX master switch - Left-click - Enable/disable all effects for the selected Mixer Track. Right-Click - Open/Close the user interfaces for all effects for that Mixer Track. When there are no FX in the Mixer Track this will be dark-gray and unresponsive. Useful to hear what your effects chain is actually doing by switching them all in and out together. There are individual FX disable switches on the FX slots. 
Track delay - This is not an effect, it is an accurate time-offset delay for the selected track. It usually used by Plugin Delay Compensation (PDC) to time-align tracks that have delays caused by their FX plugins. Colors - Grey (No value set), Orange (Automatically set PDC), Blue (Manual value set). TIP: You can use this control to fine tune Audio Clips (on separate Mixer Tracks) or any other audio that must critically time-aligned. Click the switch and select the desired offset in samples. 
Track recording arm switch - When selected (red) the track is armed and any internal or external audio sources routed to the track will be recorded. Left-click - To arm. Right-Click - To arm with record-file naming option. 
Send / Sidechain switch - Left-click on the destination track to enable audio to be passed from the selected track to the destination track. When a link is made the destination switch is replaced with a level control. Right-Click to route OR sidechain to a specific track with master routing disabled. Send Level Knob - When the 'Send' switch is activated this knob, on the destination track, controls the signal level received from the source track. For more detailed information see the section below Mixer Track Routing & Sidechaining. - Peak Meters - Output is in dB. See Levels and Mixing to learn more about using peak meters in FL Studio. NOTE: Are you sitting? OK, it is practically IMPOSSIBLE to clip insert Mixer Tracks. You can safely ignore peaks over 0 dB. Only the Master track or any track routed to an ASIO Output can clip, see Levels and Mixing to learn more about using peak meters in FL Studio.
- Mute Switch - Left-click to mute/un-mute the individual track, Right-Click to solo/un-solo the individual track.
- Mute/Unmute - Left-Click the Mute icon.
- Unmute All - Ctrl+Right-Click the Mute icon.
- Solo/Unsolo - (Ctrl+Left-Click), (Alt+Left-Click) OR (Right+Click) and Select 'Solo' on the Mute icon. NOTE: The General Settings > 'Restore previous state after solo' option will preserve the pattern of muted and unmuted items prior to a Solo action.
- Lock/Unlock State - Shift+Left-Click the Mute icon.
- Solo track AND all tracks routed TO and FROM it - Alt-Left-Click the Mute icon.
Panning - Pan controls the position of the sound in the stereo field (left to right) and is often overlooked as a control for creating an interesting and spacious mix. The pan works by mixing one side of the stereo track into the other, so a 100% pan is the mono-sum of the Left and Right channels. If you would like to pan using independent Left & Right level changes with no cross channel mixing use Fruity Stereo Shaper. By default a 'Circular Panning Law' is used.
Level Faders - 'Volume control' for the track. The level fader is applied after the effects (post effect). If you need a pre-fader control of inputs to effects, use the Channel Rack volume knobs OR route one Mixer Track to another. Automation - Right-Click and select 'Create automation clip or 'Link to controllers'. Colors - Grey (Default), Green (Selected), Orange (Armed for recording). TIP: Click above and below the fader handle to initiate a smooth change in the level. To adjust multiple faders, use (Ctrl+Shift) and left click on the meters or track label area to select multiple tracks before moving one fader in the group.
- Stereo Separation - The stereo separation filter allows you to enhance or reduce any existing stereo effect in the track. The middle (default) position is disabled. Turn the knob right to decrease the stereo separation (sum L+R to mono), turn left to increase stereo separation. NOTE: This control has no stereo effect on mono sounds as it works by processing the difference between the L and R channels, if there is no difference then there is no stereo to enhance. For details on how it works see the Stereo Shaper Expansion tutorial.
- Audio Input & Output - These menus allow you to select Inputs and Outputs from your audio device. To select external Inputs you must be using an ASIO audio device driver. Usually the main audio Output on your interface is set on the Master Mixer Track and no other track. You can select as many audio Inputs as your audio device supports. NOTE: the Input/Output names that show in these menus are set by the audio device manufacturer. Sometimes these can be quite cryptic and you may need to experiment to find the correct Input.

External audio INPUT - Each Mixer Track has an Input selector. Hardware Audio Inputs and some VST/AU sources can be selected here. For example, the Input menu is used to select external audio from an audio device to record audio. Right-Click the Input menu to 'Auto map' audio device Inputs to Mixer Tracks, starting from the selected Track. The top part of the list combines pairs of audio Inputs for stereo input or select mono inputs from the lower part of the list. Pre/Post Effects recording - Click the icon in front of the Input menu to swap between Pre, to record without FX or Post to record with FX. 
External audio OUTPUT - There is an Output selector for each Mixer Track. The Master Mixer Track must have an Output selected or you will not hear audio from FL Studio. For other Mixer Tracks ASIO hardware outputs can be selected here. For example, in live-use where one Mixer Track is sent to headphones for monitoring previewed samples/mixes while the main mix goes to the PA, to create headphone sub-mixes for members of a band or to create a surround sound sub-mix by sending several Mixer Tracks to the relevant surround channels of your audio device. - Effects slots - Each Track has 10 effects slots. NOTE: If you need more than 10 Effects, use the 'Send' feature to route the Output of one Mixer Track to another OR load Patcher in one of the slots.
- To load an Effect - Left-Click the pop-up menu arrow at the left end of the slot and use the 'select' option. Right-Click the arrow to open the Plugin Picker or Middle-Click to open the 'More Plugins' menu.
- To open an Effect interface - Left-Click the name of the Effect. Loaded Effects names are displayed in the slots.
- To re-order effects slots - Place your mouse cursor over the effect to be moved and scroll the mouse-wheel up/down (the Mixer window must be selected for this to work, click anywhere on the Mixer to select it).
- Mute/Disable LED - The same as for the Mixer Track mute LEDs.
- Mute/Unmute - Left-Click the Mute icon.
- Solo/Unsolo - (Ctrl+Left-Click), (Alt+Left-Click) OR (Right+Click) and Select 'Solo' on the Mute icon. NOTE: The General Settings > 'Restore previous state after solo' option will preserve the pattern of muted and unmuted items prior to a Solo action.
- Lock state - Shift+Click the Mute icon.
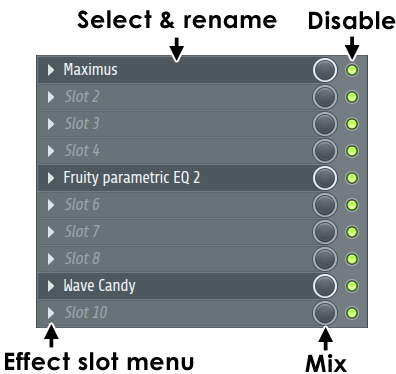
- Effect slot menu - This, mostly, replicates functions found on the plugin Wrapper Menu for quick access:
- Replace - Choose an effect from the plugin database.
- Delete - Reset FX slot to the default (empty) state.
- Presets - Shows presets for the loaded plugin (if published to FL Studio).
- Browse presets - Opens the presets menu in the Browser (not all plugins have presets here).
- Save presets as - Save the current preset as a single preset file in the Browser. The menu item can also be dragged and dropped on a compatible location. e.g. The Browser, the Channel Rack or another instance of the same plugin to copy the preset.
- Add to plugin database (flag as favorite) - Adds the plugin to the currently open sub-folder of the Plugin database folder in the Browser. This is a special browser folder that works in conjunction with the Plugin picker to help organize and load plugins into projects.
- Display preset name in preset selector - The name of the preset is shown on the Wrapper menu-bar, where possible.
- Store in spare state - Saves the plugins current settings in a temporary buffer (spare state).
- Flip with spare state - Swaps the plugin's current settings with those in the spare state.
- Link all parameters... - Opens a dialog to link automatable plugin parameters to 'tweaked' hardware controllers in sequence down the 'parameter list'. There are several options for skipping parameters or jumping to new locations in the list.
- Browse parameters - Opens the Browser > Current project, to show the plugins published parameters.
- Allow threaded processing - Improves multi-threading and multi-core CPU performance. NOTE: Some 3rd party plugins may perform worse with multi-threading on. If you are experiencing choppy or broken sound (the GPO/Kontakt Player for example), try turning this off. To permanently disable multithreaded processing for the plugin (even for future FL Studio sessions) disable the 'Processing > Allow threaded processing' option and save it for the plugin type.
- Smart disable - Stop processing the plugin when inactive. Reduces CPU load. There is a global Smart disable on the F10 Audio settings panel OR 'Smart disable' Tools > Macros > Misc > Switch smart disable for all plugins.
- Move up/down - Move up/down one slot. Alternatively hover your cursor over the FX slot and roll your Mouse-wheel.
- View editor - Open the plugins user interface (GUI).
- Rename, color and icon... (F2) - Open dialog to change associated Channel (button) name, color and icon.
- Change color... - Open dialog to change associated Channel (button) color.
- Change icon... - Open dialog to change associated Channel (button) icon.
- Help - Opens the manual for the selected plugin.
- Mixer Track Properties - For more detail click here. The Parametric Equalizer - Left-click and drag left/right to control center frequency and up/down to control EQ level. Alternatively Right-Click and drag left/right to control bandwidth and up/down to control EQ level. The area below the Equalizer holds controls for Plugin Delay Compensation.
- Mixer Track Scroll Bar - The scroll bar is below the Send switches. You can also roll your Mouse-wheel over the Track name and peak meters.
NOTE: Most controls on the Mixer are automatable (Right-Click and select 'Create automation clip', 'Link to controller' or 'Edit events').
Routing Instrument Channels to Mixer Tracks
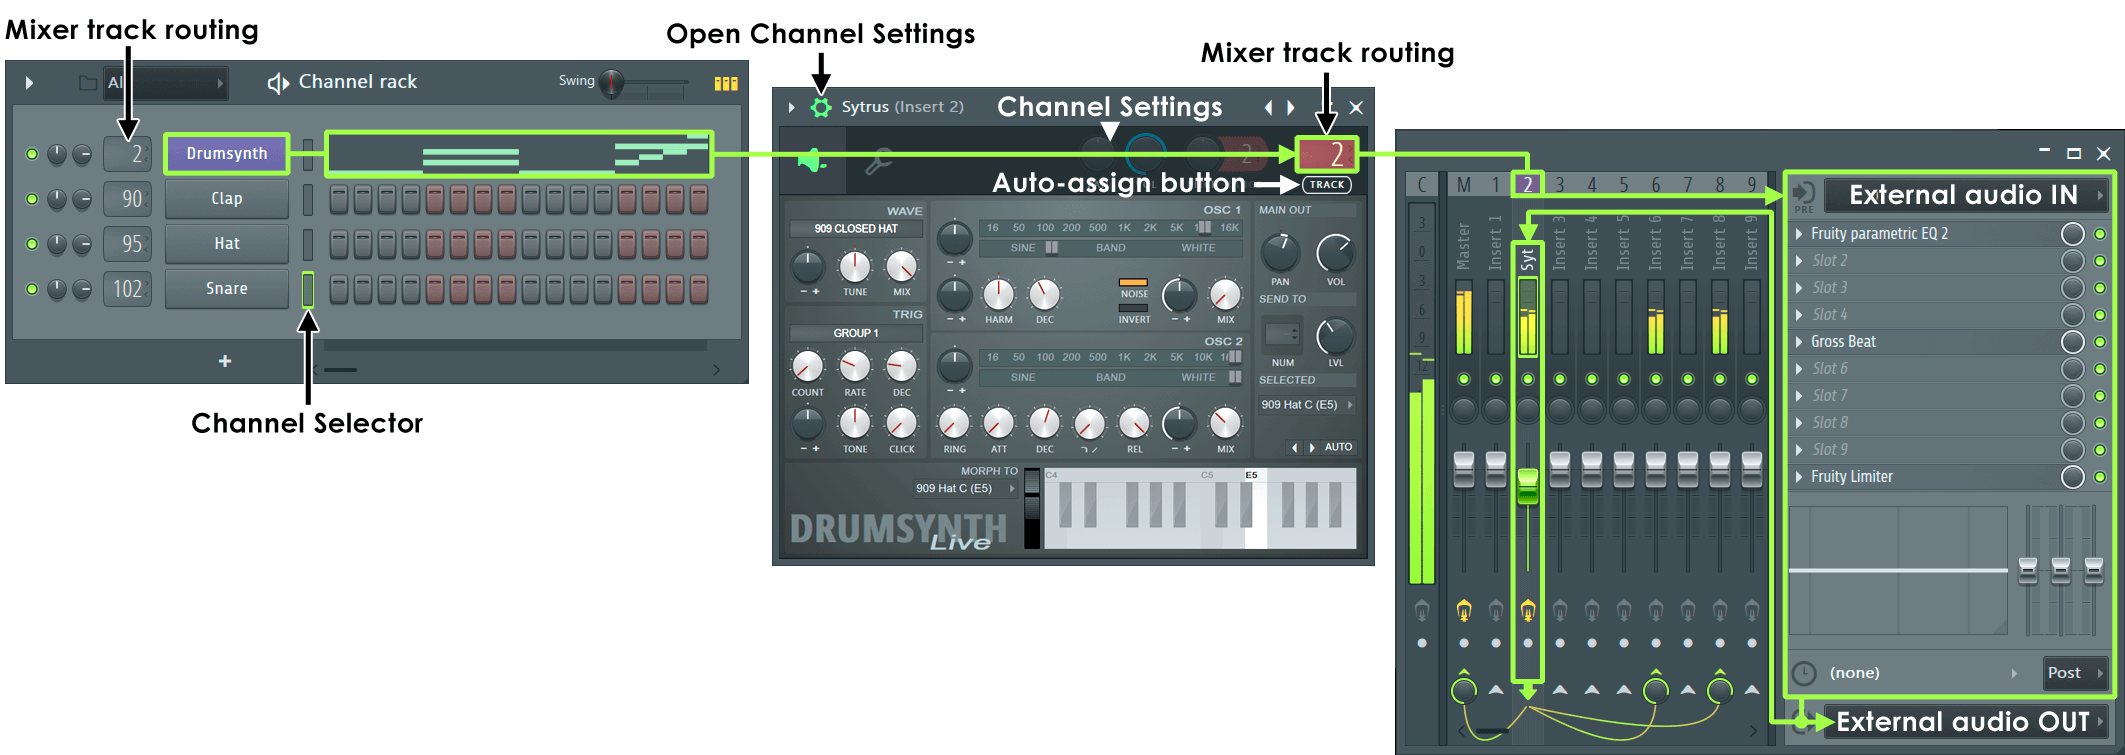
Instrument Channels and Audio Clips are routed to the Mixer Insert Tracks via the two locations shown below, the Channel Rack Routing selector or the Channel settings Routing selector, as shown below:
NOTE: Unlike 'traditional' DAW applications, Playlist tracks are not bound to Mixer Tracks. The Playlist sequences Audio, Automation and Pattern Clips but Mixer Track routing is direct from the Channel Rack (Channel Settings) directly to the Mixer. You can however use Instrument or Audio Tracks to lock specific Playlist to Mixer routing.
Basic Routing
There are several ways you can route Instrument Channels in the Channel Rack to Mixer Tracks:
- Left-click and drag the Mixer Track Routing selector in-front of the Channel Button, (Alt+M) to show/hide. If the control is hidden:
- Left-click the Channel's button to open the instrument interface.
- Click the Channel Settings icon to open the Channel Settings (if not already open).
- Assignment options:
- Auto-assign - Click the 'TRACK' label below the Track routing selector. The Channel will be assigned to the first free Mixer Track and named accordingly.
- Manual-assign - Click the Mixer Track routing display (shows Track 2 above) and drag up/down to set the destination Mixer Track.
Multiple Instrument Routing
- Select Channel Selector/s to the right side of each Instrument Channel's button that you want to route (Right-Clicking allows multiple selections).
- Right-Click the target Mixer Track and select 'Channel routing > Link selected channels to this track' (Ctrl+L) from the pop-up menu OR use 'Channel routing > Link selected channels starting from this track' (Ctrl+Shift+L) to assign multiple Channels to multiple Mixer Tracks.
NOTE: Learning the keyboard shortcuts for these two link methods is recommended.
Drag and Drop Routing
- Use instrument tracks - Drag the preset from the Browser or Plugin Picker database ((F8)) to a Playlist Track header OR Right-click a Playlist Track header and choose a plugin instrument to associate with the track. This will link the Instrument Channel, Playlist Track (including a default Pattern) through to a Mixer track. See here for more details.
- Direct to Mixer tracks - Drag and drop instruments from the Browser Plugin Database (Shift+F8) or Plugin Picker (F8) and drop on the Mixer Track of choice. NOTE: This method auto-names the target Mixer Track to that of the Instrument.
External Audio Inputs & Outputs

Each Mixer Track can host one stereo input from and send to one stereo output to your audio device (see the note below). For example, if you have an audio device with 16 microphone Inputs, then you have the option of setting 16 unique Mixer Tracks to receive each of these audio device Inputs. You can also set multiple Mixer Tracks to receive the same Input or send to the same Output.
- External routing - Audio sent to and received from the Input and Output ports on your audio device is set by the Input / Output selectors (shown left). When '(none)' is shown, this means no external audio device Input or Output is selected for the selected Track. By default, the Master Mixer Track 'Output' is routed to the audio devices main Outputs (usually the main/front Left/Right channels). However, by routing another Mixer Track (other than the master) to other audio devices Outputs (e.g. the rear channels of 5.1 surround-sound card), you can create a separate sub-mix for band headphone monitoring or studio monitoring.
- Recording Pickup Selector - Click the icon in front of the Input selector to choose a range of recording locations. See here for a detailed explanation.
- Delay compensation - Use to fix cases where recorded audio is out of sync with internal events. Recorded audio can be moved earlier or later in the Playlist with this control. See here to learn how to use this control.
- Parallel internal / external routing - It is worth noting that the Mixer Track Input / Output can function in parallel with the internal routing functions so that any Track can receive both external and internal audio sources simultaneously OR Output to the Master Mixer Track and any other available audio device Output. Mixer routing is described in more detail below:
- Surround sound 5.1 or 7.1 - You can set a group of Mixer Tracks to Output to the individual channels of a surround sound system. 5.1 uses 3 Mixer Track Outputs (1. Front L/R, 2. Rear L/R & 3. Center/Sub L/R). 7.1 uses 4 Mixer Track Outputs (1. Front 2. L/R, 3. Side L/R, 4. Rear L/R & Center/Sub L/R). There are 'surround' icons to help label tracks.
NOTE: You MUST have an ASIO Driver selected in the Audio Options to record external audio and for any options to show in these menus.
INPUT / OUTPUT Menu Right-Click Options:
- AutoMap - Automatically routes the available Inputs or Outputs to Mixer Inserts.
- Reset mapping - Removes all selected Input or Output devices (excluding Master Output).
Internal Mixer Track Routing & Sidechaining
Inter-track routing is controlled by the switches and knobs at the bottom of the Mixer...

Routing Iconography
This section focuses on the Icons along the bottom of the Mixer associated with routing.
Icons explained:
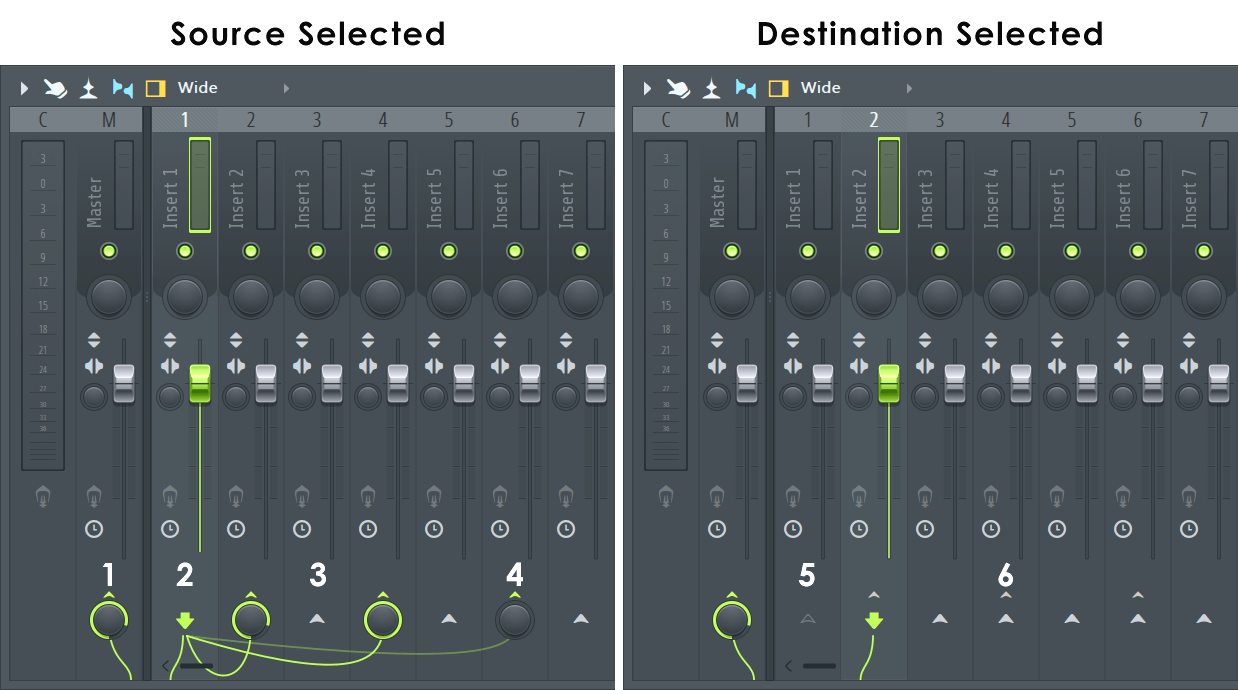
- Destination Tracks - Audio is being sent to these tracks from the Selected Track. NOTE: In the case of a cable crossing the Mixer Track divider to the Master, the cable drops off the bottom of the mixer rather than making a direct connection.
- Selected Track - The downward green arrow indicates audio is being sent from the track.
- Available Send - The up-arrows indicate available Send-Tracks and also act as a switches to create a Send when clicked.
- Sidechain Send - Grayed out cables indicate the volume control is turned to minimum. The send audio is still available on these tracks, but only for plugins that accept 'Sidechain' inputs. The source audio won't be heard directly on the destination Track
- Source Track - Any source track routed to the selected track shows as a grayed-out send switch, to indicate it's unavailable (to prevent feedback loops).
- Send in use - The small up-arrows indicate that another track is sending to the track. This does not stop the selected track sending to these tracks, click the send icons (3).
Post-fader Sends (default)
Insert Mixer Tracks can be routed (sent) to as many other Mixer Tracks as required. The Send-level knob above each Send switch appears after the switch is activated on the destination Mixer Track.
- Send from one Track to another - Select the source Track and then click the Send switch on the destination Track. Optionally, adjust the send volume with the knob that replaces the Send switch to change the audio level sent to the destination. This can be useful if you run out of FX slots on one Mixer Track or want to use 'Send' FX to lower the CPU load.
- Remove a send - Click the Deselect Switch above the Send volume knob, shown left. You can also turn the Send volume to 0 if you want to keep the link, but stop the audio.
Pre-fader Sends
The Send switches in FL Studio's Mixer take the audio after the Mixer Track fader, so this is known as a post-fader send. To create a pre-fader send you need to extract the audio from a point before the fader, in this case, any of the Effects slots. Usually Slot 1 is best since it won't have any preceding effects. To do this use Fruity Send.
- Pre-fader sends - If you need to create pre-fader sends, use the Fruity Send plugin.
Sidechain Sends
Sidechaining is the process of sending Audio from one Track to another without the audio being heard at the destination Mixer Track. The purpose is for a plugin on the destination Track to make use of the audio for some aspect of its operation. A typical example is to sidechain a kick Track to one or more compressors on destination 'sidechain' tracks, to trigger the compressor, and 'duck' the level of the audio of the destination in time with the kick. The Fruity Limiter can do this kind of sidechaining. Vocodex can accept a pair of sidechain Inputs, one for the Modulator and one for the Carrier processing sections.
A sidechain send is identifiable by any wire that is low contrast in color (see above left). Sidechains are created when the audio Send knob is set to 0%. If the knob is set to any value other than 0% then there is BOTH an audio and sidechain send. While you can't create an audio send without also creating a sidechain send, you can create a sidechain send without an audio send. An 'audio' send is the case where the source Mixer Track is audible on the destination Mixer Track. For sidechain sends, the audio is sent to the destination Track, but is only available to be picked up by effects on that Track with sidechain Inputs.
- Sidechain from one Track to another - Right-Click the Deselect Switch and select 'Sidechain only to this track'. A sidechain is any unheard 'audio send' from the Output of one Mixer Track directly into an effect plugin loaded somewhere on a second Mixer Track. Sidechaining allows plugins that can accept more than one audio Input to process multiple independent audio streams, in addition to those passing through the Mixer Track where the effect is loaded.
- Sidechain direction - The direction signals flow will depend on the plugin, for example the Fruity Limiter receives a sidechain FROM another Mixer Track while the Stereo Shaper sends a sidechain TO a Mixer Track. Available Sidechain tracks are labeled by their Track name when a plugins sidechain selector is Right-Clicked. Remember if the sidechain direction is incorrect for the plugin type then the sidechain option won't show when the plugins sidechain selector is Right-Clicked.
Multiple Track Routing
You can route multiple tracks at once. Notice the first Track you select, or a member of the selected group you Right-Click, is highlighted slightly lighter than the rest (e.g. Track 17 below). 'This track' is now the target for subsequent Mixer Menu > Track routing options.
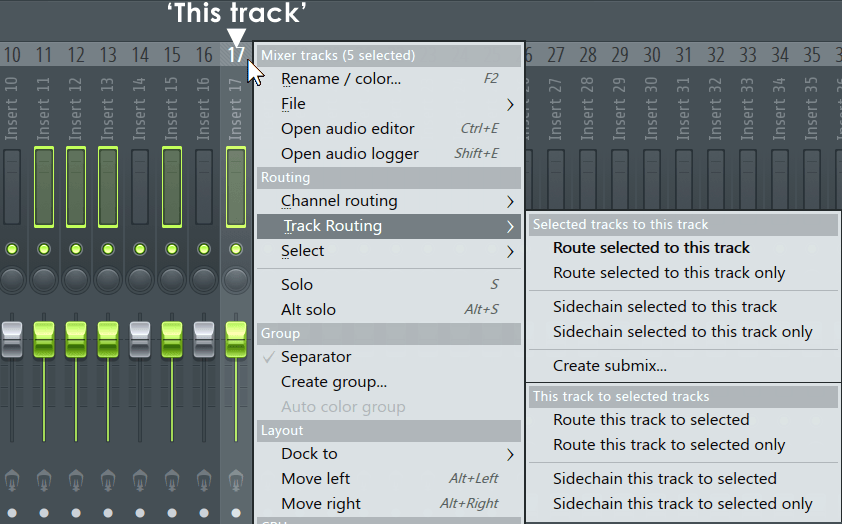
How to route multiple Mixer Tracks:
- Hold (Ctrl+Shift) and Left-click (or Left-click and drag) all tracks involved in the multiple routing, including the target Track. Don't let go of (Ctrl+Shift). NOTE: Don't use the faders to select tracks, use the number & label area (shown above).
- Still holding (Ctrl+Shift), Right-Click the target Track (Insert 17 in this example) and the context Menu will open. Notice 'this track' (Right-Clicked) is highlighted lighter than the others to indicate it is the target, otherwise referred to as 'this track' in the menu options.
- From the Track Routing > option select the desired action to perform with 'this track'.
When one Track is routed to another there are two independent audio paths. A regular audible send path that responds to the send volume level. A sidechain path that is NOT audible on the destination Mixer Track UNLESS it is picked up by a plugin with a sidechain audio Input capability loaded on the destination Mixer Track. For more information on how to use sidechain audio sends, see the Audio Input/Output Routing section.
In this way it is possible to have simultaneous send and sidechain signals from one Track to another. The 'Sidechain to this track' option on Right-Clicking a Send Switch (shown left), is just a macro to creates a send link with the send volume set to 0. So, you can change any 'send' into a 'sidechain' (only) link by manually setting the volume to 0. Remember the sidechain source Mixer Track will remain routed to the Master Mixer Track, so deselect its send to master switch if you don't want the sidechain source Mixer Track to be audible.
In the example above, the selected Mixer Track 1 (Send FROM), is sending audio to three other Mixer Tracks, the Master (not shown), Track 3 (a 'Sidechain' type send) & Track 5 (An 'audio' AND 'sidechain' type send). All audio sends are ALSO sidechain sends. Remember, you don't hear the sidechain send on the destination Track unless some plugin on the destination Track is receiving it and routing it into the regular audio path. For more information see this video tutorial on ![]() compressor Sidechaining.
compressor Sidechaining.
Mixer Docks
There are Left, Middle and Right docks. These are organizational and workflow related, tracks behave the same no matter which dock they are in. The Left and Right docks remain fixed while the Middle dock will scroll (roll your Mouse-wheel over the name area). You can dock any Mixer Track/s to any Dock. Select one or more tracks, Right-Click a Track and choose Dock to (Left, Middle or Right) from the pop-up menu. For a demonstration see ![]() this video.
this video.