INSTRUMENTS / GENERATORS
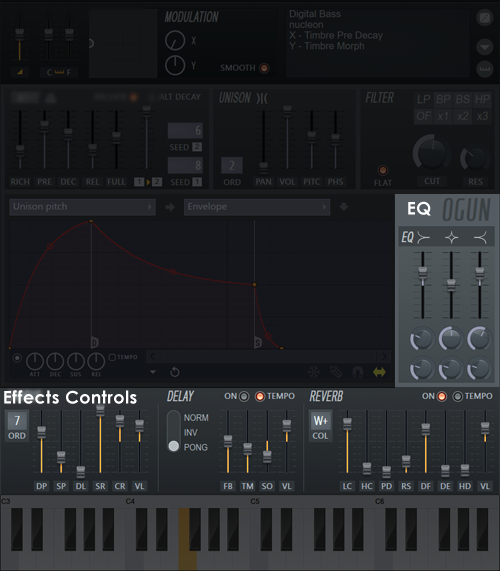
Ogun Effects Controls
Ogun effects are as follows:

Click on the following sections to open
Main Page
Master Controls
Synthesis Controls
Effects Controls
EQ
The 3 band parametric Equalizer (EQ) features the following controls for each band (from top to bottom within each band):
- EQ type - The graphic above each slider is an EQ type selector. Choose Low shelf / Peaking / High shelf.
- EQ band level - The slider adjusts the EQ level (-18 to +18 dB).
- EQ center frequency - Controls the center of the EQ band (10 Hz to 16 kHz).
- EQ bandwidth - Controls the width of the EQ band (turning the wheel to the right makes the band wider).
Chorus
Chorus is an effect created by the slight detuning of multiple copies of the output sound (similar to a choir of voices). The controls contain parameters that affect the rate, time offset, shape and depth of detune. This effect is related to Unison (described elsewhere), but operates on the whole output of Ogun rather than per voice.
- ORD (Order) - Number of Chorus voices.
- DP (Depth) - Chorus depth.
- SP (Speed) - Chorus speed.
- DL (Delay) - Chorus delay.
- SR (Spread) - Chorus panning.
- CR (Cross) - Chorus crossover frequency.
- VL (Volume) - Chorus mix.
Delay
Delay can be used to create echo & stereo-space effects.
- Normal - Normal delay feedback.
- Invert - Inverts the phase of the feedback signal to create a widening stereo effect.
- Pong - L/R stereo 'ping-pong' bounces of the feedback signal.
- Tempo - Tempo-based delay time.
- Enable - Enable the delay unit.
- FB (Feedback) - Delay feedback level.
- TM (Time) - Delay time (spacing between echoes).
- SO (Stereo Offset) - Delay time stereo offset (stereo separation of the echoes).
- VL (Volume) - Delay Volume.
Reverb
Reverb, short for 'reverberation', simulates acoustic spaces. If you clap your hands in a bathroom and in a concert hall, the two sounds will be quite different. In enclosed spaces reflections overlap one another to create a reverberant sound. The Reverb parameters allow you to simulate different types of acoustic spaces. If you want to give your sounds a realistic (live) feel, then reverb is highly useful.
- Col (Color) - Room color: W+ (warmer), W (warm), F (flat), B (bright), B+ (brighter).
- Tempo - Tempo-based pre-delay.
- Enable - Enable reverb.
- LC (Low Cut) - Adjusts the low cut-off frequency. Use this to remove low frequencies from the reverberations. LC parameter will reduce the 'rumble' and muddiness from sounds by attenuating the bass frequencies before being passed to the reverb engine.
- HC (High Cut) - Changes the high cut-off frequency. Use this to remove high frequencies from the reverb, or to make the room sound duller.
- PD (Pre Delay) - Controls the delay time between the direct input signal and the first reflection (echo).
- RS (Room Size) - Use this to set the size of the virtual room being simulated.
- DF (Diffusion) - Controls the density of the reflections bouncing off the walls of the virtual room. A low diffusion setting makes the reflections sound more distinct and sparse, like closely spaced echoes. A high diffusion setting creates a dense series of reflections that sound like a very 'live' and reflective room.
- DE (Decay) - Controls the decay time of the reverb.
- HD (High Damping) - Adjusts damping of the high frequencies in the reverb signal. Damping refers to the rate at which the high frequencies decay. This effect causes the sound to become gradually muffled and warmer with time.
- VL (Volume) - Sets the relative level of the reverberant (wet) signal.
Programming Ogun
Plugin Credits -
Code & GUI: Didier Dambrin.