INSTRUMENTS / GENERATORS
Groove Machine Synth 
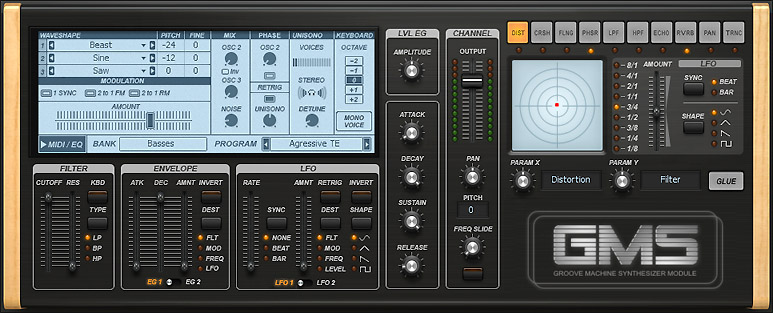
Groove Machine Synth is a multitimbral hybrid synthesizer & FX channel from Groove Machine.

Options & Controls
Click the MIDI/EQ button (showing SYNTH below) in the lower left of the screen to toggle between SYNTH and MIDI/EQ panels.
- MIDI - From the top section you can set various MIDI controller input to a selected range of Groove Machine targets. Select the target using the DESTINATION drop-down menu box.
- VELOCITY - Assign keyboard velocity to control a range of targets in Groove Machine. The VELOCITY TO LEVEL switch enables the basic velocity to volume relationship.
- MODULATION - Assign the mod wheel to a range of targets in Groove Machine.
- AFTERTOUCH - Assign aftertouch to a range of targets in Groove Machine. Aftertouch is pressure applied to keys/pads after being played, this feature may not be supported on your MIDI controller.
- PITCH BEND - Set the Pitch Bend wheel to bend-range relationship.
- EQUALIZER - The 5 band equalizer is post-FX and covers the range of center frequencies of 60 Hz, 220 Hz, 1500 Hz, 8000 Hz and 12000 Hz respectively. ENABLE - Activates the EQ.
Synth Panel
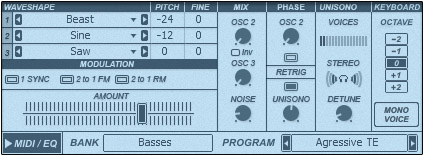
The synthesizer is a hybrid additive, FM (Frequency Modulation) & RM (Ring Modulation) design.
- Oscillator section - There are 3 independent oscillators.
- WAVESHAPE - Click to select from predefined shapes or load waveforms from .wav files or the library. You can also drop waveforms on each of the 3 oscillators.
- PITCH - Pitch change in semitones.
- FINE - Pitch change in cents.
- MODULATION - Select from one of:
- 1 SYNC - OSC1 will be synced by the frequency defined by AMOUNT fader.
- 2 to 1 FM - Oscillator 2 is linked to Oscillator 1 in a Frequency Modulation relationship.
- 2 to 1 RM - Oscillator 2 is linked to Oscillator 1 in a Ring Modulation relationship.
- AMOUNT - Sync, FM or RM amount.
- MIX
- OSC 2 - Mix for Oscillator 1 & 2.
- INV - Invert the phase of Oscillator 2.
- OSC 3 - Mix for Oscillator (1+2) & 3.
- NOISE - Mix between all oscillators and white noise source.
- PHASE
- OSC 2 - Oscillator 2 phase.
- RETRIG - Oscillator 2 phase retriggering.
- UNISONO - Unison phase.
- UNISONO - Multiple detuned voices are generated per note for a chorus-like effect.
- VOICES - Choose between 1 and 16.
- STEREO - Stereo spread of voices.
- DETUNE - Detuning of voices.
- KEYBOARD
- OCTAVE - Octave for all Oscillators.
- MONO VOICE - Monophonic mode with portamento.
Articulation
- FILTER
- CUTOFF - Channel global filter cutoff frequency.
- RES - Resonance.
- KBD - Keyboard scaling. The filter cutoff will track up and down with the note played. Higher notes having a higher cutoff frequency etc.
- TYPE - Switch between LP (Low Pass), BP (Band Pass) & HP (HighPass).
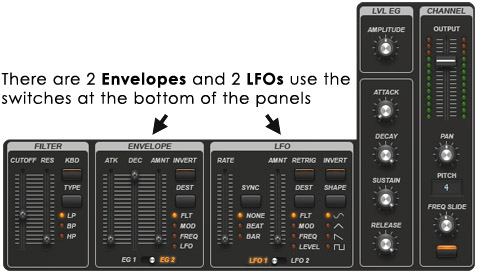
- ENVELOPE
- ATK - Attack time.
- DEC - Decay time.
- AMNT - Amount of envelope applied. Envelope scaling.
- INVERT - Invert the phase of the envelope.
- DEST - Target parameter for envelope modulation.
- EG1 / EG2 - There are two envelopes available, switch between them here.
- LFO - Low Frequency Modulation is used as a source to rhythmically or otherwise vary synthesis parameters.
- RATE - LFO Speed.
- SYNC - Synchronize the LFO period to NONE (free running), BEATs or BARs.
- AMNT - LFO modulation amount.
- RETRIG - Retriggering restarts the LFO phase on each note. Leave off for a free-running LFO effect.
- DEST - LFO destination. Select the target to be modulated by the LFO.
- INVERT - Inverts the LFO waveform.
- SHAPE - LFO waveform shape. NOTE: The Sine (top shape) is bipolar, generating both +1 and -1 values at opposing peaks. The remainder of the shapes (Triangle, Saw & Square) are uni-polar producing values between 0 and 1.
- LFO 1 / LFO 2 - There are two LFO sources available, choose the LFO to be edited here.
- LVL EG - Envelope Generator Level. The envelope is used to shape the volume contour of the sound of each note played.
- Amplitude - Overall gain.
- ATTACK - Attack time, low if faster.
- DECAY - Decay time, low is faster.
- SUSTAIN - Sustain level. Volume for the duration of the held note.
- RELEASE - Release time, low is faster. Try increasing this a little if notes 'click' when released.
- CHANNEL
- OUTPUT - Global Channel volume.
- PAN - Global Channel panning (position in the Left to Right stereo field).
- PITCH - Global Channel pitch (semitones).
- FREQ SLIDE - Slide time for portamento style effects. Activate with the switch below the knob.
Effects
There are 10 performance oriented effects:
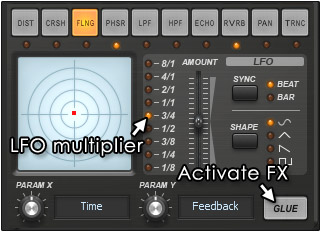
- GLUE - Click this switch to permanently enable the selected effect. Momentary activation can be gained by clicking in the X/Y panel.
- Effects - There are 10 effects these include:
- DIST - Distortion. X - Distortion amount. Y - Low pass filter cutoff frequency.
- CRSH - Bit crusher. X - Sample-rate reduction amount. Y - Low pass filter cutoff frequency.
- FLNG - Flanging. X - Depth. Y - Feedback.
- PHSR - Phasing. X - Depth. Y - Feedback.
- LPF - Low pass filtering. X - Low pass filter cutoff frequency. Y - Resonance amount.
- HPF - High pass filtering. X - High pass filter cutoff frequency. Y - Resonance amount
- ECHO - Delay/Echo. X - Feedback amount (echo strength) Y - Echo filtering.
- RVRB - Reverberation. X - Feedback. Y - Wet level (reverb amount).
- PAN - Panning. X - Left/Right pan position. Y - Binaural effect level. Up/Down.
- TRNC - Trance effect. X - Release time. Y - Drop level. Use this effect to induce side-chain style pumping.
- LFO
- LFO Multiplier - Select a multiplication factor for the LFO.
- AMOUNT - LFO multiplier, from 0 to 100% (top).
- SYNC - LFO can be synced to the Bar or Beat.
- SHAPE - LFO waveform shape.
- Arm X / Y - Each effect has a pair of unique performance parameters.
Plugin Credits:
Code: Maxx Claster
Presets: Toby Emerson, Arlo G (nucleon).


