INSTRUMENTS / GENERATORS
Transistor Bass 
TRIAL ONLY: Transistor Bass is available as a trial version in FL Studio and needs to be purchased separately.
Transistor Bass is a subtractive synthesizer in the style of the legendary Roland TB303™ Bassline synthesizer, but also enhances the concept by offering a number of tweaks not found in the original hardware, together with a guitar distortion, FX and a modern sequencer. Plus, fast editing of your bassline sequences.

Video Tutorials
Click to watch the ![]() Transistor Bass video tutorials.
Transistor Bass video tutorials.
Parameters
There are 128 'Programs'. Each program consists of a Patch (the state of all synthesis controls for Transistor Bass) and a Sequence (a melody that plays when the Sequencer is activated). You can change the Program value with the Note/Key selector or when AF (Auto Follow) is on, the Program will change depending on the note sent to the plugin (C0 to G10). Independent of the Programs are 128 Sequences that can be used with any of the Programs. Sequences can be set from 1 to 16 steps. In addition you can use Piano roll slide notes and note colors.
Title Bar
- Edit Menu
- Edit actions - Copy/Paste Sequence or Patches (parameters).
- Engine - Choose how much awesomeness you want...
- V1 Legacy - Selected when loading a project that used the first version of Transistor Bass, preserving the original sound of the project.
- V2 Extended cutoff range - Improved filter design to more closely emulate a real TB303.
- V2 TB303 cutoff range - Our most perfect emulation of an original TB303. Based on TB303 SCIENCE!
- Theme - Select a user interface theme.
- About - Information about Transistor Bass.
Main Panel
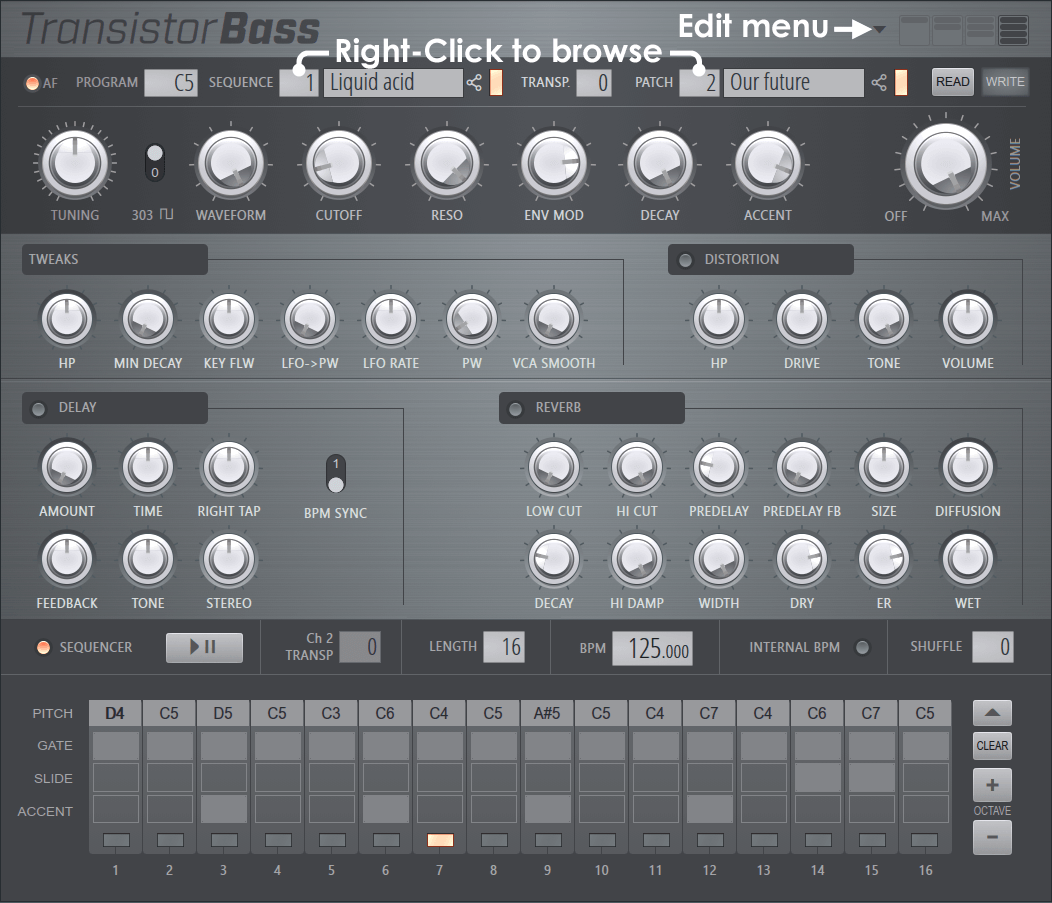
- AF (Autofollow) - When selected and the Sequencer is also activated: The active / editable Program automatically changes with input notes. Use this to change the Program and associated Sequence on-the-fly. Deselect when you want to tweak a Program and don't want input notes from FL Studio to change it while you are working on the Program.
- Program - Each program is linked to one of the 128 MIDI notes (C0 to G10). Use the selector to choose one of the 128 'Program' slots. In AF mode, each of the 128 MIDI notes will select each of the 128 Programs. Each Program can be linked to any of the 128 Patches and 128 Sequences. This means that 2 or more Programs can share the same Patch and or Sequence. Sharing is useful when you want different MIDI notes to play different Sequences, but with the same Patch (sound). When not in AF Mode, the Program won't change unless you do it via the Program selector on the interface.
- Sequence - The pattern sequencer that can have a length from 1 to 16 1/16th notes with up to 128 Sequences x 128 Patch.
- Sequence number - Defines one of the 128 Sequences associated with the Program.
- Shared Sequence indicator - Lights up when the Sequence is used by more than 1 Program. This is just a warning in case you decide to edit the Sequence and it affects another Program.
- Transp (Sequence Transpose) - Defines a Transpose for the selected Sequence, for the current Program. You can transpose sequences on-the-fly via note input from MIDI Channel 13. Note C5 is the default pitch.
- Patch - A Patch is the set of all parameters that influence the sound, including Tuning, Waveform, Delay Stereo, Reverb Wet, etc. Patches allow you to switch between completely different sounds on-the-fly.
- Patch Number - Defines the Patch associated with the Program.
- Patch Name - Name for the Patch. Click to edit.
- Shared Patch Indicator - lights up when the Patch is used by more than one Program. This is just a warning in case you decide to edit the Patch and it affects another Program.
- Read / Write (Patch parameters Edit Buffer) - When you edit parameters or they are modified by automation, they are not stored to the current Patch immediately. More specifically, each Patch has a 'working' edit buffer. This avoids overwriting precious and carefully crafted Programs: You'll always be able to return to the original Patch settings when you mess something up by clickiong the 'Read' button. If you are satisfied, you can permanently keep the Patch edit buffer by pressing the 'Write' button.
- Read - Read Patch permanent buffer into Patch edit buffer.
- Write - Write Patch edit buffer to Patch permanent buffer. The button will light to indicate the change. Additionally, Patch edit buffers are stored when you save your song. When you load it again, WRITE will be lit if you didn't press it before saving.
- Tuning - Tuning from -1 Octave to +1 Octave.
- 303 Pulse - Applies only to the Square Wave, this algorithm is an updated model designed to most closely match the original TB303. NOTE: When 303 Square Wave is active, LFO->PW, LFO RATE and PW knobs in the TWEAKS section are disabled to match the TB-303. You can hear this square wave compared to a real TB-303
 here).
- Waveform - Blend between Square (fully anti-clockwise) and Sawtooth (fully clockwise) waveforms.
- Cutoff - Filter cutoff frequency.
- Resonance - Filter resonance. Accent modulates this control also (see Accent below).
- Env Mod - Filter Envelope modulation. The filter envelope is a simple AD (Attack / Decay) envelope with a very short attack and decay is adjusted by the Decay knob.
- Decay - Filter Envelope Decay time.
- Accent - Accent amount. Accents momentarily increases the filter Cutoff, Resonance and wave Volume. NOTE: When not using the internal sequencer, accented notes are triggered with a velocity greater than 100
- Volume - Output level from the sound engine. This volume is applied BEFORE the Distortion section!
Controls Panel
- Tweaks - These controls influence the oscillator.
- HP - Frequency of the high-pass filter (the original TB-303 has a fixed-frequency highpass). Use this to adjust the output to be more or less 'bassy'.
- Min Envelope Decay - Minimum Filter Envelope decay time. This has a strong influence on accented notes, because the accent circuit uses this relies on this parameter. This is probably THE parameter that defines why one TB-303 emulation sounds different to another.
- Filter Key Follow - Anti clockwise = negative, Middle = 0, Clockwise = positive. This gives the sound more 'liveliness'. The original TB-303 does not have this feature.
- LFO -> PW - Transistor Bass features one single LFO hardwired to the Pulse Width of the Pulse oscillator. This parameter determines how much the LFO influences the Pulse Width.
- LFO Rate - How fast the PW --> LFO oscillates
- PW - Absolute Pulse Width of the Pulse oscillator. NOTE: In the real 303 this is hardwired to about 66%.
- VCA Smooth - Turning this clockwise gradually removes attack and release clicks from notes. For the original 303 sound turn fully anti clockwise.
- Distortion - The distortion is a simulation of the Pro Co Rat guitar pedal, as used by the legendary German acid techno duo "Hardfloor" (Ramon Zenker & Oliver Bondzio).
- Distortion Switch - Active/Deactivate the Distortion module.
- HP - Pre-distortion highpass.
- Drive - Distortion drive.
- Tone - Adjusts brightness of the distorted sound with a post-distortion lowpass.
- Output Volume - Adjust output volume of distortion circuit.
- Delay - A simple delay that is not affected by pitch-warp effects when changing time on-the-fly.
- Delay Switch - Active/Deactivate the Delay module.
- Amount - Input send amount, similar to a "Wet" parameter.
- Time - Left speaker's delay time
- Right Tap - Right speaker's delay time (relative to left speaker's delay time)
- Feedback - Delay feedback (the number of echoes).
- Tone - Anti clockwise = Lowpass, Middle = Filter OFF, Clockwise = Highpass
- Stereo - Stereo Width
- BPM Sync - BPM sync for delay.
- Reverb - Based on FL Reeverb 2 with the addition of a Predelay Feedback. All other parameters are like in FL Reeverb 2.
- Low Cut - Low cut-off frequency. Use to removes low frequencies from the reverberations. Using the L.Cut parameter will reduce the 'rumble' and muddiness from the bass drum by attenuating the bass frequencies before being passed to the reverb engine.
- High Cut - High cut-off frequency. Use this to remove high frequencies from the reverb, or to make the room sound duller.
- Predelay - The delay time between the direct input signal and the first reverb reflection. Predelay should be set to modest values for small rooms, and can be increased to suit room size. Predelay creates a slap-back echo effect that can add atmosphere and muffle the signal, so use it wisely.
- Predelay FB - Predelay Feedback causes the Predelay to feedback just like a normal delay.
- Size - Room Size sets the size of the virtual room. For realistic effects, the Room Size should be adjusted according to the decay time. Small rooms sound better with a short decay time, large rooms sound better with longer reverb times.
- Diffusion - Density (spacing/number) of the reflections bouncing off the walls of the virtual room. A low diffusion setting makes the reflections sound more distinct and sparse, like closely spaced echoes. A high diffusion setting creates a dense series of reflections, so close they sound more like a constant decaying noise.
- Decay - Decay time of the reverb, this is the time it takes for the signal to decay to -60dB (1/1000 of the maximum amplitude). Use low decay times for small rooms (good for fattening drum sounds), and long decay times for large rooms (halls or church-effects).
- High Damping - High frequency decay in the reverb signal. This effect causes the sound to become gradually muffled and warmer.
- Dry - The relative level of the (dry) input signal passed to the outputs.
- ER (Early Reflection) - Sets the relative level of the first reflections in the reverb.
- Wet (Wet Level) - Sets the relative level of the reverberant (wet) signal. When using Reeverb 2 in a Send Channel this should be set to 100% (maximum).
Sequencer
The sequencer is 16 steps (1/16th notes).

Transposing the sequencer from the Piano roll - Notes played on MIDI Channel 13, Note color 13 will transpose the sequencer up or down relative to the original C5 (MIDI note 60) pitch. You can trigger the sequencer via the Play/Pause button or via MIDI notes. Naturally it always plays the Sequence associated with the Program and note (up to 128 sequences can be saved).
TIP: Rotate notes in Stepsequencer with (Shift+Ctrl+Arrows)
Sequencer Controls
- Sequencer - When selected the internal sequencer will play based on input note. When deselected you can use the Piano roll & controllers as normal to play notes.
- Play/Pause - Start/Stop the sequencer.
- Transpose - Shows the current transpose setting. You can transpose a sequence pitch using note MIDI Color 13 as shown above. Note C5 (MIDI note 60) is default pitch.
- Length - Choose from 1 to 16 steps. When less than 16, the sequencer will use the first N steps.
- BPM - Set the internal BPM of the sequencer (usually FL Studio's BPM is used, see below).
- Internal BPM - When selected Transistor Bass ignores FL Studio's BPM.
- Gate Length - Changes the duration of the Gate steps. You can shorten or lengthen the default to variations in the sequenced sound not possible with the original 303, that has a fixed length (equal to a value of 50%).
- Shuffle (Swing) - Changes the length of the even steps to create a Swing effect.
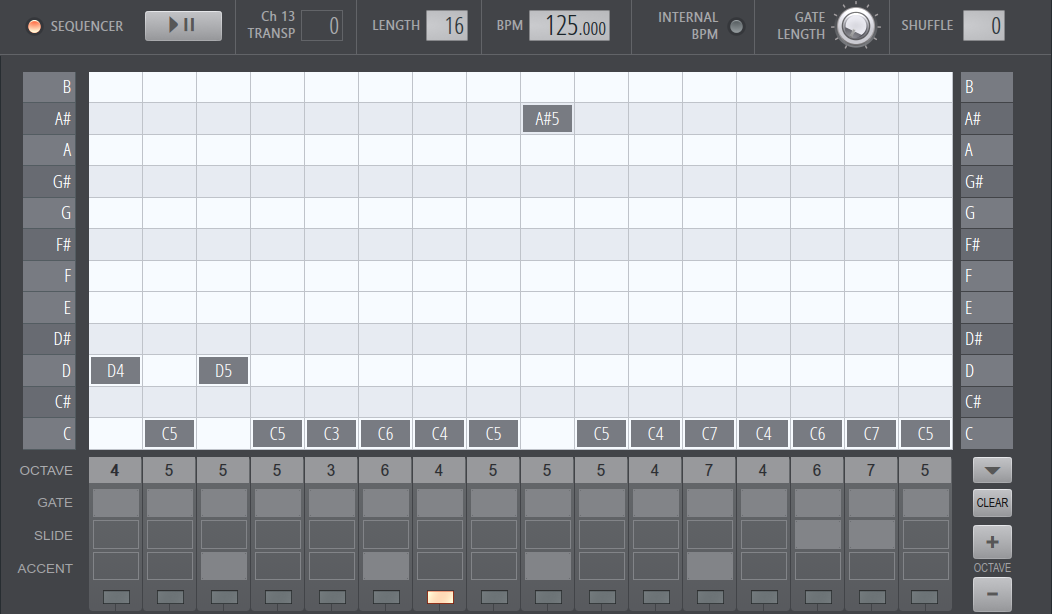
- Octave - Set the octave from 0 to 10.
- Gate - Applies the Gate effect to the step.
- Slide - Applies the Slide effect to the step .
- Accent - Applies an Accent to the step.
- Open/Close Note Editor - The arrow to the right side of the Octave indicators
- Clear - Reset sequence to default.
- +/- Octave - Sets all Octaves +/- by 1.
Keyboard editing shortcuts:
- G - Toggle Gate
- A - Toggle Accent
- S - Toggle Slide
- Arrow Left/Right - Step navigation.
- Arrow Up/Down Increase/Decrease pitch by a Semitone.
- Arrows + Up/Down + Shift - Increase/Decrease pitch by an Octave.
Note control:
- Accents - Trigger with Velocity of 100 (about 75%) or more.
- Slides - Use slide notes OR overlap notes.
Piano roll Controls
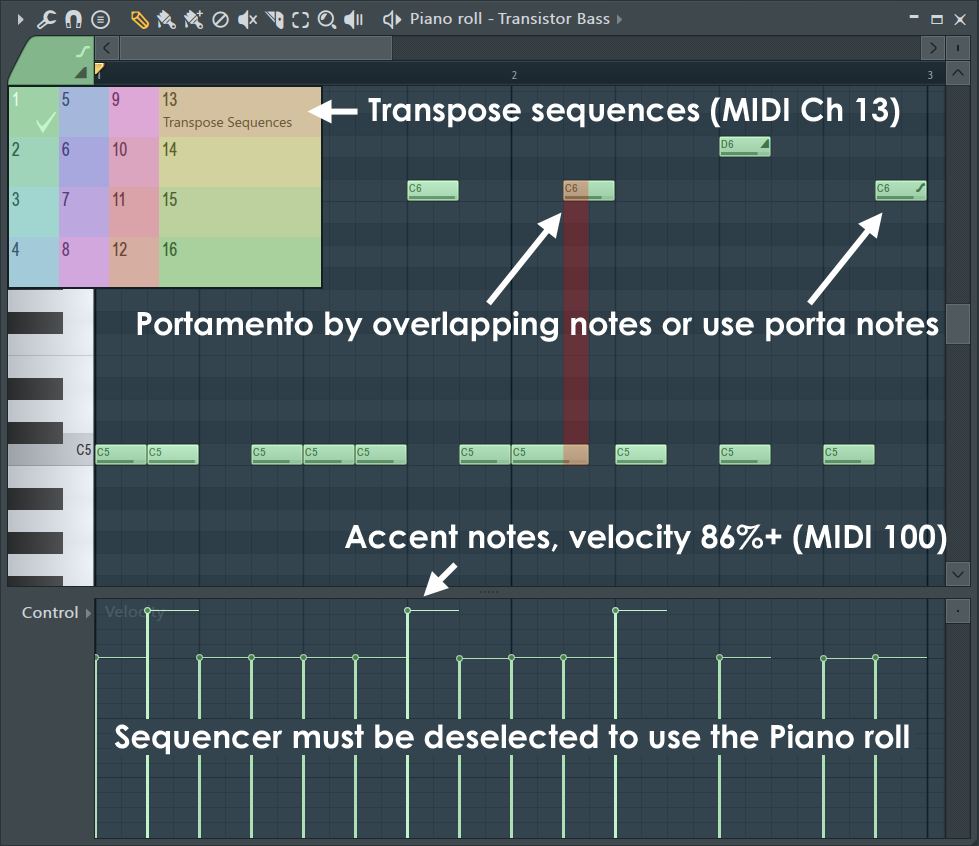
To sequence Transistor Bass from the Piano roll first deselect the sequencer.

NOTE: Autofollow is not active when the Sequencer mode is deselected (although the control will stay lit).
- Accents - Velocities 86% (MIDI velocity 100) or more will trigger the Accent function.
- Portamento - This is a short pitch-slide from a preceding notes pitch to the portamento notes pitch. You can trigger these by overlapping notes or using the portamento note function. NOTE: As with any native plugin, change the slide time on the Wrapper Miscellaneous Functions tab.
- Transposing sequences - When in Sequencer mode you can transpose a sequence pitch using note MIDI Color 13 as shown above. Note C5 (MIDI note 60) is default pitch.
Plugin Credits: Daniel Schaack.
Interface: Miroslav Krajcovic.
Reverb algorithms: Ultrafunk.