FL Studio Mobile
FL Studio Mobile - Home Panel
The Home Panel contains administrative settings grouped according to the SONGS, PROJECT, SETTINGS, SHOP and FILES tabs.
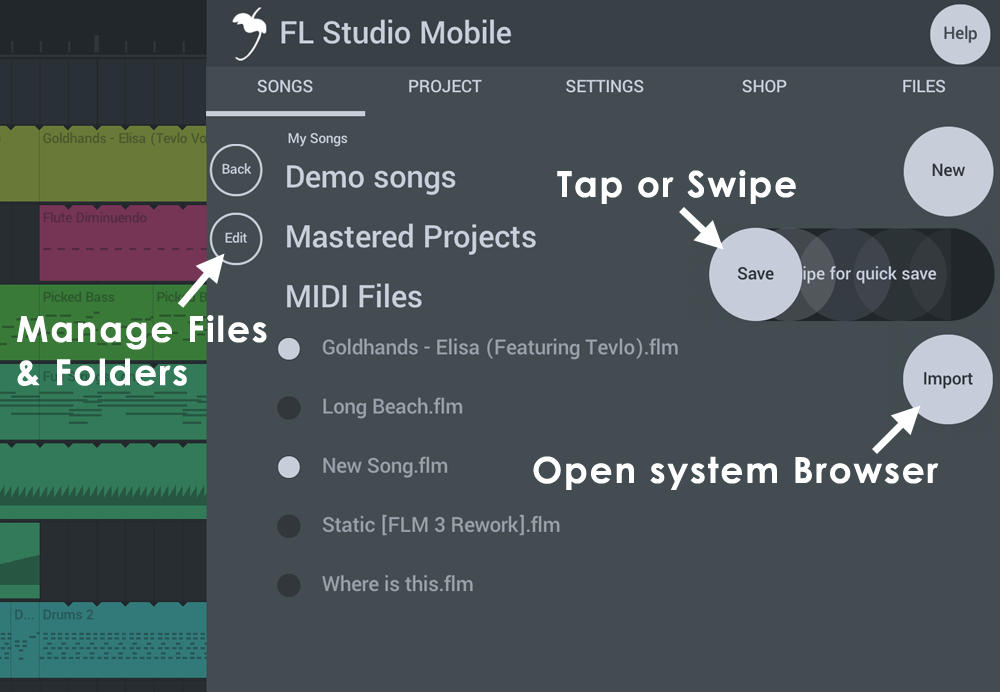
NOTE: Tap the SAVE button to open the save dialog. Swipe to quick-save (overwrite) the current project, without a pop-up dialog.
Parameters
Tap Home (Button) to access the following:
NOTE: Not all features are available on all operating systems.
HELP (Button)
The help button is your friend! Under it you can find...
- User manual - You are reading it.
- Getting started video - Play the introductory video tutorial.
- Video Tutorials - An extensive YouTube FL Studio Mobile video playlist.
- Users & support forums - The Users Forum is a great place to ask 'How-To' questions, make feature-requests or to report bugs. If something does not work, reporting it is the quickest way to get it fixed.
- Manage account - Options to manage your Image-Line Account include:
- Create an account - This will give you access to the Users Forum and allow you to Restore Purchases. NOTE: If you already have an account use 'Register app to account'.
- Register app to Account - If you already have and Image-Line Account, use this to login and register FL Studio Mobile to it.
- Delete account - Submit a GDPR compliant request to delete your Image-Line Account. NOTE: If you have any licensed products in the account, you will need to confirm you wish to delete these and permanently lose access to them.
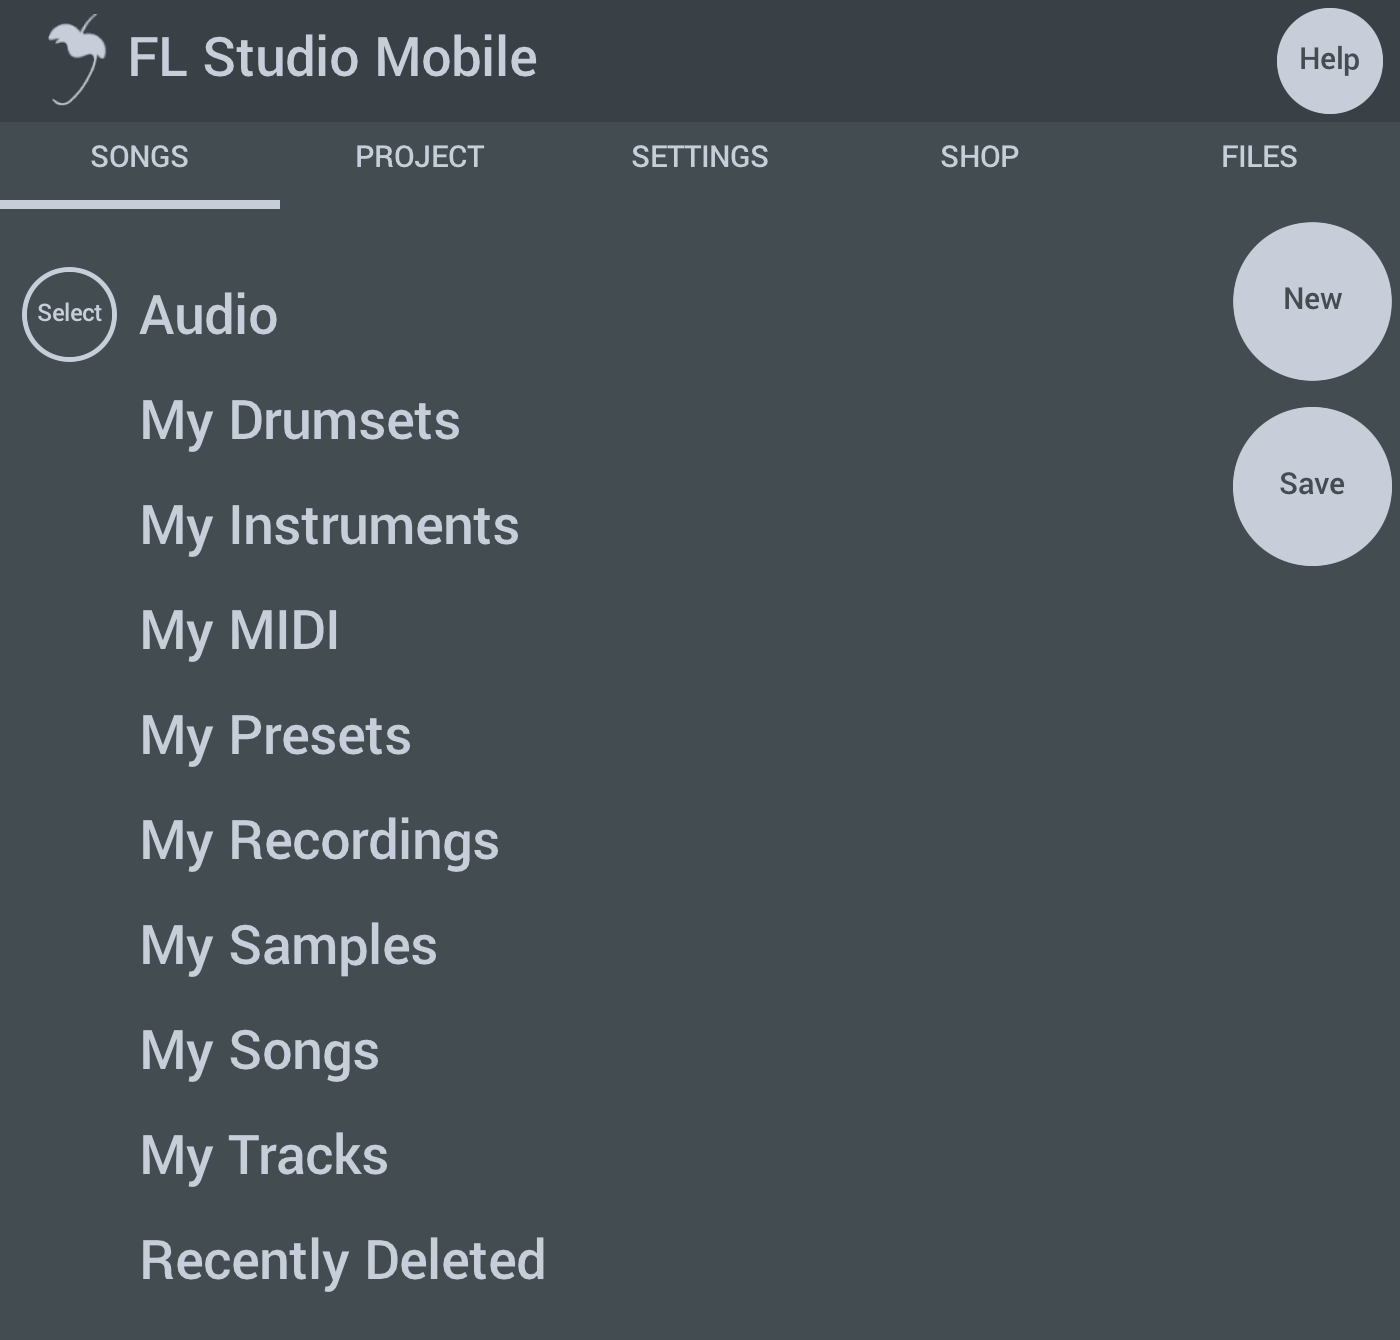
My Files
By using the (Back) button you can navigate to the top of the folder and see your My Data locations. Use this to browse, preview (audio files), delete and move content.
NOTE: On some operating systems you can Long-tap/Click the folders above and choose 'Shown in ...' the Operating System Browser for more freedom.
Managing User Files
For full details on working with user files (Import, Export & Locating) see Managing User Files
SONGS
Songs - Load and save FL Studio Mobile projects and MIDI files.
- New - Opens the New Project template.
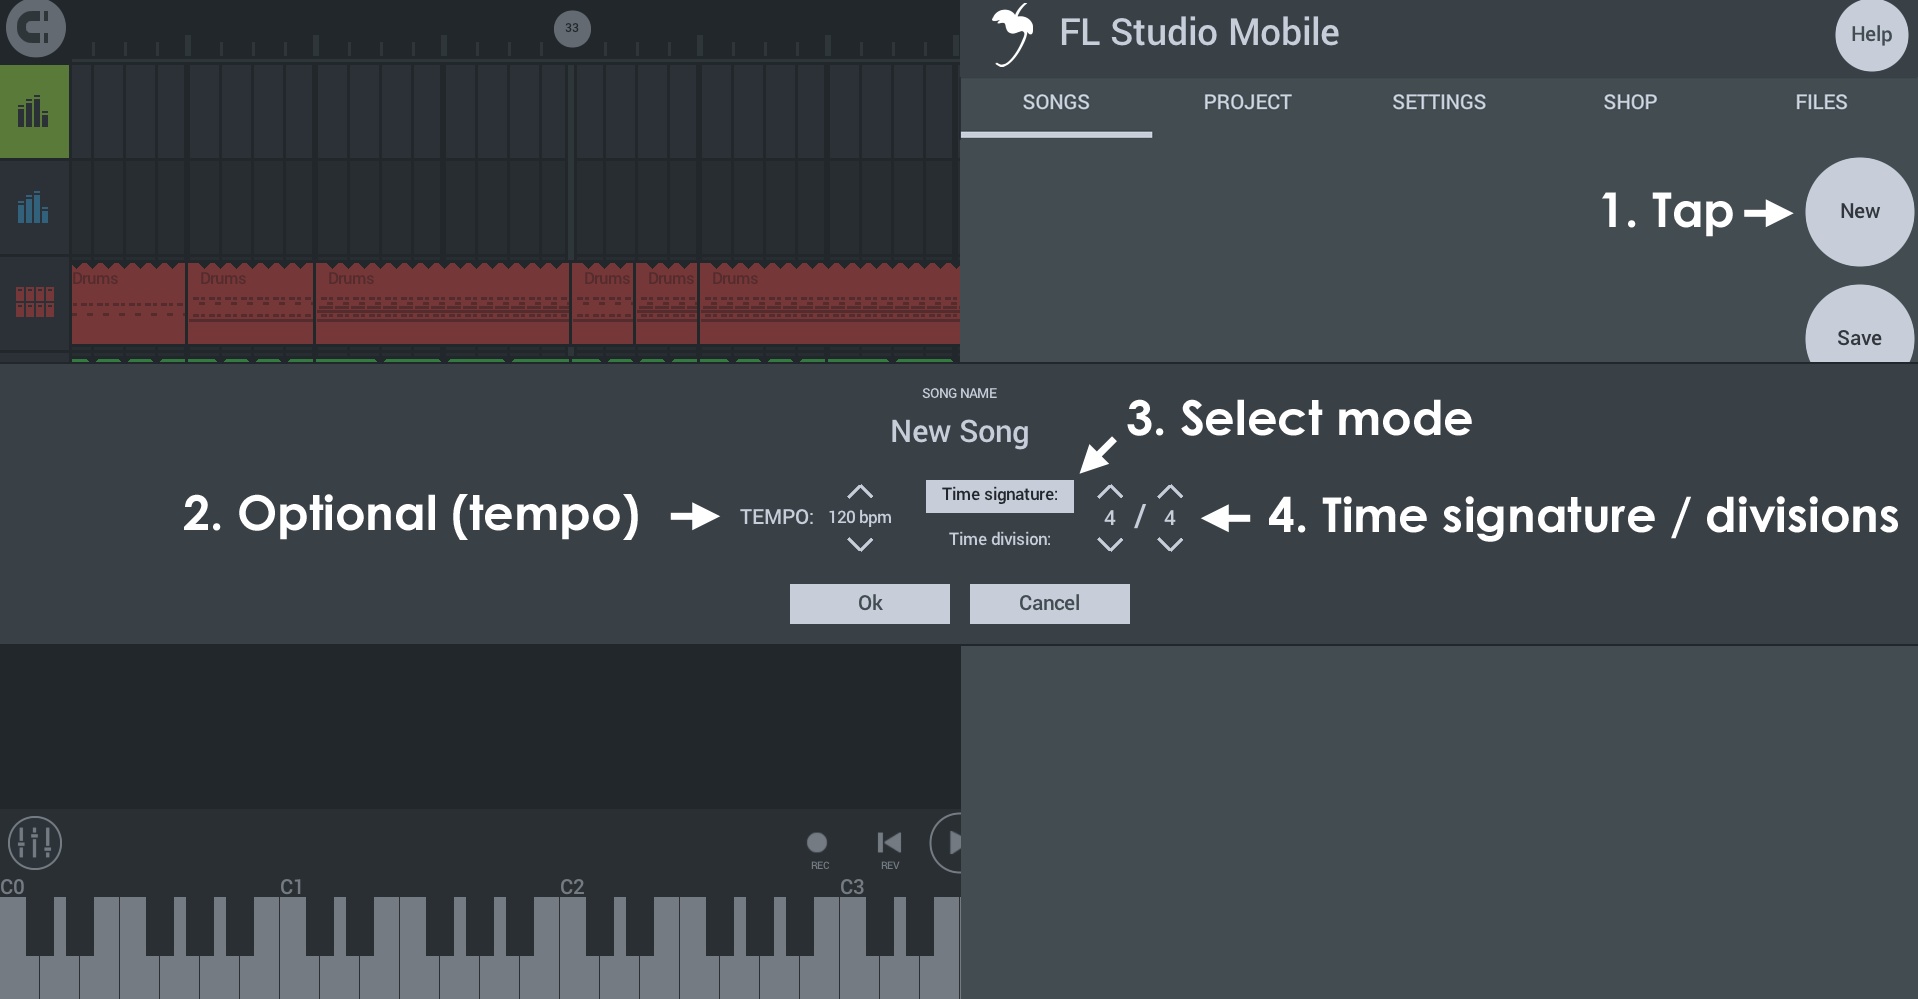
Starting a new project...
- New - Opens the new project dialog
- Tempo - Choose from a common range of tempos. You can always change this later or set an exact tempo from the BPM control on the lower transport bar.
- Mode - You can set the time ruler in FL Studio mobile to one of two modes:
- Time signature (traditional) - Select Beats per bar / Beat value. The Stepsequencer will show 1/16th notes according to the Beat value.
- Time division (advanced) - Set Steps per beat and Beats per bar. The Stepsequencer will show the number of steps per beat selected.
NOTE: Time signatures and divisions can only be set at the time a project is created. These can't be changed afterward.
- OK - Start the new project with the selected settings. NOTE: Only a single Time Signature can be set per project. You can't change the Time Signature of an existing project.
- Save - Saves the current project. NOTE: Setting a 'SEND' destination, allows you to send content via email and file-sharing Apps. Options include:
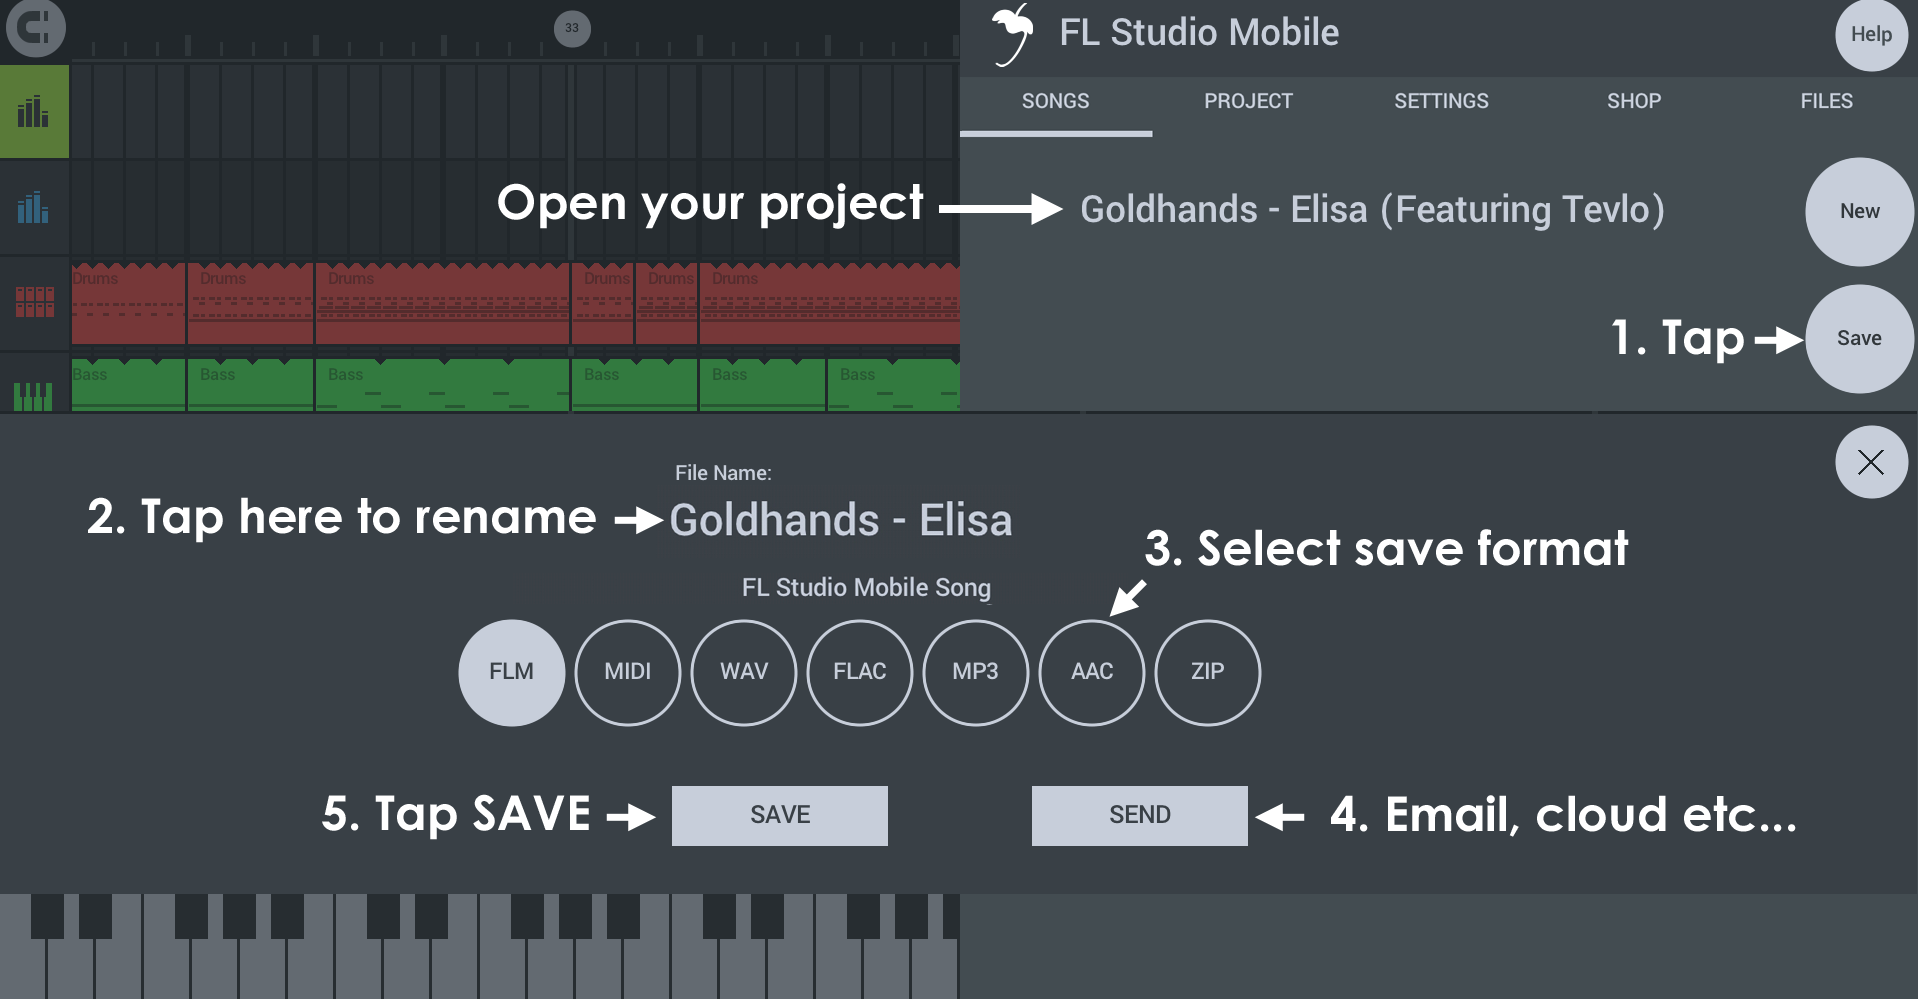
Saving or sending files...
- SONGS Tab > Save - From the SONGS tab select Save. NOTE: You can swipe this icon to the left to 'quick save', without a popup dialog, to overwrite the current project.
- Rename file (optional) - If you want to rename the project tap here and enter a new name.
- Select format - Choose the save format. FLM is a project file. MIDI is note data. WAV, FLAC, MP3 and AAC are audio formats.
- SEND (optional) - This is an alternative to saving to your device. Tap here to select email and any other external locations available through Applications that can share files on your device. NOTE: This is different to 'SHARE' TAB that allows you share files directly between FL Studio Mobile installations.
- SAVE - This saves to the default FL Studio Mobile user data folders. When saving Audio formats you will see the following options:
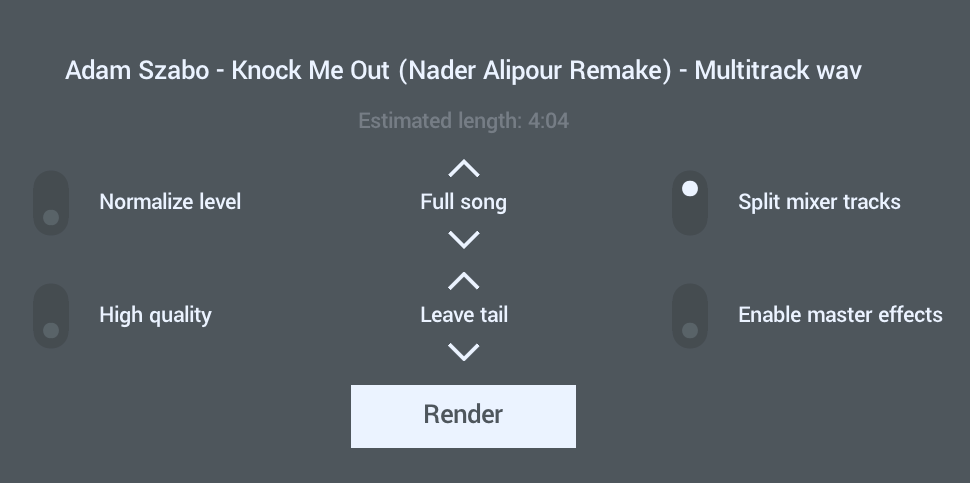
- Normalize level - Maximize level so the loudest peaks reach 100% volume.
- High quality - Sets highest quality audio. Action depends on render format - WAV 32 Bit (HQ) / 16 Bit (Off). FLAC 24 Bit (HQ) / 16 Bit (Off), MP3 320 kbps (HQ) / 192 (Off). AAC 320 kbps (HQ) / 192 (off).
- Render Mode (menu) - What parts of the Playlist should be rendered.
- Full song - Renders from the start of the Playlist until the bar with the last data (and in accordance with 'tail' settings in the menu below).
- Trim silence - Removes silence from the start of the render.
- Selection - Renders only the Playlist Time-Line selection.
- Tail Rendering (menu) - Decides how any decaying audio after the last Bar is treated.
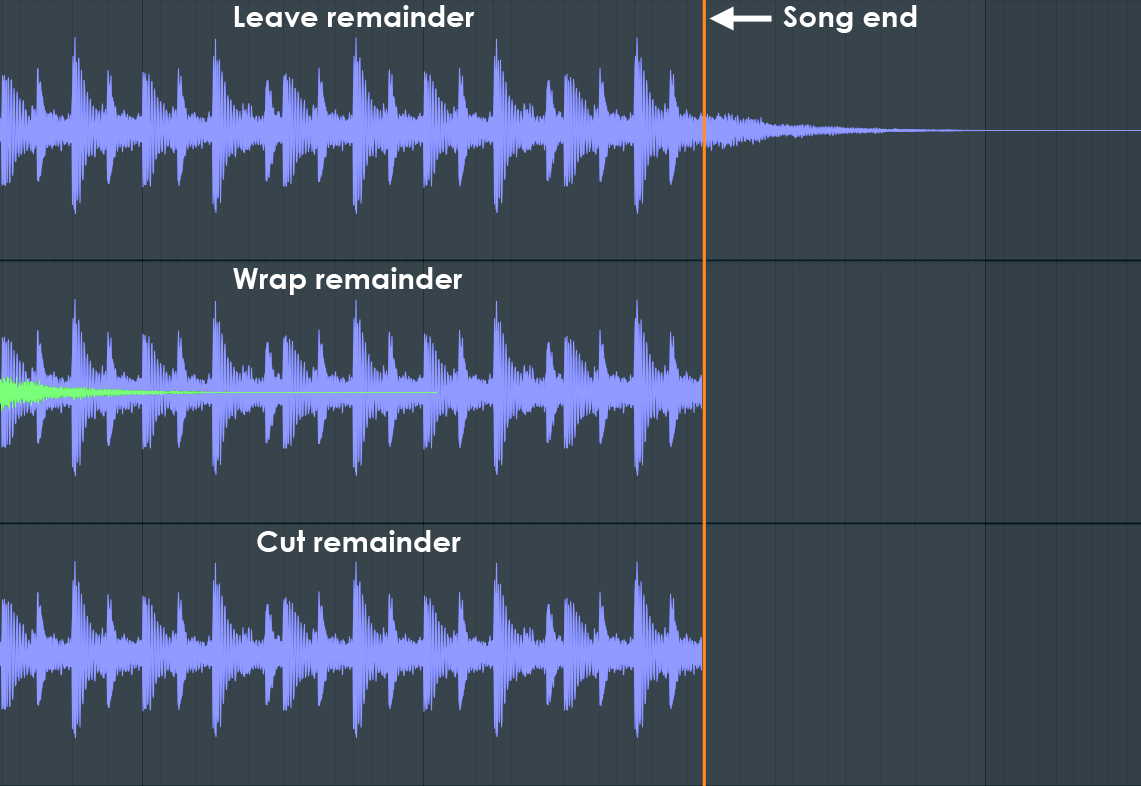
- Leave remainder - After the last bar with data rendering continues until any effects (such as reverb) have decayed to silence.
- Wrap remainder - Wraps any decaying sound at the end of the last bar back onto the beginning of the render. This is useful when rendering loops with effects to create the smoothest loop.
- Cut remainder - Stops immediately at the end of the last Bar.
- Split mixer tracks - Creates an audio files corresponding to each Playlist track in isolation of the others. These files are often referred to as 'Stems' and you can use them in other DAWs such as FL Studio, to share projects with friends who may not own the same content or plugins as you OR load stems back into the original project and mute the original to save CPU. Save location - Files are saved under My Files > My Tracks > [Project Name] - WAV / FLAC or MP3 depending on the format used.
- Enable master effects - Split tracks (Stems) will be rendered with the Master Rack effects. When using Stems in another DAW, normally this option is deselected, as this offers more flexibility for subsequent mixing. Select this option if you will reuse stems in FL Studio Mobile, to lower CPU usage. Effects on individual Playlist Tracks are always included. You will need to manually mute effects on each Rack prior to rendering if you don't want these. NOTE: As it's impossible anticipate all use cases, and all types of effects present on the Master Mixer Rack, none of the suggestions above are 'rules'. You will need to think through the logic of how you want to use Stems and whether or not you want Master effects present on each one. NOTE: This option is only present after Split mixer tracks is enabled.
- FLM - FL Studio Mobile project format (.flm extension when viewed in a file browser).
- MIDI - MIDI is a data format for sharing FL Studio Mobile project data (Notes and control information) with other DAW software (.mid extension when viewed in a file browser). NOTE: This option saves the first 16 tracks of the project to a single MIDI file. If you have more than 16 tracks you can rearrange the track order and do multiple saves OR save the additional tracks separately with the per-track Save as MIDI.
- WAV (audio) - Highest quality, large file size. Wave is a lossless audio format and preferred (along with FLAC) for handling audio in a production environment. Files are 16 Bit WAV format (.wav extension when viewed in a file browser), unless you have set 'High quality' at save pop-up options (see above) and then it uses 32 Bit format.
- FLAC (Audio) - Free Lossless Audio Codec, is similar to WAV format in retaining all audio information in the encoded waveform. FLAC has the additional benefit of significantly reducing the file size. FLAC files are typically between 20 to 30% smaller than the equivalent WAV file, all while retaining a bit-perfect copy of the original data. The 'High quality' at save pop-up options (see above) toggles between 16 and 24 bits per sample.
- MP3 (audio) - Good but lesser quality, smaller file size. Files are 192 or 320 kbps (HQ) (.mp3 extension when viewed in a file browser).
- AAC (audio) - Good but lesser quality, smaller file size. Files are 192 or 320 kbps (HQ) (.aac extension when viewed in a file browser).
- ZIP (archive) - Save to ZIP format to archive or share all samples that are used in the project (excluding purchased shop content).
Working with ZIP files there are several key workflow options:
- Import a ZIP - Use the Import button and import the ZIP project from the available folder locations on your device.
- Work from the ZIP - Open the ZIP archive from the Songs folder it was saved to. All samples are then loaded from and saved to the original ZIP archive, not from User Files/My Samples, etc.
- Import the contents of a ZIP - To import the contents of a ZIP project to your My Files folder, load the ZIP and save immediately to FLM format (FL Studio Mobile). All samples are copied to your User Files folder. Duplicates will be ignored, so it's safe to import the same archive twice. NOTE: This is also a great way to bulk-import single-shot samples. Add all the samples you need to a ZIP and then use this method to add them to your My Files > My Samples folder.
TIP: Use WAV for reuse in FL Studio Mobile and other DAW software. Use MP3 for music distribution and listening.
NOTE: For advanced file sharing see the section - Your Files! (Where are Project, WAV, MP3, MIDI files located?)