SYSTEM SETTINGS
System Settings - Files


To open the File Settings choose 'Options > File settings' from the main menu or press the F10 function key on your keyboard. The File Settings page allows you to link additional folders into the Browser, along with a location where your VST/AU plugins are saved. You can then directly access these files from the FL Studio Browser. To open: Press F10 and select the File icon. The first time you open this page, the folder slots will be empty, each row represents one 'custom' folder you can add to the Browser. Folders here are also are searched (and all sub-folders) for samples and sounds when you load a project. It is unwise to select the root of your hard drive, as FL Studio will search all the folders on your drive when it is looking for a file.
NOTE: At any time you can open a standard Operating System (OS) browser and then drag compatible files or folders from the OS browser into FL Studio (FL Studio will add the folder to the Browser automatically).
We have a series of video tutorials on using the ![]() Browser & extra search folders here.
Browser & extra search folders here.
")
NOTE: You can drag-and-drop folders from the Windows browser on the 'Browser extra search folders' area and they will be added.
Backup (Autosave)
Autosave will create backup copies of the current project (and/or any overwritten files including .flp, .fst, .zip etc) to the Browser > Backup folder. This folder is located in your files location ..[user]\Documents\Image-Line\FL Studio\Projects\Backup. If you want to recover the last autosave then use the option 'Revert to last autosave' from the File Menu OR select a project from the Browser > Backup folder.
- Autosave - Autosaves are made according to the following settings and rules:
- Never (just remind every 10 min) - No backup files are made. The reminder to save your project will appear in the Hint Bar if 10 minutes elapse without a manual save.
- Rarely (every 15 minutes) - Backups are made on every manual save AND every 15 minutes UNLESS FL Studio is playing, then the autosave is postponed until the project is stopped.
- Occasionally (every 10 minutes) - Backups are made on every manual save AND every 10 minutes UNLESS FL Studio is playing, then the autosave is postponed until the project is stopped.
- Regularly (every 5 minutes) - Backups are made on every manual save AND every 5 minutes UNLESS FL Studio is playing, then the autosave is postponed until the project is stopped.
- Frequently (every 5 minutes & before risky operations) - Backups are made on every manual save AND on critical operations AND every 5 minutes, even when FL Studio is playing and before adding plugins.
- Very frequently (every minute & before risky operations) - Afrojack style! Yes he pestered us for this :)
- Location - Choose where to save backups:
- Always save to the global folder - Uses the User data folder location under ...Image-Line\FL Studio\Projects\Backup.
- Save to the project data folder if there is one - A sub-folder will be created in the Project File location. If no Project Foldfer is set, the Global Folder will be used.
- Maximum - Set the number of saves to retain for all projects that you have been working on. Once the maximum is reached, the oldest files will be successively replaced with newer saves. The purpose of this system is for emergency recovery of crashed, damaged or incorrectly edited projects.
NOTE: For permanent sequential backups use the (Ctrl + N) save shortcut or select File > Save new version.
Plugins (VST & AU)
Virtual Studio Technology (VST) and Audio Unit (AU, macOS) are software interface standards that allows you to load software synthesizer and effect 'plugins' in FL Studio. VST/AU are in addition to the FL Studio 'native' plugin format. See the section on Installing Plugins for more details on VST/AU plugins and how to use them.
- Manage plugins - We recommend 'Find more plugins' with 'Verify plugins' selected, to perform a complete scan that categorizes plugins as generators (instruments) or effects. FL Studio will add scanned plugins to the pop-up lists that appear when you use the Channel Rack > Menu > Add one option, Channel Rack + button, Main menu > Add option and Plugin database.
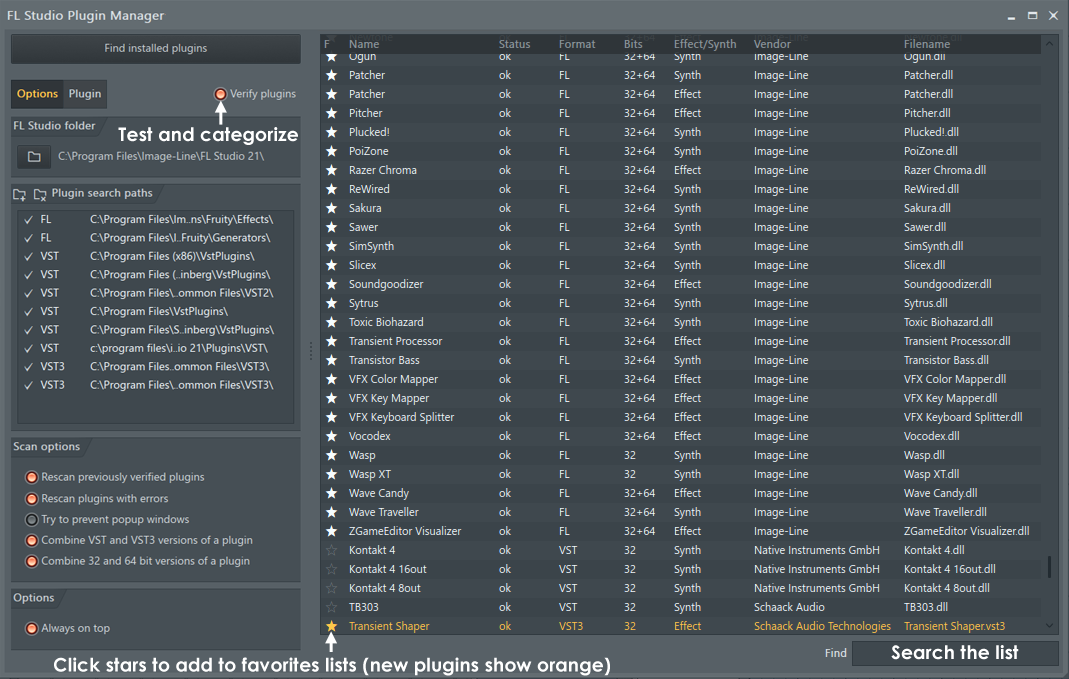
NOTE: To perform a fast scan that simply lists installed plugins, deselect 'Scan and verify'. This is equivalent to the 'Browser > Plugin database (right-click) > Refresh plugin list (fast scan)' option.
Options Tab
- Find plugins - Starts the scan process. Amazing fact!
- Verify plugins - Opens each plugin, categorizes it as a synthesizer or effect, reports if it is a 32 or 64 Bit plugin and lists the input/output ports. It's much slower than when 'Verify plugins' is off (which is the same as the Browser 'Refresh plugin (fast scan)') so be patient. If you see some pop-ups from plugins when scanning, you will need to respond and click them away to continue the scan. Scanning with this mode is important as it will correctly classify plugins as effects and generators.
- Favorites - Check the F (Favorite) column box for any plugin you want to add as a favorite. Selected plugins will show in 'add plugin' menu locations including: Channel Rack > Menu > Add one option, Channel Rack + button, Main menu > Add option and Plugin database (without thumbnail).
- Plugin search paths - Formerly called VST extra search folders, sets the default VST search locations. You can add extra search paths to custom locations of VST 1 or 2 format plugins. Working with folders:

Add path - Click the (+ Folder) icon and browse to the folder you want to add. Then click OK. This path will be added to future scans. You can add as many extra search locations as needed. NOTES: You can only add custom search paths for VST 1 and VST 2 format plugins. VST 3 and AU plugins must be installed to default system locations. The folders set here do not appear in the Browser only the plugins found in those locations (see the Plugin database). 
Remove path - Click on a custom search path in the list, then click '(x Folder)' icon. NOTE: It's not possible to remove the default paths, only those you have added yourself. - Rescan previously verified plugins - Re-verify plugins that have previously been verified, in case something has changed. Leave this off if you want to scan for new plugins and not change previous results. This has no effect unless the option 'Verify plugins' is also selected.
- Rescan plugins with errors - Rescan plugins that showed an error during a previous scan. This will also apply to 'Fast scan'.
- Combine 32 and 64 bit versions of a plugin - Create a single preset for a plugin that has both a 32 Bit and a 64 Bit version. FL will use the 'Bit size' option on the Wrapper to determine which version to open.
- Combine presets for VST and VST3 versions of a plugin - When selected this also merges presets for (some) plugins that have both a VST2 and a VST3 version. FL will first try to load the VST3 version.
- Try to prevent popup windows - This suppresses some pop-up windows that show during a 'Verify plugins' scan, but not all. It may not work well with some plugins, so it's off by default. For example, when it is ON, you may get plugin errors that are due to pop-ups with settings that were not responded to, since they were hidden.
Plugin Tab
The Plugins tab provides options to change the data stored in the plugin database, the data that is collected during plugin scans. Normally you do not need to edit this information.
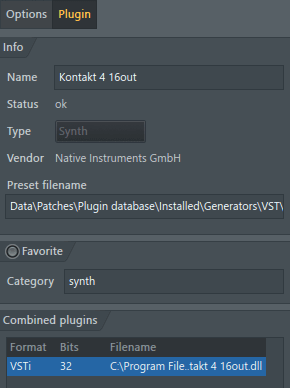
- Name - Edit to change the plugin name shown in the database.
- Status - OK or Error depending on the success of the last scan.
- Type - Synth or Effect. Decides where the plugin can be loaded in FL Studio. Use when a 'Refresh plugin list (fast scan)' has been used and the plugin was not classified OR a plugin fails to scan correctly but is working as expected. Type can't be changed when the classification was set by a 'Verify plugins' scan.
- Vendor - The company that made the plugin.
- Favorite - Flags the plugin as a Favorite so it will show in the favorites lists.
- Category - Change the Plugin Database category for the plugin. NOTE: The location of the plugin database is the FL Studio install folder - '..\Data\Patches\Plugin database\'. You can easily create new sub-folders, move and edit files with the system Browser.
- Combined plugins - Shows the plugins (VST 2 and 3, 32 Bit and 64 Bit) that are saved as a single preset when 'Combine presets for identical plugins' was used (see above).
Browser extra search folders (add your own folders to the Browser)
These folders allow you to add your own content locations to the FL Studio Browser. They are important as FL Studio will only search the locations in its own Browser when loading projects. If you want to include 3rd party sample content then you should add these locations to the Browser or install it to the User data folder. 30+ custom Browser folders can be set (note the scroll-bar down the right side of the window):
How to set a Browser extra search folder:
- Left-click on the folder icon at the start of a row as indicated above and browse to the folder location and then click 'OK'. Alternatively, double-click the text fields to enter paths manually.
- Optionally, Left-click in the Name column and enter a custom name, this sets the name shown in the Browser. If the name field is left blank then the name of the target folder will be shown in the Browser.
- OR drag-and-drop folders - From any external file browser onto the Browser. This will set a custom folder to match.
What do they do? The folders set here will appear in the FL Studio Browser. Here are four good reasons to use them:
- You can drag sounds/samples/patches from the Browser onto the desired location in FL Studio and they will be loaded automatically (channel sampler, slicer, projects [drag onto the desktop], etc).
- External folders keep your data independent from the FL Studio installation.
- The extra search folders are (as the name suggests) included in automatic search and load operations.
- The Browser contains some useful manual search functions ('Find' and 'Smart find') so you can quickly locate your files.
User Data Folder
The User data folder is the default save location for all user files when using FL Studio (Audio recordings, Projects, Plugin database/favorites etc). If you need to migrate FL Studio to another computer, after installing FL Studio, simply copy the Image-Line folder across. Similarly, backing up this folder will ensure all your projects and project related files are safe.
Tool Bar icons - Along the top of the window:
| Reset | Reset folder - This will become active if your user data folder is set to a non-standard location. When selected it sets the User data folder to the default location: ...\Users\[your computer account]\Documents\Image-Line\. There will also be a pop-up asking if you want to copy the data from the current location to the default. This is desirable, otherwise you will lose access to your custom data, projects, plugin database etc. |
|
|
User data folder - Click the icon to manually set. The User data folder is the location where FL Studio will save your project and custom data, including; Projects, your plugin database (VST plugins), custom settings and more. See here for the full list of user data sub-folders. By default The 'User data folder' is set to ...\Users\[your computer account]\Documents\Image-Line\. FL Studio will create a 'FL Studio' sub-folder to store all your data, as described above.
NOTE: Unless you are familiar with your operating system and how files are managed, we strongly recommend using the default settings. Using an unsuitable location can result in unpredictable operation of FL Studio or data loss. DO NOT use a removable drive, network drive or internet cloud backup services tied to 'DropBox', Google Drive, 'iCloud or OneDrive' for example. These services can lock the user data from being written or move files resulting in crashes or inexplicable errors. FL Studio will also prevent you setting the User data folder to certain system locations where it does not have write permissions. |
NOTES:
- Resetting to or moving the default location: If you change this location. FL Studio will offer to automatically copy the data to the new location. If not, make sure to do it manually.
- Sub-folders: Some folders listed here, won't exist until you start FL Studio or save data of that type. Don't panic! :)
- Finding save locations - If you are using a native plugin or component that can save presets, the quickest way to learn where they are saved is to save a preset and note what folder is used. Then you can manually locate it if you want to move additional presets or data there. For example, when you purchase new content.
- macOS iCloud/ Windows Onedrive - Your 'User data files' must be on your local drive NOT on any cloud service.
External Tools
The External Tools dialog lets you set up external applications (wave editors, sample browsers, etc.) for use as tools in FL Studio.
- File - Enter the full path to the external application to be used as a tool. Alternatively, click the file icon on the left to browse to an application.
- Name - The program name displayed in the Tools menu. Click to edit.
- Options - Select the tool in the file list then choose options:
- Launch with path - Launch the selected tool when the path is accessed from within FL Studio. Useful for batch audio processing applications and external sample browsers.
- Launch with file - Set an external tool to be used with audio files. For example an Audio Editor.
- Default Editor - Anywhere you see the menu option: 'Open in audio editor', the tool set here will replace Edison (the default Editor).
- Launch at startup - Launches the program at FL Studio startup, useful for VDJ tools, DMX controllers or MIDI loop-back devices. Any external application you may be using with FL Studio on a frequent basis.
Script Editor
Choose the default editor you want to use when editing MIDI Script files.
Troubleshooting
- Set to current - Sets the path where the VST and AU plugin versions of FL Studio will look for the FL Studio engine. Normally this is the location of FL Studio that was most recently installed. You may want to use another installation of FL Studio, for example an Alpha or Beta for testing. Open the FL Studio version you want to use as a VST or AU plugin (using the regular FL Studio desktop icon) and click this button to set the VST/AU path to the installation you are currently running.
- Reset browser cache - Remove and rebuild the Browser cache that stores search information.
- Repair optional features - Re-download and install all side-loaded features such as Declipping, Stem Separation and Mastering etc. NOTE: While features are being repaired, the button text will dim to gray. When the button shows white text again, the repair has completed.