MIXING & EFFECTS
Gross Beat 
TRIAL ONLY: Gross Beat comes as a demo version in FL Studio and needs to be purchased separately so you can use Gross Beat without the demo limitations.
Play with time! Gross Beat is a real-time, audio-stream playback, pitch, position and volume manipulation effect. Gross Beat stores audio in a 2-bar rolling buffer controlled by 36 time and 36 volume mapping envelopes for easy beat-synced glitch, stutter, repeat, scratching and gating effects. Welcome to Gallifrey Time Lord!
Alternatives to Gross Beat are Wave Traveller & Fruity Scratcher, however, these work on samples rather than a live audio stream.

Videos
Watch the ![]() Gross Beat Video Tutorial Series or check
the preset forum here.
Gross Beat Video Tutorial Series or check
the preset forum here.
Main Options [return]
Lurking in the darkness, just below the Time mix knob (as shown above):
- Click reduction - Reduces clicks caused by discontinuities in volume between the 'jump-from' and 'jump-to' locations. For the best results you may need to apply manual 'click reduction'. Briefly ramp the volume down to zero to coincide with the point at which the Time Envelope relocates the playback position. Step the volume back to normal at or a fraction after the jump.
- Smoothing attack compensation - Compensates for the small period of silence at Time Envelope relocation events caused by manually applied volume smoothing envelopes (see above). Selecting this option will move the Time Envelope forward slightly so that attack transients are not lost when the Volume Envelope ramps down.
- Remove DC offset - Removes output offsets/biases when playback is stopped (e.g. when the Time Mapping envelope matches the angle of the Safety line).
- HQ resampling - Adaptive 'sinc interpolation' algorithm which improves the audio quality of pitch-shifted audio at the expense of increased CPU load.
- View scratching clock - Shows the scratching dial. To scratch, click on the clock-dial and move your mouse up/down. Right-click to link to external or internal controllers. NOTE: If the Scratching Clock is hidden and Gross Beat is put into Compact Mode (drag to the left on the right edge of the Mapping Envelope area, until the plugin compacts OR for the VST version use the 'Resize' menu option), then a small mapping envelope will display here.
- About - Opens the plugin credits 'splash image'.
Time Settings [return]
These controls relate to the Time/Pitch mapping envelopes:
- Time - Time mapping envelope mix setting. Range: 0% to 100%. Use this in preference to external host Wet/Dry mix controls to avoid phasing.
- Time offset (scratching) - Click the Scratching clock to the right of the Time knob (this is activated from the Options menu if not visible). Hold and drag your mouse vertically to vary the time offset and manually scratch. Right-click to link the Clock to internal/external controllers.
Hold
Hold delay (bar repeat) - Repeats the bar as long as the button is held and the song continues to play.
Scratching Clock
Time Slots
Slots 1 to 36 (green) hold user-definable time mapping envelope presets. Slots are pre-assigned to MIDI keys and can be switched live from your controller keyboard (starting from Slot 1 = C5) OR slot changes can be automated by Right-clicking any slot and linking to internal or external controllers. NOTE: Time slots can be linked to the corresponding Volume slot number. Use the link setting (bottom middle of the mapping area) to create combined Time + Volume presets.
- Edit a slot mapping envelope - Select the slot by clicking it with your mouse. Edit the associated mapping envelope in the panel to the right. These changes are automatically associated with the selected slot.
- Move a slot - Right-click the slot button and select Move slot left / Move slot right from the popup menu OR hold CTRL to swap the selected slot with the next slot clicked.
- Rename a slot - Left-click on the slot name in the bottom-left corner of the Mapping area (as shown in the screenshot above) OR click on the slot with the middle-mouse button.
Automating Slot Selection
To control slot selection by Automation you can use one of three methods
(![]() video here):
video here):
- MIDI Controller keyboard (live) - Select Gross Beat and then play notes on your controller. C1+ will control the Volume slots, C4+ will control the Time slots.
- Automation envelope - Right-click anywhere on the Time or Volume preset slots and select 'Create automation clip'. Then select the type 'Hold' for Automation Clip control points. Finally select and Right-click slots to 'Copy value' then 'Paste value' to the Automation Clip Control Points.
- Fruity Keyboard controller (piano roll) - Add a Fruity Keyboard Controller to the project and then Right-click the Time or Volume slots and select 'Link to controller'. On the Remote control settings pop-up, from the 'Internal controller' menu select 'Kb Ctl (Fruity Keyboard Controller) - Note' and press 'Accept'. The Keyboard Controller notes can now be played from the Piano roll and Patterns added to the Playlist to control Gross Beat.
While editing and playing, slots will show three colors:
- White rectangle = Slot currently being edited.
- Green rectangle = Queued for playback.
- Green filled = Playing.
Volume Settings [return]
These controls relate to the Volume mapping envelopes.
Volume Slots
Slots 1 to 36 (orange) hold user-definable Volume mapping envelope presets. These slots are pre-assigned to MIDI keys and can be switched live from your controller keyboard (starting from Slot 1 = C2) OR slot changes can be automated by Right-clicking any slot and linking to internal or external controllers. NOTE: Volume slots can be linked to the corresponding Time slot number, use the link setting (bottom middle of the mapping area), in order to create combined Time + Volume presets.
- Edit a slot - Select the slot by clicking it with your mouse. Edit the associated mapping envelope to the right. These changes will be automatically associated with the selected slot.
- Move a slot - Right-click the slot button and select Move slot left / Move slot right from the pop-up menu OR hold CTRL to swap the selected slot with the next slot clicked.
- Rename a slot - Left-click on the slot name in the bottom-left corner of the Mapping area (as shown in the screenshot above) OR click on the slot with the middle-mouse button.
Volume Knobs
The volume knobs are 'multiplier' controls applied to the Volume mapping envelopes. They are useful for applying global ADSR tweaks to the volume dynamics of all Volume mappings.
- ATT - Attack volume smoothing. Range: 0ms to 500ms.
- REL - Release volume smoothing. Range: 0ms to 1000ms.
- TNS - Tension adjustment (slope) setting. Range: -100% to 100%.
- Volume - Volume mapping envelope mix setting. Range: 0% to 100%
Automating Slot Selection
To control slot selection by Automation you can use one of three methods
(![]() video here):
video here):
- MIDI Controller keyboard (live) - Select Gross Beat and then play notes on your controller. C2+ will control the Volume slots, C5+ will control the Time slots.
- Automation envelope - Right-click anywhere on the Time or Volume preset slots and select 'Create automation clip'. Then select the type 'Hold' for Automation Clip control points. Finally select and Right-click slots to 'Copy value' then 'Paste value' to the Automation Clip Control Points.
- Fruity Keyboard controller (piano roll) - Add a Fruity Keyboard Controller to the project and then Right-click the Time or Volume slots and select 'Link to controller'. On the Remote control settings pop-up, from the 'Internal controller' menu select 'Kb Ctl (Fruity Keyboard Controller) - Note' and press 'Accept'. The Keyboard Controller notes can now be played from the Piano roll and Patterns added to the Playlist to control Gross Beat.
While editing and playing, slots will show three colors:
- White rectangle = Slot currently being edited.
- Green rectangle = Queued for playback.
- Green filled = Playing.
Envelope Mapping Panel [return]
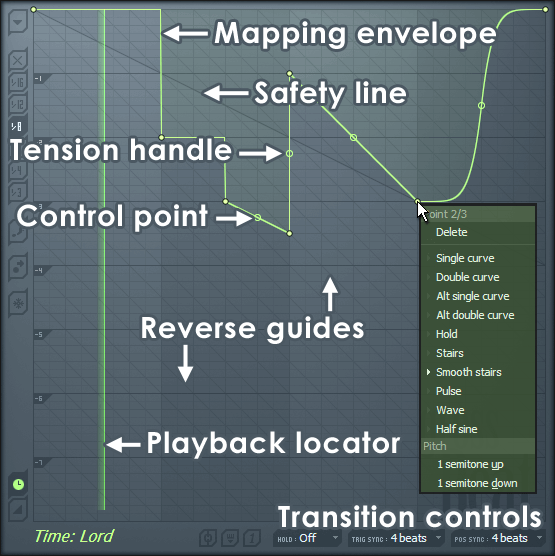
The envelope mapping panel displays the selected Time or Volume mapping envelope (slots are directly left of the Mapping Panel). Some notes about the mapping area:
- Mapping controls - A series of controls & options run down the left side and under the mapping area. Top-left is a drop-down menu (as described below). Right-clicking a control-point will open a context menu with options for graphing shapes (as shown in the screen shot, right).
- Width vs height - The mapping panel is 4 beats (1 bar) wide and 8 beats (2 bars) high. This means it is possible to step back up to 8 beats (2 bars) from the current playback position, as long as the audio buffer is full (i.e. the plugin has received at least 2 bars of audio).
- The beat is indicated by the Playback locator - a vertical green scrolling line, visible only when the host is playing.
- Angled guide markings - You will notice single darker and multiple lighter angled lines across the mapping area:
- Safety line - The single dark 'Safety Line' cuts across the first 4 beats. The Safety Line shows the safe area for mapping envelopes during the first bar of a song. The area above the Safety Line (and behind
the position of the Playback Locator) has buffered audio while the area below does not. If the Time mapping envelope goes below the Safety Line before the time-marker reaches that point, silence will be heard (or is that Gross Beat implodes creating an EMP, causing satellites to
fall out of the sky? I can't remember, you will just have to experiment). While it's not shown, imagine the Safety Line continues down to the end of the second bar.
If you need to start a song with a full audio buffer add two pre-song bars (with audio, of course) and start with a Volume mapping envelope flat-lining line along the bottom of the Mapping Area, so the pre-bars won't be heard. After two bars have played then any mapping curve is safe. Bear in mind that if you move into a new section of the song, change from verse to chorus for example, the previous two bars will be stored in the buffer and may not match the audio needed for the new section until another two bars have passed.
- Reverse guides - The multiple grey diagonal lines show the slope required to effect a normal speed reverse playback. Slopes steeper than this line will play fast reverse, shallower will be slow reverse, depending on the angle of the line. NOTE: You can change the slope in semitone units using the Mapping Options menu (select the right-most point defining a slope and apply the 1 semitone up / down function).
- Safety line - The single dark 'Safety Line' cuts across the first 4 beats. The Safety Line shows the safe area for mapping envelopes during the first bar of a song. The area above the Safety Line (and behind
the position of the Playback Locator) has buffered audio while the area below does not. If the Time mapping envelope goes below the Safety Line before the time-marker reaches that point, silence will be heard (or is that Gross Beat implodes creating an EMP, causing satellites to
fall out of the sky? I can't remember, you will just have to experiment). While it's not shown, imagine the Safety Line continues down to the end of the second bar.
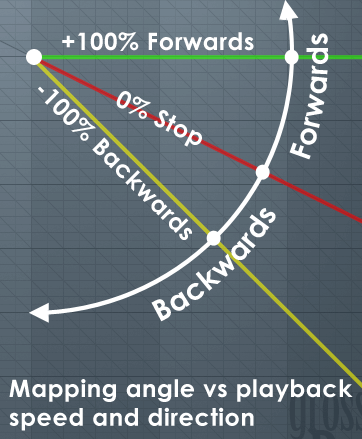
- Time Mapping Envelopes - These envelopes control playback of the audio from the 2-bar, rolling, audio buffer. The Time envelope is a sample 'offset' envelope, i.e. realtime audio + 'offset' define
the playback position, direction and speed. The top of the Mapping panel is 'real time' audio, while mappings down from the top of the Mapping panel move backward in time according to the beat scale
down the left side. Some commonly used envelopes include:
- Normal speed playback (+100%) - Horizontal mapping segments play forward at normal speed (see diagram right). The Hold envelope is useful for creating horizontal segments.
- Fast / Slow playback - Straight sloping mapping segments will change playback speed (pitch). Slopes upward from left to right play faster (higher pitch), while slopes downward from left to right play slower (lower in pitch). Use the Single curve envelope mode for straight sloping mapping segments (reset the tension handle to straighten the curve if required). The slope angle adjusts speed - playback becomes progressively slower with increased downward angle. When the slope matches the Safety line angle, playback will pause. If the slope angle is steeper than the Safety line angle, playback will reverse, reaching 'normal speed (pitch)' reverse playback when the angle matches the Reverse guides. A tool in the Mapping Area Options Menu lets you add or subtract slope in semi-tone units (select the right-most point defining a slope and apply the function).
- Reverse playback (-100%) - Match the slope of the Reverse guides for 'normal speed reverse' playback. Slopes steeper than the guides will play fast reverse (see diagram right). Use the Single curve envelope mode for constant pitch slopes (reset the tension handle to straighten the curve if required). There us a useful tool in the Mapping Area Options Menu that can add or subtract slope angle in semi-tone units (select the right-most point defining a slope and apply the function).
- Jump backward / forward in time - Step the envelope down to jump backward or up to jump forward. The number of beats jumped is measured on the vertical axis (left). Use the Hold envelope to create steps.
- Rising / Falling pitch & Scratching - Use curved mappings (e.g. Single curve, Double curve, Half sine envelopes and adjust the tension handle).
- Pause playback (0%) - Match the slope of the Safety Line (see diagram right) with a straight Single curve envelope. This will pause playback for the duration of the slope. Alternatively, use a stepped envelope mapping with these slopes for tuned/harmonic effects.
- Volume Mapping Envelopes - These behave as standard volume envelopes; the top of the mapping area is 100% (max) volume, the bottom is 0% (silence). The Normalize option, Scale Level and Envelope Sequencer tools (available from the Mapping Options menu) are useful for working with the Volume Mapping Envelopes.
Editing Mapping Envelopes
Envelopes conform to the standard Image-Line envelope behaviors with some additional features tuned for use with Gross Beat.
- Add control points - Right-click on the mapping area, continue to hold and drag to reposition the point. Hold ( Shift) while dragging to lock the vertical position, or ( Ctrl) to lock the horizontal position. Hold ( Alt) to override snapping (if selected).
- Move control points - Left-click the control point and drag to the desired position (the point will snap to the background grid unless SNAP is off, see below). Hold ( Shift) while dragging to lock the vertical position, or ( Ctrl) to lock the horizontal position. Hold ( Alt) to override snapping (if selected).
- Change envelope curve - Left-click the tension handle (circle that appears on the envelope between control points) and move up/down. Holding ( Ctrl) will allow fine adjustment. Right-click the tension handle to reset curve tension.
- Change curve type - There are a number of curve types to select from. Right-click the right-most control point of a pair of control points to select:
- Single curve - Default mode for creating straight or curved segments (depending on the tension).
- Double curve - Smooth 'S' curves, useful for scratching effects.
- Alt single curve - Asymmetrical smooth 'S' curves, useful for scratching effects.
- Alt double curve - Asymmetrical linear, or accelerating / decelerating curves (depending on the tension).
- Hold - Single steps between points, useful for creating jumps in position.
- Stairs - Multiple steps between the control points. Left-click on the tension handle and move your mouse up/down to change the step frequency. Useful for glitch / decimation effects. Step size controls the 'graininess'.
- Smooth stairs - Multiple smooth steps between the control points. Left-click on the tension handle and move your mouse up/down to change the step frequency. Useful for changes in pitch and granular effects.
- Pulse - Square wave pulse, adjust the frequency with the tension handle.
- Wave - Sine wave pulse, adjust the frequency with the tension handle.
- Half sine - One half of a sine wave. Useful for creating start, stop and scratch effects.
- Add control points - Right-click the location where you want to add a control point.
- Delete control points - Right-click the point to be deleted and select 'Delete' from menu. Alternatively, hold ( Alt) and Left-click the offending point.
Mapping controls
Down the left-hand side of the mapping area are a number of controls as follows:
Mapping Options Menu
Click on the down-arrow in the top-left corner of the area to access the following mapping envelope options:
- Open state file - Opens pre-saved Editor state files (envelopes, etc).
- Save state file - Saves an Editor state.
- Copy state - Copies the current Editor settings to be copied to another location.
- Paste state - Pastes the Editor state data to the clipboard.
- Undo - Undo last action.
- Undo history - History of edits; click the list to roll back changes.
- Last reset - Delete all edits to the last history reset.
- Tools - Contains a number of quick-edit options:
- Flip vertically - Mirrors the envelope vertically.
- Scale levels - Opens the Scale Level tool that allows you to maintain the current envelope shape while changing vertical values.
- Normalize levels - Scales the mapping envelope to the maximum vertical extent.
- Decimate points - A simple tool that adjusts the number of control points in a mapping envelope.
- Smooth up abrupt changes - Quick removal of 'spikey' or sudden changes in the envelope.
- Turn all points smooth - Preset filter to quickly filter the envelope.
- Create sequence - Opens the Envelope Sequencer tool.
- Analyze audio file - Opens a file-import window and analyzes the envelope volume of the selected audio, converting it to an mapping envelope.
Snap Settings
Snap determines how the envelope points snap (lock) to the nearest time/volume grid division.
- X - No snapping. Points can be freely moved to any location.
- 1/16 to 1/3 buttons - 1/16th beat snap to 1/3rd beat snap settings.
NOTES: ( Left-click+Alt) overrides snapping, ( Shift+Left-click) locks vertical movement and ( Ctrl+Left-click) locks horizontal movement of control points.
Step Settings
- Step editing (hold shift for pulse mode) - Click and drag in the Mapping Envelope area to add control points at each snap interval (when snap is off control points are added at the maximum resolution)
Slide Settings
- Slide remaining points - Points to the right of the selected control point will slide as a group in response to changes in position of the selected point.
Freeze Editing
- Freeze editing - Locks the mapping envelopes. Note the cursor changes to a + when mapping envelopes are frozen.
Envelope Settings
- Time travel - Selects time envelope editing.
- Volume - Selects volume editing.
Lower Panel Controls [return]
Running along the bottom of the Mapping area are the following controls:
- Link slots - Links the slot to its numerical equivalent (Volume or Time).
- Key-held - Holds the slot while the linked MIDI key is held.
- One-shot - The slot will play once and then Gross Beat will jump back to Slot 1.
- Hold - Changes the behavior of the HOLD button (located to the right of the Main Options menu).
- Off - No hold.
- Last - Replay the last stored bar when the HOLD button is activated.
- Next - Buffer the next bar and replay it while the HOLD button is active.
- Trig(ger) Sync - Synchronization with the host beats/bars, i,e when the envelope will start after a slot change command in relation to the song position.
- Off - Slots will start immediately on being selected.
- 1/4 to 4 beats - Alignment with global song position. For example, 1 beat means that the slot will start on the next (global) beat. This means that if the song is already aligned to a beat, the slot will start immediately. If the song is 1/2 way in-between 2 beats, Gross Beat will wait for half a beat. '4 beats' means that slots will always start on a bar boundary.
- Pos(ition) Sync - This is where within the envelope the slot will start, i.e. the number of beats (position) within the bar assuming Trigger Sync is OFF, so that slots start immediately.
- Off - Start at the beginning.
- 1/4 to 4 beats - Start at either 1/4, 1/2, 1, 2 or 4 beats into the envelope depending on where the global song position is.
Plugin Credits [return]
Code & Graphics: Didier Dambrin.
VSTi Port: Frederic Vanmol.
...watch out for falling satellites!