INSTRUMENTS / GENERATORS
Harmor 
Like its predecessor Harmless, Harmor is powered by a powerful additive synthesis engine. Its modules will look familiar to subtractive synthesizer enthusiasts: oscillators, filters & phasers. These are featured in Harmor but, because they are performed on additive synthesis data, rather than audio, offer more freedom.
Additive / subtractive synthesis - In Harmor no audio-stream exists, instead a table of frequency and amplitude data is manipulated efficiently, accurately and in ways not possible with traditional methods, that process an audio stream. Draw filter shapes and gain precise control over every aspect of the sound generation process. Image & Audio Resynthesis - Images and audio files can be dragged and dropped on Harmor to provide 'sampler-quality' reproduction of sounds or work with image-based synthesis when used in conjunction with your favorite image editor. Just cut-and-paste between Harmor and your editor of choice.
Check the video series ![]() Image-Line | Harmor (VST & Native Plugin Instrument), or the Harmor preset forum here.
Image-Line | Harmor (VST & Native Plugin Instrument), or the Harmor preset forum here.
TRIAL ONLY: Harmor is available as a demo in FL Studio and needs to be purchased separately so you can save projects containing Harmor channels.
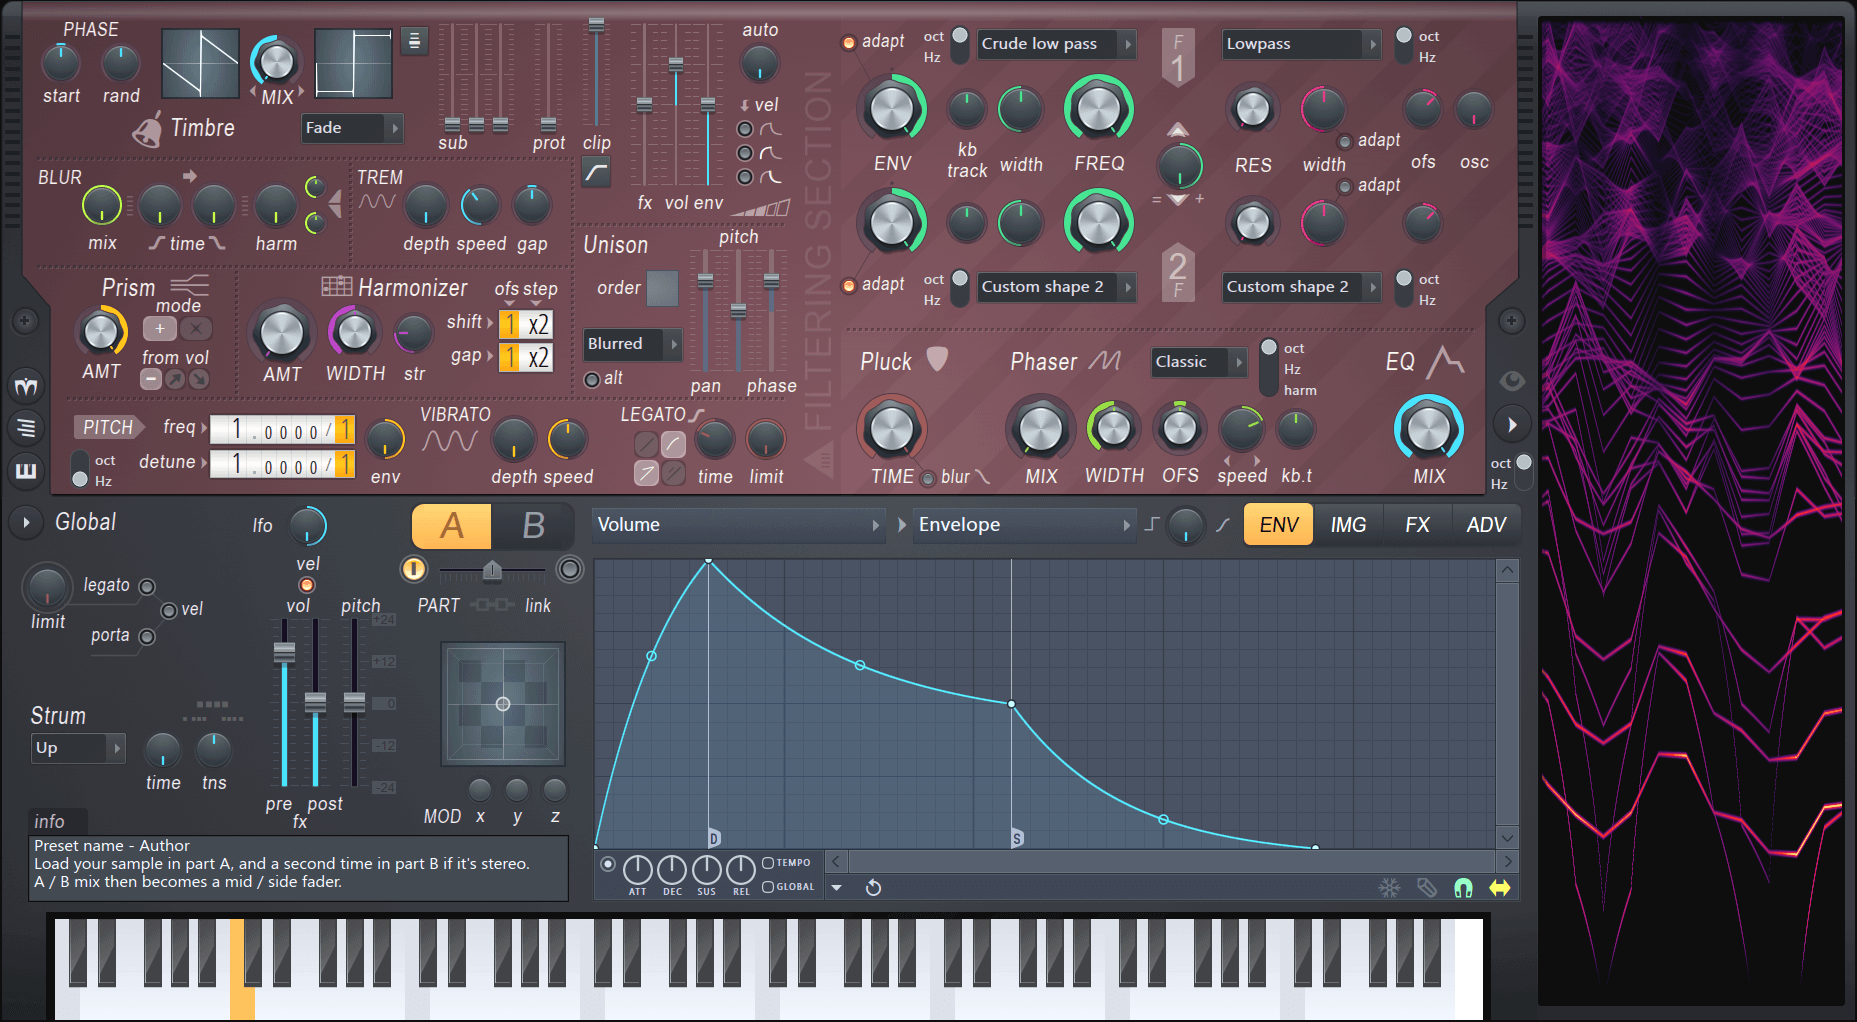
Click on the image above to jump to the help for that section
NOTES: The Harmor GUI color-codes knobs and sliders so related controls share the same color. We recommend opening the Visual Feedback panel while you are learning to program the plugin, a picture is worth 1000 words, so they say. You can also right-click most controls to open the associated Envelope ready for modulation.
Harmor Key Features
The Harmor design philosophy is 'more is more', every feature, control and harmonic function was carefully selected for maximum effectiveness.
- Additive engine - Performing additive / subtractive synthesis just as efficiently as traditional 'subtractive' synths.
- Multi-modal synthesis - Classic subtractive + audio resynthesis + image synthesis.
- Specialized processing units - Prism, pluck, blur, filters, phaser.
- Modulation - Advanced multi-part articulation envelopes.
Additive Synthesis?
Harmor can generate up to 516 sine wave (partials), per note, per unison voice AND modulate these in real-time to resynthesize ANY continuously evolving sound. So what is Additive Synthesis? This video is a great introduction to the topic - Overtones, harmonics and Additive synthesis.
In short, French mathematician, Joseph Fourier, showed that any waveform can be decomposed into a set of sine wave components. Each sine wave is referred to as a 'partial' as it is part of the complete series of sine waves that combine to produce the original waveform or sound. Partials can be harmonic, an exact (integer) multiple of the base frequency (notes pitch) or inharmonic, decimal multiples of the base frequency. Harmonic partials tend to reinforce the root note pitch adding complexity while maintaining a melodic tone. Inharmonic partials tend to confuse the root note pitch by adding a metallic or noisy edge to the tone. There are three sets of data required to store and manipulate an additive waveform.
- Partial frequency - Frequency of each partial to play. This set of partials is scaled in frequency by the fundamental frequency (root note) played.
- Partial amplitude - Amplitude of each partial that plays. Not all partials play at the same level.
- Partial phase - The phase of each partial that plays. Is the sine wave increasing or decreasing in value from the start point?
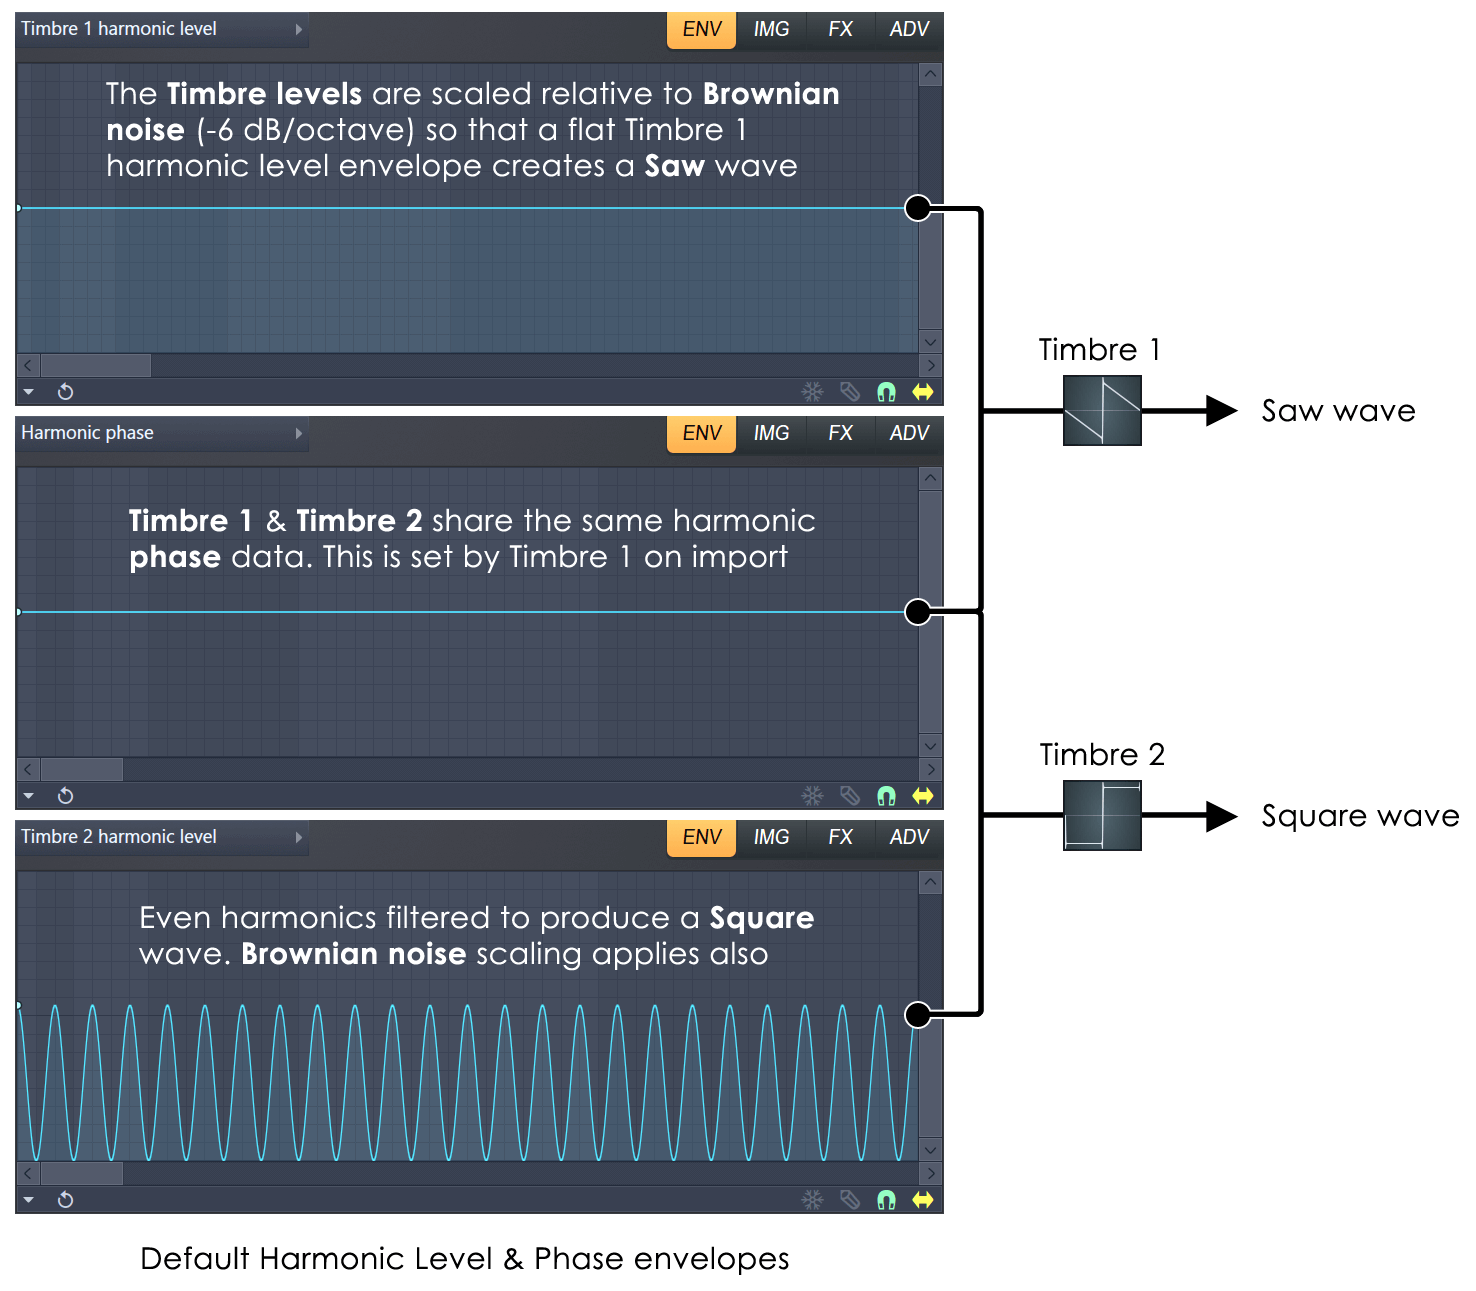
Consequently, you will see references to 'partials', and 'mappings' throughout this manual and the Harmor interface. The good news is that you don't need to understand Additive Synthesis to use Harmor, but having some idea of what it is will help you to come to grips with the synthesizer faster. The data relating to the mappings can be found in the Timbre 1 & 2 harmonic level Editor target > Shaping envelopes. These contain the frequency and amplitude data and the Harmonic phase Editor target > Shaping envelope, that contains the Phase data (shared by Timbre 1 and 2, set by Timbre 1).
Main Controls
Harmor is an additive-subtractive synthesizer making fast program changes simple and is perfect for live performances and experimentation. The main control categories are:
- Global - The Global controls relate to performance and synthesis 'Part' A/B selection.
- Part controls - For each Global Part (A & B) there is an identical set of synthesis options (as denoted by the upper purple section). Unit order can be quickly changed in the ADV (Advanced) settings.
- Articulators - Harmor features 2 part Global articulation (envelopes). Each target may be simultaneously modulated by multiple articulation parts.
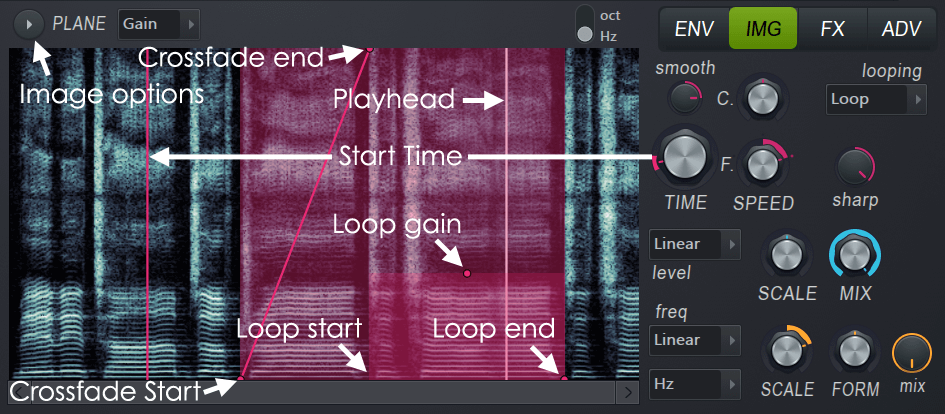
- Image (per part) - The IMG (Image Resynthesis) section can work with images OR samples.
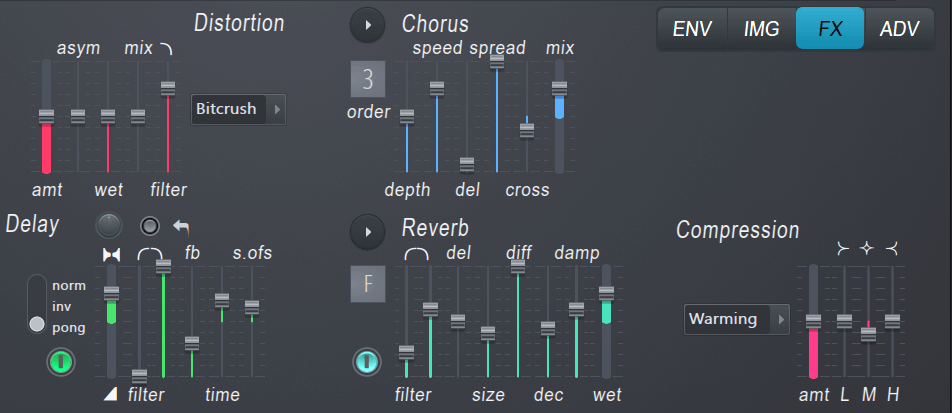
- effects (global) - The full suite of effects you would expect including Distortion, Chorus, Delay, Reverb & Compression.
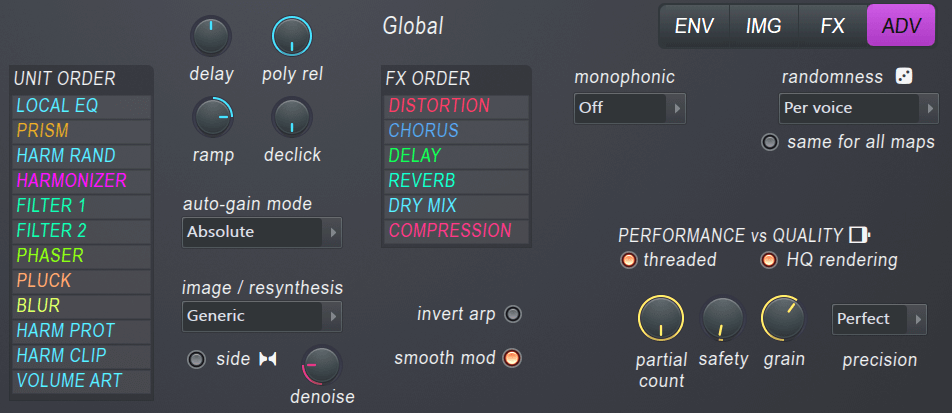
- Advanced - Change the unit order of the A/B synthesis parts independently, effects and utilize more CPU power than the Starship Enterprise can deliver with 'future proof' performance & quality settings.
Timbre
By default, Timbre 1 and Timbre 2 generate a Saw and Square wave respectively. Mixing the timbres will morph between them. You can right-click the Timbre windows to load audio files, drop audio files on the windows or edit Timbre harmonic mappings (level & phase) to achieve custom waveforms. The output from the timbre section is combined with the image / resynthesis section (when active).
The waveform from the Timbre section is additively generated according to the following controls:
Timbre - The default timbres are a Saw and Square wave. See the Timbre option below for methods of changing the waveforms.
- PHASE
- start - Starting phase in the waveform from 0 to 359 degrees.
- Rand - Turning left randomizes the phase of each partial separately, useful for adding character with when using Pluck. Turning to the right sets the global waveshape phase to a 'free-running' mode, useful when using Unison as it avoids a retriggered 'flangy' sound and for adding some phase variation retriggered notes.
- Timbre
- Timbre windows - The Timbre window holds a single-cycle waveform and is used as an oscillator source. Timbre 1 and Timbre 2 are related in that they share the same harmonic phase
information (that's why there is only one Harmonic phase envelope per part). Phase is shared so the timbres won't phase-cancel when mixed. In default mode, you can think of Timbre 1 and
Timbre 2 as two different Harmonic level mappings of the same base 'Saw oscillator'. Additionally there are several methods for making custom waveforms:.
- 1. Left-click to open the Timbre 1 or 2 Harmonic Level envelope and/or edit the Harmonic phase envelope.
- 2. Right-click to select from 'Analyze single cycle waveform' browser and 'Randomize' that randomizes the Harmonic level envelope.
- 3. Drop an audio file on Timbre window 1 (remember Timbre 2 uses the phase data from the Timbre 1). For the best results drop high quality, single cycle waveforms on the Timbre windows.
NOTES:
- When loading custom waveforms, where you are trying to achieve a specific shape, use Timbre 1 as it can set Harmonic level AND Harmonic phase mappings.
- The partial phase mapping data, set when analyzing waveforms in Timbre 1, is shared with Timbre 2.
- You can drag waveforms/samples/files from anything within FL Studio & Windows that supports 'drag-&-drop' onto the Timbre windows.
- See the section 'Timbre harmonic mappings' to learn more about manual programming of the waveforms.
- MIX - Mix between the two Timbre windows.
- Timbre blending mode (menu) - Select from several cross-fade options.
- Fade - Standard cross-fade from Timbre 1 to Timbre 2.
- Subtract - Timbre 1 is subtracted from Timbre 2.
- Multiply - Timbre 1 is multiplied by Timbre 2.
- Maximum - The maximum harmonic level is selected from Timbre 1 and 2.
- Minimum - The minimum harmonic level is selected from Timbre 1 and 2.
- Pluck - Blends the shape with the Pluck's decay, that is, the harmonics are set to match Pluck's EQ envelope.
- Timbre windows - The Timbre window holds a single-cycle waveform and is used as an oscillator source. Timbre 1 and Timbre 2 are related in that they share the same harmonic phase
information (that's why there is only one Harmonic phase envelope per part). Phase is shared so the timbres won't phase-cancel when mixed. In default mode, you can think of Timbre 1 and
Timbre 2 as two different Harmonic level mappings of the same base 'Saw oscillator'. Additionally there are several methods for making custom waveforms:.
- Sub harmonic configuration (menu) - Set Sub harmonics 2 & 3 to be Around (Sub harmonics 2 & 3 are relative to and above Sub-harmonic 1. So straddle the fundamental) or Below (Sub harmonics 1, 2 & 3 all fall below the fundamental being 1, 2 and 3 octaves below respectively).
- Sub - These Sub Harmonics add bass, weight or depth to the sound. The first slider Sub-harmonic 1 is always an octave below the root note. The remaining two sub sliders depend
on the Sub harmonic configuration (see above). When set to:
- Around - Sub-harmonic 2 is the 3rd harmonic and Sub-harmonic 4 is the 5th harmonic of Sub-harmonic 1. The 2nd harmonic is the root note.
- Below - Sub-harmonic 2 is two octaves below the fundamental and Sub-harmonic 3 three octaves below the fundamental.
- Prot - Low Harmonic Protection. Prevents filtering functions from removing the first few harmonics, that are essential for producing 'weight' to the tone of the patch. There is a related Harmonic protection shaping mapping for this control so you can set the specific partials to be protected. This can be useful when using heavy Phaser settings that often remove the fundamental.
- clip - Clipping threshold.
- Clipping mode (menu) - Each is a different threshold curve, similar to a compression curve, dictating at what amplitude level partials are 'clipped'. This parameter has a corresponding Harmonic clipping shaping mapping.
- fx - Effects to dry mix.
- vol - Volume envelope multiplier
- env - Frequency domain envelope multiplier.
- auto - Automatic gain controls the audio levels as a function of velocity and number of notes being played (similar to an audio compressor that will protect the section output from clipping). You can set Absolute or Relative gain on the Advanced Tab.
- Velocity mapping switches:
- Velocity to volume envelope attack time - Maps the velocity to the attack time of the volume envelope.
- Velocity to volume envelope attack scale - Maps the velocity to the attack time scaling of the volume envelope.
- Release velocity to envelope release scale - Maps the release velocity to the release time scaling.
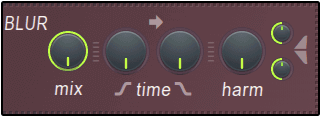
BLUR
Blur smears the partials horizontally. Blur the left side (attack), right side (decay), top (harmonic frequencies) or bottom (fundamental frequency). Use this to create preverb and reverb type sounds.
- Mix - Blur mix.
- Time - Blur Attack/Decay. Adjust the leading and trailing blur amount independently. High Attack values will soften transients in resynthesized audio, high Decay values will create 'reverb' style effects. NOTE: The Pluck control can replace the trailing blur when 'blur' is selected.
- Harm - Harmonic blur amount, equivalent to a vertical smearing of partials.
- Harmonic blur top tension - Relative blurring of high vs low frequencies.
- Harmonic blur bottom tension - Relative blurring of high vs low frequencies.
Blur Articulator
- Harmonic blur amount - 'Mix' as above.
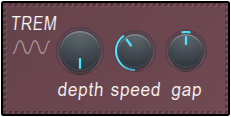
TREM
Tremolo Is a stereo effect with a left/right panning of the sound that simulates the rotary speaker effect used in some classic organ patches.
- Depth - Mix between tremolo effect and the dry signal.
- Speed - Tremolo speed.
- Gap - Extent of panning between left and right pan position. When set to 0, the effect will be monophonic affecting volume only.
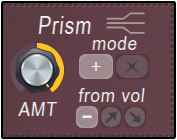
Prism
Prism shifts the position of the partials from their original relationship to the fundamental frequency. If the partials were harmonics, prism will generally making them inharmonic. This adds a metallic (extreme prism) or detuned (mild prism) quality to the sound. NOTE: The 'Harmonic prism' articulator envelope allows you to customize the prism effect as a function of the partial frequency.
- AMT - Prism amount.
- Mode - Additive or multiplicative effect of the prism amount.
- from vol - The prism amount depends on the volume of the harmonic, the louder the harmonic, the higher the amount of prism applied. Inverted applies the opposite.
Prism articulation
- Prism amount - 'Amt' as above.
- Shaping - Harmonic prism (mapping of per-partial deviation amount). This is a bi-polar envelope so you can add positive or negative deviations as a function of frequency.
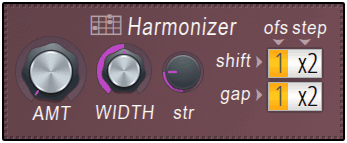
Harmonizer
The harmonizer clones and transposes the existing harmonics, using various methods (+/x octaves, or by an offset).
- amt - Harmonizing mix.
- width - Determines how far upward the harmonics are cloned.
- str - Strength places emphases on the upper harmonic clones.
- shift - Shifts the harmonics relative to the fundamental frequency (ofs = offset in octaves, step = offset in harmonics). Drag up for additive offsets and down for multiplier offsets.
- gap - Gap between the 1st harmonic and higher harmonics (ofs = offset in octaves, step = offset in harmonics). Drag up for additive offsets and down for multiplier offsets.
Harmonizer Articulation
- Harmonizer mix - 'amt' as above.
- Harmonizer width - 'width' as above.
Unison
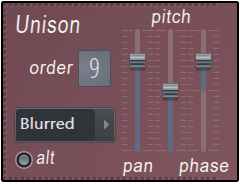
Unison is a thickening / stereoizing effect, similar to chorusing. Unlike chorus, that is applied to the final output, unison is a per-note effect where each note is given a user-defined number of 'subvoices' (from the order setting). Subvoices are then given user-defined variations of panning, volume, pitch and phasing relative to the root note, as per the following controls:
- Order - Number of unison voices. NOTE: Limit use of high unison orders where CPU load is a concern.
- Unison type menu - Select from variations of pitch and panning spread (Classic, Uniform, Blurred, Random & Special). Set by ear.
- alt - Alternates gain polarity.
- pan - Panning variation across the unison voices.
- pitch - Pitch variation (detune) across the unison voices
- phase - Timbre starting phase variation across the unison voices.
NOTE: Set unison phase to 100% (full blur) for a smooth unison on high pitch notes, lower notes may sound noisy however.
Unison Articulators
- Unison pitch thickness - 'Pitch' control as above can be mapped according to a number of Mapping envelopes.
- Unison phase - 'Phase' control as above can be mapped according to a number of Mapping envelopes.
- Unison index mapping - Independent unison voice mapping, can be found for most Editor targets including Pitch, Prism, Pluck etc. Worthy of mention is the 'Pitch > Unison index mapping' that allows the pitch of each Unison voice to be set independently.
Left-side Buttons
From top to bottom:
- About Harmor - Information about the plugin. Harmor chan by Uruido.
- Browse envelopes / images - When used in FL Studio opens the Browser to content relevant to Harmor. Drag content onto targets in the plugin including envelopes and the image-resynthesis area.
- Preview keyboard - Show and hide the piano keyboard along the bottom of the plugin.
Pitch
- oct/Hz (switch) - Pitch distribution in octaves (unweighted) or Hertz (weighted).
- freq - Frequency multiplier/divider.
- detune - Offset/detune of the partials relative to the fundamental frequency.
- env - The effect of any Pitch related envelopes are moderated by this bi-directional (-1 to +1) control.
- Vibrato - A fast pitch modulation. TIP: It can be useful to link the aftertouch to this knob. In FL Studio, press & hold a note, Right-click the knob to open the remote
control settings and then press the note harder and you are done.
- Depth - Extent of the deviation around the correct pitch.
- Speed - Frequency of the pitch deviation.
- Legato controls relate to the attack of notes and the way consecutive notes are joined.
- Portamento time curve (switches) - Linear vs logarithmic portamento (pitch slide) curve.
- Portamento / Legato time (switches) - Choose a fixed glide time or variable, depending on pitch distance and speed knob (positive or negative) setting.
- time - Controls the porta and legato slide times. NOTE: The Global portamento porta or legato switches must be activated for time to become active.
- limit - Portamento pitch limit. Restricts the pitch range over which the portamento effect will apply. NOTE: The Global portamento, 'porta' switch must be activated for this limit to become active.
Filter
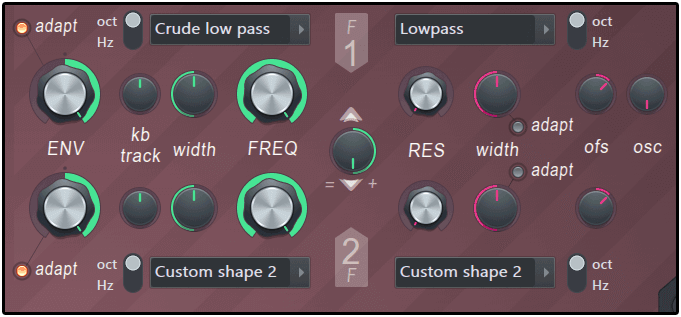
The filter functions control the type of filtering and cutoff frequency.
- ENV - Envelope modulation amount. The knob is bi-directional from -100 to +100%.
- adapt - Adaptive envelope mode. The bandwidth of the filter changes width as a function of the notes frequency, so that the duration of envelopes applied to low vs high notes sound similar in duration. Set by ear.
- oct / Hz - Sets the shape of the resonance frequency peak to an Octave or Hertz scale. Set by ear.
- kb track - Keyboard tracking. Applies an offset to the filter cutoff value depending on pitch. The offset-value can be positive or negative depending on the direction of the knob. For example, keyboard tracking is useful to make a sound brighter, by raising the cutoff frequency of a low-pass filter, as higher keys are played.
- width - Filter bandwidth, equivalent to 'dB/Octave' setting on traditional filters. Narrower widths create a more clearly defined 'center frequency' or 'cut' frequency.
- FREQ - Filter cutoff frequency. This is the target for all controls in green to the left of the knob.
- Filter type menu - Choose from cutoff slope variations, Crude & Hill being the steepest:
- Low pass - Filters frequencies above the cutoff frequency.
- Band pass - Filters frequencies either side of a central band.
- Band stop - Filters frequencies inside a central band.
- High pass - Filters frequencies below the cutoff frequency.
- Phaser - 'Comb filtering', a series of stacked band-stop filers.
- Custom shape 1 & 2 - Define your own filter shape with ENV 'Filter shape 1 & 2' envelopes.
- Filter 1 & 2 mix - Filter resonance sections can operate in parallel or series depending on the position of the knob (see below). Consider the percentage like the mix between Filter 1 and 2. When parallel it's the mix of both filters to the output. When serial its the mix of Filter 1 directly to the output or into Filter 2.
- Left of 12 O'Clock = (1-Mix) * F1 + Mix * F2
- Right of 12 O'Clock = (1-Mix) * F1 + Mix * (F1⇒F2)
Where:
- F1 is the output of Filter 1
- F2 is the output of Filter 2
- F1⇒F2 is the output of F1 processed by F2
- Mix is the value of the Filter 1 & 2 mix knob
TIP: If Units are placed after F1, then F1 becomes F1 + following units.
- RES - Filter resonance. This boosts frequencies around the cutoff value (depending on the offset value). Resonance accentuates the cutoff frequency position making a familiar 'resonant' sound.
- Resonance type menu - Choose from resonance type variations:
- Classic - Single narrow resonance peak.
- Cuberdon, Pedestal, Sedge hat, Wide bump, Double cone - Various resonance peak shapes, named according to their approximate shape.
- Well & Wormhole - Cut frequencies at the cutoff frequency with resonant peaks either side of the hole. These settings are designed to be used with the self-oscillation, to avoid annoying interferences and overly loud ringing when the resonance peak passes harmonic frequencies.
- Noise - Special effect. Harmonics are sounded randomly. Use the RES to control the amount of randomness, width controls the length/duration of changes in harmonics.
- Custom shape 1 & 2 - Define your own resonance filter shape with 'Filter (resonance) shape 1 & 2' envelopes.
- Low pass - Provides a resonance peak followed by a dip, this makes it an 'extra lowpass', so that the slope of the lowpass filter effectively becomes steeper as the resonance increases.
- width - Resonance peak width, left = narrow, right = wide.
- adapt - Adaptive envelope mode. The bandwidth of the filter changes width as a function of the notes frequency, so that the resonance sounds similar regardless of the note pitch. Set by ear.
- ofs - Offset shifts the resonant frequency +/- 2400 cents, relative to the cutoff frequency. NOTE: Resonance may become inaudible for low-pass modes if the offset moves the peak past the filter cutoff point, since there may be few or no frequencies to resonate beyond the cutoff point.
- osc - Self-oscillation level. A sine wave is deliberately introduced at the resonant frequency developing more distinct 'tonal' sound. Can be useful when the offset moves the resonant peak beyond the filter cutoff point (see 'ofs' above).
Filter Articulation
- Filter 1 & 2 frequency - 'FREQ' as above.
- Filter 1 & 2 width - 'width' as above.
- Filter 1 & 2 resonance amount - 'RES' as above.
- Filter 1 & 2 resonance offset - 'ofs' as above.
- Filter 1 & 2 Mix - As above.
Pluck
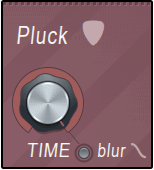
Pluck is a specialized decay-related filter. To change the filter shape select 'Pluck shape' from the Editor target shaping. The mapping represents decay time (vertical) as a function of frequency (horizontal). The default shape decays the high frequencies first, progressing down to the low frequencies. This simulates a plucked string where the pluck is bright and quickly dulls. At high settings the default pluck shape imparts a 'damped' quality to the tone.
- TIME - Decay time ('Pluck shape' envelope multiplier).
- blur - The pluck setting replaces the blur decay in the BLUR section.
Pluck Articulation
- Pluck amount
Phaser
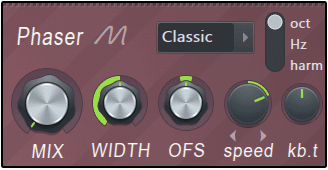
Phasing is the process of creating, constantly moving, frequency cancellation/s in a sound. The Harmor phaser allows individual harmonics to be phased rather than it being applied to the entire output or 'cancellation patterns' (cut templates) to be applied to the timbre making a range of interesting phasing and harmonic effects possible.
- MIX - Amount of phasing.
- Phaser type menu - Select phaser type. There are three broad categories as follows:
- Classic, Triangle, Eggs - In this group you will find settings similar to traditional phaser sounds.
- Deep, Deeper, Condom, Twins, Cascade & Box - Are special phasing effects that fully exploit the Harmor additive architecture.
- freq - Extra special! Modulates the frequency of all the partials in the timbre according to a user defined envelope.
- custom - User defined phaser envelope.
- Phaser scale - Set the scale to octave, Hz or harmonics. Set by ear. Use the phaser in harmonic scale mode to achieve pulse-width modulation (PWM) oscillator sync or FM type sounds.
- WIDTH - Wider settings cause a more aggressive phase cancellation.
- lfo - Subjects the width setting to LFO modulation. The lfo characteristics are set at the main LFO (lower right on the interface).
- OFS - Offsets the phase mask (cancellation) position.
- speed - Speed with which the phase cancellations are swept across the spectrum. The control is bipolar, turn left for downward sloping phasing and right for upward phasing. The unit of measurement is a step, so for a value of 1:00 the sweep duration is a single step, and for a value of -1:00 a single step to the opposite direction.
- kb.t - Keyboard tracking adds an offset to the phase depending on note pitch note.
Phaser Articulation
- Phaser mix - 'MIX' as above.
- Phaser width - 'WIDTH' as above.
- Phaser offset - 'OFS' as above.
EQ
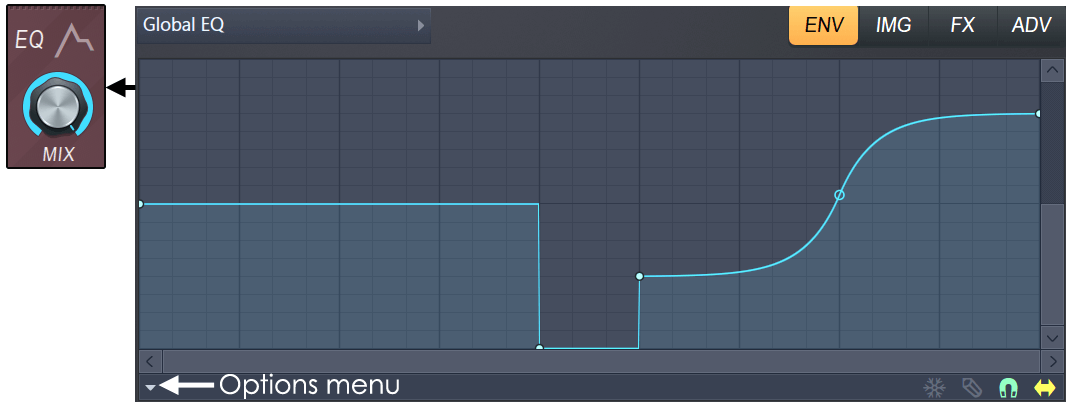
EQ or equalization adjusts the tonal balance of the sound. The MIX knob controls the EQ as set by the ENV > Shaping > Global EQ envelope. By default the EQ curve is flat so no EQ will be applied when tweaking the knob. There are two EQ envelopes available.
- Global EQ - The equalization curve is the same regardless of the notes played.
- Local EQ - The equalization curve follows the notes played. That is, the EQ frequencies will be relative to the root note played.
The EQ knob on the UI controls the Global EQ mix. The Local EQ mix is always 100%.
NOTE: there are a number of predefined shapes available from the Options menu.
- MIX - Wet/dry mix for the EQ curve.
- Equalization curve - Set from the ENV (envelopes) > Shaping (section) > Global EQ
Visual Feedback
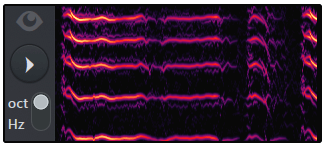
The visual feedback panel shows partials sent to the synthesis engine and is perfect for learning how features and functions in Harmor work. Leave it open during patch creation. It also looks cool and impresses onlookers.
- Visual feedback (switch) - Click once to open, again to expand and again to close. For an extra large view mode type (or cut and paste) "can i haz moar view" into the Preset Name area.
- Oct / Hz (switch) - Sets the vertical scale to octaves or Hz. See here for a tutorials on Log (Octave) vs Linear (Hz) scaling.
NOTES: Visual feedback shows a monophonic harmonic series related to the last note played. Visual feedback is quite CPU intensive, so close the panel if you experience high CPU loads with Harmor-intensive tracks. The display may appear over the Harmor GUI in some VST hosts, because those hosts don't allow the plugin to resize.
Global Controls
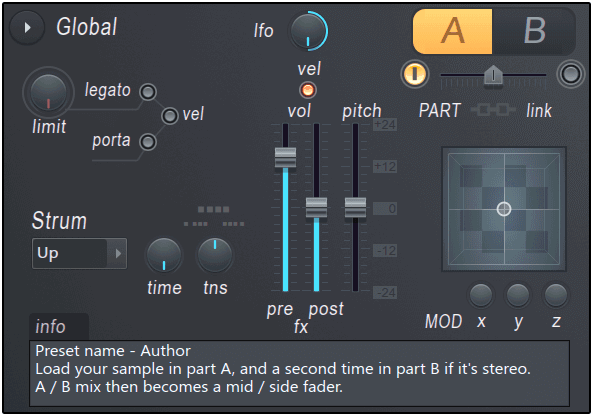
These parameters control performance related effects including portamento, strumming and modulation. The A/B (Part) switch is used to access the two separate and identical synthesis banks.
- Options - Options menu (next to the Global label).
- Copy preset - Copies the currently selected preset. You can use this to transfer presets between instances of Harmor.
- Copy part - Harmor has two parts A and B. Each is an identical and independent synthesis section. Copy part A or B with this option.
- Paste preset/part - Paste the preset or part. You can also paste between instances of Harmor.
- Lock part - Locks the currently selected part.
- Chorus - Select chorus presets. These are also accessible from the FX panel.
- Reverb - Select reverb presets. These are also accessible from the FX panel.
- About Harmor - Version number, credits etc.
- lfo - Scales all active LFO envelopes. The value can be positive or negative depending on the direction of the lfo knob.
- vel - Links note velocity to volume.
- Part controls - Harmor has two parts A and B. Each is an identical and independent synthesis section.
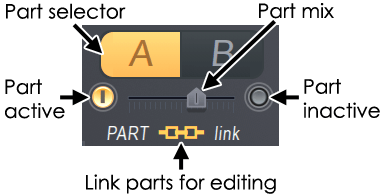
- A/B (switch) - Select to edit Part A or Part B. To use parts in stereo use the ENV > Panning > Envelope control to pan parts A and B in the stereo field.
- Part mix - Control the balance of Parts A and B. This is not automatable. Rather, use the volume envelopes of parts A and B to create mix changes.
- Activate switches - Select the switches on either end of the mix slider to activate or deactivate parts.
- Link parts - Links parts for editing, so changes made on one parts controls will be applied to the same controls on the other. You can activate and deactivate this as you are programming patches to make related and independent changes to controls on each part. NOTE: When controls are linked and one is automated by an external controller the other will not respond, you need to link each part control separately to the same external controller knob or slider. Internal automation will maintain these linked relationships.
- Limit - Pitch range over which legato effects will occur. Exceed the limit and normal polyphony will apply.
- Legato (switch) - Legato is a monophonic mode that slides pitch between overlapping notes. NOTE: This control interacts with the Part A/B LEGATO 'time', 'Portamento / Legato time (switches)' & 'legato curve (switches)'.
- porta(switch) - Portamento is a polyphonic mode that slides between overlapping notes. NOTE: This control interacts with the Part A/B LEGATO 'time', 'Portamento / Legato time (switches)' and 'limit' knob.
- vel (switch) - Links note-on velocity to portamento or legato attack time, and note-off velocity to legato release time.
- Strum - Delays the onset of notes in a chord. Play a chord and set the time knob to a higher time value to create 'strum' effects such as playing a guitar. Set the direction
of the strum to:
- Up - Lowest note in the chord is played first up to the highest, last.
- Down - Highest note in the chord is played first down to the lowest, last.
- Alt - The direction alternates between Up and Down on alternating chords.
- Random - The strum direction is randomized.
- time - Time taken to strum the chord.
- tns (tension) - Acceleration / deceleration through the chord. Left = strum accelerating. Right = strum decelerating.
- MOD X, Y, Z - The XYZ values are freely assignable to Modulation targets in Harmor via the 'Articulation part' > Modulation X/Y or Z mapping envelopes. Simply edit the X, Y or Z Modulation mapping envelope from the default (flat) state and it will control the selected Editor target. NOTE: X (left-right) & Y (up-down) can be controlled by left-clicking in the X/Y/Z area and dragging. Z can be controlled by mouse wheel OR clicking the middle mouse button and dragging vertically. NOTE: X and Y also correspond to FL Studio Piano roll per-note parameters.
- pre fx - Pre FX (effects section) volume.
- post fx - Post FX (effects section) volume.
- Pitch - Playback pitch. NOTE: In Image synthesis / resynthesis mode you can set the playback speed to zero, right-click in the image window and right-click and scrub horizontally (time) and vertically (pitch).
ENV - Envelopes
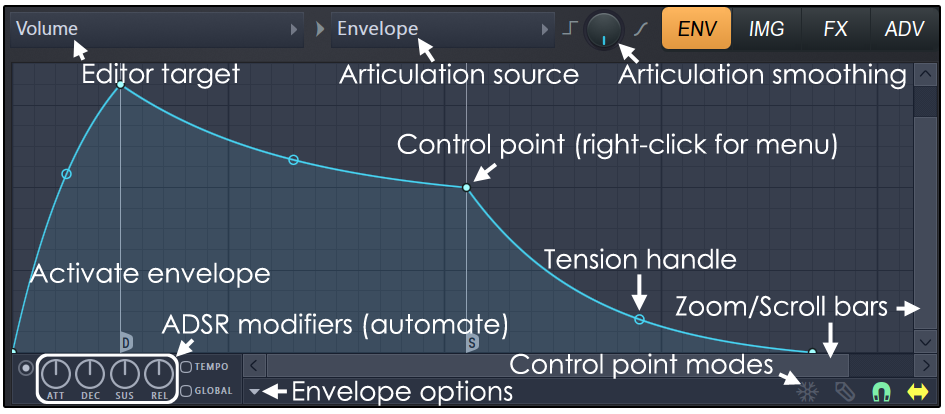
The ENV panel provides access to the full suite of modulation parameters in Harmor. The ENV editor shows Editor Targets (usually a synthesis control), for each target there can be a number of Articulation parts (modulation sources).
TIP: Finding the right envelope:
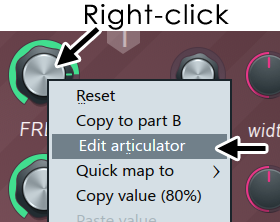
A quick way to find the articulation envelopes for any parameter is to Right-click the target control and select 'Edit articulator' from the pop-up menu. The Editor target will be automatically selected in the Envelope editor.
Controls above the Envelope
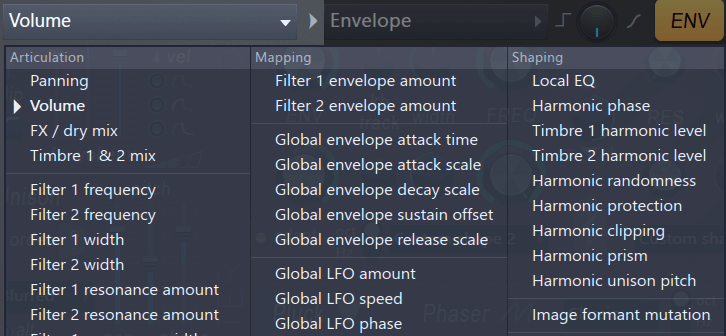
- Editor targets - Choose the editor target. 'Shaping' category targets have only one part (envelope).
- Articulator part - Edit & or activate any number of Articulator Parts so that the target is modulated by multiple inputs, if desired.
- Articulator Smoothing (knob) - Time based smoothing of the output of the envelope. Envelope values are averaged over an integration window. The width of the window is set by the knob.
Controls on the Envelope
There are several basic operations for editing the envelope/mapping shape:
- Add a new Control Point - Position your cursor over the line, or envelope background, and right-click.
- Reposition a Control Point - Left-click and drag control points. Hold SHIFT while dragging to lock the vertical position, or CTRL to lock the horizontal position.
- Delete a Control Point - Right-click a control point and select Delete. Alternatively, hold ALT and Left-click.
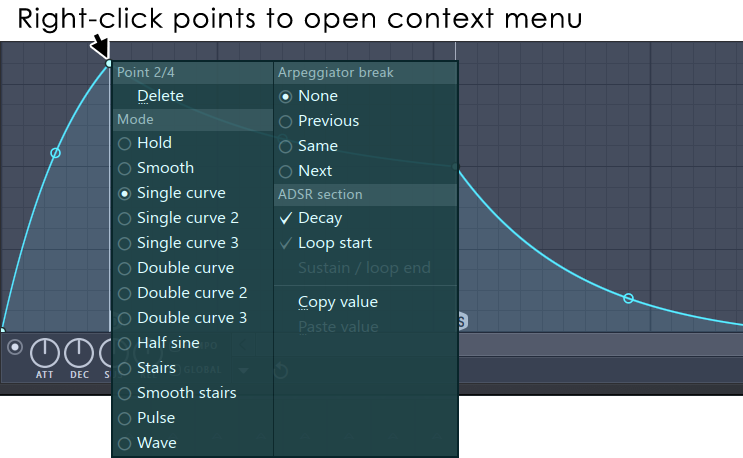
- Change a Segment Type - Right-click a control point and select a curve type (the selection applies to the preceding segment), see the control point context menu for more details.
- Change Segment Tension (Acceleration) - To change the amount of tension, Left-click on the tension handle (the circle located half way between the control points) and move your mouse up/down. Right-click the handle to reset to a straight line. Hold CTRL during adjustments to fine-tune.
NOTE: The ATT, DEC, SUS and REL knobs make RELATIVE changes to the ADSR envelope, snapping back after release. While the envelope will appear as it did prior to the change, the envelope will sound according to the relative changes made (as seen in the Hint Bar while the knob is adjusted). Right-clicking the knobs will give options, in particular Create automation clip & Link to controller so automation of envelopes (and LFO parameters) is possible. Similarly, Right-clicking points gives options such as Sustain loop start & Sustain loop end points can be set to loop the envelope during the sustain action.
Envelope tips:
- Many envelopes need to be activated with the switch in the lower-left corner before articulating the target.
- Use the horizontal and vertical zoom/scroll bars for more accurate editing. Click and drag on the ends to zoom or hover your mouse pointer and roll your mouse-wheel.
- Make use of the SNAP switch (lower-right) to snap to envelope values.
- Notice the background shading, it will usually reflect bars, octaves or other useful divisions related to the Articulation target.
- If an envelope is frozen and won't respond to editing, uncheck the FREEZE switch on the lower right.
- Envelopes can be synced to tempo using the TEMPO Switch.
- The Envelope options menu usually contains a list of useful pre-defined envelopes or can be used to save your own.
- Drop compatible file types on envelopes and they can be auto-analyzed. For example .fnv (envelope state files), .wav, .mp3, ,ogg etc audio files (volume envelope will be extracted and replicated).
Controls below the Envelope
- ADSR modifiers - These knobs are modifiers for the set envelope. That is, they are designed to be automated. After they are edited/moved, the envelope will snap back to its original appearance but the duration/value of the A, D, S or R target will be multiplied by the value of the knob. You can notice this by observing changes to the Envelope play-position marker as it moves across the envelope.
- ATT - Attack length modifier.
- DEC - Decay modifier.
- SUS - Sustain modifier.
- REL - Release modifier.
- Tempo - Locks the envelope grid to project tempo/beat. Changes in project tempo will affect envelope timings.
- Global - Retriggers the envelope, including those playing, with each new note played so all notes share the same envelope phase/timing.
- Envelope options - See the Envelope options menu section for more details.
- Freeze - Enable this switch to lock the envelope curve to its current setup. This feature is useful if you have finished changing the spline structure of an envelope and want to protect it from accidental edits (it also hides the handles to provide a clear view of the shape).
- Step - Enable this option to set the Editor to step editing mode. Drag within the editor to create a 'free hand' curve in which a new control point is defined for every step in the timeline. Hold SHIFT while dragging to draw 'pulse' lines (straight vertical/horizontal lines only). Note that each new segment created in this mode uses the same tension as the previous segment.
- Snap - Enable this option if you want the control points to snap to the nearest step in the timeline while dragging.
- Slide - Enable this option to preserve the relative distance between a dragged control point and all control points after it (this option is enabled by default).
Control point context menu:
- Delete - Delete point.
- Change curve type - Right-click the right-most control point of the segment to be changed, this will open the Curve Type Menu with the following options:
- Single curve - Default mode for creating straight or curved segments (depending on the tension).
- Double curve - Smooth 'S' curves, useful for scratching effects.
- Alt single curve - Linear or asymmetrical accelerating / decelerating curve (depending on the tension).
- Alt double curve - Linear or asymmetrical smooth 'S' curves(depending on the tension), useful for scratching effects.
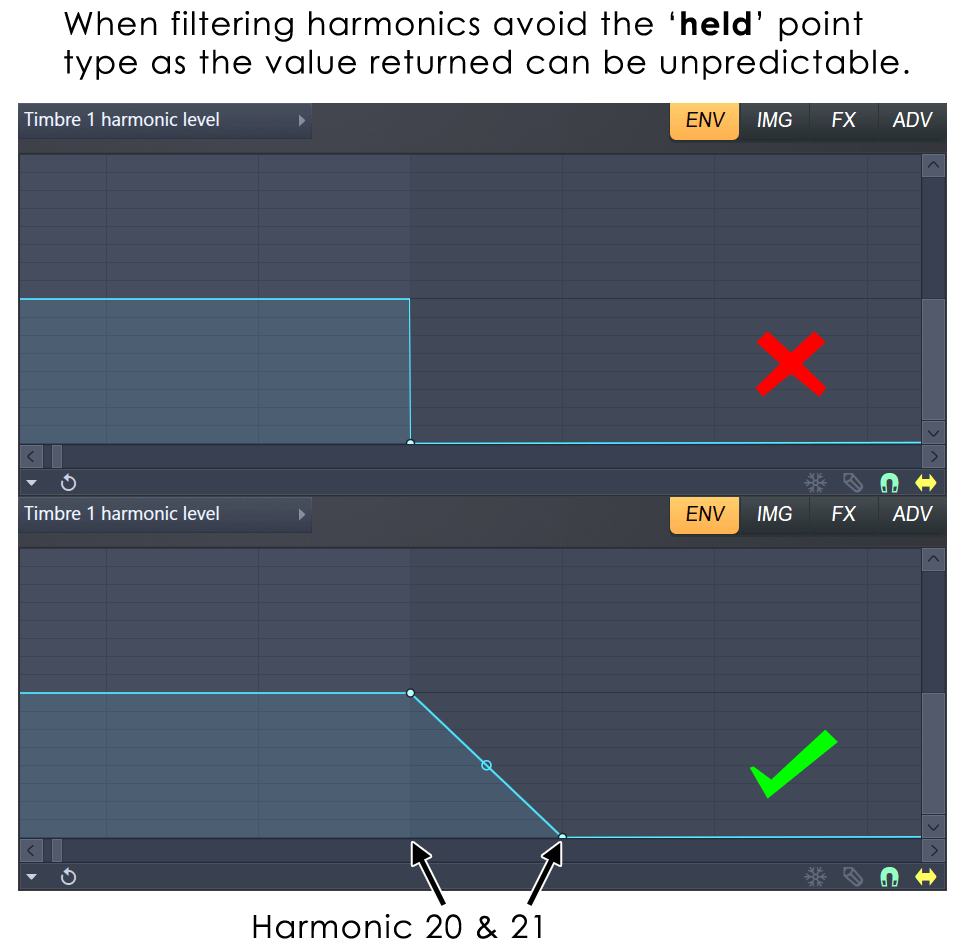
- Hold - Single steps between points, useful for creating jumps in position.
- Stairs - Multiple steps between the control points. Left-click on the tension handle and move your mouse up/down to change the step frequency. Useful for glitch / decimation effects. Step size controls the 'graininess'.
- Smooth stairs - Multiple smooth steps between the control points. Left-click on the tension handle and move your mouse up/down to change the step frequency. Useful for changes in pitch and granular effects.
- Pulse - Square wave pulse, adjust the frequency with the tension handle.
- Wave - Sine wave pulse, adjust the frequency with the tension handle.
- Half sine - One half of a sine wave. Useful for creating start, stop and scratch effects.
- Smooth - Allows for smoothly joining points with an 'S' curve.
- Arpeggiator break - Harmor uses special arpeggiator envelope markers active when playing chords (see also the Envelope Sequencer accessed from the Envelope Options Menu):
- None - Use this to clear an unwanted break point.
- Previous (
 ) - At the break-point applies the following segment to the note below the previous note
in the chord modulated.
- Same (
 ) - At the break-point applies the following segment to the same note as last modulated by the
envelope.
- Next (
 ) - At the break-point applies the following segment to the note above the last note in the chord modulated.
- Special ADSR markers: - Harmor uses special ADSR envelope markers:
- S (sustain / loop end): Marks the end of the decay/loop section and the start of the release section.
- L (loop start): Marks the start of a sustain/loop section.
- D (decay): Marks the start of the decay section.
Envelope options menu
The Envelope options menu contains a range of useful tools, which may vary depending on the articulator part (envelope, LFO, mapping).
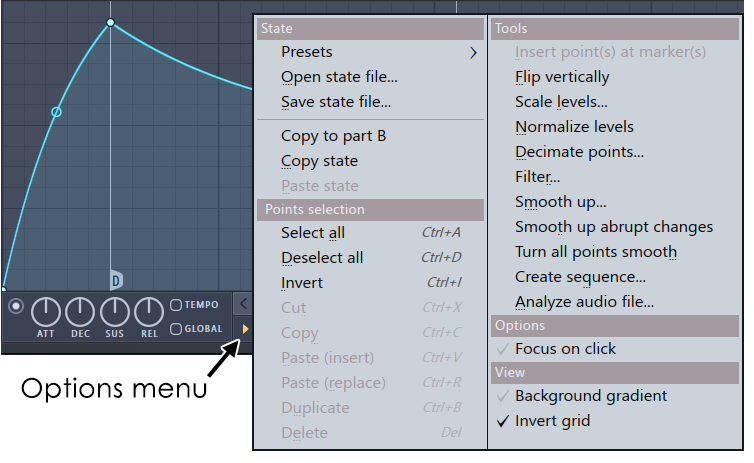 Options - Click the forward-arrow to select:
- Open state file... - Opens pre-saved Editor state files (envelopes, etc).
- Save state file... - Save an Editor state.
- Copy to Part B / A - Copies the current articulation to the same target in the matching synthesis part.
- Copy state - Copies the current Editor settings to be copied to another location.
- Paste state - Paste the Editor state data in the clipboard.
- Reset - Reset to default state.
- Prepare for smooth editing - Creates a smooth tension between existing points.
- Select all - Selects all points for simultaneous adjusting.
- Deselect all - Deselects all points.
- Invert - Selects all points except currently selected.
- Cut - Cuts points.
- Copy - Copies points.
- Paste (insert) - Inserts copied points after a selected point.
- Paste (replace) - Replaces selected points with copied points.
- Duplicate - Duplicates selected points.
- Delete - Deletes selected points.
- Bipolar LFO tension - Changes the tension knob effect (below the envelope) . Selected: tension adjustments are made symmetrically around the zero line (bipolar). Deselected: tension adjustments are made relative to the waveform maxima and minima (unipolar).
- Frozen LFO - The first LFO value is held. The LFO envelope continues to act on this value.
- Make all loop - Includes all points into a loop.
- Insert point at locator - Inserts a point at the position of the locator.
- Flip vertically - Inverts the current envelope.
- Scale levels - Opens the Scale Level tool.
- Normalize levels - Scales the envelope so the highest and/or lowest levels reach +/- 100%.
- Decimate points - Opens a simple tool that allows manipulation of the number of control points in the envelope (useful in conjunction with Analyze audio file).
- Filter - Opens the Envelope Filter tool (useful in conjunction with Analyze audio file).
- Smooth up - Opens the Smooth Up tool that allows smoothing of the envelope shape (useful in conjunction with Analyze audio file).
- Smooth up abrupt changes - Quick removal of 'spikey' or sudden changes in the envelope.
- Turn all points smooth - Preset filter to quickly filter the envelope.
- Create sequence - Opens the Envelope sequencer.
- Analyze audio file... - Creates an envelope that mirrors the volume amplitude profile of the analyzed sound. You can also drop audio files on the envelope and they will be analyzed.
- Focus on click - When on, clicking on the envelope editor will focus the control and thus steal keyboard focus from other controls.
- Background gradient - Turn the background gradient on/off.
- Invert grid - Flips the background colors.
Targets are divided into Articulation (modulation destinations), Mapping (keyboard/articulator to target modifier relationships) and Shaping (harmonic filter shaping).
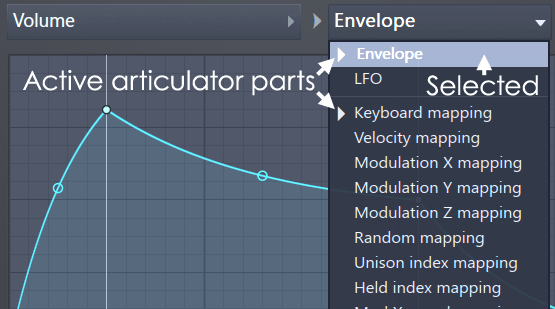
Each Editor Target can respond to multiple Articulator Parts. Active parts & articulators show with an indicator next to them.
For LFO articulation the initial state shows one point (noted below) which can be used to change the amplitude, phase & start-time of the LFO.
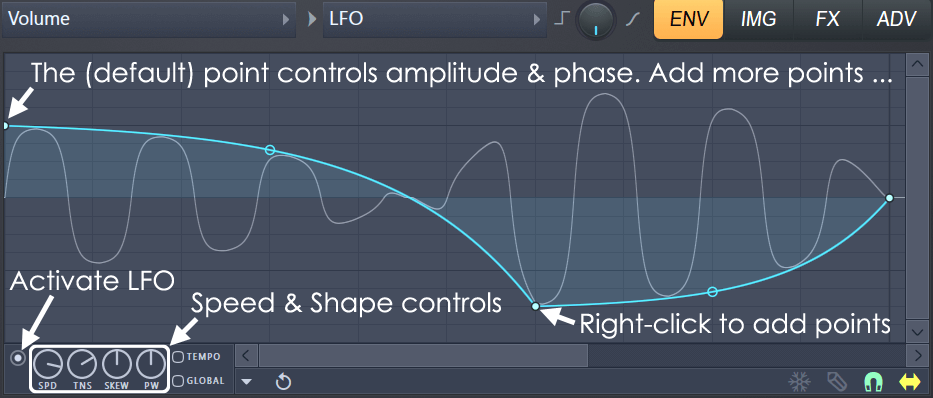 NOTE: All active LFO's can be scaled/modulated according to the Global LFO control which has independent Amount, Speed and Phase
articulation mappings.
To change:
- LFO Amplitude - Drag the 'Amplitude handle' vertically.
- LFO phase - Drag 'Amplitude handle' the handle below the center zero-line.
- LFO start time - Drag the 'Amplitude handle' to the right.
- LFO shape - Manipulate the TENS (Tension), SK (Skew) & PW (Pulse Width) knobs. A sine-wave shape, for example, can be achieved by tweaking Tension alone.
- Tempo lock - Select Tempo-based time to the right of the knobs.
- LFO note-on sync - Select Global / retriggered LFO phase at note-on. Global sync, retriggers the envelope, including those playing, when a new note is played. This means all notes will share the same envelope phase/timing.
- LFO full envelope control - Add more points (as shown above) to allow changes to Amplitude & Phase over time. The position of the blue envelope above and below the center zero-line determines LFO phase.
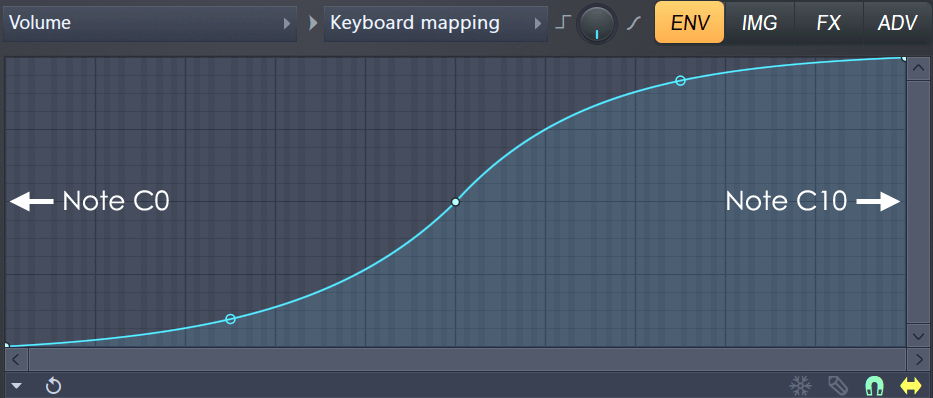
Keyboard mappings - represent the piano keyboard from C0 to C10. As you move your mouse cursor around the editor the exact notes will show in the FL Studio Hint Bar (or VST Hint Bar).
One related and special Articulator part is the Held index mapping that generates 'index' values for successively held notes. When the notes of a chord are added in secession (rather than simultaneously) each additional note after the first will have an 'index' value 1 unit greater than the last. In practice, the mapping steps 1 grid unit per note. It's useful with:
- Chords - Where you only want the first note to be bright and later ones to use a lower filter cutoff frequency for example.
- Legato - If you want the note to which you are sliding to have different values/properties for the Editor target compared to the first.
- Arpeggiator - Giving control over the values of each note if they are added in secession to create an arpeggiator chord.
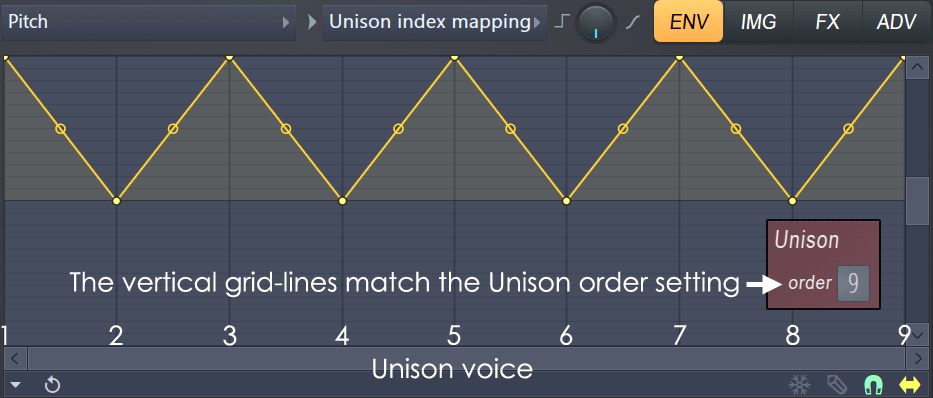
Unison Index Mapping - Another particularly useful mapping is the Unison index mapping. This mapping part allows you to pan, pitch, set levels, etc., for each unison voice independently, opening up many powerful synthesis techniques.
The horizontal grid changes to reflect the number of unison voices active. When two voices are active the extreme ends are Unison voice 1 (left) and Unison voice 2 (right) respectively.

