IMAGE-LINE / TOOLS
Minihost Modular
Minihost Modular is a modular environment for hosting/interconnecting VST/AU plugins based on a custom modular engine especially developed for this purpose. As a standalone, Minihost Modular can be used as an advanced VST or AU host with modular routing with some sequencing recording/playback capabilities. As a VST or AU plugin, Minihost Modular can be used to extend the capabilities of your existing DAW software with its powerful modular, recallable, environment. Minihost Modular bares some similarities to FL Studio's Patcher but has an extended capability as a self contained host.
Further resources - See the Minihost Modular ![]() video tutorial playlist here or visit the user forum here.
video tutorial playlist here or visit the user forum here.
Features include:
- Works as standalone and VST or AU host on Windows and macOS. There are 32 Bit and 64 Bit versions.
- Multi-input/multi-out (MIDI & audio) support. The standalone version is unlimited, the VST has 3 stereo outputs.
- Powerful Piano roll Module based on FL Studio's, to create, record and trigger musical sequences via MIDI.
- Natively optimized modular routing.
- Unlimited undo/redo system, including plugin states undo/redo.
- Multiprocessor support (standalone version only).
- Automatically creates plugin thumbnail pictures after first opening a plugin.
Getting Started & Setup
See the setup video ![]() here
here
System requirements:
- macOS 10.6 or higher.
- Windows XP SP2 or higher. Intel or compatible processor with SSE2 support
32Bit / 64Bit versions:
Minihost Modular 32 Bit loads 32 Bit plugins while Minihost Modular 64 Bit loads 64 Bit plugins. There currently is no 32 to 64 Bit bridging possible inside Minihost Modular. You can, of course, load either the 32 or 64 bit VST version in hosts that support both bit-depths such as FL Studio and even run both Stand-alone versions simultaneously.
Registering Plugins
Before MiniHost can find your plugins you need to specify their location and scan them. The fastest way is to use Scan (no verify), but we recommend Scan & Verify as it will tell you what plugins might cause problems (you will get crash reports in the lis), and give more information such as manufacturer, number of I/Os etc.
Select File > Preferences > Plugins > Scan & Verify
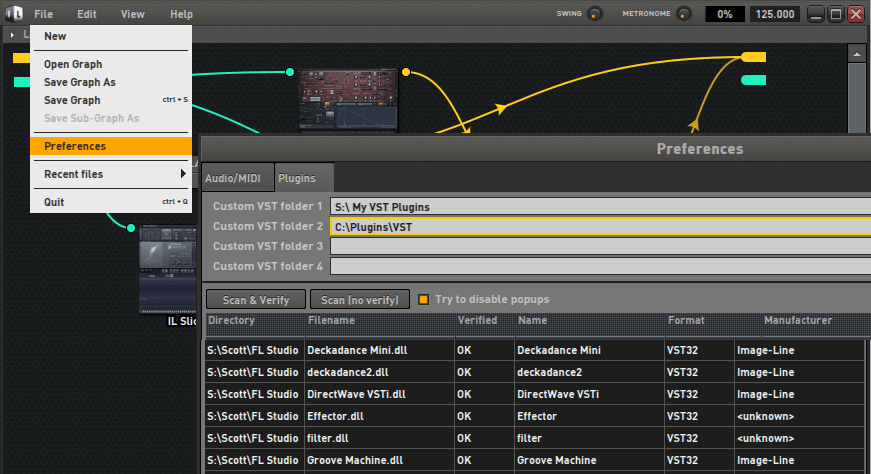
NOTES:
- Scanning - Without scanning your plugins, you won't be able to add any plugins in MiniHost Modular and .gra files from other users won't load correctly.
- Enter up to 4 VST search locations - These are in ADDITION to the standard VST locations that will also be scanned.
- Bridging - Minihost Modular will only run 32 or 64 Bit plugins equivalent to the version you are using (32 or 64 Bit).
Menu Bar

- File - General file operations and Preferences:
- Open/Save Graph - Open and save Graph layouts.
- Preferences - Including Audio/MIDI Input/Output settings and Plugin options.
- Recent files - File history.
- Edit - Undo/Redo history.
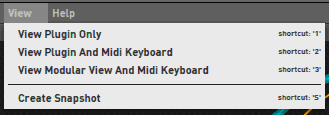
- View - View 'Plugins', 'Plugins and MIDI Keyboard', 'Modular view, and MIDI Keyboard'.
- Help - Help, About and version information.
- Shuffle - Add a 'shuffle' or 'swing' rhythm to Steps. 'Shuffle' holds the first note of the bar at the expense of the second note in the bar.
- Metronome - Volume control for the tempo click track.
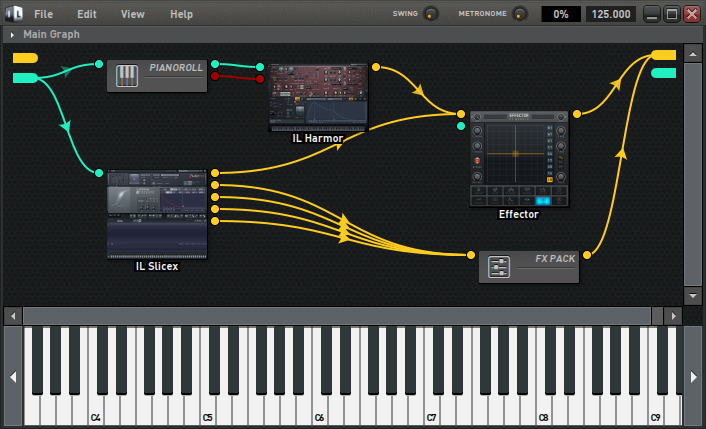
Modular View
The Modular (Graph) view is an intuitive, what you see is what is connected affair. Objects can be added, edited and moved as needed.
This window shows the 'Graph' of interconnected Modules (such as plugins or the Piano roll Module). NOTE: The workspace is resizable, drag on the window to resize OR drag an object to the edge of the workspace to auto-resize.
Data Links
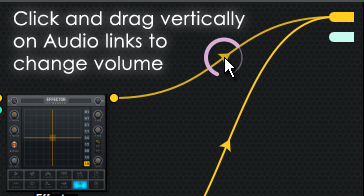
- Audio (Yellow) - Shows Audio links (inputs & or outputs depending on the plugin). Change volume by hovering over middle of audio connection until the volume control appears, then click
and drag vertically to adjust the volume.
- Parameters (Red) - Shows internal automation parameter links (plugin program/interface controls).
- Events (Cyan) - Shows note/event links (MIDI control data).
NOTE: To use Minihost Modular with Patcher, set the In/Out ports on the Wrapper to 0.
Working with the Graph window
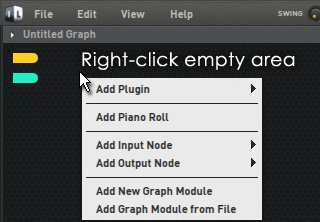
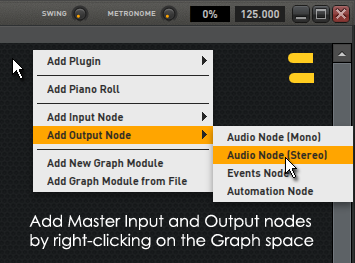
- Adding Modules & Nodes - Right-Click in empty space and use the pop-up menu. NOTE: The first time you open a plugin a preview thumbnail of the interface will be created. This can
take a few seconds to happen, so be patient.
- Open Module Editors - Double-Click the desired Module.
- Creating connections - Modules have inputs on the left-side and/or outputs on their right-side. The connectors (dots) are color-coded to the Parameter data type. Click on any output or input connector and drag to a compatible connector (shown in green).
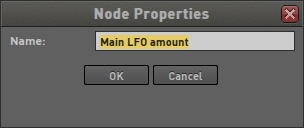
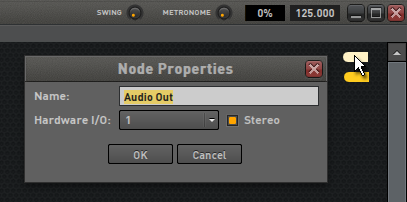
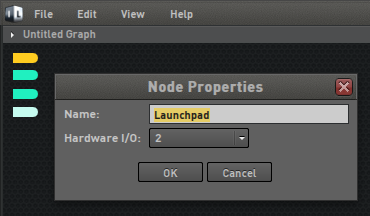
- Renaming Pins and editing their properties - Double-Click on nodes to open the dialog:
- Switching between views - Use the View menu. You can select one of three states or create a snapshot view that will save the current view.
Graph Modules (Sub Graphs)
You can add entire Graph modules (windows) to the project. These have all the features of the parent Graph except connect to the Graph above the level at which they are added.
- To add a Graph Module - Right-click on an empty area and select Add New Graph Module.
- Enter module - Double-click the Graph Module.
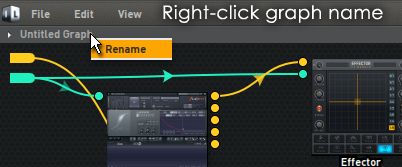
- Change name - Right-click the Graph name, then click Rename and edit the name (shown as 'Layer 2 Graph' below):
- Navigate through nested graphs - Click the name on top of the module.
- Adding Nodes - Nodes added in sub-Graphs will show on the parent Graph Module.
- Saving - You can save a Graph Module, including any nested contents which can be useful to store and reuse favorite plugin and FX chains.
Using Minihost Modular as a Plugin
Minihost can be loaded as a VST plugin in compatible host DAW software such as FL Studio or Cubase. There are 32 and 64 Bit versions and each can load VST or AU format plugins.
NOTE: When loading MiniHost Modular .gra (graph) files from other users, you will need to have the same plugins as they used installed. Make sure scanned all your plugins prior to loading the Graph Module.
Using Minihost Modular as a Standalone Host
As standalone, Minihost Modular fulfills two main purposes:
- To serve as a powerful plugin-hosting modular environment for live performance musicians.
- As creative tool to record, create and easily prepare modular setups and sequences that can later on be used in a DAW (in the plugin version of Minihost Modular) or on stage.
Standalone & Host Mode Input/Output Settings
Minihost Modular standalone and plugin versions are largely identical, but there are a few details you should know about. The following section informs you about these differences.
MIDI and Audio Inputs and Outputs
Hardware AUDIO Input & Outputs
- Select your Audio device in the Preferences:

- Assign the inputs and outputs to Master I/O nodes by double-clicking on Audio Nodes (Orange) and selecting the hardware I/O they should receive audio from (Input Nodes) or send audio to (Output Nodes).
Assign nodes by double-clicking on the node and setting the properties:
NOTE: In the plugin version, only hardware I/O 1 is available because the plugin VSTi/AU has only one MIDI input and one MIDI output.
Hardware MIDI Input & Outputs
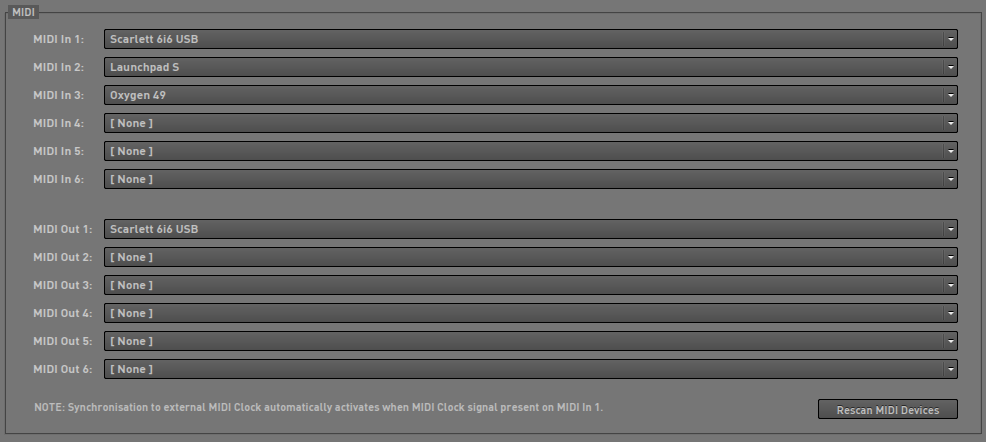
- Select up to 6 MIDI I/O devices in the Preferences. NOTE: The number (1 to 6) for each device as you will need this in the next step.
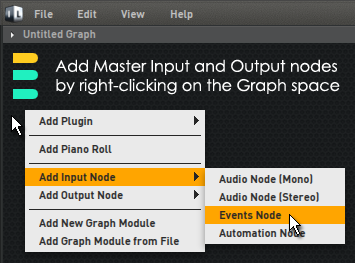
- Assign main input and output nodes by double-clicking on Event Nodes (blue) and selecting the hardware I/O number they should receive data from or hardware to send data to. To add
new nodes right click the empty graph space and select Add input node > Events node or Add output node > Events node.
Assign nodes by double-clicking on the node and setting the properties:
NOTE: In the plugin version, for audio input hardware only I/O 1 (left) 2 (right) will be used, because the plugin VSTi/AU has only one audio input. For audio output hardware I/O 1-6 will are valid because the plugin VSTi/AU has 3 stereo audio outputs. Other settings will be ignored.
TIP: When using MiniHost Modular as standalone, you may want to use it as multi-FX modular environment to process outboard equipment. In this situation, it makes sense to have more than 1 stereo input and more than 1 stereo output.
MIDI Clock synchronization
MiniHost Modular automatically synchronizes to incoming MIDI Clock signals. This can easily be tested by activating the Metronome and listening for the click to follow the incoming MIDI Clock's tempo.
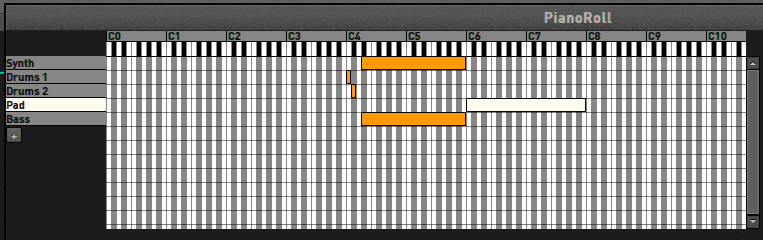
Piano roll Module
The Piano roll Module allows you record, create and play back small loop-able musical sequences. The musical sequences can then be routed to plugins and can even be used to trigger other Piano roll Modules. It also possible to freeze Zones to lower CPU usage, and to create graphical envelopes that can control automation.
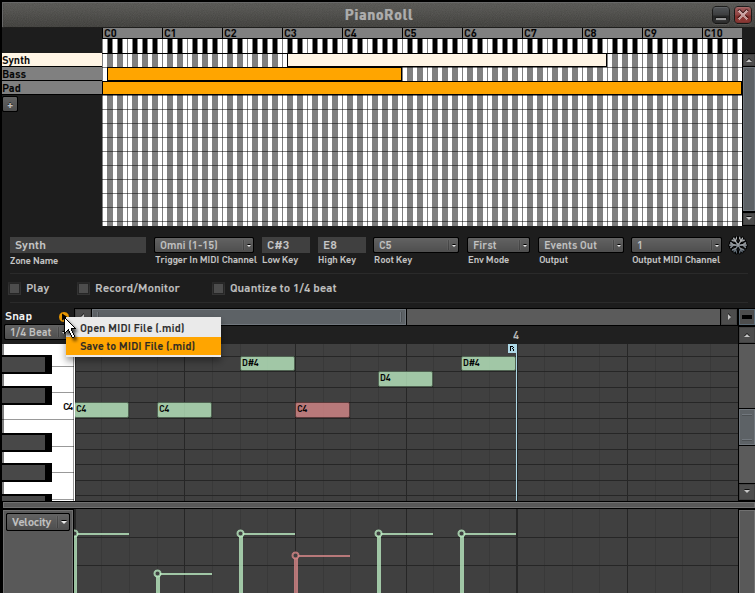
Top: Zone Editor, Middle: Per-Zone parameter bar, Bottom: Sequence Editor. NOTE: The Open/Save MIDI data (*.mid files) menu as shown above. This will save the note data for the selected zone.
Zones
The Piano roll Module can hold 1 or more Zones. A Zone is a named musical sequence which reacts to a given MIDI keyboard range, on a specific MIDI Channel or all MIDI Channels (Omni). It can also play one or more graphical envelopes, routed to different destinations.
Zone Editor
All Zones of the current Piano roll Module are shown in the Zone Editor.
- Select a Zone - Click on it (either in left or right part of editor).
- Move/resize a Zone - Click in middle or on left/right border and drag mouse.
- Rename a Zone - Double-click the Zone name (on the left of the editor).
- Add a Zone - Click the [+] button below the zone names.
- Delete a Zone - Select the zone (it will turn white), then press Delete/Backspace on the keyboard.
Per-zone parameters
Information for the selected zone is shown here.

Parameters:
- Zone Name - Double-click to edit.
- Trigger In MIDI Channel - Channel the Zone will be triggered on (1-15 or Omni). NOTE: Channel 16 has been reserved for future use.
- Low Key/High Key - Start/End of Zone (as edited via mouse in Zone Editor)
- Root Key - If a root key is selected the Zone will play in transposed fashion relative to the set Root Key.
- Env Mode - Defines the behavior of envelope (Env) playback when the same Zone is played by many keys at once.
- First - Env is only played once, on first key.
- Last - Env is restarted each key.
- Add - Env is played for each key, so if many keys play together all the Envelopes are added together.
- Output - Select the Event Node that the note data is set to. You can right-click the Piano roll to add Event nodes and they will become available for this menu.
- (Freeze button) - Press to freeze the zone as a non-transposable sample, to save CPU.
Editing Sequences
Snap button (on top left).
Using the Piano roll
NOTE: Many of the movement and draw commands are constrained by the snap setting that determines how notes move relative to the Piano roll grid. Hold the (Alt) key to temporarily bypass snap. Note also that the Global snap setting can be used for MIDI input quantizing.
- Adding Notes - Left-click on the Piano roll. To change the note length, click on the end of the note and drag. The default length for notes will be equal to the last touched note. Brush mode - Hold the (Shift) key. Notes will be painted according to the Snap value. Make sure your note-length is appropriate for your snap setting prior to brushing.
- Deleting notes - Right-click notes or select notes and use the Del/Backspace key.
- Selecting/Deselecting groups of notes - There are a number of methods to select several notes, so you can move and resize them all at once:
- Standard selection - Press and hold (Ctrl key) and either click a note to select it, or drag a rectangle to select all notes in enclosed area.
- Add notes to selection - Hold (Ctrl+Shift) together while selecting to add notes to the existing selection.
- Copy & Paste - Make a selection (see above), hold the (Shift) button THEN drag selection with the left-mouse button OR (Ctrl+C), scroll to the new position/pattern and (Ctrl+V).
- Moving notes - Select the note/sequence, Left-click on the note and drag vertically or horizontally. NOTE: The snap setting will affect the movement.
- Change note length - Select the note/sequence, Left-click on the right side and drag horizontally to change the note length. This can also be performed on a selection of notes. NOTE: The snap setting will affect the way in which the note changes length.
Recording sequences
- Stop playback in your DAW (Plugin version only)
- Select the Zone you want to record MIDI on.
- Activate the Record/Monitor button to hear (monitor) the input.
- Set Metronome volume via the control.
- If you want your notes to be quantized while recording, activate the Snap option.
- Press Play and the recording will start. Recording is per the over dub process, which means you can record in several loops.
Adding/Editing Automation Envelopes
Envelopes are associated with the Piano roll, although you don't need to have any note data to create an envelope for a Zone and use it to automate a plugin. To link an Automation Envelope to a Plugin target, proceed as follows:
- Add an Automation Output Node - On the Piano roll module, Right-click it and select Add Output Node > Automation Node> and then give it a name.
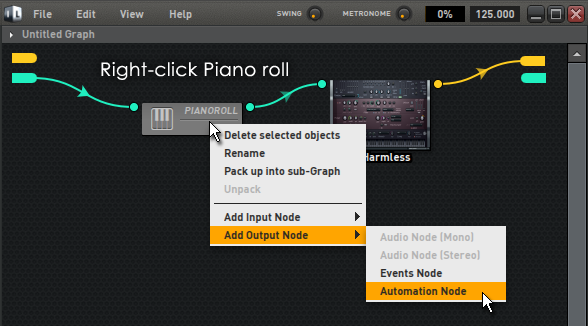
- To add an Automation Input Node - On the Plugin you want to automate, Right-click it, and select Add Automation Input Node > Parameter. NOTE: You can control as many
automation targets as you like with a single Automation Output.
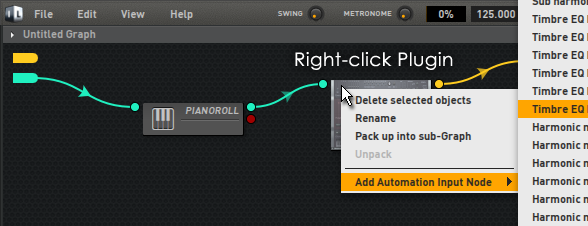
- Connect - Click the Output Node (on Piano roll Module) and drag to the Input Node (on the plugin).

- Choose the target - Open the Piano roll and select destination Automation Node in the Editor drop-down menu.
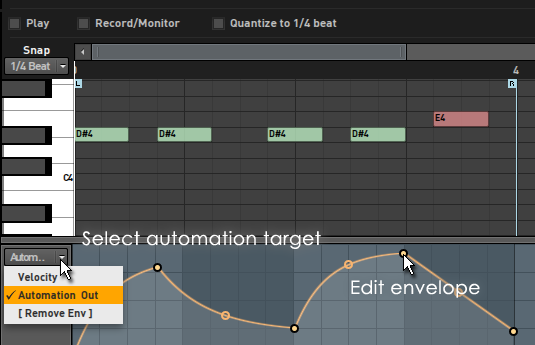
- Edit envelope - Right-click to add and delete control points. Left click, hold and drag to reposition control points. Alt + Click and drag to move without snap. Alt
needs to be held before clicking on the control point.
Envelope controls
There are several basic operations for editing the envelope/mapping shape:
- Add a new Control Point - Position your cursor over the line, or envelope background, and double-click.
- Reposition a Control Point - Left-click and drag control points.
- Delete a Control Point - Right-click a control point and select Delete. Alternatively, hold ALT and Left-click.
- Change a Segment Type - Right-click a control point and select a curve type (the selection applies to the preceding segment).
- Change Segment Tension (Acceleration) - To change the amount of tension, Left-click on the tension handle (the circle located half way between the control points) and move your mouse up/down. Right-click the handle to reset to a straight line. Hold CTRL during adjustments to fine-tune.
- Delete envelope - Use the Remove Envelope function from the drop-down menu OR just unlink the node if you plan to use it later. NOTE: Envelopes will also be removed when all Nodes are deleted.
Plugin Credits:
Code: Daniel Schaack.