EFFECTS
NewTone 
Newtone is a pitch-correction and time manipulation editor. Slice, warp, correct, edit vocals, instrumentals and other recordings. A
![]() Newtone Video Tutorial series
is available. A related plugin for live pitch manipulation is Pitcher.
Newtone Video Tutorial series
is available. A related plugin for live pitch manipulation is Pitcher.
Pitch Mode
The default mode analyzes the file to show pitch, vertical position, and volume, height of notes.

Detected notes display as blocks on the Piano roll. Note volume appears as a background waveform. There are three indicators:
- Orange rectangles show the average pitch for the detected note.
- Orange shaded blocks indicate the nearest semi-tone.
- Orange line displays the detected pitch at each point.
Toolbar Controls
- Center - Global pitch correction. Scales all notes toward 100% nearest pitch.
- Variation - Global pitch variation correction. Controls vibrato and pitch errors.
- Transition - Global pitch transition speed between notes.
- Length/Sel - Shows the length of the sample and any selection (in samples).
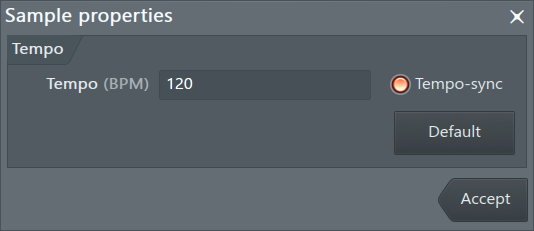
- Tempo - Shows the detected or embedded Tempo of the sample. (Right-Click) the Tempo value, below the Tempo label, to open the sample properties to manually change this.
- Sync - Syncs the loaded sample to FL Studio's project tempo. See also the File menu option 'Use project tempo on load'.
- Mode buttons (
 Mode Buttons). From left to right:
- Cut mode - Select and slice notes by clicking on the desired cut location. In Cut mode hold (Alt) and click on the two slices to be joined. Otherwise use (Shift + Alt) when not in Cut mode.
- Advanced Edit mode (Double-click) - There are two advanced edit modes selected from the Edit menu. Pitch edit - Allows the note's properties including Pitch, Formant, Volume etc., to be edited. When Vibrato edit is selected the tool shows the vibrato functions including frequency, start and end intensity and vibrato volume.
- Slaved Playback mode (H) - Playback position will sync to FL Studio's transport controls (make sure FL Studio is in Song Mode). The bars in Newtone and the Playlist will also be aligned. To start Newtone from a point later in the FL Studio project make a selection in the Playlist from the point where you want Newtone to start. You can disable this behavior by switching 'Ignore host selection' (right-click the slave button to access).
- Auto-Scroll mode (A) - The Piano roll will scroll to follow the playback cursor.
Editing Pitch
Editing options include:
- Pitch correction (single note) - (Right-click) notes and they will snap to the nearest semitone. For unsnapped re-pitching click the Pitch handle, hold (Alt) and drag vertically.
- Pitch correction (of a selection) - Make a selection by holding (Ctrl + click-n-drag) vertically through any note/s to select them and then click a note on the Piano roll ruler to the left. The selected notes will snap to the selected pitch.
- Pitch correction (all notes) - Use the 'Center' (pitch center), 'Variation' (pitch vibrato/ drift) and 'Transition' (legato) knobs. These scale values for all notes simultaneously. For most corrections you will probably just use these controls and make a few specific note-by note adjustments in Advanced Edit mode.
- Fine tune pitch Hold (Alt + drag) the center of the note vertically.
- Pitch variation correction - Enter Advanced Edit mode and then double-click the note to activate it. Controls include 'Pitch variation', 'Ramp-in' and 'Ramp-out' on a note-by-note basis (see above). To adjust parameters click on the controls as indicated and drag in the direction of the arrows.
- Formant - Enter Advanced Edit mode and then double-click the note to activate it. Drag vertically on the Formant control as indicated above. Formants are resonances caused by the size and shape of the vocal tract. Changing the formant will change the apparent size, age or even sex of the vocalist.
- Vibrato - Make sure Vibrato Edit mode is selected and then double-click the note to enter Advanced Mode. This
provides control over 'Vibrato frequency', 'Start' and 'End' intensity and volume vibrato envelope on a note-by-note basis.

NOTES: The vibrato control will interact with existing vibrato, so it can be easier to see what you are doing by dialing out the natural vibrato with the variation knob then bring back some of the natural vibrato later if desired. The vertical green line is fixed and shows the estimated frequency of the natural vibrato in the original sample (if any). The blue line can be moved horizontally to set the frequency from maximum (far right) to minimum (far left). The start and end vibrato levels are bi-directional and can be dragged vertically to change amount and phase of the vibrato. The set frequency line marks the division between start and end controls.
- Selections and editing - When you make a selection (or select all notes) to change the pitch all notes in the selection will respond. In Advanced Edit mode all notes will respond to 'parameter level' edits also (e.g. Variation or Formant).
- Note positions & boundaries - Clicking and dragging at the edges of the note blocks will move them. Where two notes are joining (as is often the case), the intersection of both notes will move together. The Snap resolution setting will determine how notes move. To override snap hold (Alt) while dragging. To create new notes or insert missed notes, use the Cut tool to slice existing notes.
- Join 'glue' notes or slices - Hold (Ctrl) while in Cut mode, then wait for the 'pointing' finger to appear then click the second of the two notes to be joined.
- Cut, pasted & delete - Follow standard keyboard shortcuts (see below).
- Auto-flatten pitch - Select some notes then click a note on the piano roll to set the group pitch.
- Select a key for auto-pitching - Select Snap to scale and move notes vertically and they will only jump to notes on the selected scale.
- Snap to time grid - Where the audio snaps to is dependent on the snap resolution and which notes are selected.
- Vibrato control - In addition to the 'Variation' knob it's possible to impose a simulated vibrato on notes. Select 'Vibrato edit' from the Edit menu then the 'Advanced edit' display will change to show vibrato controls.
- Convert your vocal parts to synthesizer performances - by sending MIDI scores to Piano roll with the 'Send score' button.
- Cut mode (Shift) - Or click on the Cut button.
- Move note start/end independently Click the Left or Right edge of the note and drag, hold (Ctrl + drag) left/right to detach it from surrounding notes, if possible.
- Move note independently Place the cursor on the front half of the note so the hand cursor appears and drag. Hold (Ctrl + drag) to detach the note from surrounding notes, if possible.
- Advanced Edit mode (temporary) (Double-click) Double-click the note to be edited. To remain in Advanced Edit model select the Advanced Edit button.
- Leave Advanced Edit (Double-click) the Piano roll.
- Preview / Scrub - When playback is stopped, click on the middle of a note (where the double-headed vertical arrow appears) and drag horizontally.
- Abusing Newtone - in ways for which it was not intended will reward the adventurous.
General Editor Functions
These operations apply to the editor:
- Move the Piano roll in any direction Click (Ctrl + Alt) & drag the mouse OR click the (Middle mouse button) & drag.
- Scroll the Piano roll vertically Scroll the mouse wheel.
- Scroll horizontally (Shift + mouse wheel).
- Zoom horizontally (Ctrl + mouse wheel).
- Zoom vertically (Alt + mouse wheel).
- Zoom Selection / Zoom Full Make a selection and (Ctrl + Right-click). If nothing is selected this will Zoom Out to full view.
Title-bar Options
Transport
- Loop mode On/Off (L).
- Play/Stop (Space Bar) To Pause (Ctrl + Space).
 File
File
- New - Opens a new (empty) editor window.
- Load sample (Ctrl+O) - Opens a file browser dialog in 'load' mode.
- Save sample as (Ctrl+S) -
Opens a file browser dialog in 'save' mode. The pop-up dialog has two options under the 'Save as type' field:
- Microsoft wave file (*.wav) Standard lossless .wav file at the bit-depth and sample rate set in the Sample Properties dialog.
- Microsoft compressed wave file (*.wav) Lossy compression formats. After initiating the save a second dialog opens to save the sample in one of many compressed formats. MS compressed wave files simply wrap the selected compression type in a *.wav file, and put information in the wave header as to what decompression method the opening program should use (not all programs read this information). FL Studio will load and decompress MS compressed wave files automatically as long as you have the appropriate codec installed.
- WavPack (*.wv) (or Right-click the 'Save as' button) Lossless or lossy, depending on settings, open-source compression (see the WavPack website for more details). After initiating save in this format you will be prompted for a bit-depth (lossless is the default, other settings are lossy compression modes). In 'lossless' mode expect between 30-70% reduction in file sizes, useful for archiving purposes. FL Studio will load and decompress WavPack files automatically.
- MPEG 3 audio file (*.mp3) Mp3 is a Lossy compression format. It has gained world-wide popularity because it was one of the first on the market that provided good quality lossy compression. After initiating a save a second dialog opens to select the quality (bit-rate), this controls the tradeoff between audio quality and file size. Good listening quality on portable devices starts at about 160 kbps, use 224 kbps or 320 (max) if you want something probably indistinguishable from CD quality.
- Ogg Vorbis (*.ogg) Lossy, open source compression format, similar in concept to mp3 (see the Vorbis or Ogg Wikipedia website for more details). After initiating a save a second dialog opens to select the quality (bit-rate), this controls the tradeoff between audio quality and file size. Use a setting of 0.50 or more if you want good quality. FL Studio will load and decompress *.ogg files automatically.
NOTE: Do not use any of the lossy formats (Microsoft compressed wave file, MPEG 3 or Ogg Vorbis) to archive project samples or loops. Use Microsoft wave files or WavPack in lossless compression mode if you want to save space. Hard disk space is cheap, samples may be irreplaceable.
- Save as MIDI - Saves the current pitch detections and manipulations as a MIDI file (.mid).
- Export regions - Each detected note and slice will be saved with a region marker.
- Slave to host playback - These options are also available by Right-Clicking the Slave Playback icon on the Edit window.
- Ignore host selection - Playback will follow the absolute song position in FL Studio. Normally Newtone will align its first bar to start at the beginning of Playlist selections in FL Studio.
- Ignore own selection - Playback isn't limited to the selection in Newtone.
- Ignore space bar key - Spacebar is ignored when Newtone is slaved to FL Studio's transport. This avoids the situation where you are editing something in sync with a song, and each time you edit, if Newtone is in focus, it plays alone instead of with the FL Studio project.
- Use project tempo on load - When enabled, the project tempo will be used to sync (stretch the sample) instead of whatever tempo value is stored in the sample itself. When off, the sample tempo is used or an auto-detected tempo if necessary. You can also apply these same states by selecting the Sync button on the toolbar.
- Edit properties (F2) (OR Right-click the sample name below TITLE or Tempo value displayed on the Toolbar next to the Sync button) - Opens a dialog to set BPM and Tempo-sync that causes the sample to stretch with changes to host BPM once imported.
 Edit
Edit
- Undo (Ctrl+Alt+Z) OR (Ctrl+Alt+Z) - Undo/Redo OR Undo many.
- Cut (Ctrl+X) - Cuts the selection.
- Copy (Ctrl+C) - Copy selection.
- Paste (Ctrl+V) - Paste selection.
- Copy to MIDI clipboard Copies the current note detection to the MIDI clipboard. To send notes to the Piano roll use 'Send to piano roll' below.
- Delete (Del) - Delete selection.
- Advanced Edit (Ctrl+A) - Toggles Advanced Edit (A) pitch mode. In A mode the A box will automatically appear when the mouse cursor is placed over a note. Otherwise you can double-click notes to enter Advanced Edit mode.
- Vibrato edit - Toggles Advanced Edit (A) vibrato mode. This allows you to fine-tune pitch vibrato effects on individual notes. In A mode the A box will automatically appear when the mouse cursor is placed over a note. Otherwise you can double-click notes to enter Advanced Edit mode.
- Cut Mode (C) - Toggles Cut Mode used to Cut/Slice notes.
- Snap to scale - Once you start moving notes from their existing locations they will only snap to notes from that scale.
- Scale - Select the scale to use in conjunction with the Snap to scale function.
- Snap to grid - Set the horizontal snapping from 'none' to '1/8 beat' (32nd notes). Hold (Alt) to temporarily override snap.
- Send to Playlist as audio clip - Sends the audio to the Playlist as an Audio Clip with markers set for the note boundaries.
- Send to piano roll - Sends the detected notes to the Piano roll as MIDI data.
 Select
- Deselect (Up arrow) selection.
- Select time around selection (Ctrl+Enter) - Selects the time-line range occupied by the selected notes. If no selection is made the Zoomed range will be selected.
- Select before current selection - Selects the time-line before the current selection.
- Select after current selection - Selects the time-line after the current selection.
- Select all - Selects the time-line.
- Select all slices (Ctrl + A) - Selects all audio.
 Undo
Undo
- Undo - Undo if there is nothing to redo, (Ctrl+Z).
 Create Score
- Left-click - Sends the detected score to a Piano roll in the currently selected Channel & Pattern. Right-click Copies the score to the MIDI clipboard.
 Save as
- Left-click Save as a new file. Right-click Save the file as WavePack format (.wv). See the 'File > Save sample as' section for a detailed description of .wv format.
 Drag selection
- Drag this button and drop on a compatible location in FL Studio (Playlist, Channel window e.t.c,) to copy the selection to that destination. If nothing is selected the entire sample will be copied.
 Send selection to Playlist
- Sends the selection to the Playlist. If nothing is selected the entire sample will be copied.
Credits
Pitch/Time manipulation engine by: Zplane
Code & GUI: Frederic Vanmol.
Title-bar skin: Didier Dambrin.