FL Studio Mobile
FL Studio Mobile - Home Panel Files
The Home Panel contains administrative settings grouped according to the SONGS, SETTINGS, SHOP and SHARE tabs.
Parameters
Tap Home (Button) > Files to access the following:
NOTE: Not all features are available on all operating systems.
FILES (Backup or Share Files Between FL Studio Mobile Installations)
This tab allows you to:
- Backup your files to an internet file drive service (Google Drive, OneDrive, Dropbox etc). NOTE: Backup will consume space on your Cloud Drive.
- Share files between devices logged into the same account using an internet file drive service.
- Share files directly between any devices running FL Studio Mobile, connected to the same network, using WiFi.
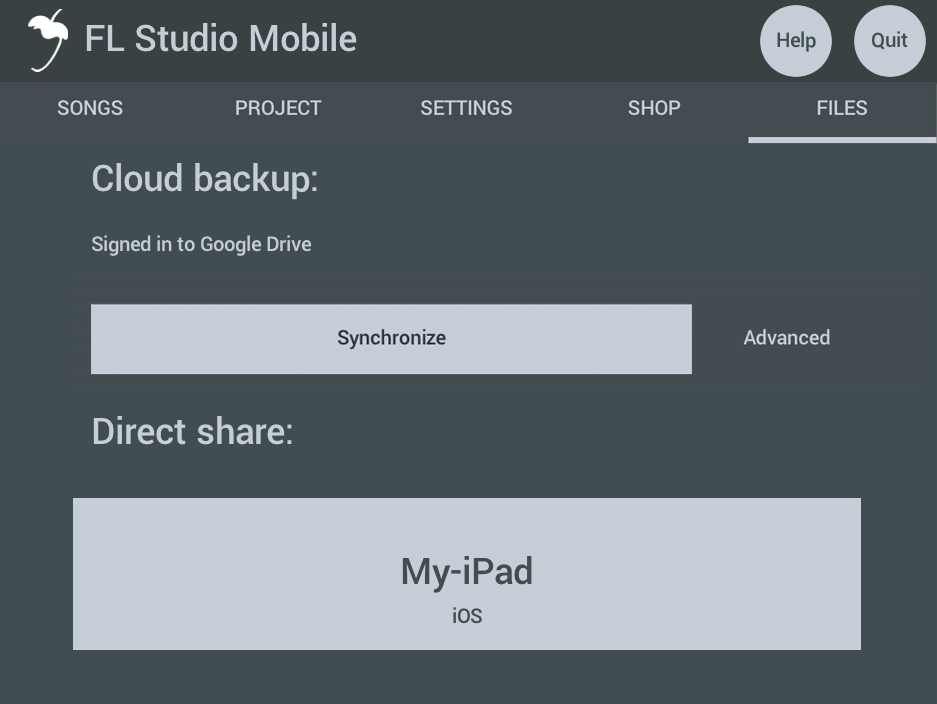
Cloud Backup / Share
By logging into one of the supported 'Cloud' file sharing services supported (Google Drive & OneDrive), backup and sync your files online. This will also allow you to share files between devices running FL Studio Mobile and connected to the same account.
- Sign in - Tap the Sign In button and choose a Cloud service to login to. Sign in to the account with your normal login details. NOTE: Not all Cloud services are available on all operating systems. Cloud backup is not yet available on Windows UWP.
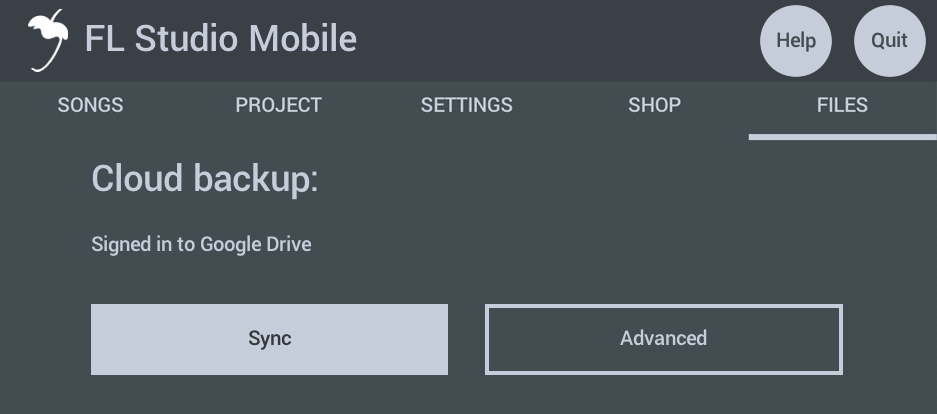
- Sync - After logging in, the Sync will appear and allows you to upload your files to the Cloud drive. If there are already files online from a previous backup, or from another device, these will be downloaded. NOTE: When the files are in sync, or the Cloud Drive is waiting to be scanned, you will see 'Cloud sync is active' instead of the Sync / Advanced buttons.
Sync applies default actions based on the following rules, where the 'Cloud' is your internet file drive:
- Upload - The file is missing on the Cloud Drive OR the file was changed locally on your device. Action: Upload to Cloud as it is newer on your device.
- Download - The file is missing locally on your device OR the file was changed on the Cloud Drive. Action: Download from the Cloud as it is newer there.
- Decide - The file was changed on your device and on the Cloud Drive, so it is not clear which version you want to keep. This can happen if you edit the same project on two devices. In this case you have several options:
- Do nothing - Ignore this file until the next Sync.
- Delete from cloud - When uploading, delete the file on the Cloud drive and replace with the file on the device.
- Delete from device - When downloading, delete the file on the device and replace with the file on the Cloud Drive.
- Keep both - Renames the filename_1 to keep copies of both.
- Advanced - Use the Advanced option to make more detailed changes:
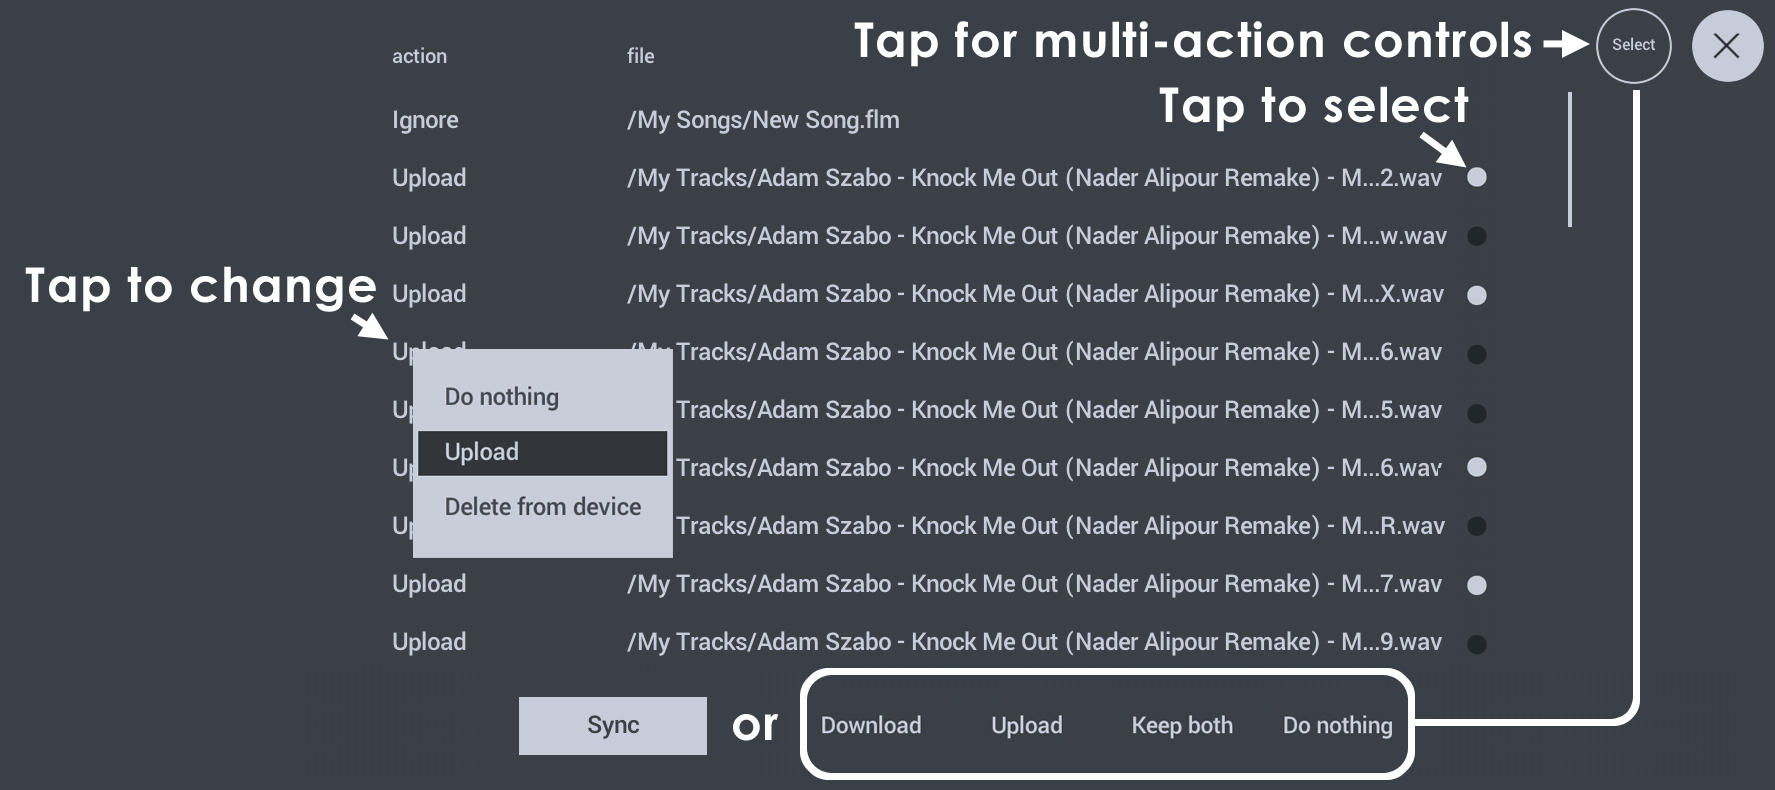
- Action - Shows the default Sync actions, discussed above. You can tap to change actions for individual files. To apply the actions shown on the Advanced dialog, press the Sync button at the bottom of the list. Once the window is closed, the system will revert to defaults as described above for the next Sync.
- File - Each file to be processed is listed. You can make bulk changes by tapping the Select button and then using the select icons and using the new controls that appear (Upload, Download, Keep Both, Do nothing). Keep Both is useful when there is a Decide conflict. That is, there is a file in the cloud and on the device, both of which, are changed.
- Select - Changes the lower button from Sync, to the options shown below. Tap Select, then use the individual file 'Select' icons, to choose the files you want to change and finally choose one of the Select options along the bottom:
- Download - Replace the file on the device with the one in the cloud.
- Upload - Replace the file in the Cloud with the one on the device.
- Keep both - Create an name_1 version of the file and keep name and name_1.
- Do nothing - Ignore this file until the next Sync.
NOTE: To delete files from the Cloud you need to delete the same file on all devices. Otherwise, it will be uploaded to the cloud again on the next Sync from a device containing it.
Cloud Drive Notes
Supported Cloud Services - Not all services are available on all Operating Systems. While it is possible to view the FL Studio Mobile Cloud folder on all Cloud Drive services, from a Web-browser, not all drives allow you to edit or add to the data in the Cloud. See below for the specific limitations and features of each Cloud Drive service:
- Deleting files - When Cloud Sync is in use, you must delete them from all devices. Otherwise the file/s will be re-uploaded to the Cloud Drive when a synced device contacts the Cloud Drive. FL Studio Mobile will only delete files from the Cloud Drive, not from cross-synced devices, to minimize the risk of deleting important user files.
- Update frequency - When Sync is set to Manual the Cloud Drive is checked when the FILE tab is opened and then at 30 second intervals, so be patient if the Sync button does not immediately appear. When set to Automatic the Cloud Drive is checked every 2 minutes for updates. The Cloud Drive is also checked upon opening the FILES tab. When you see Cloud sync is active, this means all files are in sync or the device has not accessed the Cloud Drive yet, and does not know about pending changes.
- Target folders - FL Studio Mobile will only share data with the following locations: My Drumsets, My Instruments, My MIDI, My Presets, My Recordings, My Samples, My Tracks and My Songs. You can't rename these folders on your Cloud Drive, they must remain as set.
- Google Drive (Google) - FL Studio Mobile has limited permissions to access your drive. It will create a folder called FL Studio Mobile in the root of your drive. It can only access files that were uploaded by itself and won't be able to 'see' any files that you add directly to your Google Drive folder via a Web-browser or any other application, other than FL Studio Mobile.
NOTE: Google Drive does not allow you to manually add files to the FL Studio Mobile folders, as a way of adding content to your device, it will only see files it has put on your drive. You can, however, delete files manually on the cloud drive and this will be reflected on your device in the next sync.
- OneDrive (Microsoft) - FL Studio Mobile has limited permissions to access your drive. It will create a folder called FL Studio Mobile in the Apps folder of your Cloud Drive and it can only access this folder. Once the parent folder is created, you can rename it, move it OR add your own files in the sub-folders, listed above. In this way you can quickly add files to your connected FL Studio Mobile installations via any Web Browser. The only limitation is that FL Studio Mobile can't see files in the Trash folder. Once you delete files in the cloud, FL Studio Mobile will consider them missing and try to re upload them from your device. So you will need to delete files on your device to delete them on OneDrive.
NOTE: OneDrive allows you to manually add files via a Web Browser to the FL Studio Mobile folders, as a way of adding content to your device.
NOTE: Cloud Drive features are controlled by their respective developers. We can't add features that are not supported by the services, or change how they function. As security is a high priority on these services, FL Studio Mobile can't access any parts of your drive it did not create.
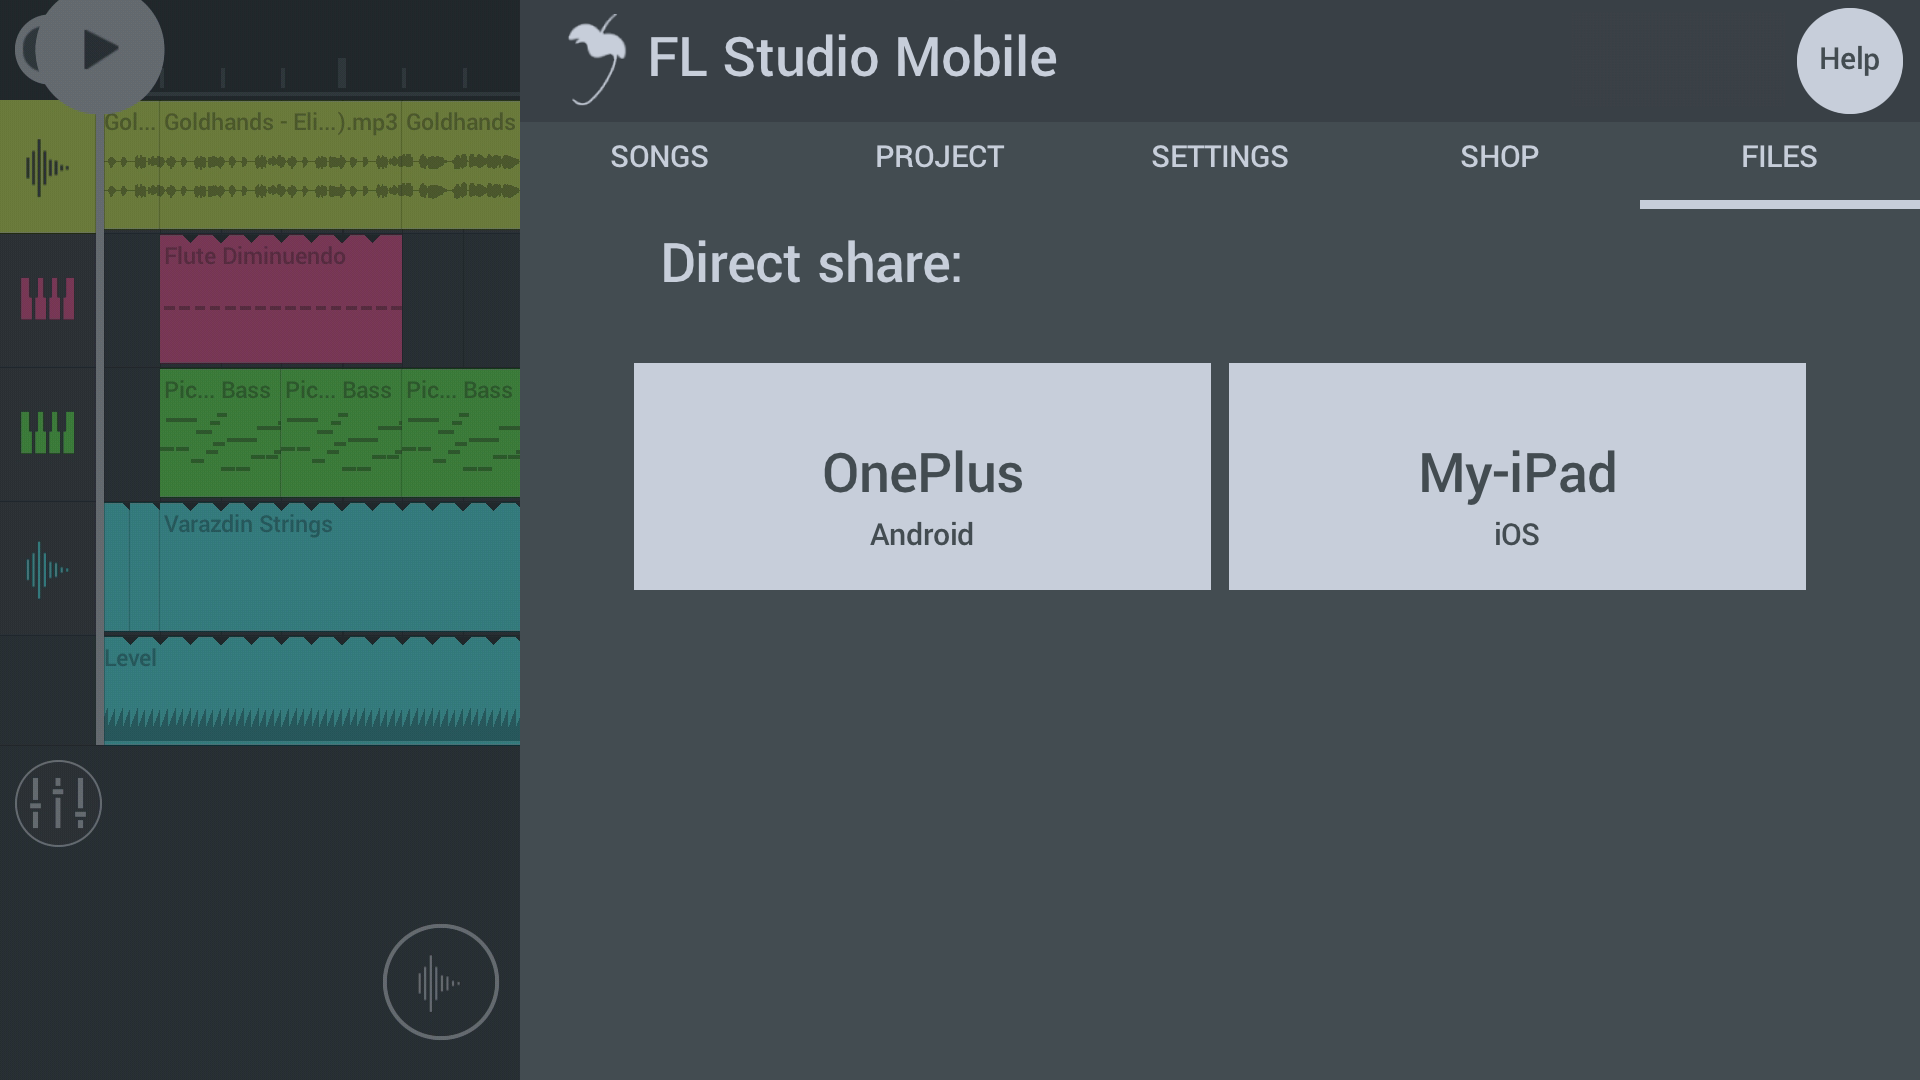
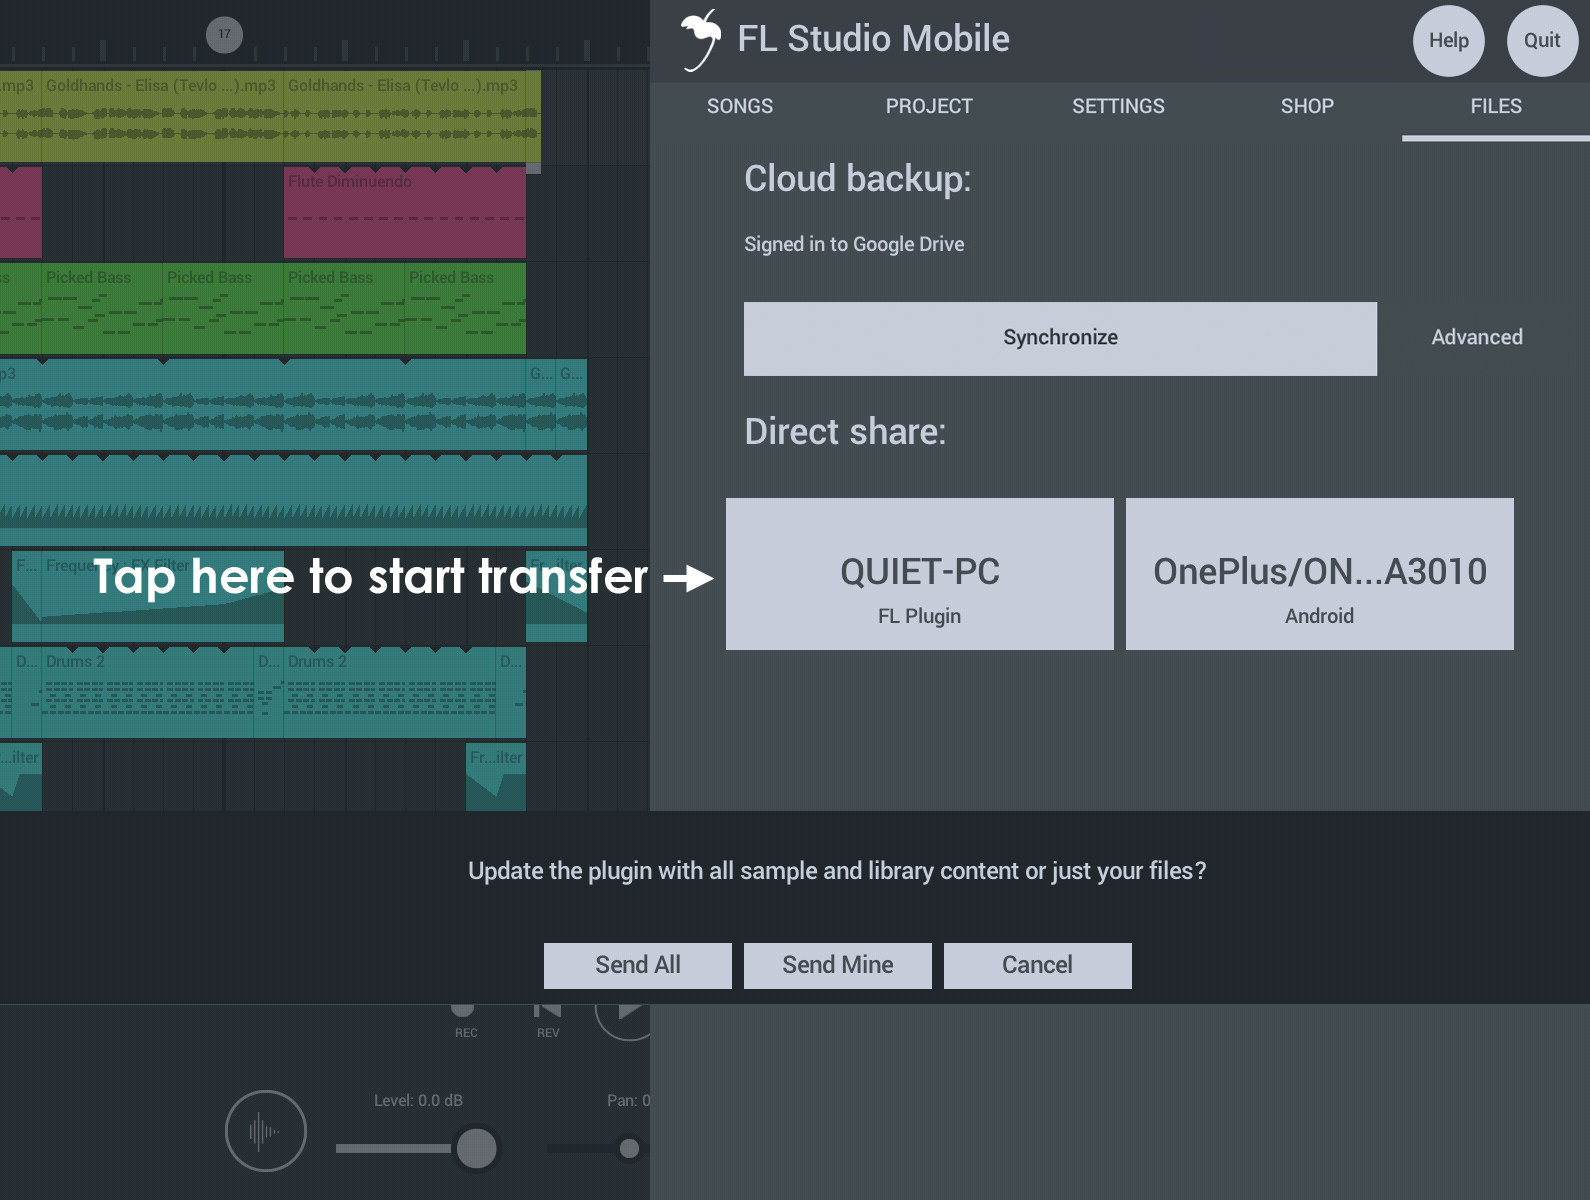
Direct Share
Share - You can share project related files between your mobile devices running FL Studio Mobile. When your devices are connected to the same network (including WiFi) choose a target device receive 'Your Files', that is everything in the FLM User Files folder. This page allows you to sync projects across a network and between FL Studio Mobile installation on ALL detected Android, iOS and Windows (App and FL Plugin) devices. NOTE: The first time you do this with a computer, you may see a Firewall pop-up security message. Allow FL Studio Mobile access to your Network. How to Share:
- Make sure you are using the latest version of FL Studio Mobile on your device AND have the latest FL Studio plugin update - get it here.
- Connect your PC and or any Mobile devices to the same network. Normally this will be via WiFi, but it's OK if you have a combination of WiFi and Ethernet connections. The important factor is all devices are connected to the same Network.
- Open FL Studio Mobile on the PC and on the Mobile device.
- From the PC and Mobile device/s select the Share tab. NOTE: On the PC, the first time you do this, you will see a Firewall pop-up security message. Allow FL Studio Mobile access to your Network.
- On the Share tab, you should see all other instances of FL Studio Mobile, on all devices listed. Sharing goes FROM the device you are using TO the one you select.
- Tap on the device and Your Files (see below) is transferred to that device.
- You will need to restart the destination FL Studio Mobile instance to see the new data as it is scanned at start-up.
- Make a shortcut on your Computer desktop to your My Files location, then you can manually copy files in and out of this location and then use SHARE to send them to your Mobile Device, or get them after a SHARE to your computer, easy!
IMPORTANT NOTE: The first time you use the FL Studio Plugin version, you should Send All library content to it. By default, the plugin version only ships with a limited library of sounds so you will need to update it with the complete library from a Mobile version. If you don't do this, projects will be missing sounds on the plugin version. This can take several minutes to complete.
Managing User Files
This section relates to the internal file browser that opens when you choose Presets or add Audio Clips. The options here are available only for user files. They do not apply for factory installed content.
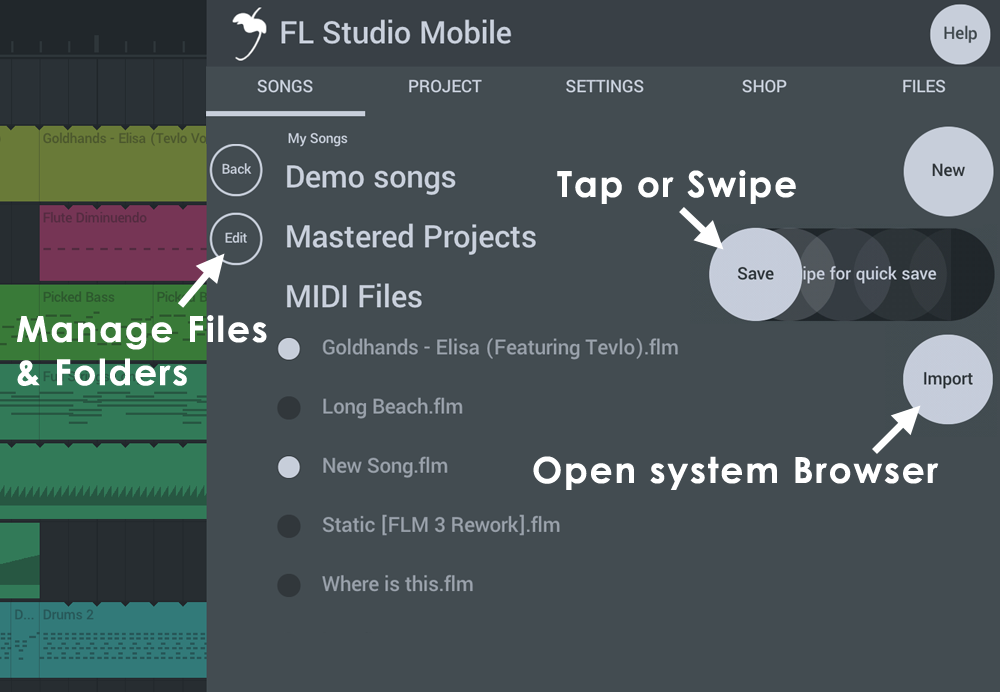
The Home panel has controls to Edit your user files or access the System Browser (Import)
Use the Edit control to Create Folders, Delete files or folders or Move files, for example.
Other locations with access to your User Files may have slightly different options.
File Management Overview
Working with files
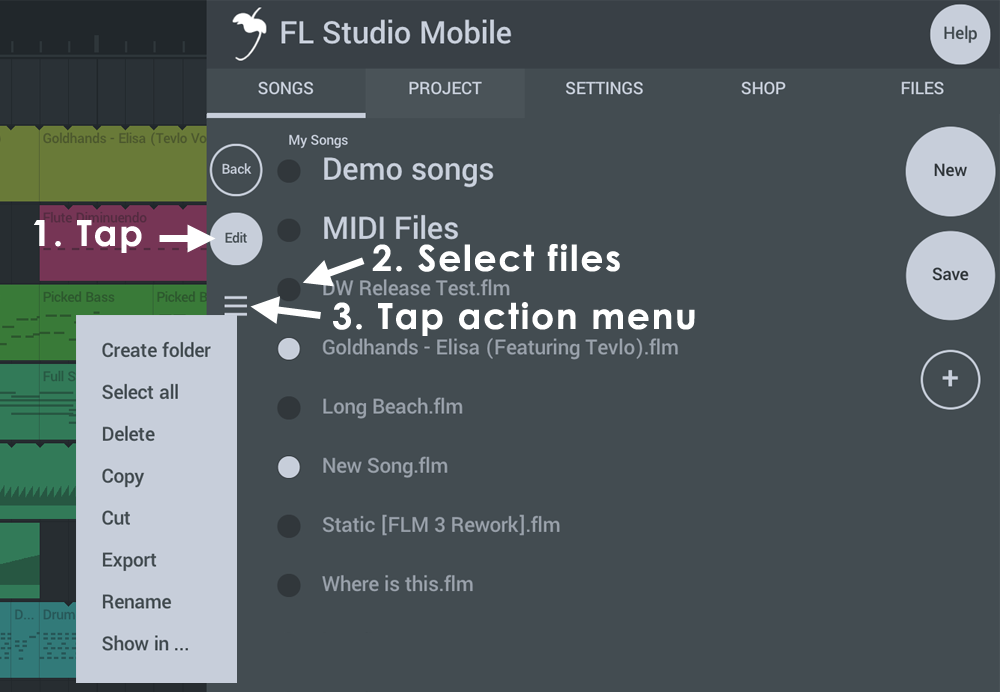
- Tap Edit to open the file management options.
- Tap Select buttons for the files you want to manage. If you are creating folders skip this step.
- Tap the Action menu and choose the option/action you wish to perform.
- Long tap Audio files to Send to Playlist or Insert at playhead.
- ALTERNATIVELY use the System Browser (Import) to manage files using the built-in file browser for your device's Operating System. You can also use this to Import Content from locations outside FL Studio Mobile. NOTE: See how to ZIP Bulk Sample Import if you want to import multiple samples into FL Studio Mobile quickly.
Long-Tap / Right-Click File Options
The options available will depend on where you are accessing the files ...
- Create folder - Create a folder as a sub-folder of the current location.
- Select all - Select all files.
- Delete - Delete selected files
- Copy - Copies files ready for copying to another location (Paste).
- Cut - Select files ready for moving to another location (Paste).
- Paste - Paste Copied/Cut files.
- Export - Export files with the OS supplied sharing options.
- Rename - Change the name of Files or Folders.
- Show in Finder/Explorer ... - If this option is available, it will allow you to the Operating System Browser where the file is located.
- Wave (iOS only) - Audio Paste.
Finding Your Files
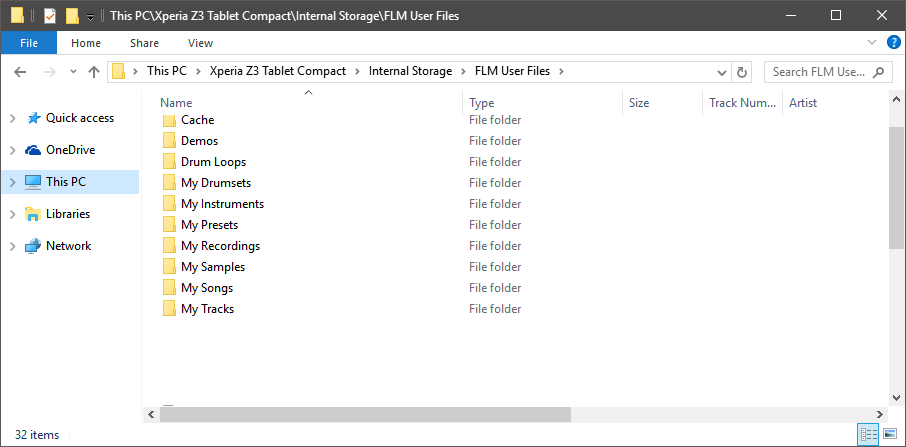
Using mobile devices as creative tools can be frustrating as mobile Operating Systems (Android, iOS and Windows UWP), more or less, prevent easy access to internal folders used by Apps. Operating System specific instructions are provided below on how to access these folders. Under the FL Studio Mobile installation folder you can find the following sub-folders. Initially these folders are empty, they are for your data:
FL Studio Mobile install sub-folders:
- My Drumsets - Drumsets are collection of sounds that make up a drum kit. This is not drum-sample data, it's preset data that loads the samples into a drum kit.
- My Instruments - Place DirectWave Program (.dwp) instrument files, including the sample sub-folder and the legacy-format FLM2 (.instr) format here. You can export .dwp and .instr directly from the FL Studio (PC version) > DirectWave (plugin) > PROGRAM > Right-click the Program label and select 'Save program'.
- My MIDI - Contains all MIDI format files (.mid). These will show at the main SONGS Menu and on the Channel Menu ('Import MIDI Tracks' and 'Save as MIDI').
- My Presets - This folder contains all plugin presets (Instruments and Effects). There are no sub folders as presets contain meta-data inside the presets so FL Studio Mobile will only show compatible presets in the plugin you open to load them. Example files are MiniSynth (.flms) and all other presets including GMS, Transistor Bass and FX Modules (.flmpst).
- My Recordings - Audio recordings made from within FL Studio Mobile. WAV (uncompressed format, 16, 24 or 32 Bit). See NOTE.
- My Samples - One-shots, samples, sounds anything you want to include in WAV (uncompressed 16, 24 or 32 Bit format) or MP3. See NOTE.
- My Songs - Your FL Studio project files.
- My Tracks - These audio files that are created when you render projects. Make sure to render to Lossless (WAV) or MP3 format if you want to re-use a track in FL Studio Mobile (create a new Playlist track of type 'Wave' to load). Compressed (AAC format) files will not show for use in FL Studio Mobile. These will play in your Media Player however.
Save CPU: you can convert any Playlist Track to audio by Soloing it and rendering to Uncompressed (WAV) format from the Home page > Songs > Render button. Then load it back into the Playlist with the + button > Audio Wave option (locate your render and load it).
NOTES:
- You must restart FL Studio Mobile after adding new samples for them to be scanned and be available for use.
- Locations in FL Studio Mobile that load sample data - Drum Sampler, DirectWave and the Audio Clip will scan My Recordings, My Samples and My Tracks for WAV (uncompressed, 16, 24 or 32 Bit) and MP3 (compressed) data and present it as a load option. So, you can also copy WAV/MP3 files to any of these locations. Too keep things organized, use 'My Samples' for your tuned and untuned instrument/percussion samples. 'My Recordings' for vocals and instrument samples. 'My Tracks' for stems and completed songs.
Accessing, Exporting & Importing Your Content (WAV, MP3, MID, FLM, ZIP, AAC)
This section shows you how to import custom samples, instruments, presets, music and any other files as used above to your device. This can be a little confusing as mobile operating systems generally make it difficult to work directly with file and folders.
All Operating Systems
- SHARE - If you have access to a Desktop computer, one of the easiest methods is to use SHARE with the FL Studio Plugin TO and FROM the Mobile Device. In this case, add content to the FL Studio Mobile plugin folder on your computer, then SHARE to the mobile device. Or SHARE from the device to your computer.
- ZIP Bulk Sample Import - Create a ZIP file containing all the samples you want to use and save it to your FL Studio Mobile device. ZIP is a standard archive format used to bundle and reduce the size of file groups. Next, use IMPORT to use your system browser to locate and import the ZIP file. After loading the ZIP, open it an immediately save to FLM format (FL Studio Mobile). All samples in the ZIP are copied to your My Files > My Samples folder. You will see a pop-up if you would like to deleted the ZIP. Normally you would do this if you were importing samples this way.
Alternatively, to work directly with the file system of your device, proceed as follows:
Android File Management
Android 11 and higher
If you are using Android 11 or higher, you can use the internal SONGS tab to manage your file and folders, including the Import button. By default you will be in the My Songs folder but you can go up one level to see all your folders. NOTE: Deleting the App will remove all your files. Use Cloud Backup to save your work!
If you have used a previous version of Android, there is a possibility to manually access your folders, the path has changed and destination folder from FLM User files to files:
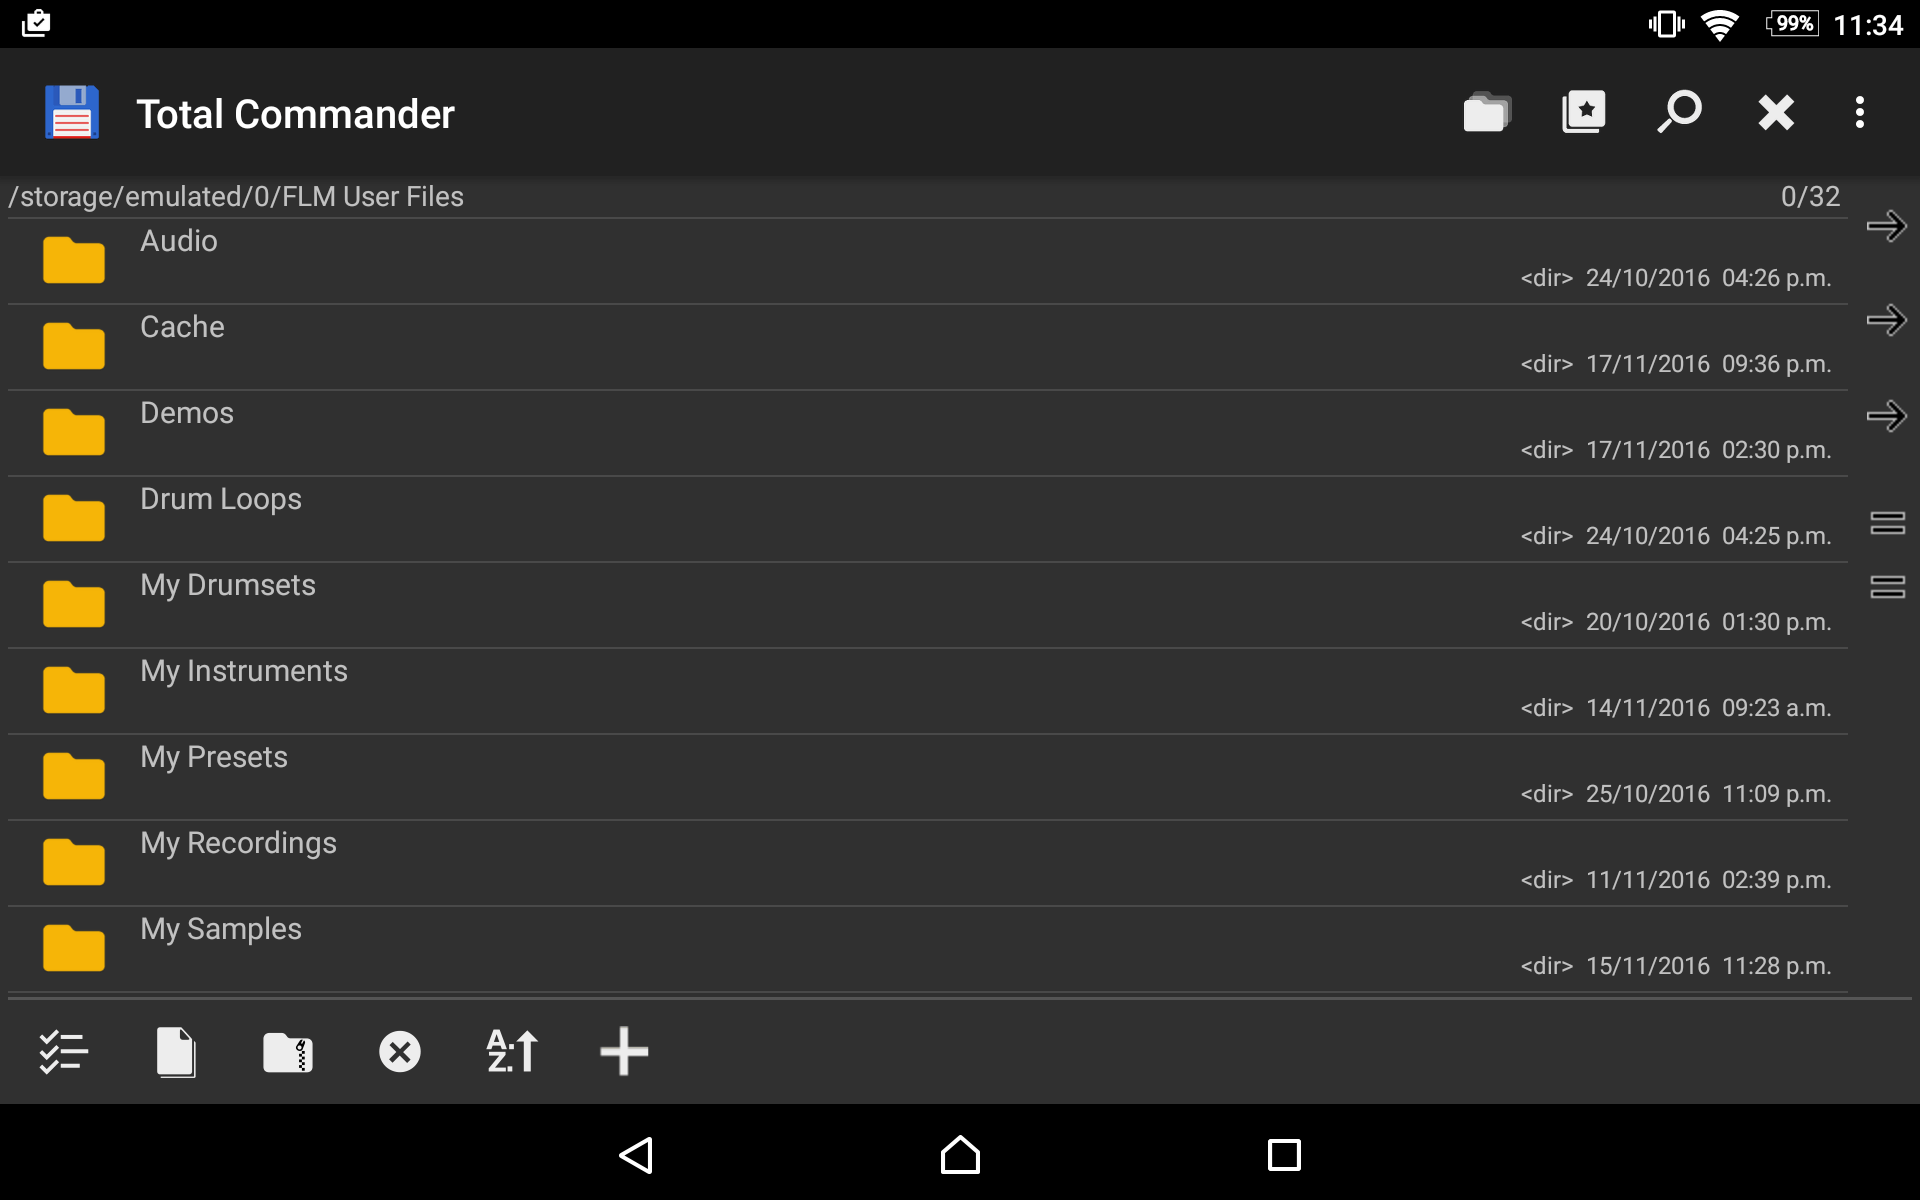
- Install Total Commander.
- Navigate to Internal shared storage > Android > data > Installed apps. At this point you will be asked for additional permissions. Then > com.imageline.FLM > files.
- Bookmark this location.
Android 10 or lower
If you are using Android 10 or below, you will have the option for direct access to internal folders, there are two main options:
- Connect your device to your computer with a USB cable. Then set the device to work in 'Data transfer' mode. You should now have drag-and-drop access to your Data Folders. You will need to find the FLM User Files folder. This is usually in the root/top of the main storage.
- OR 2. Use AirDroid that will allow you to use a Web Browser to access folders and files on any Android device (works on Windows and Macs). If you are working internal on an Android device, Total Commander will allow you to copy and paste your files between folders on the device. There are also a number of plugins available for working across networks, for example a LAN plugin.
NOTE: The IMPORT button on the Home page will allow you to browser system files on your device. Generally these are restricted to a few key folders. If you can save files to your device in these locations, IMPORT is generally an easier method to get your custom content into FL Studio Mobile.
Apple iOS File Management
The following methods are available:
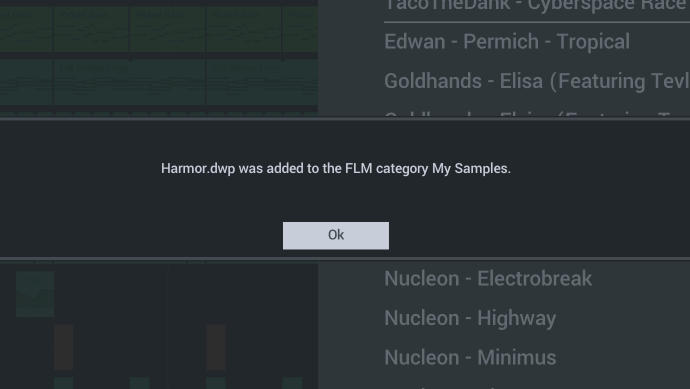
- System Import - iOS will recognize most file-types associated with FL Studio Mobile (.flm, .mid, .flmpst, .flms, .wav, .mp3) in emails, Cloud storage etc, and allow you to open them with FL Studio Mobile. Long-tap on the attachment or file, as show in your email or Cloud storage App, then select FL Studio Mobile from the pop-up options to open the file.
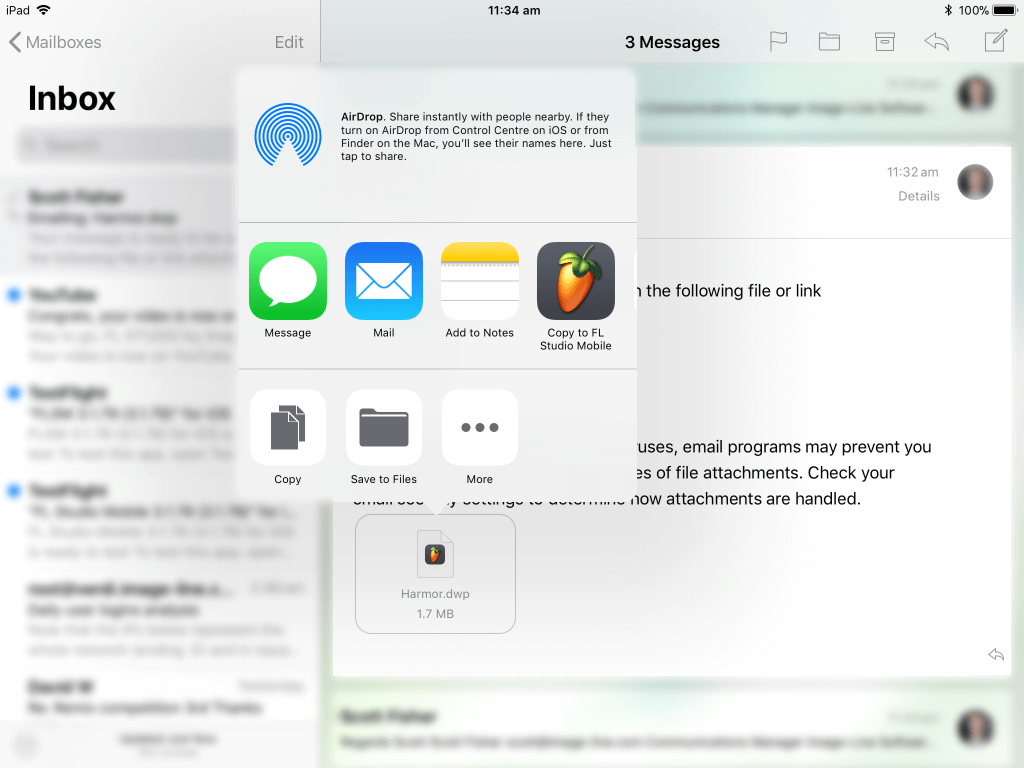
When FL Studio Mobile starts, the file will be moved to the appropriate folder in the App. This method works, one file at a time.
NOTE: The IMPORT button on the Home page will allow you to browser system files on your device. Generally these are restricted to a few key folders. If you can save files to your device in these locations, IMPORT is generally an easier method to get your custom content into FL Studio Mobile.
FL Studio Plugin File Management
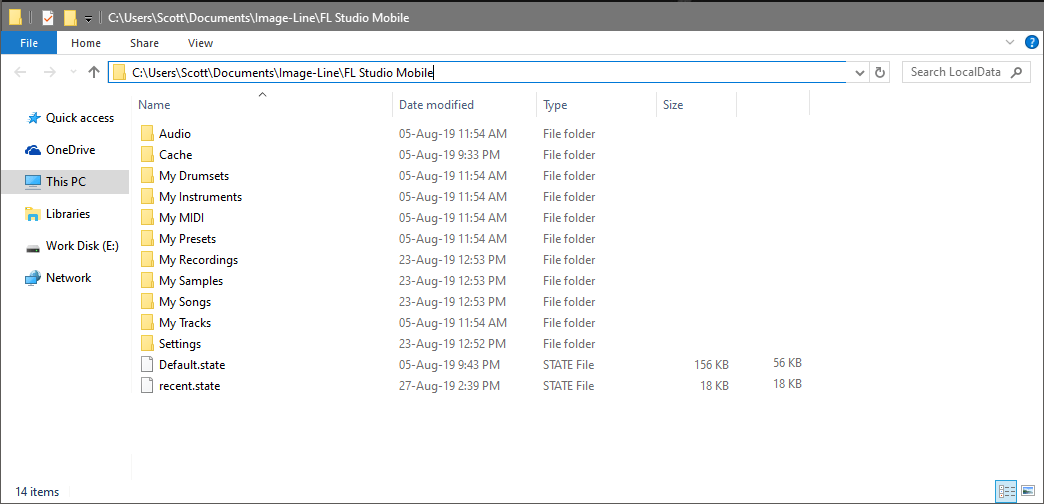
This method requires you have the desktop version of FL Studio installed on your computer. You can use the Trial Version of FL Studio for this purpose. Make a desktop shortcut to the FL Studio User data folder. Under [user]\Documents\Image-Line\FL Studio Mobile\. This is the same location for macOS and Windows. Then you can drag and drop any content to and from the folders as you need. Then, use the Sharing function to send this content to your mobile device AND also back to your Windows or Mac computer.
FL Studio Windows App File Management
The following options are available:
- Windows App (Windows Desktop) - Make a desktop shortcut to the FL Studio Mobile user data folder. The path has some custom data as shown in red. Normally under C:\Users\YOUR_ACCOUNT\AppData\Local\Packages\Image-Line.FLStudioMobile_RANDOM_LETTERS_NUMBERS\LocalState. NOTE: the AppData folder is hidden, so you will need to have 'Show hidden items' selected in the file browser. If you don't have permission to enter the folder, check this guide. Windows 8 and 10 are the same in this regard.
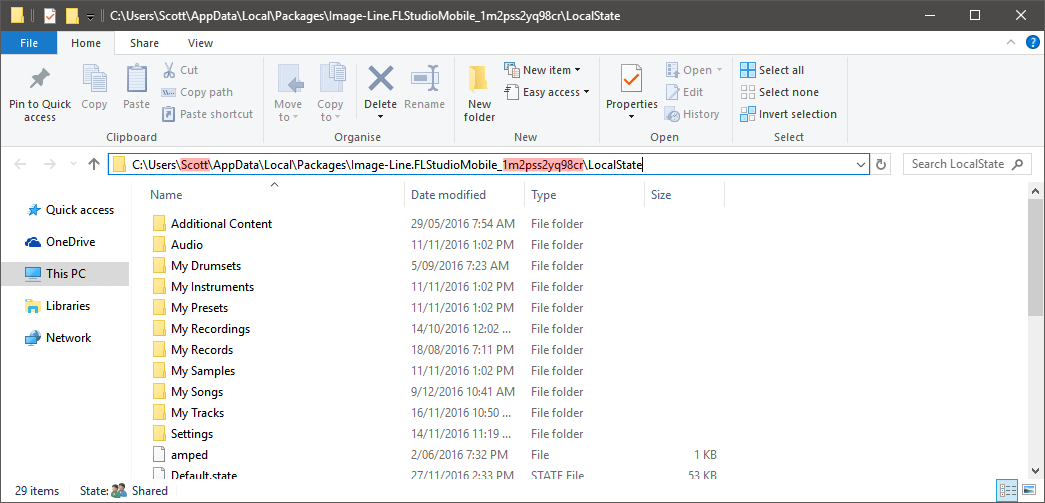
TIP: The quickest way to find it is to long-click on a file in FL Studio Mobile and select 'Show in Explorer'. The LocalState folder contains all the FL Studio Mobile files.
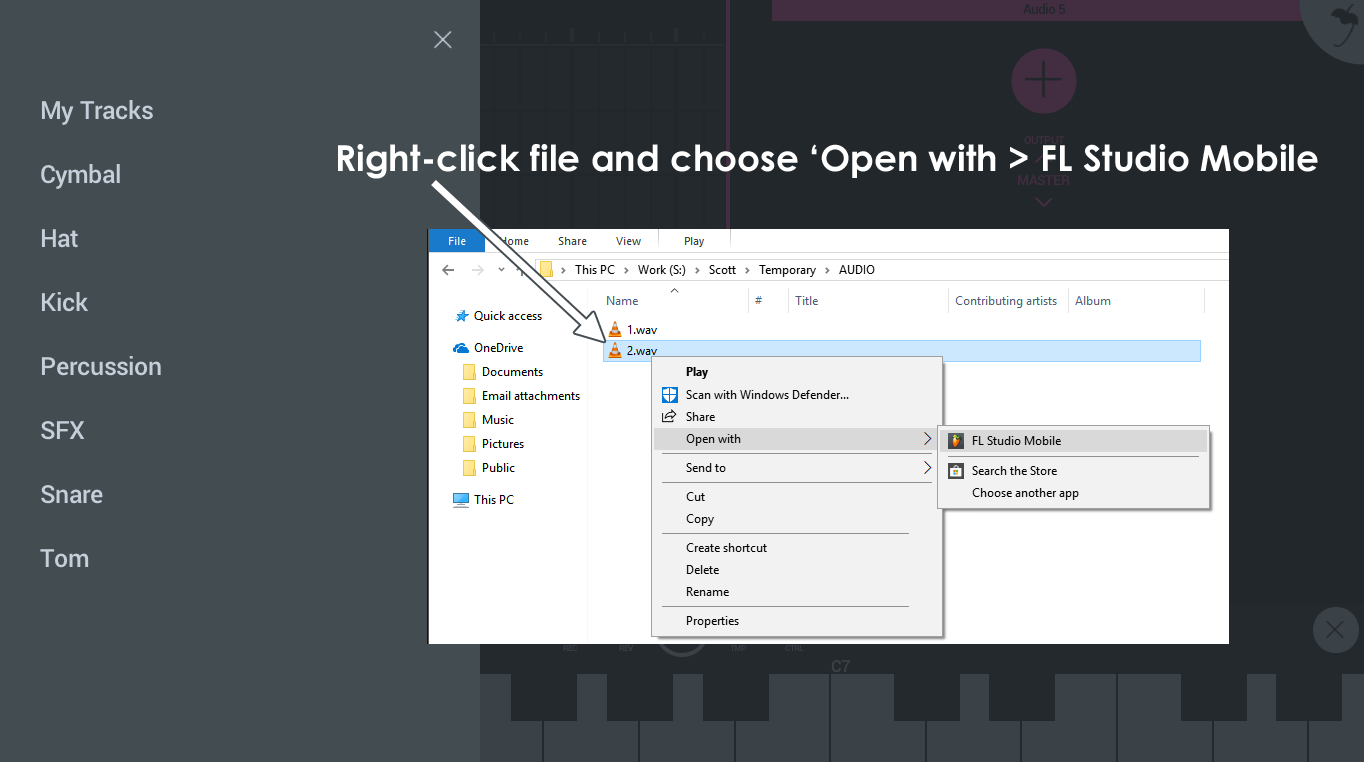
- Loading from within the App - It's not possible to browse audio files in folders external to the App from FL Studio Mobile. To load audio files external to the App, open a regular Windows File Browser, then right-click the target file and choose 'Open with > FL Studio Mobile'. This will import the file to the App.