MIXING & EFFECTS
Mixer Track Panel
This section covers the Mixer Track panel. Only one Mixer Track panel can be seen at a time. It integrates a parametric equalizer, PDC (Plugin Delay Compensation) and hardware audio INPUT/OUTPUT controls.
NOTE: The integrated effects are the last processing/FX stage prior to audio leaving the Mixer Track and so follow any plugin FX loaded into slots.
Panel Controls
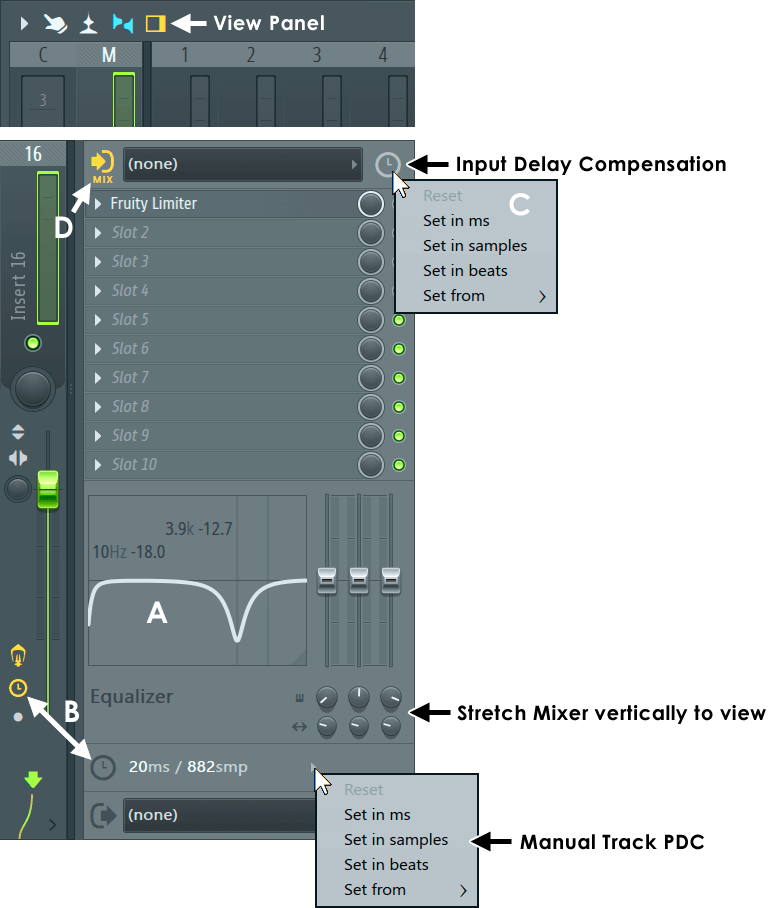
- Parametric EQ (A) - The equalizer is very similar to the standalone Parametric EQ plugin which comes with FL Studio. However, the band types in this version are predefined and can not be changed: Band 1 - Low Shelf; Band 2 - Peaking; 3 - High Shelf. The graph for the Parametric EQ, Left-click to control center frequency (left-right)/amplitude(up/down) or Right-Click to control bandwidth (left-right)/amplitude(up/down).
- Manual Plugin Delay Compensation (B) - PDC. Left-click the icon on tracks to make manual adjustments to PDC, or use the drop-down menu on the Track Inspector panel. The Track Icon will turn blue when manual PDC offsets are set. Controls as discussed below. NOTE: Manual PDC can be used in conjunction with Automatic PDC. Manual values are treated as offsets to APDC.
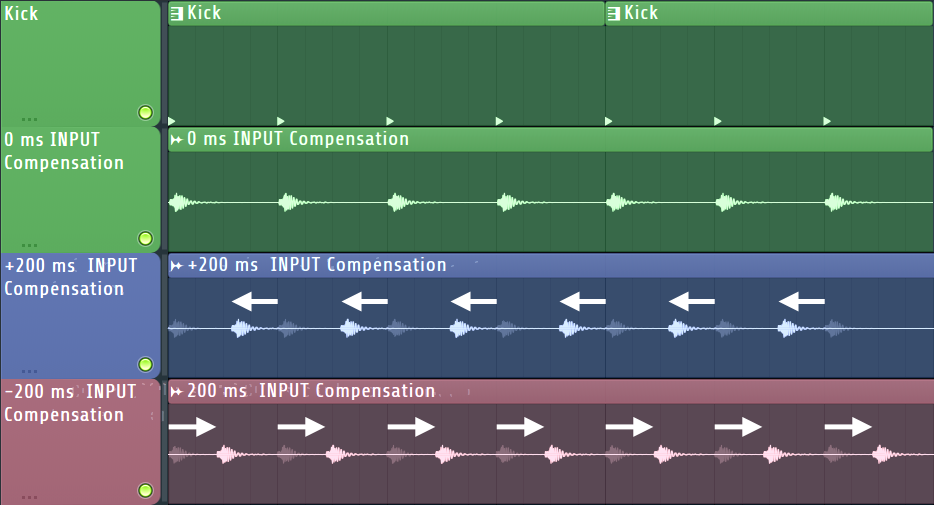
- Audio INPUT delay compensation (C) - Use to fix cases where recorded audio, is out of sync with internal events. Normally, use positive values to move the audio to the left (earlier), since most external audio inputs are delayed, or negative values to shift recorded audio to the right (later) if it is ahead of internal events. There is also a global control for changing recorded input alignment on the Audio Settings > Playback Tracking > Offset.
- Set in (ms, samples beats) - Choose the units you will be moving the recorded audio in. Positve values move recordings left. Negative values move recordings right.
- Adjust position of recorded audio - When this is selected, any latency caused by plugins in the audio path will also be compensated. Normally this should be left on.
NOTES:
- Measuring delay - A good way to accurately measure Input Delay is to take a Microphone input (set Monitor external input off, to prevent feedback), and record the FL Studio Metronome sound into the Playlist. The clicks should be on the start of each beat. If the Metronome is late, use positive Input Delay Compensation (IDC) values, if it is early use negative IDC values. Tweak the IDC value until recorded Metronome clicks align with the grid. If it is variable see the next note.
- FL Studio ASIO and jitter - Under Windows, the Audio Driver provides critical timing information. FL Studio ASIO is a simulated ASIO Driver, using the WASAPI system and is provided for the widest compatibility, but can be prone to audio 'jitter' where the position of recorded audio varies from recording to recording. You should not have any issues if you use the native ASIO driver for your Audio Device. If you must use FL Studio ASIO, you can also try changing the Playback Tracking options to minimize timing issues.
- Recording Pickup Location (D) - Use the (clickable) selector in front of the Input menu to choose where in the signal chain to record audio. This is important as it will decide if effects or other sounds are blended with the recording. Options include:
- External input only (EXT) - RECOMMENDED! Audio is recorded direct from the audio interface. Recording level is under the control of the Audio Interface and can't be changed inside FL Studio. TIP: Use this when you are recording multiple takes or Loop recording and you don't want the previous take/s, or any other audio routed to the recording Mixer Track blended with the external input.
- External and mixer input (MIX) - Includes external input and audio from internally routed Mixer Tracks. Recordings are made from the point just prior to the Mixer Track Effects (at the top of the FX stack). NOTE: This is equivalent to 'PRE' from versions prior to FL Studio 20.9.
- Post effects (FX) - Includes external input, internally routed Mixer Tracks and Mixer Track effects. Recordings are made from the point just after the last effect slot (at the bottom of the FX stack).
- Post EQ (EQ) - Includes external input, internally routed Mixer Tracks, Track effects and Track EQ. Recordings are made from the point just after the The Mixer Track properties Track EQ.
- Post level and panning (LVL) - Includes external input, internally routed Mixer Tracks, Track effects, Track EQ, Mixer Track Level and Pan controls. Recordings are made from the point after the Mixer Track Level and Panning controls. NOTE: This is equivalent to 'POST' from versions prior to FL Studio 20.9.
- Post track (POST) - Includes external input, internally routed Mixer Tracks, Track effects, Track EQ, Mixer Track Level, Pan and Mute controls. Recordings are made from the point after the Mixer Track Mute switch. TIP: Can be useful when making DJ-style scratching effects and you need to mute the input.
- Monitor external input - Below the recording locations are some input monitoring options. These options determine if the External input is audible through FL Studio.
- Off - Do not monitor external input.
- When armed - Monitor the external Input only when the Mixer track is armed for recording.
- On - Always monitor the external Input.
NOTE: - For more information on Audio Recording see here.
Plugin Delay Compensation (PDC)
PDC is required when plugins (instruments or effects) have processing delays that put their audio out of sync with other audio in the project. Most commonly effects introduce these unwanted delays and this causes the audio on their Mixer Track out of sync with other Mixer Tracks. PDC works by adding a delay of the same value to all other Mixer tracks, to bring them into sync again. When several plugins introduce unwanted delay on several Mixer Tracks then multiple compensations are required so that all the tracks end up in sync when the audio reaches the Master Mixer track. NOTE: There is a separate option under the Mixer menu
- Automatic PDC (Orange icon) - Use the Plugin delay compensation > Automatic option on the Mixer menu. This will automatically update PDC settings as plugin delay is detected or changes, no further input is needed from you. If APDC fails (usually because a plugin is not reporting its latency correctly), you can manually set PDC (Left-click the PDC icons on Mixer tracks or use the menu as shown at B above). Manual PDC settings will be treated as offsets to Automatic PDC, unless Automatic PDC is off.
NOTE: Automation compensation - The Plugin delay compensation > Compensate automations option is available to ensure projects made before FL Studio 20.7 play correctly, where manual tweaks were used to get FX Automation in time with plugins.
- Delay Track/Generator - The PDC (B) on Mixer Tracks affects Track PDC, the PDC icon on the INPUT field affects audio input latency, from external audio inputs.
- Manual delay compensation (Blue icon) - Use the drop-down menu to add offsets to the APDC. For plugins that consistently report incorrect or no latency, you can set a permanent offset in the Wrapper Setting > Info > Latency field and it will be remembered per-plugin. For this, and the wrapper setting, positive values delay the selected track, negative values delay all other tracks in the following units:
- Reset - Resets the PDC to 'none', the default 'no delay' condition.
- Set in ms (milliseconds) - Set the PDC in ms, a value entry box will appear after selecting this setting.
- Set in samples - Set the PDC in samples, a value entry box will appear after selecting this setting. This is the finest control over delay.
- Set in beats - Set the PDC in beats, a value entry box will appear after selecting this setting.
- Set from - This will list Mixer Tracks that have latency caused by plugins. Select a track to automatically adapt the current PDC value to the selected track without the need to manually enter values.
Continuous adjustments - Roll the Mouse-wheel over the time icon or latency display (Mouse-wheel) = 10 ms steps, (Ctrl+Mouse-wheel) = 1 ms steps, (Ctrl+Alt+Mouse-wheel) = 1 sample steps. Mouse-wheel works in three places: Track Input latency icon (FX panel), Track Output latency selector (FX panel), Track Output latency icon (Mixer Tracks).
NOTES:
- Auto + Manual PDC - Manual PDC can be used in conjunction with Automatic PDC. Manual values are treated as offsets to APDC.
- Manual PDC & Compensate Automations - Since Manual PDC applies to the whole Mixer Track and the Compensate Automations option needs to know where in the effect chain latency is occurring, this feature will not work. The work-around is to use two Mixer Tracks. Route the sound you want to apply Manual PDC to another track, add manual PDC there, then route the output to the Mixer Track where FX Automations will be used.
The Delay Panel (B) is available on all Mixer Tracks. This will turn orange when a delay is detected on that Mixer track, either from instrument Channel/s routed to that track or from effect/s loaded on the track. You can also click the icon to make manual adjustments to PDC (Automatic PDC will still operate in addition to these changes). Manual PDC is required when plugins don't report their processing latency correctly or at all. Enter positive values to add delay to the Mixer Track or negative values to add latency to all other tracks. If you need to set up PDC manually, a tutorial is provided in the next section.
NOTES:
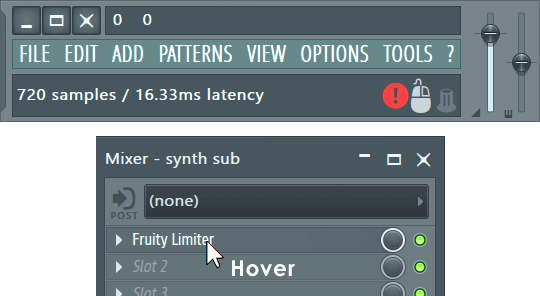
- Icons - The PDC icon will show orange for Mixer tracks with detected plugin latency OR where PDC has been manually set. Hovering your mouse over the PDC icon will show the detected latency in the Hint bar.
- Realtime performance - When using PDC, FL Studio will no longer respond 'instantly' as the audio output is delayed to sync with the PDC latency.
- APDC - Works for both Instrument and Effect plugins.
- Routing - APDC also applies to inter-track routing, including multi input/output plugins, and sidechains.
- APDC + PDC - Manual and Automatic PDC can be used together.
- Delay sign - Positive manual latency values will delay the selected track, negative values delay all other tracks.
Guide to Manual PDC - Instruments and Effects
Normally Automatic PDC should work. If not, Mixer Tracks containing Instrument and or FX plugin that introduce unwanted delay (delay-affected) will be out of sync with the other Mixer Tracks. Manual PDC is no more complex than delaying all 'normal' tracks by the same amount as the delay-affected track, bringing the two audio streams back in sync. To facilitate manual PDC, a highly accurate compensating delay is available through the Mixer Track Delay Panel (B). These will act as offsets to Automatic PDC if it is left on (recommended).
Step-by-step instructions to using Manual PDC:
- Switch Automatic PDC on (Mixer Menu > Plugin delay compensation > Automatic) - This will make PDC management easier if things change in the project (and they usually do).
- Delay-affected (slow) plugin/s - Route the delay-affected instrument to, or insert delay-affected plugin/s on an FX slot of any Mixer Track.
- Determine the delay compensation - Normally this is shown in the hint bar when you hover over a plugin FX slot that contains a plugin causing (and reporting) a delay. However, since this is incorrect you will need to use trial-and-error to set the PDC. Use negative values to delay the selected Mixer Track when the plugin is early or positive values to delay all other Mixer Tracks, when the plugin is late.
- Testing - In the case of an instrument, set a short, sharp sound and compare it with a similarly short-sharp sound on another Mixer track (with no FX). In the case of an effect set up two Mixer Tracks and route the same kick or hat sound through the delay affected track and a normal track without FX. Play the sounds together and adjust the PDC control until the sounds from the delay affected and normal Mixer tracks are in sync/phase (you can adjust down to the level of single samples).
NOTE: If you intend to use a delay-affected plugin on the Master Mixer Track (and you are not sending audio out of FL Studio via an individual Mixer Track output), then you do not need to compensate as all audio passes through the Master track and so all audio is equally delayed by the offending plugin.