SYSTEM SETTINGS
System Settings - Audio


To open the Audio Settings choose 'Options > Audio settings' from the main menu or press the F10 function key on your keyboard. The Audio Settings page contains options and settings for your audio device. The settings chosen here can have a big impact on CPU load, so it is worth taking the time to learn what options are available. Note that some options change depending on whether an ASIO or Direct Sound driver is selected in the Output selector. If this is your first time to adjust the Audio Settings you may like to view the audio setup pages from the 'Getting Started' section.
")
")
|
Above left shows the Windows Audio Options with the FL Studio ASIO 'ASIO' driver selected, above right the macOS Core Audio 'Built-in Output' driver. If your Audio Interface has its own ASIO/Core Audio drivers, use them.
A word about Soundcards, Audio Interfaces & Drivers
Soundcard: The term 'soundcard' is used rather loosely, you may have a soundcard in your PC, a chip on your motherboard or it may be an external device connected by USB/FireWire/Bluetooth. The term Audio Interface is better used. An audio device is any device that makes the sound you hear from your PC speakers. Audio Interface Driver: The driver is the software interface between the operating system (OS) and the audio device hardware. The driver tells the OS, and so FL Studio, what inputs/outputs the interface has and what sample rates it can support. In the case of Windows, ASIO drivers are faster and more efficient than Primary Sound Driver drivers.
Options
Audio Input / Output
The options selected here will determine what audio INPUTS and OUTPUTS are available to be used by FL Studio. Select the audio inputs and outputs from the Mixer IN/OUT menus.
- Device - A drop-down menu used to select the audio device (output/input device) to be used by FL Studio. The list will show installed audio device drivers. If you have more than one audio device installed, the Output menu can be used to switch between them (press F10 to open the settings panel).
To use more than one audio device simultaneously:
- Windows - If you want to use a single input and output from two devices, then select FL Studio ASIO and choose separate Input and Outputs as shown below. If you want to use simultaneous inputs or outputs from several devices, select ASIO4ALL, open the Driver and Activate multiple inputs/outputs across devices.
- macOS - Open the Utilities folder and Aggregate audio devices. Then select the Aggregated device in Device list.
- Status - Shows the status of the selected audio device driver's inputs and outputs. The reported output latency is the total output latency including plugins.
- Auto close - When selected, allows other applications to share the audio device when FL Studio loses focus (FL Studio is minimized or another application is selected). This option allows you to share your audio interface when your audio driver is not multi-client. If you are having trouble with other devices taking control of the audio device and tying up inputs/outputs in ASIO4ALL then turn this off, close all other programs (VOIP, Skype, Media players etc) and restart FL Studio. The FL Studio ASIO driver is multi-client so will allow you to hear audio from multiple applications simultaneously. NOTE: When plugins are bridged they will steal audio focus and this can stop playback. Turn off 'Auto close' or use FL Studio ASIO.
- Sample Rate - Sets the sample play-back rate used by the mixer. Where possible use the default sample rate of 44100Hz. Many older audio devices (the Creative Audigy series for example) have a minimum sample rate of 48000Hz. In this case, please be aware that some (early plugins) may not perform correctly (usually tuning related issues) although the vast majority of plugins available today are multi-rate compatible.
- Bit depth (16, 24) - Both audio input and output bit depth is set from the Windows, ASIO or macOS Core Audio device manager:
- Windows - Right-Click your volume control icon on the Windows task-bar, select 'Recording devices' or 'Playback devices' and select the audio device then 'Set as default' then select 'Properties > Advanced' and select a 24 bit 44100 Hz option if available OR 16 bit 44100 Hz if not. If you have an custom ASIO driver for your device the Bit depth settings may also be adjustable from there.
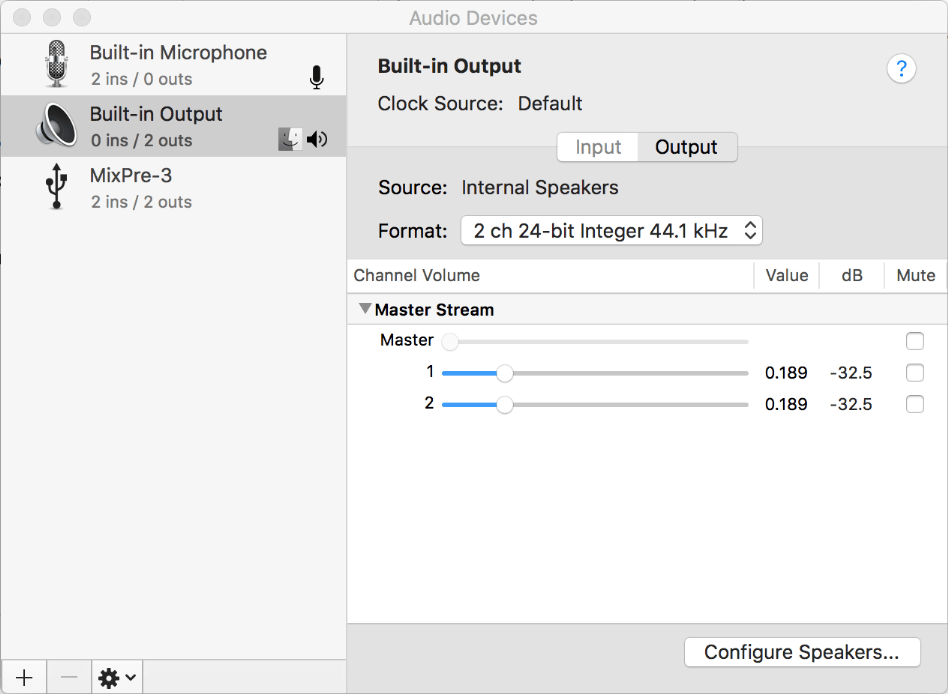
- macOS - Open Audio MIDI Setup (you can find it in Utilities, inside the Applications folder). For your selected audio device, on the right side of the Audio Devices window, set the Format: 44100 Hz / 2ch-24 Bit Integer.
Windows: Audio Properties
If your audio device does not natively support ASIO, the FL Studio install includes FL Studio ASIO (see below) and 3rd party driver ASIO4ALL. NOTE: that ASIO4ALL is a generic ASIO driver that works with most audio devices, your experience may be different. ASIO4ALL allows you to select inputs and outputs from different audio devices/audio-devices. The help section on ASIO4ALL advanced settings covers the options.
- Buffer Length - On Windows, to change the buffer length, click on the 'Show ASIO panel' button below this readout. On macOS the buffer is shown directly. The buffer stores audio data before it's sent to your audio device. This allows FL Studio to even out momentary spikes in CPU load when processing that can be slower than 'real-time'. Longer buffers lower CPU load and reduce audio glitches. However with longer buffers the delay between playing a MIDI keyboard or tweaking a control in FL Studio and hearing it is at least equal to this setting (in ms). The ideal buffer depends on your CPU architecture:
- Intel and AMD CPUS - Use between 10 and 20 ms (440 to 880 samples). If you need low latency for live MIDI performances or audio recording use the smallest buffer without the buffer underrun count increasing.
- Apple Silicon (M1, M2, M3 ...) - Use 256, 192, 128 or 64 samples only. 128 is the recommended starting point. Use these lower buffers to ensure the performance cores are activated, improving performance, which is the opposite to Intel CPUs that do better with longer buffers.
NOTE: In both cases see techniques for optimizing CPU performance here.
- Clock Source - Some audio cards provide external clock source which can fix sync/output problems. However, most cards work properly with the default "Internal" source selected.
- Show ASIO Panel - Opens the ASIO driver settings panel, use this to change latency settings. Settings between 1-4 ms without underruns are 'cutting edge', 5-10 ms are excellent and 11-20 ms are good. 10 ms (441 samples) is a good target.
- Mix in buffer switch - Output audio is mixed in ASIO's 'buffer switch'. The option allows some audio devices to reach lower latencies. NOTE: When used the underrun counter is bypassed and buffer underruns may be more audible.
- Triple buffer - Can reduce audible underruns when close to 100% CPU load with some ASIO drivers. Triple buffering is most useful when mixing under high CPU load and with some audio device drivers known to crash when they receive too many buffer underruns (e.g. Tascam US122). NOTE: Triple buffering doubles the latency compared to what is set in the ASIO driver (see the 'Status' information just below the Device Driver menu). Good drivers trigger the buffer at the start of the latency period, and so FL Studio has the whole buffer latency period available to process audio. Poorly written drivers may trigger the buffer late in the period and so effectively lower the buffer time available, leading to underruns. The triple buffer option works one buffer unit behind, and prepares audio for the next buffer period at each cycle. This doubles the latency, but that ensures that there will be enough time to process each buffer unit.
FL Studio ASIO
FL Studio ASIO has the advantage of being fully multi-client on most machines. This will allow you to hear the audio from FL Studio and other applications (such as YouTube, SoundCloud etc) at the same time.
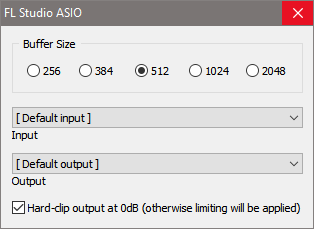
NOTE: On some systems you may need to select the actual Output using the drop-down menu if the [Default output] setting does not work.
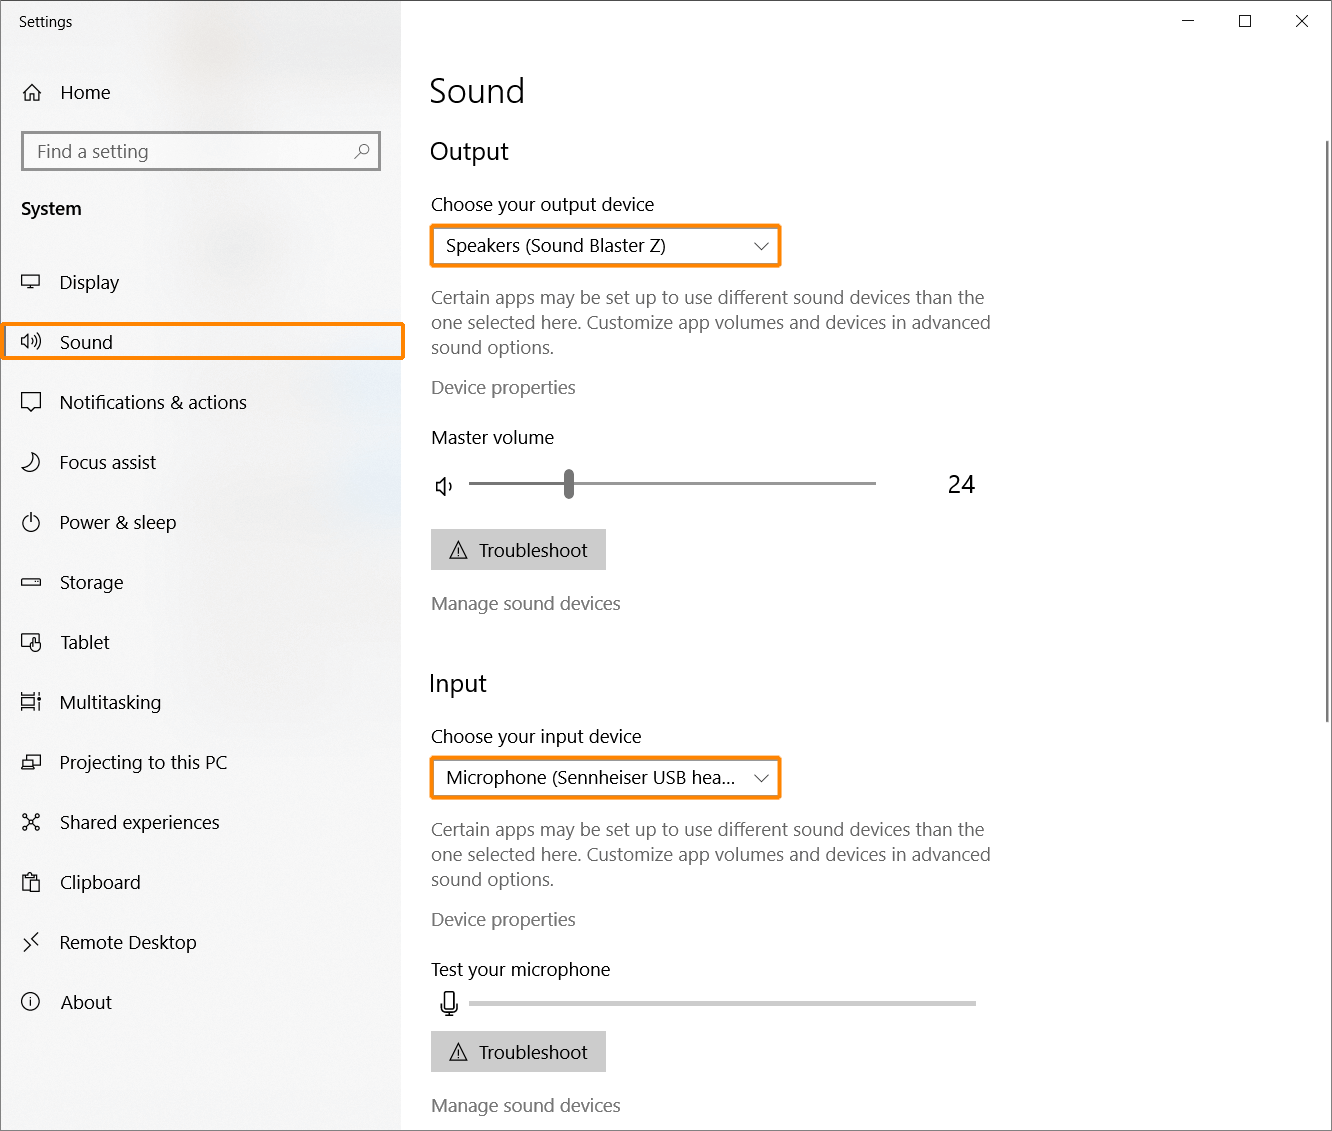
- Input / Output - When this is set to [Default input] or [Default output], FL Studio will use the default Windows Input (Recording) and Output (Playback) device, as set and shown below. The [Default input] and [Default output] are decided by the 'Default Device' for Playback [Default output] and Recording [Default input] set on the Windows Sound Control Panel (Right-click the Windows speaker icon and choose 'Open Sound settings > Sound control panel'). You can also click this control and specifically select other inputs and outputs from the audio devices installed on your computer. If you need to aggregate multiple inputs and or outputs from multiple audio devices use ASIO4ALL.
Windows 10+
Older Windows
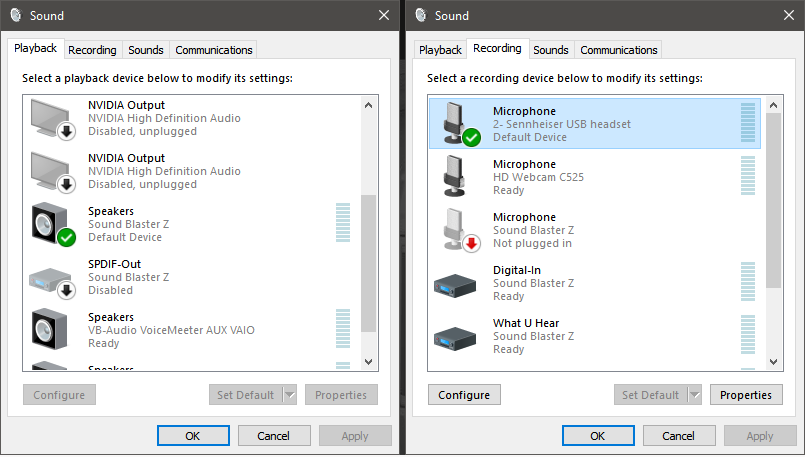
NOTE: After selecting a Recording device, select Properties > Advanced to set the Sample rate and Bit depth for recording input (if available).
- Hard-clip output at 0dB (otherwise limiting will be applied) - When selected the audio will distort when it goes over 0 dB. When deselected a limiter will be applied to prevent distortion. NOTE: With limiting applied you can no longer hear clipping distortion from FL Studio's main output. This means you will need to pay attention to your peak meters (make sure the Master does not go over 0 dB), otherwise your rendered tracks will sound distorted even tho your live audio doesn't. Traps for young players! All this happens external to FL Studio, so the switch has no effect on the internal processing, it's all post-FL Studio audio handling.
NOTE: While your experience may vary, in situations where low latency performance is critical, we recommend you preference drivers in this order - Native ASIO driver > ASIO4ALLv2 > FL Studio ASIO. A Native ASIO driver is one that comes from the manufacturer of your audio device. For notes on FL Studio ASIO related jitter, see here.
Primary Sound Driver Properties
Visible only when using Standard drivers (Primary Sound, WDM, Primary, etc). We strongly recommend using FL Studio ASIO unless it does not work for some reason. Then...
- Buffer Length - This slider controls the audio buffer length. The buffer stores audio data before it's sent to your audio device. This allows FL Studio to even out momentary spikes in CPU load when processing that can be slower than 'real-time'. Longer buffers lower CPU load and reduce audio glitches. However with longer buffers the delay between playing a MIDI keyboard or tweaking a control in FL Studio and hearing it is at least equal to this setting (in ms). The ideal buffer is the smallest your computer can manage without causing the buffer underrun count to increase (techniques for optimizing the buffer are described here). A good target with Primary sound drivers is 20-50 ms (880 to 2205 ms).
- Offset - This option can improve driver performance under Windows Vista. The default 0% option is off.
- Use Polling - Polling is a technique for managing Primary Sound Driver's audio buffer, which usually allows much smaller buffer without underruns. On some PC-s, however, it can have the opposite effect.
- Use Hardware Buffer - Uses the hardware audio buffer of 'Primary Sound Driver' enabled sound cards.
- Use 32-Bit Buffer - Uses a 32-Bit floating-point buffer. Only works with Windows XP or above.
macOS: Audio Properties
macOS uses 'Core Audio'. The default driver is 'Built-in Audio'. 3rd party audio devices will also show here, they also use Core Audio.
- Buffer Length - This slider controls the audio buffer length. The buffer stores audio data before it's sent to your audio device. This allows FL Studio to even out momentary spikes in CPU load when processing that can be slower than 'real-time'. Longer buffers lower CPU load and reduce audio glitches. However with longer buffers the delay between playing a MIDI keyboard or tweaking a control in FL Studio and hearing it is at least equal to this setting (in ms). A good target with 'Built-in Audio' is 10 ms (441 samples) if you are playing a MIDI controller and 20 ms (880 samples) if you are not.
- System audio settings - From the Finder, search 'Utilities'. Open the Utilities folder and then the application 'Audio MIDI Setup'. From here you can make adjustments to the Audio settings for your Mac. The Built-in Output and Built-in Microphone are the default macOS Output and Input respectively.
NOTE: While most Audio Interfaces when used with Macs don't need any extra drivers or software installed to work, many professional level Audio Interfaces do have additional software that will either significantly improve the functionality of your device, or at least make it less problematic if you are experiencing issues. Look for this software on the manufacturers website.
- Aggregate audio devices - This procedure is known to significantly improve the reliability of audio devices when used with FL Studio. It will also allow you to use more than one audio device at the same time within FL Studio. See: Aggregate audio devices.
Audio Processing Thread
- Priority - Sets the priority of the audio mixing thread. Higher = more CPU devoted to the audio mixing thread, but increases the risk of lockups/freezing when CPU demands become high. Lower = greater risk of buffer underruns. Adjust this (in combination with the buffer settings) if you have problems with lockups and/or buffer underruns.
- Safe overloads - Off: The audio mixing thread is given a very high priority, so that the user interface doesn't cause hiccups in the audio engine. When the audio mixing thread is using all the CPU, it may leave nothing to the Graphical User Interface (GUI), which will then appear frozen. On (default): 'Safe overloads' adapts the mixer priority when CPU overloads occur, leaving a little CPU to run the GUI, so that you can sill interact with FL and minimize the CPU usage.
- Underruns - This counter shows the total number of underruns detected. An underrun is counted when the buffer that feeds audio to your audio device runs out of audio data. If this happens during live playback, you will usually hear clicking, popping or crackling sounds. It means your computer's CPU couldn't keep up with the real-time playback demands of the project (song). There is a section on reducing underruns described here.
NOTES:
- Underruns are only a problem if you hear glitches and clicks during live-playback. The total count does not matter if you don't hear them. You will see the count increase loading projects and plugins, this is normal and does not indicate a problem!
- If you hear glitches in rendered audio this is not an underrun, it's likely a plugin behaving badly.
- Some options and some audio-driver related underruns, can bypass the underrun counter. It's possible to can hear clicks and glitches in live audio, without the count increasing, and it is still an underrun. Although it could also be a plugin behaving badly, something to check.
Plugin output
Visible only when using FL Studio with the VST connection plugin or as a ReWire client.
- Slave Tempo - On: FL Studio will synchronize with the tempo of the host.
- Record Automation - When turned on, remote control messages (MIDI) from the host will be recorded during recording sessions.
Playback tracking
Changing the source for the Playback tracking can solve jittery/incorrect playback position indicators OR solve audio recording alignment problems with the Playlist. NOTES: Low Buffer Length settings can also improve positional accuracy. The Playhead position is very sensitive to the timing information provided by the Audio Driver. If this information is inaccurate or the Playhead jumps about, it indicates an issue with your Audio Driver. Always make sure you are updated to the latest Audio Drivers for your hardware. For notes on FL Studio ASIO related jitter, see here.
- Playback tracking source:
- Driver - The audio driver is used for playback position. NOTE: If your audio interface has a manufacturer-supplied driver, you should select it in the Device menu and use 'Driver' mode for optimal performance.
- Hybrid - Driver/Mixer hybrid position. This option can be effective to fix visual jitter of the playhead or timing errors to solve audio/video timing problems that can happen with some audio devices.
- Mixer (default) - The Mixer position is used. This works acceptably when the buffer latency is around 10ms (441 samples), or less, to solve audio/video timing problems that can happen with some audio devices. NOTE: If you are using a 3rd party Audio Interface, prefer 'Driver' mode.
- Offset - Use this to correct the location of recorded notes or to correct the position of FL Studio's Playhead (the vertical green line in the Playlist and Piano roll). This may be necessary if the audio device driver does not report its position correctly. Before using this control make sure positional errors are NOT caused by:
- Input quantizing under the control of the Global Snap setting
- Latency compensation due to the Mixer menu > Disk recording> Latency compensation setting
OR if the playhead position and other visuals don't align with the audio, use the slider to add positive or negative offset to realign the Play & record position. This is a global change to all tracks.
Using external hardware - If timing errors come from loop back or MIDI Out recording, where there is a real-world delay as audio or MIDI exits your computer and comes back after being processed by external music effects or synthesizers, use Audio Input delay compensation . This is available to make changes to individual audio INPUTs.
CPU
These options are intended to reduce CPU load and maximize FL Studio performance on your PC.
- Multithreaded generator processing - Spreads generator (instrument) load over multiple CPU cores. See Multicore CPU Processing for information on optimizing multi-core performance. Issues with plugins? See plugins behaving badly.
- Multithreaded mixer processing - Spreads effect & mixer load over CPU multiple cores. See Multicore CPU Processing for information on optimizing multi-core performance. Issues with plugins? See plugins behaving badly.
- Smart disable - Globally disables both instruments and effects, when inactive, to reduce CPU load. NOTE: This option works in conjunction with each plugin's Wrapper Smart disable switch setting. It ONLY works on wrappers that have their 'Smart Disable' settings switched ON. The purpose is to globally enable/disable all plugins Smart Disable behavior. To apply Smart disable to all plugins you must first use the Tools Menu > Macros Switch smart disable for all plugins option. This turns each plugin's wrapper Smart disable on. If Smart disable causes issues with any plugins it can be disabled for those individual plugins using the same wrapper menu setting 'Smart disable'. NOTE: Smart Disable is active only during live playback, it is temporarily disabled when rendering.
- Align tick lengths - This is a troubleshooting option. May help solve problems with VST/AU plugins that include: Clicks and unexplained noises. Rendered-audio timing errors, where the plugin is out of sync with the beat. Unexpectedly high CPU load. A tick is the smallest internal unit of time used for sequencing automation & note events (PPQ counts the number of ticks (pulses) per quarter-note for example).
NOTES:
- For a plugin to be multithreaded there are 3 places where the option must be selected, here, the Wrapper menu 'Allow threaded processing' and Wrapper Additional Settings Menu 'Processing > Allow threaded processing'. All three are selected by default.
- Some of these options may cause problems with VST/AU plugins. What plugins? It all depends on how closely they conform to the VST design standard, don't look at us, we are not the 'VST police'. What sort of 'problems'? We are not prophets either, but possibly plugin-crashes, audio glitches, out-of-sync playback or CPU spikes. See plugins behaving badly.
Mixer
- Resampling - is the process of smoothly creating changes in sample data when the system is called to 'invent' intermediate volume levels between any two known sample points. This is necessary when
samples are transposed from their original pitch to avoid 'quantizing' and/or 'aliasing' noise. The benefits of higher quality interpolation will only apply to transposed Sampler Channels. This video covers the concepts of
 aliasing and Interpolation in more detail.
There are two locations where interpolation can be set. Here in the Audio Settings the interpolation method affects the 'live' audio quality (and CPU load when Sampler or Audio Clip Channels are transposed). Interpolation is also found on the export dialog. This affects audio quality in the rendered file. Ideally your live and rendered interpolation settings should match, so what you hear live is the same as what you hear in the rendered file. In reality, this isn't always possible due to CPU limitations. The options are the same for both locations, they are:
- Linear - interpolation imposes the lowest CPU load with basic linear averaging between samples. This is likely to result in 'aliasing' (high frequency noises) when Sampler Channels / Audio Clips are transposed far from their original pitch.
- 6-point hermite - has been optimized for 'real-time' playback, providing superior quality to 'linear' interpolation and is a good setting when you are trying to minimize CPU usage.
- 64, 128, 256, 512-point sinc - 24-point sinc is the default. Higher numbers increasingly provide the highest quality interpolation. NOTE: Normally you should not use 128-point sinc and higher for realtime playback. It will consume large amounts of CPU when samples are transposed.
NOTE: Normally you would leave the live interpolation set to 24-point sinc and only adjust it if you notice aliasing when pitching samples AND it's an issue.
- Metronome track - Selects the mixer track that will receive the Metronome. By default, the Master Mixer track is used for preview (default '---' to send to the Master Track).
- Preview track - Selects the mixer track that will receive audio previews from the Browser, Wave Editor, etc. By default, the Master Mixer track is used for preview (default '---' to send to the Master Track).
- Reset Plugins on Transport - Resets all plugins when using the transport functions - start/stop, moving the song position marker, etc. This ensures, as far as possible, projects sound the same each time they are played. Some plugins generate or process sound differently depending on their moment-by-moment state. Uncheck for faster, less glitchy response when changing song position. NOTE: When disabled, the differences are unlikely to be significant, but it's worth checking this function if you notice inconsistent behavior.
- Play truncated notes - On transport relocation play notes truncated by the new playback location.