RECORDING
Recording External and Internal Audio 
This section covers everything you need to know about recording external audio sources connected to your audio device input/s and internal audio generated by instruments. Sections include:
![]()
- Pre-requisites for recording audio
- Recording FAQ
- USB microphones (a special case)
- How to record external audio
- Loop recording for multiple 'takes'
- Recording internal audio / Freezing mixer tracks
Pre-requisites for recording external audio
Before you can record external audio sources the following settings & conditions are required:
- You must be using FL Studio Producer Edition or higher.
- Windows: An ASIO audio device driver must be selected for your audio device (press F10 to open the options settings, select Audio and select an ASIO driver). NOTE: We highly recommend using the OEM ASIO driver that was specifically designed for your audio interface. The 'FL Studio ASIO' driver was written for maximum compatibility and can introduce latency in your recordings (a small delay).
- macOS: From macOS 10.14 (Mojave) onward, FL Studio must have permission to access your microphone. Open 'System Preferences > Security & Privacy > Microphone'. Enable microphone access for FL Studio.
- The recording filter (shown above) must be set to record audio (Right-Click the record button ), if you are recording to disk (Playlist recording).
- An audio source must be connected to your audio device audio input/s (DOH!).
- The active audio device input/s (from 4. above) must be selected on the Mixer track input menu.
- The Mixer track must be armed to record audio (see Playlist recording) OR if you are using Edison, it must be set to record audio on the input Mixer track (see Edison recording).
Recording FAQ
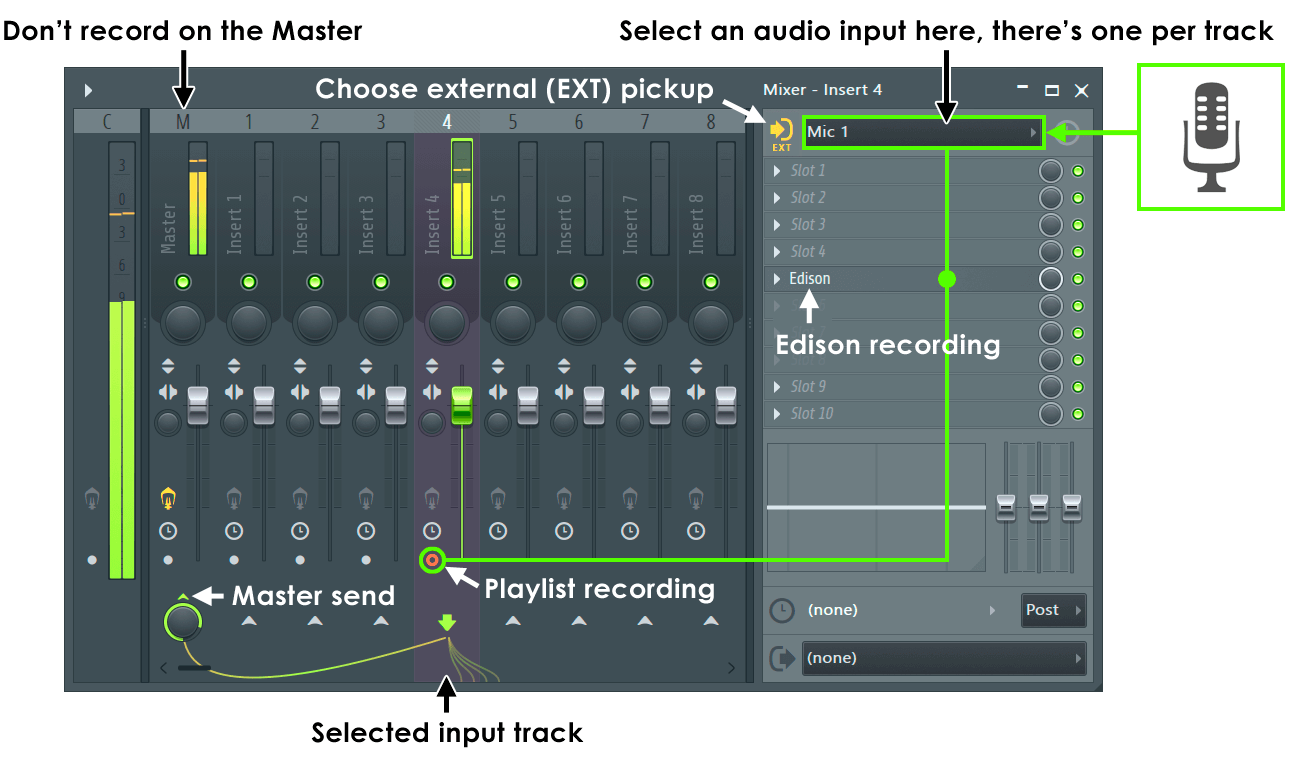
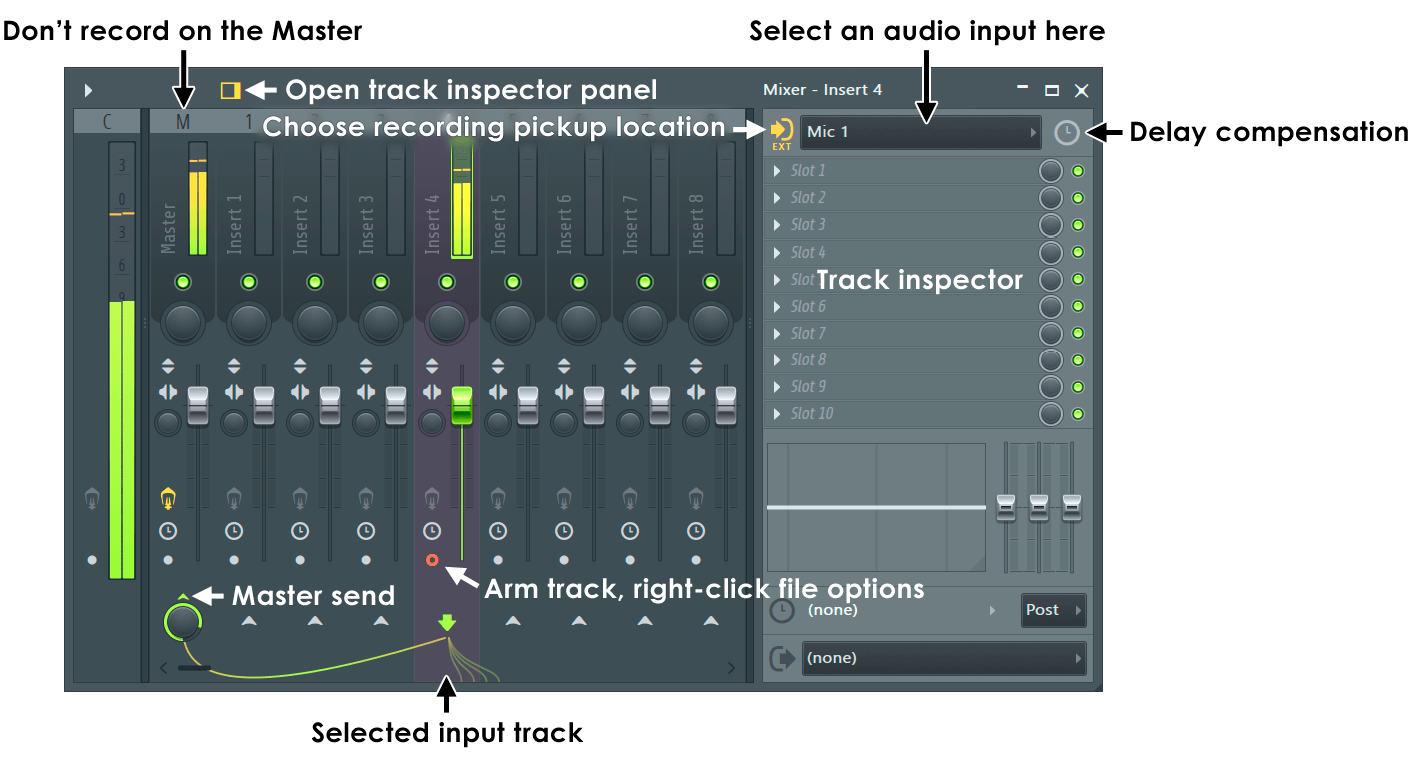
- Where does external audio enter FL Studio? - Select external audio from the Mixer Input menus (shown above). Each Mixer track can receive one external stereo audio input. The Input menu displays a drop-down list from your selected audio device/s (mic, line, etc). These controls can also be mirrored on Playlist Tracks shown here. The screenshot above shows the audio device microphone (Mic 1) selected on Mixer Track 4. If you have more than one audio input to record, use multiple mixer tracks to receive each input.
In addition to the Input you can also decide where in the signal chain to record audio from. Click the Recording Pickup selector in front of the Input menu to choose Direct input through to Post effects and Fader recording.
NOTE: On Windows, Input options will only be available if an ASIO audio device driver is being used and macOS you may also need to Aggregate your Audio Devices AND give FL Studio permission to access your microphone.
- How do I record audio? - There are two methods that can be used individually or together:
- Playlist - 1. Associate a Playlist Track lane with a Mixer Track by Right-Clicking the Playlist track header and selecting - Track mode > Audio track > Insert (link to the desired Mixer Track). 2. Arm a Mixer track by clicking on the disk recording icon (see screenshot above).
- Edison - Place an instance of Edison in the Mixer track receiving audio and record into memory (see screenshot above). Edison is best when you are experimenting and plan to make multiple takes such as when 'Loop Recording'. In this case region markers are automatically placed in the recording each time FL Studio loops back to the beginning of the project. Regions (loops) can then be dragged into the Playlist.
Use these methods to record external sources, internal sources or a combination of both. For details, see below.
- Why do I hear music/percussion/metronome along with my recording - You are recording on a Mixer Track that has other internal audio routed to it. If you record on the Master Mixer Track, that will include every other Mixer track in the project! Make sure the Recording Pickup location is set to EXT (External) OR no Channel Rack instruments or Audio Clips are routed to your external Input recording Mixer Track when using Pickup locations other than EXT. NOTE: The Mixer Track the Metronome is sent to is set from the Audio Settings > Preview mixer track.
- Why do my recordings come from one speaker? - FL Studio records a stereo input, since all Mixer tracks are stereo. You are probably feeding your audio-interface a signal that only appears on the left or right channel of a stereo input. Solution: The Mixer INPUT menu has an upper stereo list and lower mono list. Select your input from the lower, mono INPUT list. This will copy the active channel into the silent stereo channel so audio comes from both speakers.
- Why do my recordings stop after 1 Bar - You have Loop Recording mode selected. Unless there is already data in the Playlist or a selection is made, the default length will be 1 Bar.
- How do I record multiple independent inputs (multi-track record)? - All Mixer tracks can be armed to record external and/or internal audio sources to disk (see Playlist Recording below). It's possible to, simultaneously, record the full number of audio inputs on your audio device.
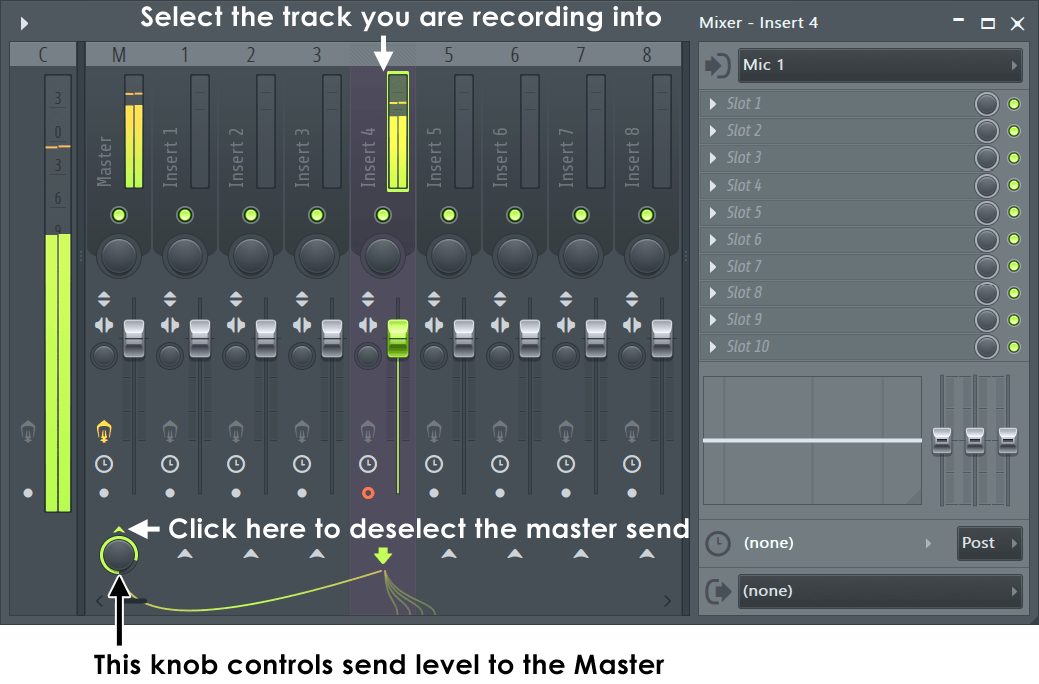
NOTE: Right-Click the Mixer Input menu to initiate an 'Auto-map'. This will automatically map each input on your audio device to a unique Mixer Track Input, starting on the Mixer track where the Auto-map was initiated and working to the right. To prevent feedback, the Master Tack send (click here for an oversized and obsessive diagram) will be disabled on each Mixer Track, so you will see input activity on the Peak Meters, but won't hear anything.
- How do I record using multiple audio devices at the same time? - For example, how to use a USB microphone Input and your regular audio device Output, at the same time. Windows: FL Studio ASIO allows you to select one Input and one Output from separate audio devices. ASIO4ALL will allow you to select multiple Inputs and Outputs from separate audio devices. macOS: Use the Aggregate audio devices feature under the Utilities folder in macOS, this has similar capabilities to ASIO4ALL as described above.
- How do I record my hardware synthesizer/drum-machine/sampler? - To use sounds from an external synthesizer, while it is played by FL Studio, you will need to make MIDI connections AND audio connections to your audio device inputs. FL Studio can record the sound/s (discussed below) as it plays the external MIDI hardware using a MIDI Out plugin.
- Can I record using a USB microphone or headset? - Yes, USB microphones may require some additional setup discussed here.
- How do I set the recording bit-depth - FL Studio receives audio from the audio device as a pre-digitized stream, the '32 bit float recording' option set in the Mixer menu > Disk recording save option has no effect on the incoming recorded bit-depth (only the save format). Recording bit-depth is set in the audio device's own options and is shown in the hint bar when selecting items from the mixer input menu. Windows:, right-click your volume control icon on the Windows task-bar, select 'Recording devices'. Select your input device and 'Set as default' then select 'Properties', then 'Advanced' and choose 24 bit 44100 Hz option if available OR 16 bit 44100 Hz if not. macOS: Use the Audio MIDI Setup options.
- Why aren't my audio recordings correctly aligned with the Playlist grid? - In cases where audio drivers are not accurately reporting their position to FL Studio, you may need to adjust the Playback Tracking options. Under Windows, FL Studio ASIO can result in alignment and also jitter in the position from take-to-take as it is a 'simulated' ASIO driver based on WASAPI. Make sure to switch to the native ASIO driver for your Audio Interface if you have one. Alternatively, if the delay comes from loop back or MIDI Out recording, where there is a real-world delay as audio or MIDI exits your computer and comes back after being processed by external music effects or synthesizers, use Audio Input delay compensation .
Using a USB microphone or headset
![]()
![]()
USB microphone & headsets appear as separate audio devices apart from your main audio device. To use two, or more, audio devices with FL Studio: Windows - Follow the steps in the section Recording USB audio-inputs OR for macOS - Use the Aggregate audio device feature under the Utilities folder.
How to record external audio (microphones, guitars, etc)
There are two main ways for recording external audio explained below, the first method records audio as an Audio Clip in the Playlist. The second records to the Edison plugin, loaded onto the Mixer track of your choice.
1. Playlist audio recording procedure
While this section looks complex, with many steps, it details the full external-audio to Playlist recording step-by-step procedure and all options. Once you understand the process it only takes a few mouse-clicks to record external or internal audio.
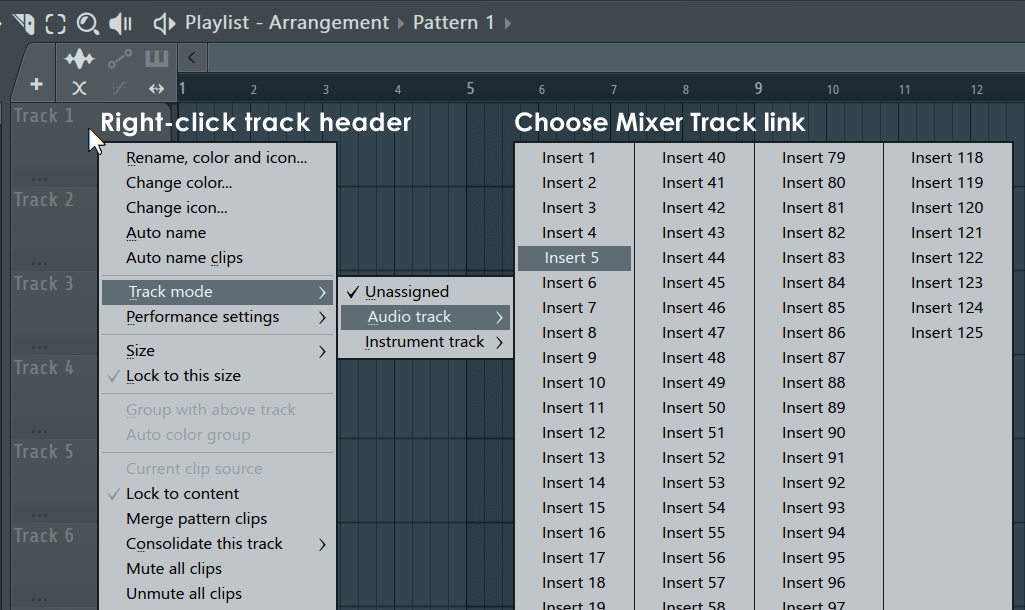
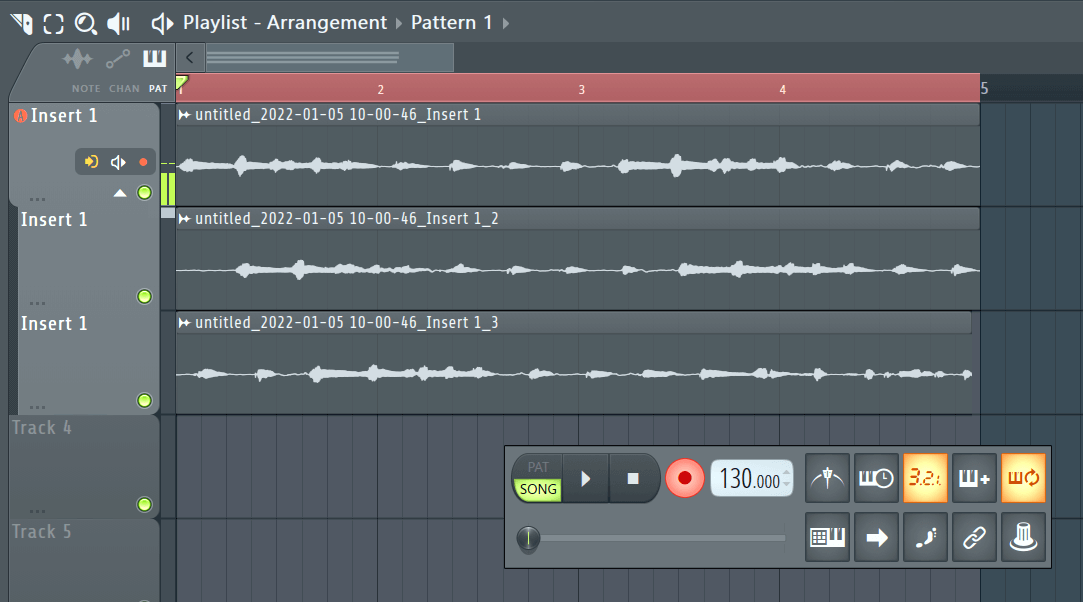
Playlist lanes are not initially bound to audio inputs, as is common in other DAWs. Audio is recorded through the Mixer, to disk, and the recording is automatically placed onto the first Playlist Track where it won't overlap with existing content. You can link a Playlist Track to a Mixer Track audio input by right-clicking the Playlist Track header and choosing 'Track mode > Audio track > Insert ...' to associate it with a Mixer Track, as shown below in Step 3. Recordings will then appear as Audio Clips.
External audio is recorded via Mixer track Inputs. Recordings appear in the Playlist as Audio Clips. As Playlist tracks do not initially represent specific Mixer tracks, it doesn't matter what Playlist track the Mixer track is associated with, or what Playlist track the Audio Clip subsequently moved to. The Pickup Location (showing EXT below) decides where in the input chain audio is recorded from. EXT is direct from the external input without anything inside FL Studio altering or effecting the signal. External (EXT) is generally the best option to use, unless you are an advanced user and thoroughly understand how audio routing in FL Studio works.
- Pre-requisites - The pre-requisites for external recording must first be satisfied (as described above). NOTE: On Windows machines, we highly recommend using the OEM ASIO driver that was specifically designed for your audio interface. The 'FL Studio ASIO' driver was written for maximum compatibility and can introduce latency in your recordings (a small delay).
- Don't record on the Master Mixer track - Choose an unused Mixer Track. Instruments, Audio Clips and other Mixer Tracks routed to the Mixer track you record on, will be mixed in with the external audio input. The Master Mixer Track has all other Mixer Tracks routed to it, so it's not the place to record external audio.
- Playlist track association, Input selection & Mixer track arming - Playlist lanes are not initially bound to audio inputs, as is common in other DAWs. You must convert Playlist Tracks to Audio Track mode to receive the recorded audio, and select the audio input to record:
- Link a Playlist Track with a Mixer Track Input - You have two options:
1. From the Mixer, select the Mixer Track(s) you want to record from, Right-click one and choose 'Assign to new mixer track(s)'. It is possible to set up multiple tracks this way if you select more than one Mixer track.
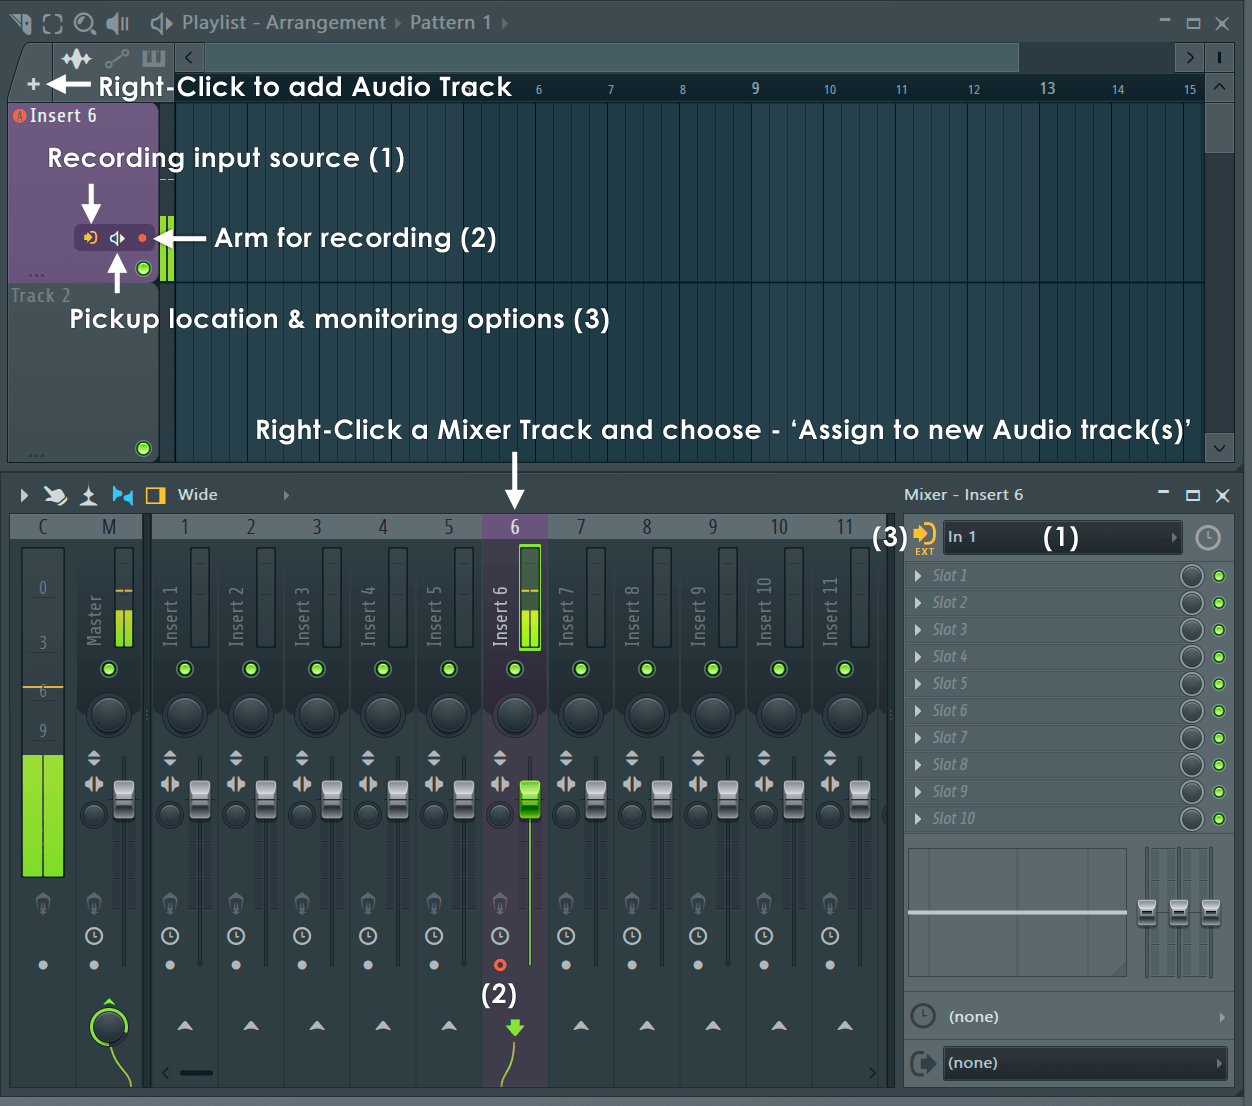
2. From the Playlist - Alternatively, select any number of Playlist tracks, Right-click one Track Header and choose Track mode > Audio track and then Mixer Track to receive audio from (shown below). If you have made a multi-selection of Playlist Tracks, the assignment will start from the Mixer Track you choose. All recordings from this Mixer Input will appear on the linked Playlist Track. Subsequent recordings, made on the same Mixer Input, will appear as sub-tracks to this parent. All 'Audio Track' inputs default to EXT (External) recording location and the Audio Clips are routed back to the originating Insert Mixer track.
TIP: If you are recording in Audio Track mode and need to make multiple takes, select Loop record and deselect Blend record so recordings are muted when you press stop. This prevents previous recordings interfering with the next take. Alternatively, manually mute previous Playlist Tracks before recording the next pass.
- Choose an external input or microphone (see below) - As shown above, the Input, Pickup location, Monitoring and Record Arm controls from the Mixer Tracks are mirrored on the Playlist, changing settings in either location is possible. The options in the drop-down Input menu will depend on your audio device. Most audio devices have at least one Mic and one Line input, however you may need to experiment to find the input that carries your external audio. Selecting an input will auto-arm the track for recording, as indicated by the red track recording icon. If you want to use a USB microphone or headset to record audio, follow the steps outlined here first.

- Recording Pickup Selector (see below) - Use the (clickable) selector in front of the Input menu to choose where in the signal chain to record audio.
This is important as it will decide if effects or other sounds are blended with the recording. Options range from
completely raw audio directly from the audio interface, to all Effects and Mixer Track options included.
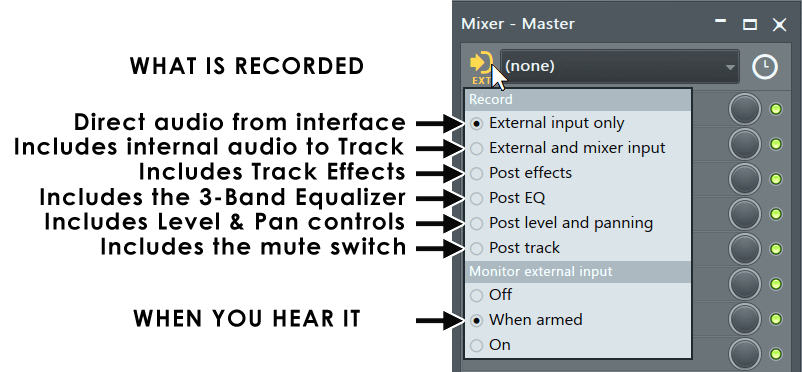
- External input only (EXT) - RECOMMENDED! Audio is recorded direct from the audio interface. Recording level is under the control of the Audio Interface and can't be changed inside FL Studio. TIP: Use this when you are recording multiple takes or Loop recording and you don't want the previous take/s, or any other audio routed to the recording Mixer Track blended with the external input.
- External and mixer input (MIX) - Includes external input and audio from internally routed Mixer Tracks. Recordings are made from the point just prior to the Mixer Track Effects (at the top of the FX stack). NOTE: This is equivalent to 'PRE' from versions prior to FL Studio 20.9.
- Post effects (FX) - Includes external input, internally routed Mixer Tracks and Mixer Track effects. Recordings are made from the point just after the last effect slot (at the bottom of the FX stack).
- Post EQ (EQ) - Includes external input, internally routed Mixer Tracks, Track effects and Track EQ. Recordings are made from the point just after the The Mixer Track properties Track EQ.
- Post level and panning (LVL) - Includes external input, internally routed Mixer Tracks, Track effects, Track EQ, Mixer Track Level and Pan controls. Recordings are made from the point after the Mixer Track Level and Panning controls. NOTE: This is equivalent to 'POST' from versions prior to FL Studio 20.9.
- Post track (POST) - Includes external input, internally routed Mixer Tracks, Track effects, Track EQ, Mixer Track Level, Pan and Mute controls. Recordings are made from the point after the Mixer Track Mute switch. TIP: Can be useful when making DJ-style scratching effects and you need to mute the input.
- Monitor external input - Below the recording locations are some input monitoring options. These options determine if the External input is audible through FL Studio.
- Off - Do not monitor external input.
- When armed - Monitor the external Input only when the Mixer track is armed for recording.
- On - Always monitor the external Input.
NOTES:
- After recording - The Audio Clip is routed back to the same Mixer Track it was recorded from. Make sure you have a specific reason for any Recording Pickup location lower than 'Direct input' since the effects and or any other Mixer Tracks routed to the Input Track will be blended with the recording and can't be undone.
- Timing issues - If the recorded audio is late, or early, relative to other Playlist events, use the manual Input Delay Compensation icon to adjust this on a per-input basis. Positive values to move the audio to the left (earlier) and negative values to shift recorded audio to the right (later). See Audio input delay compensation for more information. There is also a global control for changing recorded input alignment on the Audio Settings > Playback Tracking > Offset.
- Link a Playlist Track with a Mixer Track Input - You have two options:
- Mono inputs - If you have a mono sound source that appears in only the L or R stereo channel, you will notice that the input options are divided into 'Stereo' in the upper section and 'Mono' in the lower section. By selecting the Mono version of your input, FL Studio will record the signal into both the L and R Mixer channels.
- Naming & save location (optional) - If you want to select the name and location of the saved .wav file as something other than the default then Right-Click the Mixer track recording icon to open the file-name/location dialog. Select a location in the browser dialog and name the .wav file to be recorded. If you use Left-click, an automatic file name will be assigned to the track. Do the same for all Mixer tracks you want to record. NOTE: Setting a custom record location folder from the F10 > Project > General Data folder setting, will mean the default location is set by you.
- Recording Options - Open the Mixer pop-up menu. In the Disk Recording sub-menu select -
- Auto-create audio clip - This should be on by default. An Audio Clip will be automatically created in the Playlist. NOTE: Automatic Audio Clip placement only works in Song mode.
- Latency compensation - Turn ON. This removes an amount of time equal to the audio device latency (buffer length) from the start of the recording, ensuring the audio is aligned with the internal Playlist events. If the recorded audio still does not seem to be in sync, you may need to adjust the Playback tracking options. Start with the 'Playback tracking source' options, but if these don't work you can use the manual Audio input delay compensation. NOTE: This setting does not affect the live (monitored) sound, only the recording. See the point below on 'Monitoring' for ways to improve latency delay on the live audio passing through FL Studio.
- Bit-depth - This is the saved bit-depth and is the resolution of the waveforms amplitude quantization. '32-Bit floating point recording' is only necessary if your audio device is set to record at a bit-depth higher than 16-Bit so use the 32-Bit setting to save files recorded at 24-Bit. NOTE: FL Studio receives audio from the audio device as a pre-digitized stream, the bit-depth set in the Mixer has no effect on the recorded bit-depth (that is set in the audio device's own options and is shown in the hint bar when selecting items from the mixer INPUT menu). Saving a 16-Bit sample at 32-Bit will make the file significantly larger with no gain in quality.
To set the recorded bit-depth:
- Windows: Use the Windows Recording Device Properties options or the options in your ASIO Device Driver.
- macOS: Use the Audio MIDI Setup options.
- Hearing the sound being recorded (monitoring) - Let's assume you are monitoring FL Studio through headphones and not getting an echo caused by feedback from your speakers into your microphone. By default,
live inputs to the Mixer are routed to the Master mixer track and back to the audio device outputs. As the audio path through FL Studio is delayed by an amount equal to the audio device buffer length setting, the monitored sound may echo against the live source. Latency echo can cause problems for performers (e.g. vocalists) who need to hear their live performance mixed with the song. Latency echo can be eliminated in three ways:
- Recording Pickup Selector - As described in Step 2 (above), set the 'Monitor external input' setting 'Off'. This will stop the external audio input from being sent back to your speakers. The downside is that you can no longer 'monitor' the recorded sound, although you can move one headphone cup an ear (DJ style) and listen live. However, if you Audio Interface has 'Direct Monitoring' see below.

- Direct Monitoring - Use 'direct monitoring' if supported by your audio device. Direct monitoring is achieved inside the audio interface, routing a copy of the input signal directly to the outputs (including headphone jack), and so eliminates latency caused by the audio buffer. No annoying echo!
NOTE: If you use direct monitoring, set the recording pickup 'Off' as shown in the video above, to disable the audio monitored through FL Studio. Also note that direct monitoring isn't common on basic (consumer level) audio devices, so consult the audio device manual to see if it's available on your interface. Most external USB/FireWire audio devices have a hardware knob or button labeled 'Direct monitoring' or 'Monitor'.
- Latency - If you don't have Direct Monitoring and you need to monitor your input signal, try lowering the buffer settings and see if the echo can be eliminated or reduced to acceptable levels. Of course there are limits to how low the ASIO / Core Audio buffer can be set. NOTE: Under Windows, FL Studio ASIO can introduce some further complications. See FL Studio ASIO and jitter.
- Recording Pickup Selector - As described in Step 2 (above), set the 'Monitor external input' setting 'Off'. This will stop the external audio input from being sent back to your speakers. The downside is that you can no longer 'monitor' the recorded sound, although you can move one headphone cup an ear (DJ style) and listen live. However, if you Audio Interface has 'Direct Monitoring' see below.
- Recording with effects - Click the Recording Pickup selector at the front of the Input selector so it shows FX ('Post effects' recording). HOWEVER! We STRONGLY recommend recording all incoming audio WITHOUT EFFECTS and adding them later as this provides maximum flexibility. To monitor the incoming signal with effects while recording without effects, use Direct input or Mixer input recording. This ensures that the audio is recorded dry, but is still monitored with effects. After recording, the Audio Clip will be automatically routed back to the original input track so it plays with the same effects.
- The Record Button: Prepare for recording. There are two functions associated with the Record button on the Transport Panel.
- Recording filter - There is a recording filter pop-up menu, Right-Click the Record button and make sure 'Audio' has a tick (all data-types with a tick will be recorded, click to select/deselect items). NOTE: Mac users, you must also give FL Studio permission to access your microphone.
- Arming - Left-click the record button to arm for recording. The button will light to indicate that record mode is activated (orange).
NOTE: Don't forget that Insert Mixer track also has a recording switch that must be armed. In this way, you can leave many Mixer Tracks armed and disable recording from the Master Recording button.
- Start recording - Press the Play button to start recording.
- Stop recording - When you are finished, press the Stop button. If you want all armed tracks to unarm enable the 'Disk Recording > Auto-unarm' option in the Mixer popup menu. If tracks remain armed and you press record again new Audio Clips will be created leaving previously recorded Audio Clips intact.
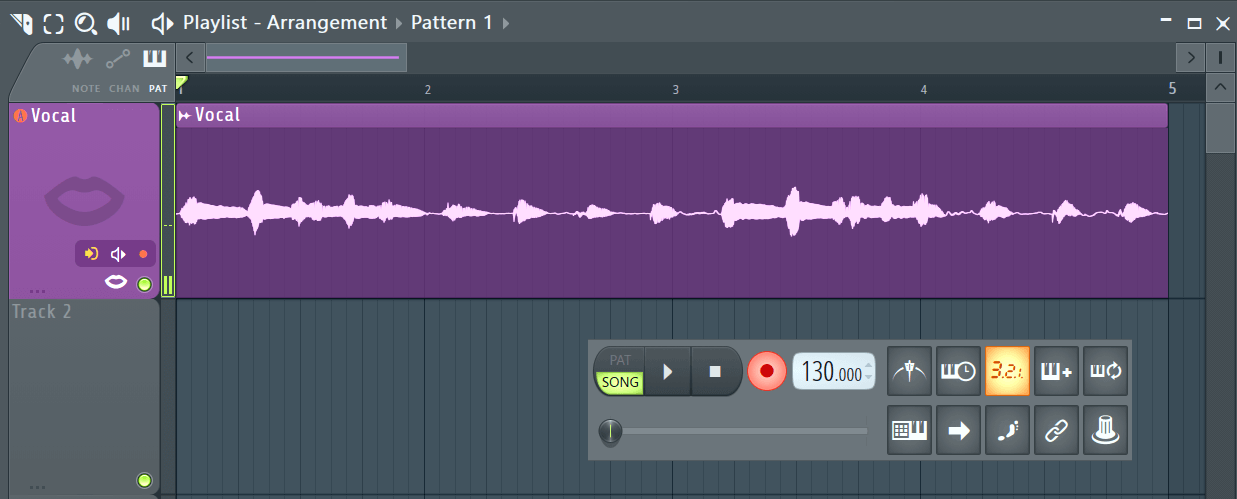
- Where's my audio? - If you are in Song mode AND the Mixer menu setting, Auto-create Audio Clips is on, your recording will appear as an Audio Clip wave display in the Playlist window. If you are in Pattern mode, the recording will appear as an Audio Clip Channel.
- Audio Clip placement - If you have not specifically linked a Mixer Track to a Playlist Lane, Audio Clips will be placed in the first track with enough room to fit the Audio Clip, without overlap with existing Clips, although you can move it anywhere you like afterward. To ensure your Audio Clips are placed sensibly, we recommend using the Audio Track method described at Section 3 above.
- The recorded audio data - This is saved to disk will be in one of three locations:
- 1. The folder set at Step 5 (above) OR
- 2. The FL Studio recorded data folder ...[User]\Documents\FL Studio\Audio\Recorded. This folder is shown in the Browser OR
- 3. If you have set a custom record location from the F10 > Project > General Data folder setting, your audio files will be there.
NOTE: About deleted recordings. Since recordings can be restored after undo (Ctrl+Z) actions, they are not removed from disk until they are no-longer re-doable i.e. when you perform another action that replaces the undo history entry OR you quit FL Studio. Then they are automatically moved to your Operating System recycle bin / trash folder. So, there is always hope to recover that perfect take you accidentally deleted!
- Audio Clip Mixer track routing - See Section 3 above. Remember: If you using Audio Tracks, then the Audio Clip will be routed back to the Input Mixer Track, this will mix with any subsequent recordings (so mute it, before proceeding). If not, the recorded Audio Clip will be routed to the same Mixer Track the Input Mixer Track is routed to. This won't be mixed with subsequent recordings, but will be audible.
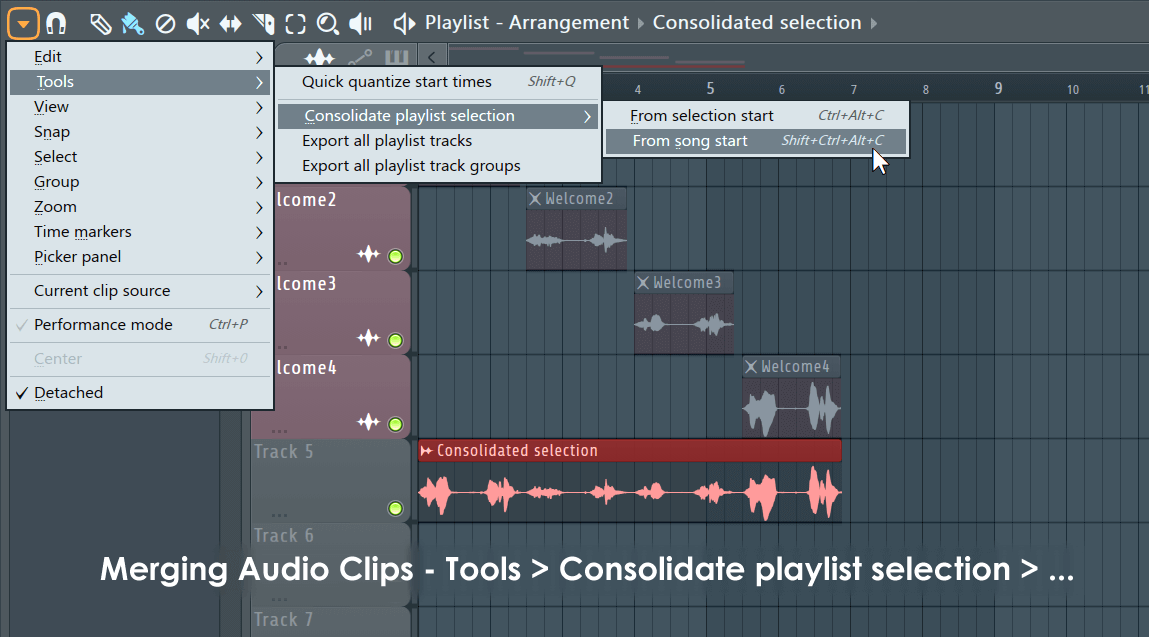
- Cleaning up / Compiling takes - See the manual section Bouncing to Audio for the method to compile your audio takes into single Audio Clip.
Playlist Loop Recording
Playlist & Sound-on-sound method - You can Loop record all or at any part of the Playlist by making a time selection and hear previously recorded loops for 'sound-on-sound' recording.
- Do not use Audio Tracks - Since Audio Tracks route the recorded Audio Clip back to the same Mixer Track as you recorded from, this will cause previous loops to mix with the next recording in the loop. You can deselect 'Blend recording' (see below) to avoid this, but then you won't be sound-on-sound looping.
- Select Loop record mode - The switch is on the Toolbar Shortcuts.
- Select 'Blend Recording' from the Toolbar Shortcuts. This will mean each loop recording will be audible. When this is off previous loops will be muted.
- Select Song mode - From the Transport Panel.
- Make a Playlist selection (optional) - If you want to Loop record over a section of the song, highlight the time-line section in the Playlist. Hold (Ctrl + Left-click) and then drag along the bar-count at the top of the Playlist. If you don't make a selection then the whole song will Loop record.
- Monitoring options - To mute loop recorded Audio Clips switch Blend recorded notes Off. To hear loop recorded Audio Clips, turn it On.
- Arm record mode and press Play to start recording - When FL Studio reaches the end of the Playlist data or selection it will dump the recorded audio to the Playlist as an Audio Clip and loop back to the beginning of the selection to start recording a new
Audio Clip.
NOTE: Each time around the loop FL Studio must save .wav files, create channels and new .wav files. On some systems, or with heavy projects, there may be audio glitches in the first few ms of each loop. Adding a bar lead in at the start of the loop section where you are not performing input audio will avoid this problem, should you experience it.
- Setting a custom record location folder from the F10 > Project > General Data folder setting, will send any recorded audio files to this location.
- If your audio device does not have factory ASIO drivers, use FL Studio ASIO or the ASIO4ALL driver. ASIO4ALL allows you to aggregate multiple input devices and record from several sources simultaneously (for example; a USB microphone and your Audio Interface).
NOTES:
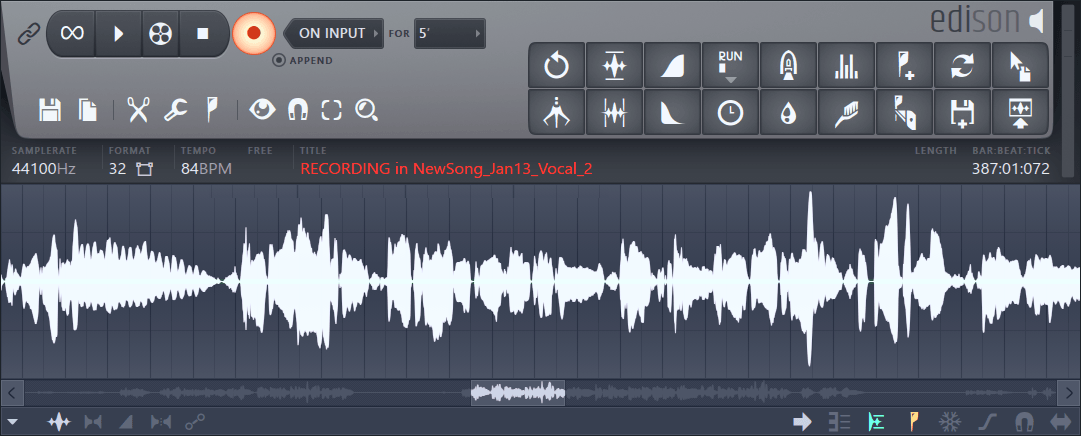
2. Edison recording procedure
Edison will record audio from any FX slot into which it is loaded. This makes it a handy tool for sound-design and general recording duties where you are not specifically wanting to sync the recording with the Playlist.
If the pre-requisites for external recording have been satisfied (as described above):
- Load Edison - Load Edison in an FX slot in the Mixer track that you want to record. Don't use the Master track (all audio from all tracks is routed here). TIP: Select the Mixer track and press (Shift+E) to auto-load Edison in the first empty FX slot on the track ready to record.
- Input selection - Select an external input (see below). Loading Edison before selecting an input will disable the auto-arming of the disk-record function. It is possible to turn this back on (if you wish) by clicking on the Mixer track record icon associated with the track you are using.
- Effects - Place Edison before any effects loaded in the same Mixer track for a 'dry' recording. It is recommended to record all external audio dry as this gives you the opportunity to add and change them later on.
- Record using Edison - Click here to see the Edison help and normal recording setup options. You will be able to record into Edison, where it is stored in memory, and then export the audio to a sample or Audio Clip.
- Exporting recorded audio - There are three main ways to export audio from Edison into FL Studio:
 Send to Playlist button, Left or Right-Click to:
- Left-click: Send to Playlist as Audio Clip (Shift+C) - Dumps the selection to the Playlist as an Audio Clip.
- Right-Click: Send to selected Channel - Dumps the selection to the selected Channel.
 Drag / copy sample / move selection - Left-click on the button and drag to the desired location (e.g. Playlist Clip-track). The selected region in the Sample Edit Window (or whole sample if no selection is made) will be copied and moved to any compatible location in FL Studio. Apart from the Playlist other locations may include Sampler channels, Fruity Slicer, DirectWave, etc. Right-Click to copy the selection to the clipboard.
 Save and load - Save the audio/selection to a file and re-import it through the Browser.
NOTES: 1. Take the time to read the next section on Mono inputs (3.4) and Monitoring (3.7) as they are also relevant to Edison recording. 2. Memory considerations: Edison records into RAM and so is not suited to recording hours of continuous audio. Edison uses approximately 20 Meg of RAM per minute of recording. If you need to record for more than 15 minutes then the Playlist (disk recording) method is recommended (see below).
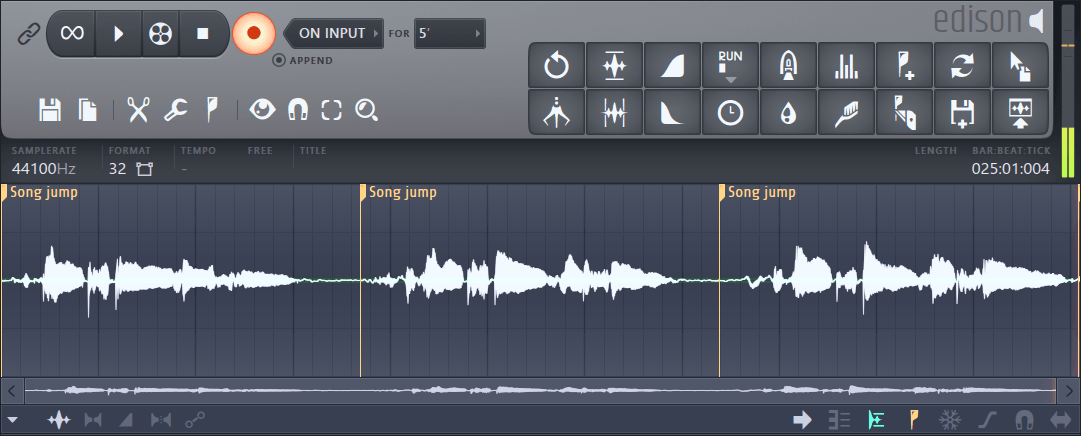
Edison Loop recording
Loop recording is the process of repeatedly laying down audio-takes while FL Studio loops a project. This technique is often preferred by instrumentalists or vocalists who want to repeat a phrase/section of a song until they get the perfect take, there are two loop recording methods available:
- Edison method - We recommend using Edison for Loop recording duties as described in the Edison Loop Recording
section. This will provide glitch-free recordings with the advantage that Edison will place region markers at the start of each loop-back for precise selection of the preferred loop. After recording the desired regions (loops)
can be selected and dragged (or sent) into the Playlist or saved as audio files. Use Edison as follows:
- Load Edison - Select a Mixer track and press (Shift+E). This loads Edison in the first empty FX slot ready to record with 'Slave playback to host' and Record 'On play' enabled.
- Select your input - Select your live audio input from the Mixer INPUT menu.
- Make a Playlist selection - If you only want to record a section of the song, highlight the section of time in the Playlist, hold (Ctrl) and then click and drag along the bar-count at the top of the Playlist. If you don't make a selection then the whole song will Loop record.
- Start recording - Press Play in FL Studio and record as many takes as you need into Edison. Each time Edison loops section Markers will be placed in the recording (these are useful for later).
- Stop recording - Stop FL Studio and click on the record button in Edison to disable it.
- Start playback - Press Play in FL Studio and the first take in Edison will play in sync with the Playlist (slave mode is on), looping when the Playlist does.
- Audition takes - With Edison focused use the left and right arrow keys on your keyboard to select a different takes in Edison. Each left/Right-Click will jump to the next/previous section.
- Send the perfect take to the Playlist - Press (Shift+C) to send the current selection in Edison to Playlist. NOTE: Edison will automatically set the sample properties to the current project tempo so that the recording will stretch as the project tempo is changed.
NOTE: The Edison method does not allow for 'sound-on-sound' recording where layers of audio are built up on each pass, for that use the Playlist method, below.
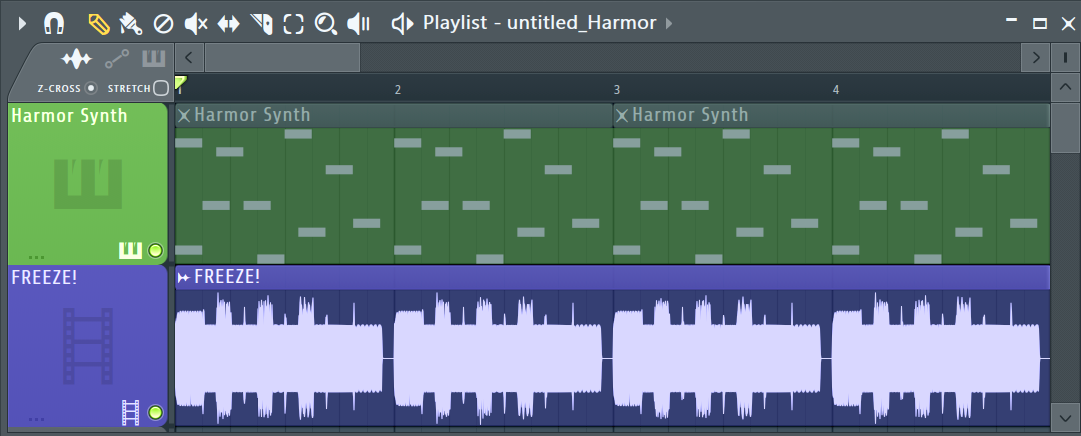
3. Recording Internal Mixer Audio (Freezing Mixer Tracks)
FL Studio allows you to record the output of one or more Mixer tracks to .wav files and to auto-insert them as Audio Clips in the Clip Track area (optional). There are two ways to record a track - non-realtime recording, which results in the highest audio quality and realtime recording (interactive) that allows recording of ASIO inputs.
Non-realtime recording Playlist (Mixer track freezing)
To perform non-realtime export of Mixer track/s, also known as 'track freezing' and auto-create an Audio Clip. See the Playlist section of the manual on Consolidating Clips. Alternatively, use the 'Split mixer tracks' option on the Export project dialog that will create a .wav file for each active Mixer track in the project. Great for creating track stems when importing audio into a 3rd party application.
Realtime recording Edison & Playlist
As an alternative to off-line rendering, as described above, you can use Edison or the track recording icon to capture audio from any number of Mixer tracks, live:
- Select your recording location - Either load Edison into an FX slot of the Mixer track you wish to record OR for Disk/Playlist recording Arm Mixer tracks by pressing the disk icon.
- Disk recording - If you are recording to the Playlist then turn OFF the Mixer menu > Disk recording > Latency compensation option. There is no latency for internal audio sources.
- Effects - In the case of Edison, you have the option of placing multiple instances of Edison on the same Mixer track, with or without other effects loaded before or after each instance. In this way you can record dry and wet (with effects) versions of your Mixer track audio (to record a dry version, make sure Edison is in slot #1). In the case of disk recording any effects on the track will be recorded, if you don't want this, disable the effects now.
- Record - Click here to see the Edison help and normal recording setup options. You will be able to record into Edison, where it is stored in memory, and then export the audio to a sample or Audio Clip. For disk recording the process is as described in the sections above, however this time it is internal audio that is recorded.
Mixer reference diagram

Full descriptions are available on the main Mixer page.
NOTE: Most controls are automatable (Right-Click and select 'Create automation clip').