INSTRUMENT PLUGINS / EFFECT PLUGINS / CHANNEL SETTINGS
Plugin Wrapper
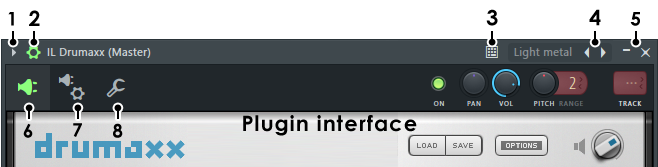
The Wrapper is a software interface/layer between instrument / effect plugins and FL Studio. All controls are common to all plugins (FL native & VST), while the plugin options (7) only appear on Wrappers hosting VST format plugins. The Wrapper provides compatibility with the VST 1, 2 & 3 standards (the screenshot below demonstrates the Fruity Wrapper hosting the 'Drumaxx' VSTi plugin). More information on installing and using 3rd party VST/DX plugins here.
There is a native and a VST wrapper, FL Studio automatically selects the appropriate Wrapper depending on the plugin type loaded. There are several control options:
1. Plugin Menu
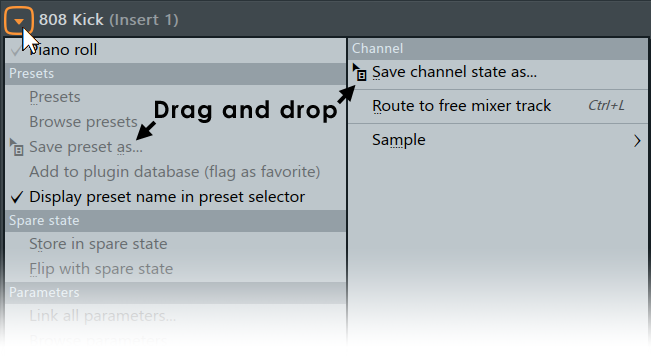
The Plugin Menu contains various plugin-specific commands, including preset management. The commands displayed will depend on the type of plugin being hosted. NOTE: The Save preset as command can be dragged and dropped on a compatible target.
- Piano roll
Opens a Piano roll for the selected channel.
- Presets
- Presets - Contains a sub-menu with preset handling options for the effect:
- Randomize gives random values to the published (i.e. known to FL Studio) plugin settings. When enabled, selecting a preset will load a random 50% of the settings, so you can quickly mix different presets and create new effects.
- Hybridize blends between the previous and next selected preset.
- Tree Display displays the settings in a 'tree' view. The Presets menu is disabled if there is no effect assigned to the plugin slot.
- Browse presets - Opens the presets menu in the Browser (not all plugins have presets shown here however).
- Save presets as - Save the current preset as a single preset file in the Browser. The menu item can also be dragged and dropped on a compatible location. e.g. The Browser, the Channel Rack or another instance of the same plugin to copy the preset.
- Add to plugin database (flag as favorite) - Adds the plugin to the currently open sub-directory of the Plugin database folder in the Browser. This is a special browser folder that works in conjunction with the Plugin picker to help organize and load plugins into projects.
- Display preset name in preset selector - The name of the preset is shown on the Wrapper menu-bar (4), where possible.
- Presets - Contains a sub-menu with preset handling options for the effect:
- Spare state
These options are useful for saving plugin settings, making edits, then comparing the original vs edited versions.
- Store in spare state - Saves the plugins current settings in a temporary buffer (spare state).
- Flip with spare state - Swaps the plugin's current settings with those in the spare state.
- Parameters
- Link all parameters... - Opens a dialog to link automatable plugin parameters to 'tweaked' hardware controllers in sequence down the 'parameter list'.
There are several options for skipping parameters or jumping to new locations in the list.
- Basic operation - Select 'Link all parameters' from the menu, and move the first hardware controller to be linked (the link is made to the first item in the 'Current parameter' list). When you move the second hardware controller it will be auto-linked to the next parameter and so on, until the end of the parameter list is reached or the link dialog is closed.
- To skip a link, Left-click the Skip button at the bottom of the link dialog (immediately left of the 'Accept' button).
- To jump directly to a parameter, use the Current parameter menu (top most in the link dialog) and select the target parameter you are interested in. You can then continue auto-linking from that point in the list by moving hardware controllers as before OR jump to another parameter in the list using the 'Current parameter' menu as previously described.
- Browse parameters - Allows you to see the list of automatable parameters in the Browser. Embedded CC Parameters: Every instance of the Wrapper has 128 CC (MIDI Control Change) parameters in a parameter list. These parameters transmit CC data directly to the plugin (for plugins that read CC data directly) and can be linked like any other parameter to a MIDI or internal controller. Thus, you can send CC data directly to the plugin instead of linking to a specific knob on the plugin interface. These parameters can also be set in conjunction with the Omni mode associated with the Remote control settings 'link' dialog to send CC data to any selected plugin and to save MIDI controller assignments (see the VST Control section for more details).
- Link all parameters... - Opens a dialog to link automatable plugin parameters to 'tweaked' hardware controllers in sequence down the 'parameter list'.
There are several options for skipping parameters or jumping to new locations in the list.
- CPU
- Allow threaded processing - Improves multi-threading and multi-core CPU performance. NOTE: Some 3rd party plugins may perform worse with multi-threading on. If you are experiencing choppy or broken sound (the GPO/Kontakt Player for example), try turning this off. To permanently disable multithreaded processing for the plugin (even for future FL Studio sessions) disable the 'Processing > Allow threaded processing' option and save it for the plugin type.
- Smart disable - Stops FL Studio processing the plugin when inactive. This can dramatically reduce CPU load, in certain projects. There is a macro: Tools > Macros > Misc > Switch smart disable for all plugins that selects this switch for all plugins.
NOTE: Smart disable can interfere with some plugins, including those that are time-based, envelope based or for long-decaying effects. Issues such as audio cutting out, not starting at the expected time, or timing out of sync. If plugins misbehave when disabled, you can deselect the Wrapper Settings > Allow smart disable option. This will be remembered for future instances of the plugin. There is also a global Smart disable on the F10 Audio settings panel.
- Make editor thumbnail - Places a small thumbnail image of the plugin interface into the Browser > Current project for use in an external editor. NOTE: the Browser view must be larger than 'Compact' for the thumbnail image to display.
- Rename, color and icon... (F2) - Open dialog to change associated Channel (button) name, color and icon.
- Change color... - Open dialog to change associated Channel (button) color.
- Change icon... - Open dialog to change associated Channel (button) icon.
- Detached - Detaches the Plugin from the FL Studio desktop so it can be moved to a monitor that does not have the FL Desktop stretched across it. NOTE: Detached plugins now are seen by Windows and FL Studio as separate applications. The plugin will stop responding to MIDI input if you tweak the UI AND can steal the Audio Interface. Refocus FL Studio to continue MIDI play. To correct audio stealing see the sections on Audio Settings > Auto close device and Plugin GUI Scaling to learn more how this affects workflow.
- Help - Opens the plugins in-line help (if any).
- Channel
- Save channel state as... - Saves the entire Channel state as a single preset in the Browser, including VST wrapper settings, Sample settings and Miscellaneous functions. The menu item can also be dragged and dropped on a compatible location. e.g. The Browser, the Channel Rack or another instance of the same plugin to copy the preset.
- Route to free mixer track (Ctrl+L) - Routes the channel to the first empty Mixer track. Feeling lucky punk?
2. Detailed Wrapper Settings (Show/Hide)
|
|
Wrapper settings - opens and closes the additional settings details as discussed below. |
3. Typing Keyboard Priority
|
|
Typing Keyboard Priority - This decides whether FL Studio or the plugin is the first to respond to keyboard shortcuts. When selected - The plugin uses keyboard shortcuts before FL Studio. Any unused shortcuts are passed onto FL Studio. When deselected - FL Studio uses keyboard shortcuts first then any unused shortcuts are passed to the plugin. This 'first to use' order is important, because when a keyboard command is used by FL Studio or a plugin, it is no longer available down-stream. When a keyboard command is not used by FL Studio or the plugin, it is passed downstream. The option is only available when the plugin accepts keyboard shortcuts. |
If the above does not work, you may need to take the following into consideration:
- Wrapper settings - Enable the 'Keep focus' option.
- Bridging - Bridged plugins (Bit size option) always steal keyboard focus when selected (that is its window has been clicked in). You can avoid this by using plugins of a corresponding bit version (32 Bit or 64 Bit) as your FL Studio version. NOTE: 32 Bit FL Studio was discontinued with 20.9, but 32 Bit plugins will still work when bridged. FL Studio for Mac only supports 64 Bit VST and AU plugins.
- Patcher - All plugins within Patcher will steal keyboard focus when selected.
- Plugin specific - Some plugins just don't forward the key event to FL Studio. Please contact the developer.
- Detached - Some detached plugin windows steal keyboard focus when focused. Avoid this by changing the detached state of the plugin from the Plugin window menu.
4. Preset Browser
|
|
Preset browser - This is for presets saved by the user and some plugins that publish their presets to the Wrapper. In this case, clicking on the left/right arrows will step through presets. Right-clicking here will open the preset menu for the plugin. |
5. Window Controls
|
|
Minimize / Close - Minimize plugin interface / Close plugin interface. |
6. Plugin Interface
|
|
Plugin interface - Use this to switch back to the Plugin interface after using one of the other Channel Settings tabs. To open multiple plugin interfaces - Hold (Alt)/(option) and click the Channel's Button on the Channel Rack. Keep doing this for each new instrument you wish to remain simultaneously visible. To disable the auto-close interface behavior you can also deselect the F10 General settings option Auto select linked modules. |
7. Plugin Wrapper Settings
|
|
Settings - These options are only available when using VST/AU plugins and provide advanced plugin wrapper controls. Click on the screenshot Settings, Processing or troubleshooting tabs above to see the help for that tab. |
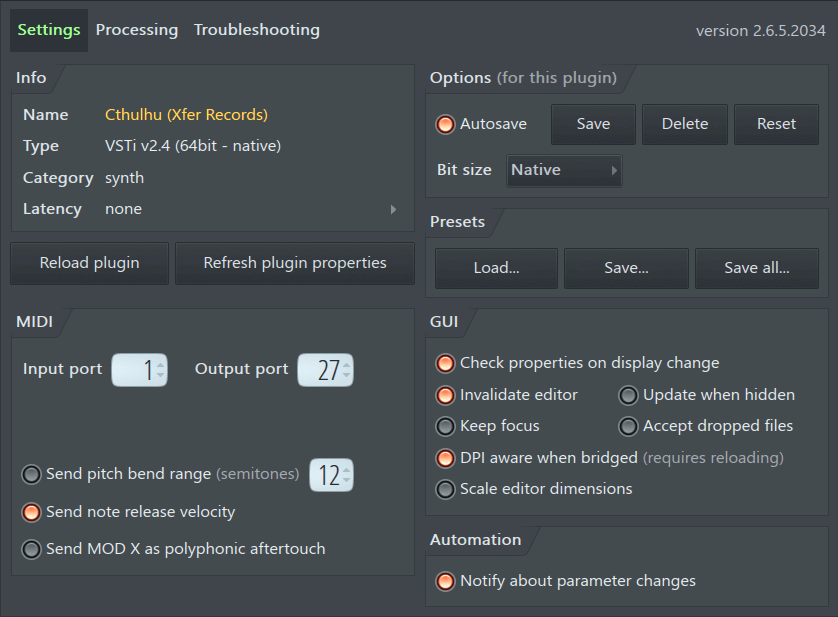
- Info - Displays any information published by the plugin, such as: Plugin Name, Type (32/64 Bit), Category & processing latency.
- Latency - Manual offset (Left-click the Latency value) to compensate for plugins that consistently report an incorrect latency. This setting will be remembered per-plugin. See Plugin Delay Compensation for more info.
NOTE: The latency value shown here is the total latency (manual + plugin latency). The information following, in brackets, will let you know if you are looking at a 'Manual' (where you have set a latency and the plugin does not report one), 'Plugin' (where the plugin has a latency that has been auto-detected and no manual value has been added) or 'Manual + Plugin' (where there is both a manual and automatic latency are in effect). In this case, to see individual latency values, check the in the controls hint in the Hint bar where you will see: "Latency X ms (manual) + Y ms (plugin)".
- Latency - Manual offset (Left-click the Latency value) to compensate for plugins that consistently report an incorrect latency. This setting will be remembered per-plugin. See Plugin Delay Compensation for more info.
- Options - Options are saved per-plugin, saved options are used each time the plugin is loaded, until they are deleted.
- Autosave - Automatically saves the options set in the wrapper Settings and Processing tabs. Settings are remembered the next time the plugin is loaded (this option is on by default). NOTE: Not all options are saved. Scaling / GUI options. In this case, these parameters are saved with presets. Making a favorite preset after setting these options will ensure the plugin always loads with the correct GUI settings.
- Save - Saves the options set in the wrapper. Saved options are used each time the plugin is loaded. Use when automatic saving is disabled. NOTE: Not all options are saved. Scaling / GUI options. In this case, these parameters are saved with presets. Making a favorite preset after setting these options will ensure the plugin always loads with the correct GUI settings.
- Delete - Clear the options for the currently loaded plugin. Default settings will be used next time the plugin is opened.
- Reset - Reset plugin options to the default state.
- Bit size (Bridging) - This option tells the Wrapper which Bit size version of a plugin to load for both FL Studio 32 and 64 Bit. It's useful when you want to always use a particular Bit size of a plugin (say a 64 Bit sampler in FL Studio 32 Bit) OR one Bit size is more stable than another across all versions of FL Studio. There are three options, Native, 32 Bit and 64 Bit:
- Native - The Wrapper will load the Bit-size plugin to match FL Studio 32 or 64 Bit (the native Bit-size).
- 32 or 64 Bit - The Wrapper will always try to load the set Bit-size in all versions of FL Studio (32 and 64 Bit). If the set Bit size can't be found the Wrapper will use the one that is available.
NOTE: This option is not applicable to macOS. Only 64 Bit plugins can be used.
- Presets
- Load preset/bank - Allows you to import a standard VST bank (FXB) or preset (FXP) in the currently hosted plugin instance. A bank replaces all of the programs for this plugin instance, while loading a preset replaces only the currently active program.
- Save preset - Allows you to export the current patch as a VST preset (FXP).
- Save all - Exports all programs in the bank as individual VST presets (FXP).
- Buttons
- Reload plugin - Reloads the plugin and resets it to the default settings.
- Refresh plugin properties - Checks plugin properties, such as, the number of inputs, outputs and latency. Can be useful if these were not registered correctly on loading or for properties that have changed after the plugin was loaded.
- MIDI
- Input port / Output port - Select the MIDI input and output ports respectively. MIDI ports are independent communication channels within a given MIDI connection. When the same port numbers are set on a MIDI input and output device the plugin and other MIDI device will be able to share exclusive MIDI data.
- Send note release velocity - Sends the note release velocity to the plugin along with the 'note off' message. Note off velocity is recorded in the Piano roll and can be edited using the integrated event editor. Your controller must send 'release velocity' for this to work, of course. But then again, perhaps not. Our support forums are full of people wondering why 'release velocity' is not working :)
- Send pitch bend range - When selected, the MIDI pitch bend range selected to the right of the switch will be passed to the plugin. Plugins that support pitch bend range will respond correctly to host bend instructions. This is not selected by default as some plugins interpret pitch bend range messages as a filter 'reset' message, causing problems.
- Send MOD X as polyphonic aftertouch - Enabling this option allows polyphonic, per-note, aftertouch to be sent to the plugin from the (Mod X) note property in the Piano roll. Per-note aftertouch values are sent at note-on. This option is not related to poly aftertouch from controllers.
- Graphical User Interface (GUI)
- Check properties on display change - Some plugins send a display change message when some properties have changed, such as the selected patch. This option allows FL Studio to detect the change and ensure data is correctly copied between FL Studio and the plugin.
- Invalidate plugin editor - Sends the plugin's 'idle' message. When FL Studio receives the idle message the plugin GUI can be refreshed. Try de-selecting this setting if the plugin has graphical display glitches.
- Update when hidden - Keep the GUI updated when not visible.
- Keep focus - Prevent the plugin from stealing keyboard input. NOTE: This won't always work. In particular bridged plugins always steal keyboard focus if focussed.
- Accept dropped files - VST plugins have first priority use files dropped on the plugin. If the plugin handles the file, it will not be available to FL Studio. When this is off, FL Studio will use the file and it will not be available to the plugin.
- DPI aware when bridged - Must be used with 'Wrapper Processing > Make bridged'. VST plugins with native rescaling will then use the Operating System display scaling. See Rescaling VST plugins for more details. NOTE: For Windows, deselect this option if VST plugins don't display correctly when using the FL64 (scaled).exe version.
- Scale editor dimensions - Try this when plugin GUIs are mismatched to the size of the window containing them.
- Automation
- Notify about parameter changes - Normally this is on so FL Studio is notified precisely what plugin controls you have been touching, and the police can be alerted. This data is also used for Last tweaked parameter linking and the undo history (when 'General Settings > Undo knob tweaks' is selected). As some badly behaved plugins continuously send parameter change messages to FL Studio this will reset the 'Last tweaked parameter' value and make it impossible select and link some target of your choice.
|
|
> Processing. Click on the screenshot Settings, Processing or troubleshooting tabs below to see the help for that tab. |
- Compatibility Options - Not all plugin developers work strictly to the letter of the VST/2/3 plugin specification (sadly). In this case there may be graphical, audio or other issues (crashing) with a plugin. These options are provided to help in such cases. NOTE: If you are troubleshooting plugins, see the section on 'Plugins behaving badly' for more tips. If you report plugin issues to developers expect a lot of finger pointing and blaming the other guy. No we don't really expect you to remember all these options, to understand what they do, or even to find them in the manual. They are here mainly so Tech support can tell you to flip a switch when some plugin is acting up, and you start pointing the finger at FL Studio. These options keep the peace and make everyone happy.
- Allow threaded processing - Switch to turn multi-core enhanced processing on/off. NOTE: A plugin will be multi-core threaded only if this, the Global Multithreaded options and the Wrapper menu - 'Allow threaded processing' options are on. The threaded processing option here is provided since it can be saved using the 'Settings' tab 'per plugin type'. This is useful to prevent plugins that are not multithread safe running in this mode in future, regardless of the other settings.
- Allow smart disable - When deselected 'Smart disable' will not be applied to the plugin. There is a global Smart disable on the F10 Audio settings panel OR 'Smart disable' Tools > Macros > Misc > Switch smart disable for all plugins. These all act on the Wrapper menu > 'Smart disable' option.
- Make bridged - Only VST plugins can be 'Bridged'. Bridging opens a plugin in a separate process outside FL Studio. This means the Operating System (OS) sees the plugin as a separate program and we can do more things with it. Non-bridged plugins are invisible to the OS, inside FL Studio. Both 32 and 64 Bit plugins can be bridged. There are four cases where bridging VST plugins is useful, if these don't apply, don't bridge:
1. Memory management (only useful for FL Studio 32 Bit) - Bridging removes the plugins memory allocation from FL Studio's memory space to an independent process under Windows. Bridging is particularly beneficial for sampler and ROMpler plugins that consume large amounts of memory loading samples. The maximum memory available to the bridged plugin will be at least 2 Gb for 32 Bit Windows and at least 4 Gb depending on your version of 64 Bit Windows (see 2). To reduce the memory burden of Audio Clips and Sampler Channels use the 'Keep on disk' option.
2. Running cross-bit-depth VST plugins - Bridging allows 32 Bit VST plugins to run in FL Studio 64 Bit and 64 Bit VST plugins to be used in FL Studio 32 Bit. 32 and 64 Bit plugins are auto-detected and the Bridged mode will be set accordingly. The memory available to the plugin depends on the Windows bit-depth as described above. NOTES:
- 2.1 Memory - 64 Bit plugins running on 64 Bit windows will have access to the maximum memory available under your Windows version.
- 2.2 CPU and Stability - We recommend using 32 Bit plugins in FL Studio 32 Bit and 64 Bit plugins in FL Studio 64 Bit, where possible. Bridging introduces an additional layer of processing and so a small CPU overhead (approx 1-2% per plugin). It can also decrease stability for some plugin. If a plugin crashes, please report it to Tech support and we will fix it, or point the finger at the developer.
3. Protect FL Studio from crashing plugins - If a plugin crashes while in Bridged mode then it is less likely to bring down FL Studio at the same time. Try using Bridged mode with plugins that are unstable or crash. If you just read point 2.2 (above), you are right, this is a paradox!
4. Rescaling VST plugins - High resolution monitors will shrink VST plugin interfaces. NOTE: To ensure the plugin always loads with the correct GUI settings, make a favorite preset after setting these options:
- VST plugins WITH native rescaling - Select Wrapper processing > Make bridged ON and Wrapper settings > DPI aware when bridged ON. NOTE: You should check your plugin manual for information on how to use its own scaling settings.
- VST plugins WITHOUT native rescaling - Bridging opens the plugin outside FL Studio so it can respond to Windows System scaling. Select Wrapper processing > Make bridged ON and Wrapper processing > External window ON plus Wrapper settings > DPI aware when bridged OFF. NOTE: The 'Make bridged' option won't show if the plugin is already bridged. If this is the case, you can proceed without setting it. Also, please take the time and contact the VST plugin developer and request they support VST Scaling.
- Two foolproof fixes when all else fails:
1. Rescale FL Studio - There are a pair of additional executable files in the FL Studio installation folder, FL64 (scaled).exe and FL (scaled).exe. These will submit FL Studio and VST plugins to the Windows scaling and should simplify plugin management. The tradeoff is FL Studio may look slightly blurry, particularly on displays 17" or larger. OR
2. Change display resolution - If you are using a high resolution (e.g. 3840x2160) on a relatively small display such as a laptop (14-17"), set the screen resolution to something like 1920x1080 or 2560x1440. You probably won't notice much change in image quality, and plugin scaling issues will be solved.
NOTES:
- FL Studio Scaling - See General Settings > Rescaling options for more information on GUI rescaling. You have probably already set Windows scaling to work on your high resolution monitor, and so the plugin will be scaled appropriately. If not, open the Windows Control Panel, click on Display > Custom Sizing Options. From there adjust GUI zoom percentage selector. All bridged plugins with the correct settings will use this scaling value.
- Bridged plugins - Will appear to the OS as a separate program and so can steal Audio Interface focus. Bridging can stop audio playback depending on the Driver and Audio Options in use. Work-around options include using FL Studio ASIO or deselecting Options > Audio > Auto close.
- External window - For use with bridged plugins. It can be used to correct plugins that appear too small. NOTE: Deselect the Wrapper Menu option 'DPI aware when bridged' first.
- Ensure processor state in plugin callback - Only deselect if you are having unexpected issues including noises, DC offset, volume spikes, plugin crashes etc.
- Notify about rendering mode - The plugin is informed when FL Studio is rendering so it can switch to a higher quality output, if possible. This must be selected to achieve HQ rendering from plugins that support different real-time and rendered quality. Try deselecting this option if a plugin is not rendering correctly. NOTE: Native FL Studio plugins respond to the HQ for all plugins render option.
- Process inactive inputs and outputs - Some plugins mark one or more of their inputs/outputs as 'inactive' even though they are being used. By default, FL Studio doesn't process inactive inputs/outputs, so no sound is produced. This option ensures FL Studio processes 'inactive' outputs.
- Auto map inputs - Auto map inputs only applies to plugins loaded in Mixer effects slots since instrument channels can't receive audio input.
- 1. Sidechain the total number of mixer tracks, to your multi-input plugin's mixer track, that equals the number of audio inputs the plugin needs BEFORE using the 'Auto map inputs' function. If you don't sidechain the total number, some inputs will remain unassigned.
- 2. Click the Auto map inputs button and the sidechained mixer tracks will be assigned to the multi-input plugin's available inputs. Auto map will assign the sidechained Mixer track with the lowest
number to the first plugin input, and so on.
If you need to reassign these mappings see the section below on 'Manual assignment of plugins loaded in effects slots'.
- Reset - Reset the inputs/outputs to the default state.
- Auto map outputs - Auto-assign plugin outputs to mixer tracks following the plugin's own Mixer track. The routing will incrementally map to Mixer-tracks following the plugins selected Mixer track. If you need to reassign these mappings see the section below on 'Manual assignment of plugins loaded in effects slots'.
- Manual assignment of inputs/outputs - Right-click the input/output fields to open the list of routing options. The routing details vary depending on whether the plugin is loaded in an instrument channel or
in an effects slot:
- Manual assignment of plugins loaded in channels - Right-click the input or output number fields to open a list then click on an item to select it. When plugins are loaded in Channels, the numbers for the inputs and outputs are Mixer-track offsets (relative to the Mixer track number set in the Channel Settings). For example, if the plugin is routed to Mixer track 10 and a plugin input is set to -2 and a plugin output set to 10, then the plugin will receive audio-input from track 8 (10 - 2) and output audio to track 20 (10 + 10).
- Manual assignment of plugins loaded in effects slots - Right-click the input/output number fields to open a list then click on an item to select it. When plugins are loaded in the Mixer, the numbers are 'indexes' to the list of inputs or outputs that are routed to and from the Mixer track that the effect is in. NOTE: When routing Mixer tracks to the target Mixer track (the one holding the effect), Right-click the Track Send switch and use the 'Sidechain to this track' option. This mutes the audio being sent to the effect's track, while allowing the 'side-chain' signal to be processed on the input set to receive it. Failure to do this will result in a parallel audio signal, one entering through the effect's input and another passing through the effect stack as normal.
NOTE: Always name the Mixer tracks being used by the plugin. This ensures FL Studio knows they are being used by a plugin which can be important for PDC calculations, split-mixer track rendering and automatic track assignment.
|
|
Troubleshooting - These options are only available when using VST/AU plugins and provide advanced plugin wrapper controls. Click on the screenshot Settings, Processing or troubleshooting tabs above to see the help for that tab. |