Image-Line Software
Image-Line Remote
Image-Line Remote (IL Remote) is a free Android or iOS, Tablet or Phone, user-configurable MIDI controller application for FL Studio. Just open FL Studio on your computer and IL Remote on your mobile device and you will be controlling it from your phone or tablet. You can use up to 15 devices, in any combination of Android and iOS simultaneously. Get IL Remote here - IL Remote Android or IL Remote iOS. See the ![]() Video Tutorial Playlist here.
Video Tutorial Playlist here.
NOTE: You need (at least) FL Studio 12.3 (to access the latest features) AND Android 3.0 or iOS 5.1 to use IL Remote.
TIP: Use the MAIN tab to control FL Studio from your phone or tablet device while you are in another room or remote from your computer to start or stop recording, control headphone levels etc.
Overview
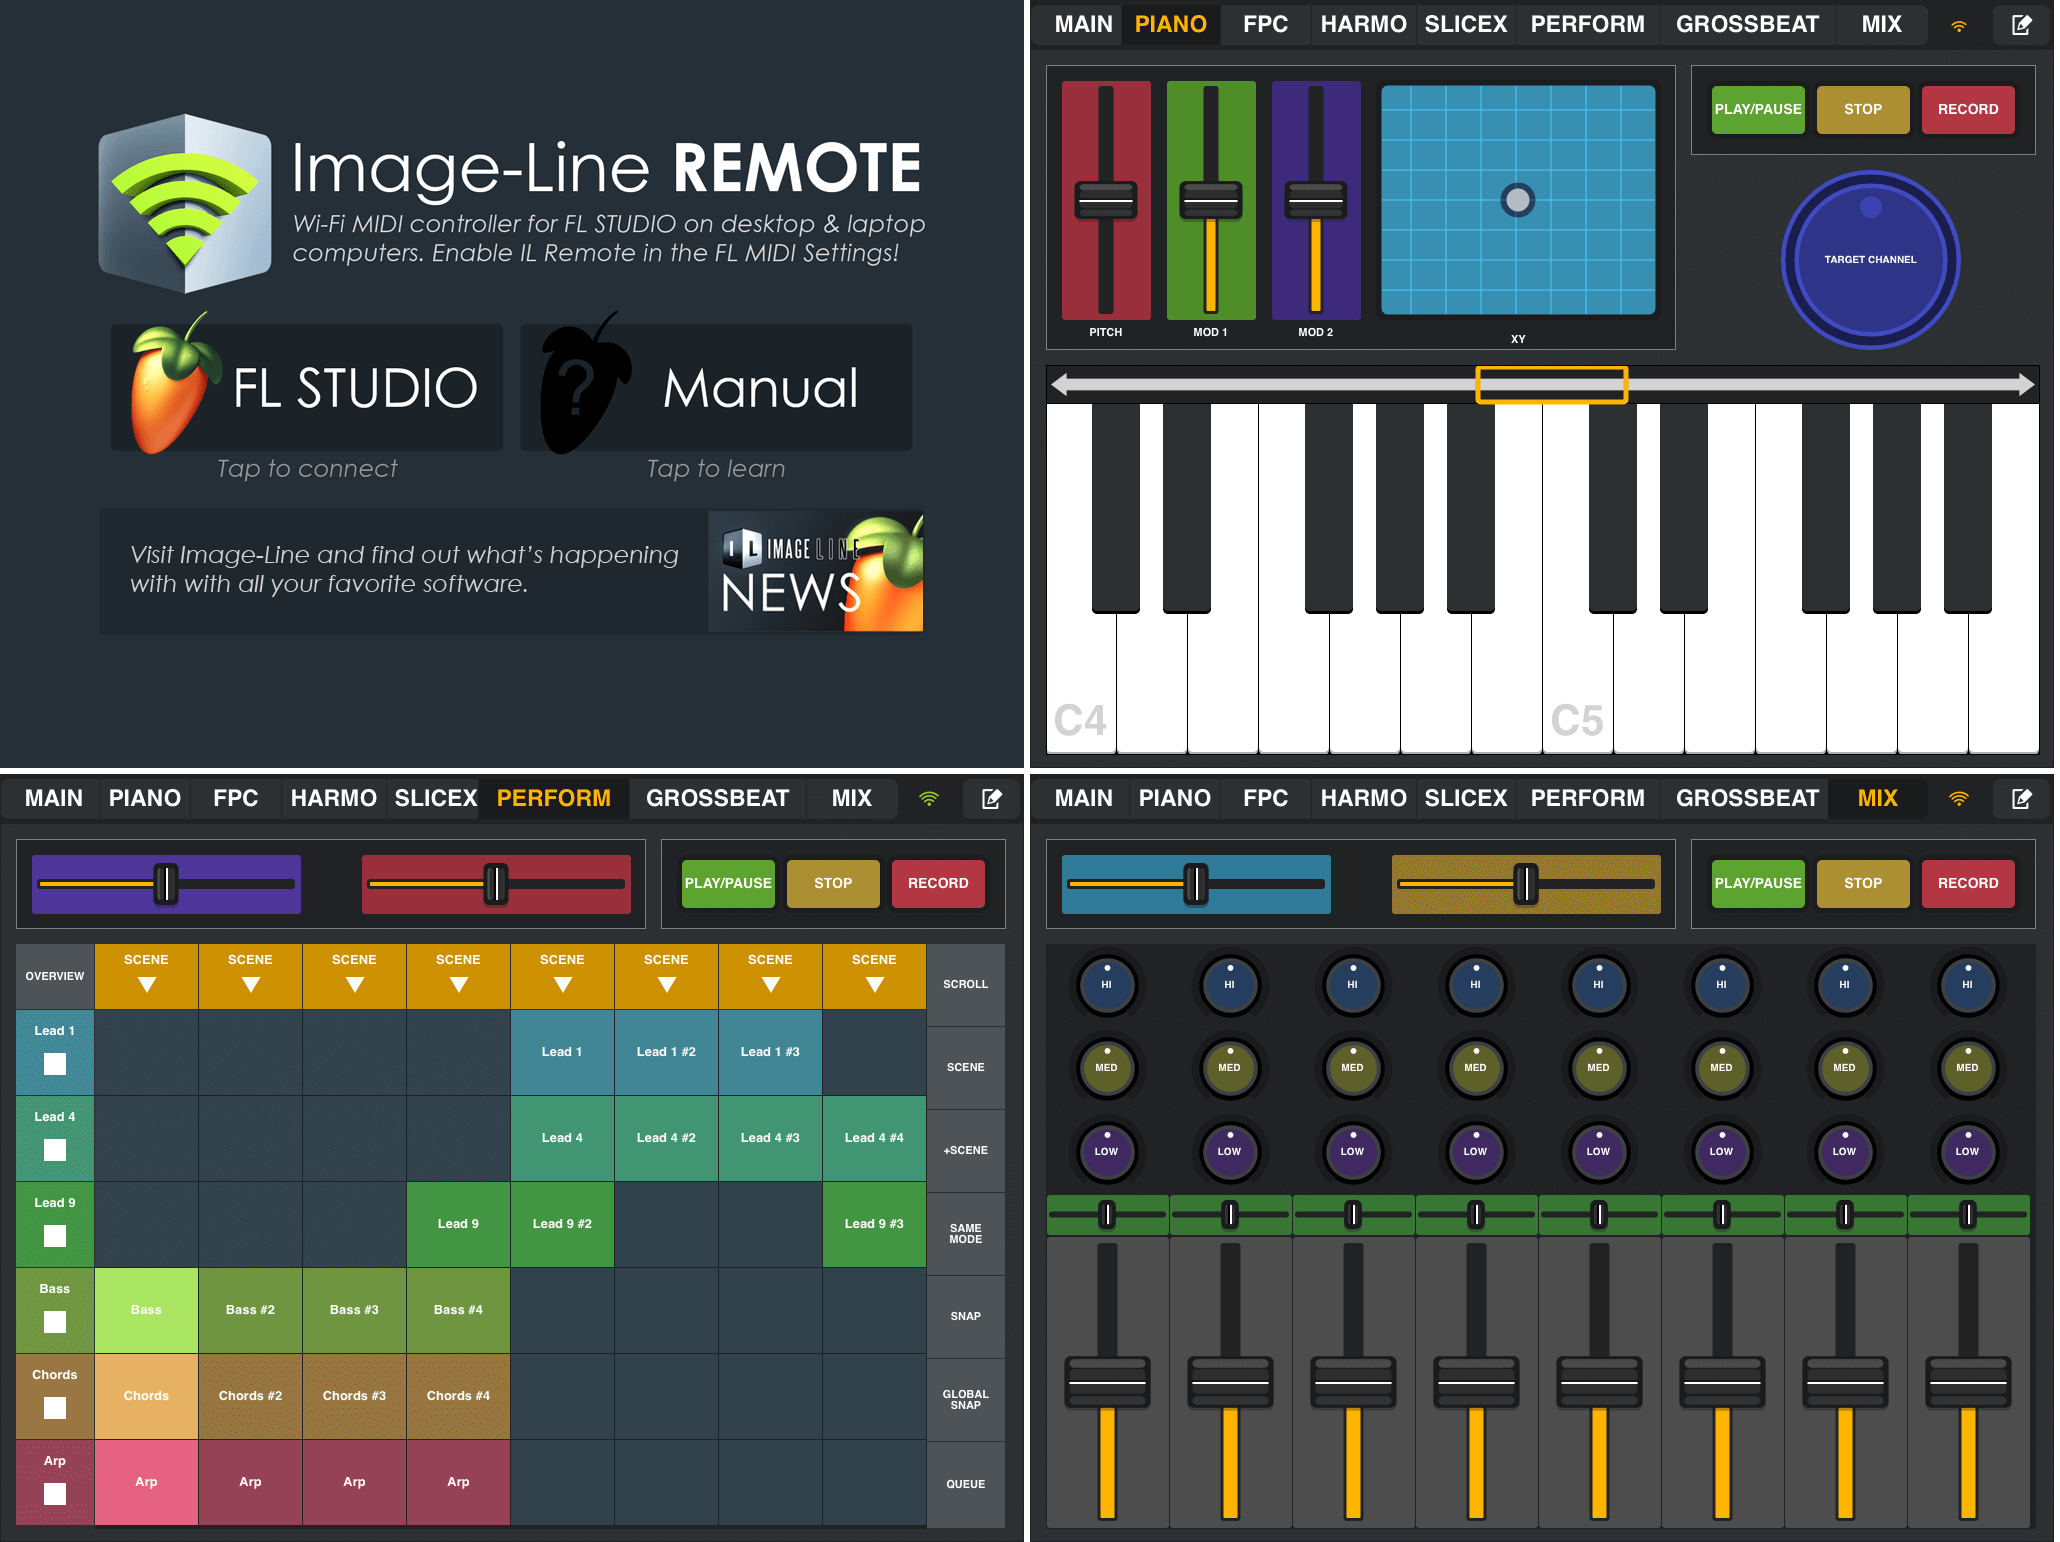
IL Remote has a number of default tabs designed to work with FL Studio. You can create new tabs with custom control layouts or delete existing tabs when in Edit mode. NOTE: Not all functions on the preset tabs are pre-linked to targets in FL Studio and will require initial linking. If you use the 'Override global links' method these will be remembered for future FL Studio sessions. Example defaults include:
- HOME - The Home screen allows you to load the default 'FL Studio' layout, read this 'Manual' or check the Image-Line news.
- MAIN - Transport controls. These are all pre-linked to targets in FL Studio.
- PIANO - MIDI Keyboard will play the selected Channel.
- FPC - Fruity Pad Controller.
- HARMO - Scale corrected MIDI/keyboard grid. Plays the selected Channel.
- SLICEX - Slicex controller. The X/Y parameter needs to be linked to Slicex.
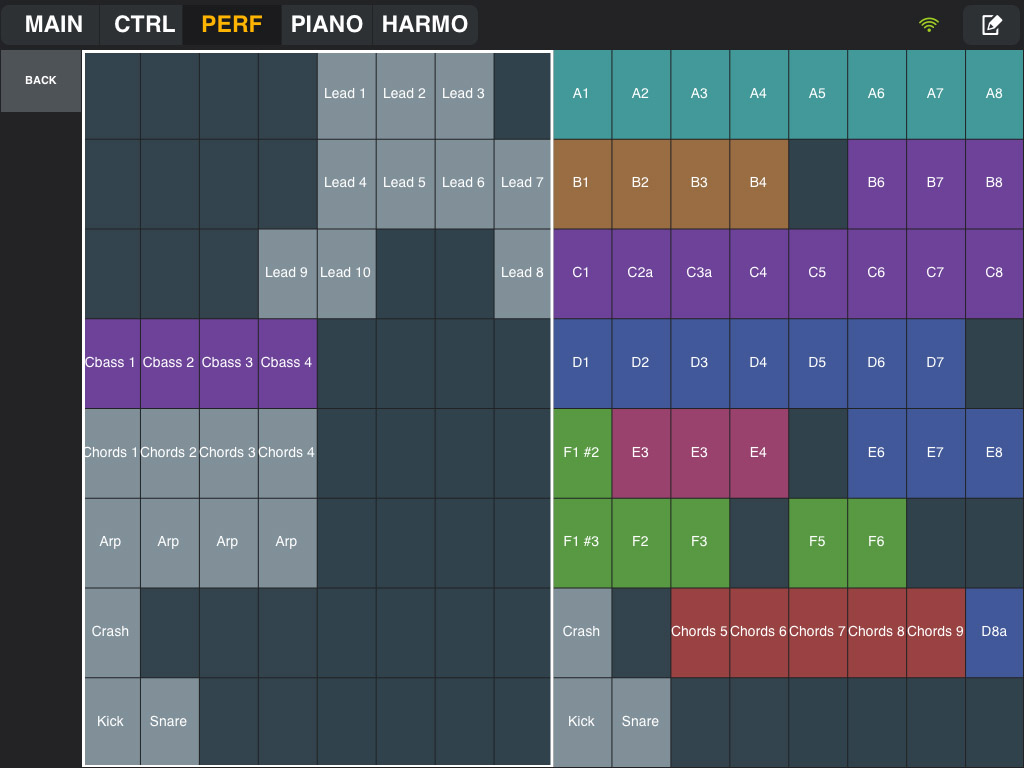
- PERFORM - Clip triggering grid for Performance Mode. Clips will be automatically filled when a Performance Mode project is loaded.
- GROSSBEAT - Gross Beat controller. Linking to Gross Beat - Right-Click any time slot on Gross Beat in FL Studio, select 'Link to controller' then press any time slot button on the IL Remote Gross Beat controller and all slots will be linked at once.
- MIX - Mixer controls.
NOTE: The configuration of the tabs above will vary depending on the screen dimensions and resolution of the device you are using.
Tab Controls
The default tabs, listed above, are made from one or more of the following control elements, accessed from the (+)Controls menu while in Edit Mode. For example, to make your own Mixer start with a Container and add Knobs, Pads and Faders, then save it as a Preset named 'Mixer'.
- Pad - Multi-purpose Pad.
- Fader - Horizontal or vertical faders.
- Knob - Control knobs.
- Jog Wheel - Continuous controller.
- Mixer - Configurable Mixer.
- Clip Launcher - Performance Mode Clip launching tool.
- X/Y Control - Two axis variable controller.
- Piano Keyboard - MIDI controller.
- Harmonic Grid - Become a proficient Jazz player, instantly.
- Container - Hold and organize groups of the above controls.
Image-Line Remote Users & Support Forum
Visit the IL Remote users forum to share layouts, presets and to get support. Log into your existing account or create one to get access.
Wi-Fi Setup & Connections
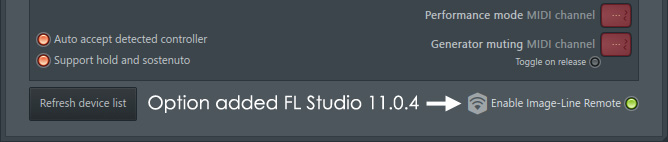
IL Remote connects automatically to FL Studio when your computer and mobile device are connected to the same network and IL Remote is activated in the options, as shown below. Typical networking scenarios would be a computer connected to a Wi-Fi capable modem/router either by Wi-Fi or Ethernet cable and the Android/iOS device/s connected by Wi-Fi to the same network OR a laptop working as an Ad-hoc Wi-Fi network, and the Android/iOS device/s connected directly to that.
Connecting IL Remote and FL Studio over an Existing Wi-Fi Network
- Log in - Make sure your computer and IL Remote device are connected to the same network.
- MIDI settings: - From FL Studio's MIDI Settings turn on 'Enable Image Line Remote'.
- Security - The first time you activate the IL Remote setting you will probably need to allow FL Studio access through the OS firewall, at the usual security pop-up.
If you don't get a pop-up, and you can't get a connection between FL Studio and IL Remote, you will need to manually add FL Studio to the Firewall exceptions list.
Do this from the Control Panel > System & Security > Windows Firewall > Allow an app through Windows firewall. These steps are explained in detail in the
 IL Remote networking video tutorial.
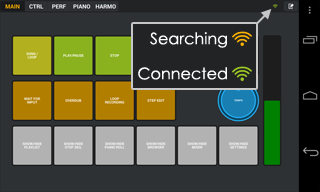
- Check the connection - Once connected the network icon will change from orange to green as shown below.
NOTE: You can connect up to 15 mobile devices (iOS and Android) simultaneously to FL Studio. Just open IL Remote on each device you want to use and the rest is taken care of for you.
Network Troubleshooting
If you are having problems connecting try the following in this order:
- Disable your Windows firewall - If IL Remote now connects then follow these steps:
IL Remote networking video tutorial.
- Disable anti-virus programs - If this works, white-list FL Studio in the anti-virus program options. Look for any firewall options (integrated into the anti-virus program) as mentioned above. If there are options, allow FL Studio (FL.exe) for local networks and enable port 9050 and 9100 for UDP protocol.
- Check your network router's admin controls - Look for IP filtering, MAC filtering (if your device can connect to the internet through your Wi-Fi network this won't be the cause), router firewalls etc. Ports - Try adding a manual rule to allow FL Studio (FL.exe) for local networks and enabling port 9050 and 9100 for UDP protocol. IL Remote only uses port 9050, so add this exception anywhere you can find the opportunity.
- Change password encryption - If you are using WPA/WPA2/PSK, try WEP encryption type for the password, or vice versa.
- Update your router's firmware - This will involve getting into the admin options and installing a file that updates the router's internal programs. Check the manufacturers website for details.
Ad-Hoc Network Creation
If you are not connecting FL Studio and IL Remote over an existing Wi-Fi network, you can create an Ad hoc (computer-to-computer) network. This allows you to use the Wi-Fi built into a laptop/netbook or desktop PC with a Wi-Fi device attached, directly to your mobile device/s without passing through a network router.
Windows 8/10
The 'Set up an ad hoc network' setup options were removed from windows 8 and the boffins at Microsoft now expect you to type in Windows CMD entries. Fear not, we have written some batch files to take care of this faffing about for you.
- Download - Windows_8_Adhoc_Network_Scripts.zip and extract 'start_adhoc_network.bat' and 'stop_adhoc_network.bat' to your computer.
- Run the start network batch file - Right-Click 'start_adhoc_network.bat' and select the pop-up menu option 'Run as administrator'. Feel free to drag and drop these files on an open text editor window, to see what's inside, if running our batch files is too spooky for you.
- Following the prompts - Type the network name and password (at least 8 characters) and check the connection is listed in the Wi-Fi networks, and in the "waiting for users" state.
- Android users (conditional) - If you do not see the Ad-hoc network in the Wi-Fi networks list, you may need to install a Virtual Router application on your FL Studio computer. Two suggestions are Virtual Router (free, open source) and My Public Wi-Fi (free), although any Virtual Router will work. This step is necessary with Android devices that don't show ad-hoc networks. Just enter the same network name and Password used in the steps above.
- Press any key to continue... - This message shows at the end of the script and will close the window.
- Wi-Fi connection - From your mobile device open the Wi-Fi settings and log into the network using the network name and password you used above.
- Connect FL Studio & IL Remote - Now follow the instructions for connecting to an existing network above. NOTE: When connecting to the ad-hoc network this can take up to 30 seconds before it's really established, even if the PC or Android device says 'Connected', so be patient.
- To stop the network - Right-Click 'stop_adhoc_network.bat' and select 'Run as administrator'
Windows 7, Vista & XP
The Network and sharing center Wizard will take care of most steps as follows:
- Open the 'Network & Sharing Center' by clicking the Start button and then clicking Control Panel. In the search box, type network, and then click Network and Sharing Center.
- Click 'Set up a new connection or network' and then 'Next'.
- Following the Wizard - Type the name and password of the network and Check that the connection is listed in the Wi-Fi networks, and in the "waiting for users" state.
- Android users (conditional) - If you do not see the Ad-hoc network in the Wi-Fi networks list, you may need to install a Virtual Router application on your FL Studio computer. Two suggestions are Virtual Router (free, open source) and My Public Wi-Fi (free), although any Virtual Router will work. This step is necessary with Android devices that don't show ad-hoc networks. Just enter the same network name and Password used in the steps above.
- Wi-Fi connection - From your mobile device open the Wi-Fi settings and log into the network using the network name and password you used above.
- Connect FL Studio & IL Remote - Now follow the instructions for connecting to an existing network above. NOTE: When connecting to the ad-hoc network this can take up to 30 seconds before it's really established, even if the PC or Android device says 'Connected', so be patient.
OS X
Proceed as follows:
- Choose Create Network from the Wi-Fi status icon in the menu bar. If the icon isn?t in the menu bar, choose Apple menu > System Preferences, and then click Network. Click Wi-Fi and select the ?Show Wi-Fi status in menu bar? checkbox.
- Give the network a name, and select a channel from the pop-up menu. The default channel is 11, but you can choose a different channel.
- Select the Require Password checkbox to protect your network with a password. Type the password you will use to join your network from your device. Type a password of exactly 5 ASCII characters or 10 hexadecimal digits if you chose ?40-bit WEP (more compatible)? from the Security pop-up menu OR Type a password of exactly 13 ASCII characters or 26 hexadecimal digits if you chose ?128-bit WEP? from the Security pop-up menu. NOTE: Don't use WPA or WPA2.
Ad-Hoc Network Troubleshooting
- Windows delay - Establishing an ad-hoc connection can take up to a full minute after it's shown as 'connected'. To check the connection is really up and working, go to the WiFi settings on your mobile device and check if it has been assigned an IP address.
- Password encryption - Don't use WPA/WPA2/PSK, try WEP encryption type for the password.
Linking IL Remote Controls to Targets
If you already know how to use FL Studio controller linking, the process with IL Remote is exactly the same. IL Remote appears to FL Studio just another 'hardware' controller once the Wi-Fi connection is made.
While many controls on the default tabs are pre-linked to specific FL Studio targets, you can make your own custom links as per normal MIDI controller procedures. Drop into 'Edit Mode', add new tabs/controls or redefine existing links. To link IL Remote controls to FL Studio targets follow the standard procedures:
- See here for Permanent Links that are remembered next time you open FL Studio and the IL Remote App (recommended).
- See here for Per-Session links that are forgotten after you close FL Studio.
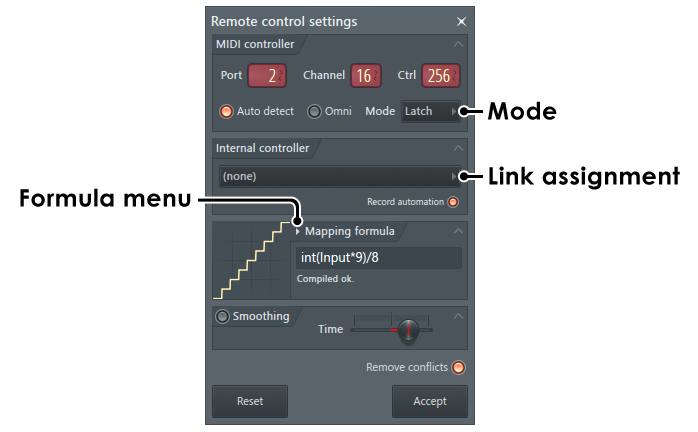
NOTE: FL Studio has a range of sophisticated linking options that significantly enhance the power of IL Remote. In particular, familiarize yourself with the Remote Control Settings Mode switch and user defined Mapping formula (the field below menu) shown below:
MIDI Channels & Control Change (CC) Numbers
While most controls have MIDI Channel settings, generally you do not need to worry about these settings, use the default. MIDI Channels are useful in situations where you may have control conflicts.
For example if you want to use multiple Keyboards or Harmonic Grids to control separate plugins you will need to set the target plugins and IL Remote keyboards to unique MIDI Channel pairings. Further, Control ID (0 to 127 x 16 MIDI Channels) communicate with targets that associate a specific CC numbers with controls. For example CC 1 is used for 'Modwheel' control and CC 64 is defined as 'Sustain' pedal by plugins conforming to General MIDI.
Edit Mode
To enter EDIT mode drag on the Edit icon (shown below) from right to left. The system is designed to avoid accidental touches while performing.

Once in edit mode you will have access to the following controls:

- Layouts - Load and save groups of tabs (a Layout).
Layouts
A Layout (*.ilr format) is a collection of tabs in an IL Remote project. The Layout menu is located to the top-left of the display while in Edit mode. Presets (*.ilrp format) are a collection of controls saved in a Container that can be loaded on a tab. This is the fastest way to build new Layouts.
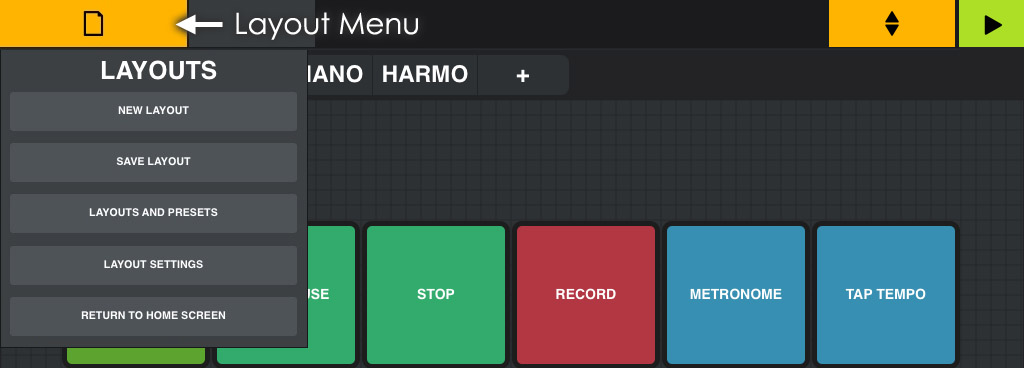
Layout Menu
- New Layout - Start from a blank slate. You have the options:
- Choose a layout name - Just tap in the box and type a name for your Layout.
- Tabs - Choose to use the Fullscreen or Splitscreen modes (Horizontal, Vertical and Quartered).
- Save Layout - Save the currently loaded Layout.
- Layouts and Presets - Load and browse Layouts (groups of Tabs) or Presets (created using Containers) from a menu.
- Show Layouts/Presets - Filter the list to show each data type.
- Load - Select the Layout from the menu and tap Load.
- Share - Select the Layout from the menu and tap Share to open sharing options such as Email (iOS) or Dropbox, Skype or other connected Apps (Android). NOTE: Share is not currently available for the iPhone, you will need to use iTunes to manage data. Why not visit the IL Remote users forum to share layouts and presets.
- Layout Settings - Choose color theme and accelerometer settings.
- Bright/Dark Theme - Choose an overall White or Gray theme.
- Normal, Big, Huge Font - Choose the size of the font used on controls.
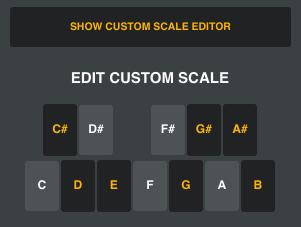
- Show Custom Scale Editor - Tap to select any notes you like from a mini-keyboard. This 'scale' then becomes available under the name 'Custom' for controls that
allow you to select scales from a scale menu, such as the Keyboard or Harmonic Grid.
- Accel X, Y, Z CC - Set the X, Y and Z accelerometer CC number ID settings.
- Microphone CC - Set the devices microphone CC number ID settings. The volume for the mic will be tracked and converted into a controller message between 0 and 1.
- Return to Home Screen - The Home screen allows you to load the default 'FL Studio' layout, read this 'Manual' or check the Image-Line news.
Importing layouts and presets:
- Android - Put files in /sdcard/ILRemote_import folder and launch the App, then press "scan import folder". TIP: Airdroid allows you to manage files on your Android device via any web browser.
- iOS - Use "open in ILRemote" from the mail App.
- Saving tabs - While you can't save and load tabs, you can create a full-page sized Container (double tap it while in Edit mode), then fill it with your custom controls and save the Container as a Preset. In future you can add a new tab and load the preset and there's your saved tab. This also allows people with different devices to load the tab and resize it to fit their device when sharing since controls in a Container are auto-scaled with resizing.
Controls
This section covers the Controls that can be placed on tabs. Controls are the interactive user-interface elements that are linked to targets in FL Studio.
Control Principles
The following apply to most controls or tabs:
- Make full-screen - Double tapping controls while in edit mode will make them full screen, if possible for the control type.
- Lock the selected tab - While in live play mode, long-press the current tab to lock/unlock it and avoid accidental tab changes.
- Custom colors - When selecting custom colors, the last row of colors stores presets (use Pick to make custom selections), the previous rows are default presets.
- Edge snapping - When resizing a control near a border (less than 2 grid steps); if you hold the resizing handle, located at the bottom right corner of the control, for more than 2 seconds, the control will snap to the border(s). This can be useful if you want a control to take either the whole height or whole width without being in full screen.
- Conflicting CC numbers (CTRL ID) - Where Knobs, Faders & X/Y Controls have conflicting CC numbers set these will show in red.
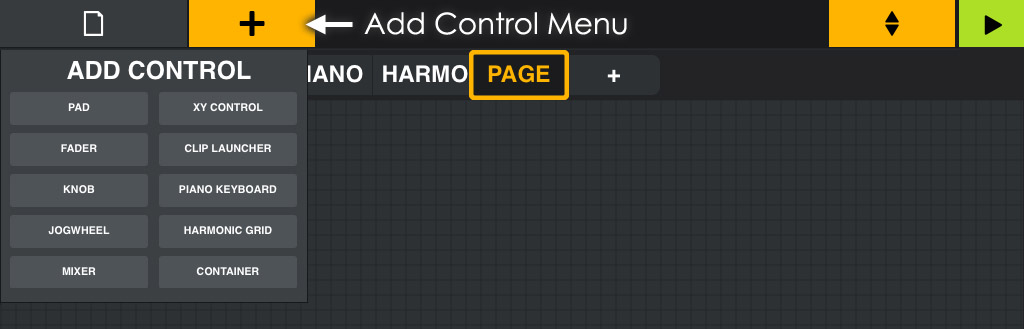
Adding Controls
In Edit mode tap the Add Control menu shown below to add controls to the selected tab.
NOTE: You can split tabs into horizontal, vertical and quarter divisions using the Layouts > New Layout menu options.
The following controls are available
Pad
Pads can be used as drum-pads, triggers, switches, buttons, a track-pad or to send keyboard shortcuts. Pads can also send special system commands or to set a controller to specific value (i.e SysCmd and Ctrl Values mode).
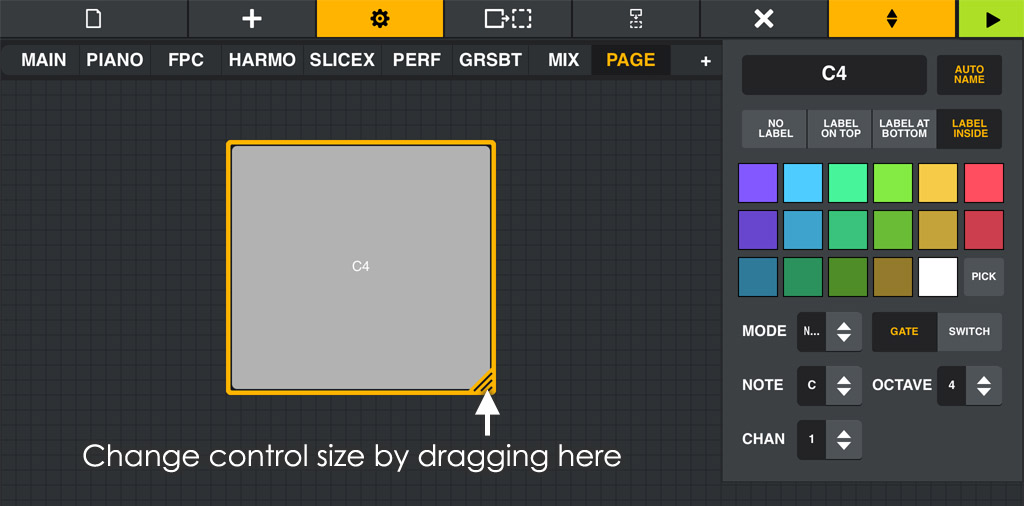
Pad Controls
- C4 (label) - In the image above showing C4 (note name). Tap here to edit the pad name. Auto Name - Takes the name of the pad from the Note and Octave setting. When SysCmd mode is enabled, Auto Name will rename the pad to the name of the selected command.
- Label position - Choose No Label, Label On Top, Label At Bottom, Label Inside (shown above).
- Mode - Set System Command, Control Change, Trackpad, Shortcut and Note values to be sent from the pad.
- Note is the default for pads. When selected Note / Octave is avaiable to send MIDI notes on the set Channel MIDI Channel (1 to 16).
- SysCmd (System Command) - The pad sends core program function commands to FL Studio. Use the Msg (message) menu, available when this mode is selected, to choose a wide range of (self explanatory) control functions.
- Ctrl.Values (Control Change Values) - The Pad will send a CC message instead of a note number. When selected, use the Ctrl.ID and Value options to send data when the Pad is pressed. If the pad is in Switch or Gate mode, the CC value will be reset to 0 when released/switched off. To avoid this, use a group mode (as explained below). NOTE: Only values between 0 and 1 are valid. To send CC values between 0 and 127, divide the desired CC value by 127 and enter the result to at least 4 decimal places.
- Trackpad - The Speed option sets the mouse speed factor (relative to your computer mouse settings). Using the trackpad:
- Drag your finger around the pad to move the mouse. While the host program is connected you can eveb minimize it and control your computer as usual.
- While you can use the three mouse buttons on the trackpad, but you can also Quick tap in the main area to left click. Quick tap with two fingers in the main area to right click. Quick tap with three fingers in the main area for middle click. Swipe up/down with two fingers to simulate Mouse-wheel movements.
- Shortcut - Keyboard shortcuts can either be a single key or combinations of modifier keys (Ctrl for example) and a command key. Set the Mod (modifier) option to None, Ctrl, Shift, Alt, or combinations and the command Key to be sent as the keyboard shortcut.
- Gate / Switch - Gate transmits note ON when pressed and OFF when released. Switch - Tap once for note on and again for note off (useful for triggering and sustaining loop
samples for example).
- Group - In Switch mode you can enter a number between 0 (reset) to 999. These are 'cut groups', so that any Pads with the same Group number will turn off other active pads in the same Group when pressed. This means that only one Pad in a Group may be activated at a time.
- Chan - MIDI Channel (1 to 16). NOTE: MIDI Channel is used as part of the link-address, so set the MIDI Channel first, then make any links to target controls.
Fader
Link faders to any similar control on a GUI or to knobs where you would prefer the visual feedback a Fader provides.
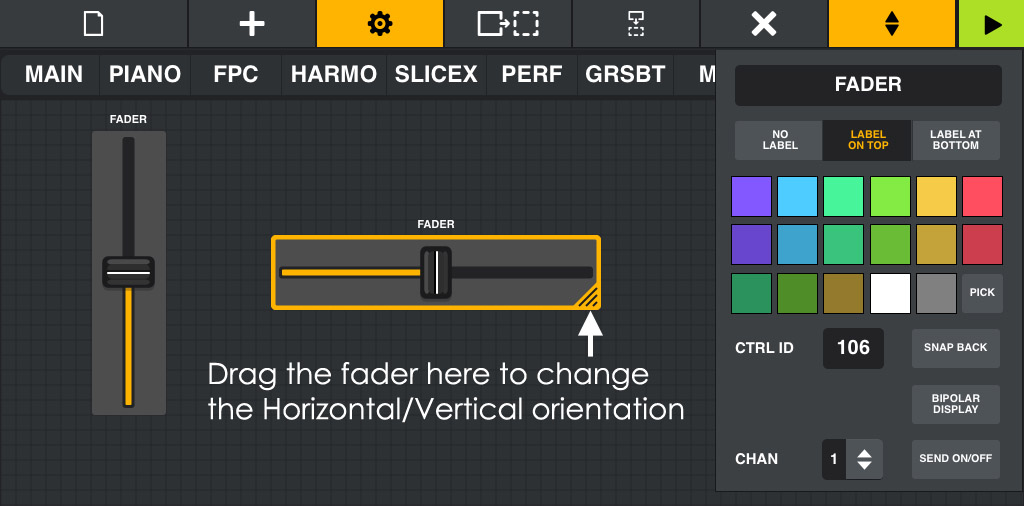
Fader Controls
- FADER - Tap here to edit the control name.
- Label position - Choose No Label, Label On Top (shown above), Label At Bottom.
- Ctrl ID - Set the CC MIDI number for the control.
- Snap Back - Snaps back to the starting position on release.
- Snap To - Set the value to snap back to when Snap is selected. NOTE: Only values between 0 and 1 are valid.
- Bipolar Display - Fader is changed to bi-polar mode with the initial position at the center. TIP: Useful for Pitch and Cross-Fader duties.
- Chan - MIDI Channel (1 to 16). NOTE: MIDI Channel is used as part of the link-address, so set the MIDI Channel first, then make any links to target controls.
- Send On/Off - Sends an additional Note ON/OFF message when the Fader is touched and released. This is useful for targets where there is an additional control that should be
switched on when the control is being touched and off when it is released. For example: Use it to activate an effect slot when the Fader is touched and deactivate it when released.
Linking Instructions: When using 'Send On/Off' there are now two parameters to link to the target:
- 1. Continuous parameters - With 'Send On/Off' disabled, link the fader to the target.
- 2. Note Switch - With 'Send On/Off' enabled link the parameter to be controlled by the On/Off note switch by touching the control.
You can also do this in the reverse order: Link the note message first with 'Send on/off' enabled, disable it then link the continuous parameter targets.
Knob
Knobs link to any standard parametric control in FL Studio.
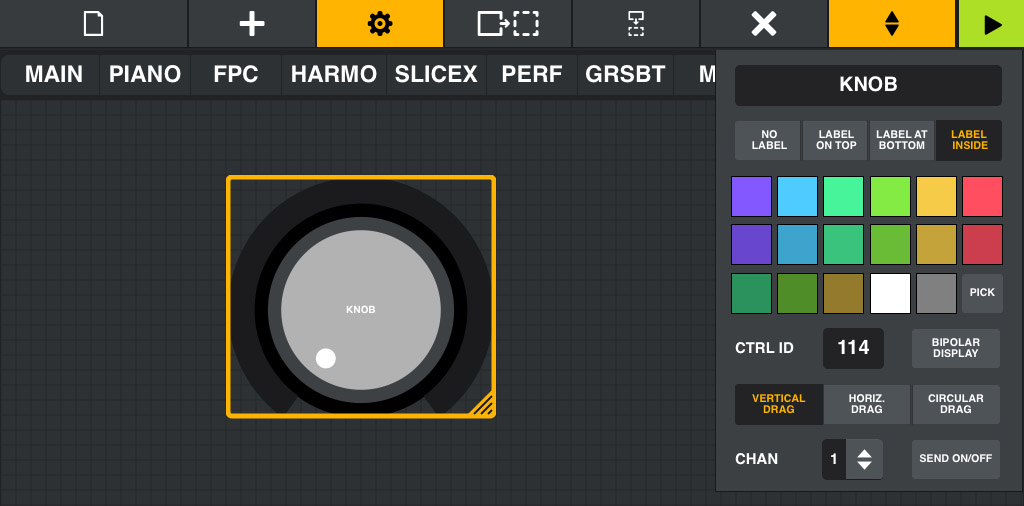
Knob Controls
- KNOB (label) - Tap here to edit the control name.
- Label position - Choose No Label, Label On Top, Label At Bottom, Label inside (Shown above).
- Ctrl ID - Set the CC MIDI number for the control.
- Centered - Knob is initialized in the vertical position (i.e for Panning duties).
- Drag orientation - Choose Vertical, Horizontal or Circular dragging to use the knob.
- Chan - MIDI Channel (1 to 16). NOTE: MIDI Channel is used as part of the link-address, so set the MIDI Channel first, then make any links to target controls.
- Send On/Off - Sends an additional Note ON/OFF message when the pad is touched and released. This is useful for targets where there is an additional control that should be
switched on when the control is being touched and off when it is released. For example: Use it to activate an effect slot when the knob is touched and deactivate it when released.
Linking Instructions: When using 'Send On/Off' there are now two parameters to link to the target:
- 1. Continuous parameters - With 'Send On/Off' disabled, link the knob to the target.
- 2. Note Switch - With 'Send On/Off' enabled link the parameter to be controlled by the On/Off note switch by touching the control.
NOTE: When Send On/Off is disabled, double-tapping a knob will reset it to the center position.
Jog Wheel
Jog Wheels are traditionally used for scrolling and selection purposes, for example, scrolling through presets or moving a cursor along the playlist. They can also be used as infinite or continuous knobs.
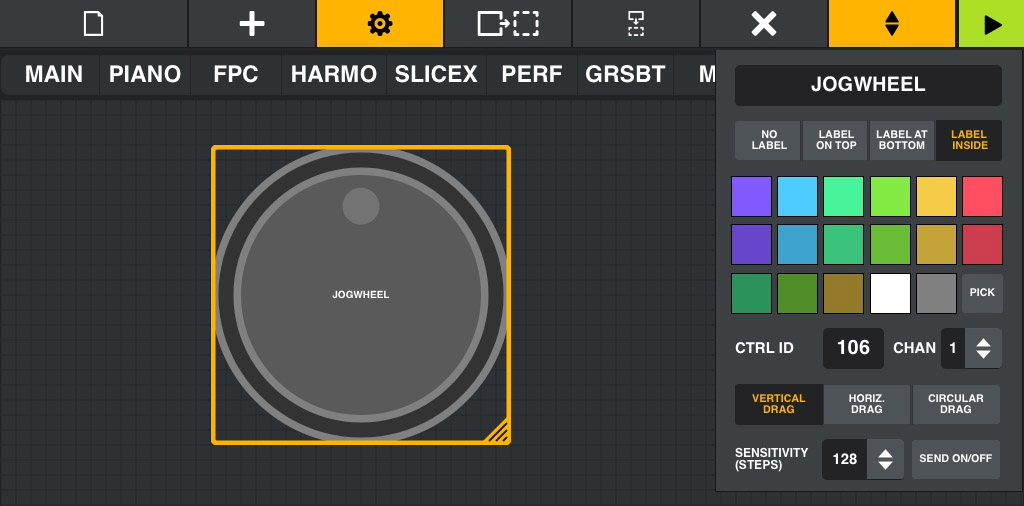
TIPS: If Jogwheels scroll too fast, set them to 12 steps mode. When setting a Jog to control horizontal/vertical, zoom/scrolling or other 'oriented' targets, it's a good idea to set the Drag mode to the same orientation to avoid confusion (Vertical or Horizontal).
Jog Wheel Controls
- JOGWHEEL (label) - Tap here to edit the control name.
- Label position - Choose No Label, Label On Top, Label At Bottom, Label inside (Shown above).
- Ctrl ID - Set the CC MIDI number for the control. This menu also shows System Commands (See below).
- Chan - MIDI Channel (1 to 16). The MIDI Channel is used as part of the link-address, so set the MIDI Channel first, then make any links to target controls. When SYSCMD
(System Command) is selected the Ctrl ID menu is replaced by the following function list:
Command Function Jog Generic jog (use to select data). Alt.GenericJog Alternate generic jog (use to relocate data). PreviousNext Generic track selection. MoveJog Use to relocate items UndoJog Undo History MarkerJumpJog Jump to the next marker MarkerSelJog Select marker HZoomJog Horizontal Zoom VZoomJog Vertical Zoom SnapMode Change Snap Mode WindowJog Select Windows PatternJog Select Patterns TrackJog Select Mixer Track ChannelJog Select Instrument Channel TempoJog Tempo in 0.1 BPM increments - Vertical, Horizontal, Circular Drag - Set the Jogwheel to spin on vertical, horizontal or circular finger movements.
- Sensitivity (Steps) - Choose the granularity of the wheel. 4 to 128 steps per revolutions.
- Send On/Off - Sends an additional Note ON/OFF message when the control is touched and released. This is useful for targets where there is an additional control that should be switched
on when the control is being touched and off when it is released.
Linking Instructions: When using 'Send On/Off' there are now two parameters to link to the target:
- 1. Continuous parameters - With 'Send On/Off' disabled, link the jog to the target.
- 2. Note Switch - With 'Send On/Off' enabled link the parameter to be controlled by the On/Off note switch by touching the control.
Mixer

Mixer Controls
- MIXER (label) - Tap here to edit the Mixer name.
- Label position - Choose No Label, Label On Top (shown above), Label At Bottom.
- Tracks - Choose from 2 to 16.
- Show on/off buttons - Generic 'latched' buttons for any mixer function that can be switched (FX slots for example).
- Show panning sliders - Sliders that allow you to control the panning position of the Mixer track.
- Show scrollbar - Enables buttons to show Mixer tracks in banks as chosen by the Tracks setting. Tap quickly to jump to a specific range of tracks, or tab and drag to fine-tune the view position.
NOTE: To maximize the control while in Edit mode, double tap it.
Clip Launcher
Performance Mode allows you to trigger Clips from the Playlist to create live remix performances of your FL Studio projects.
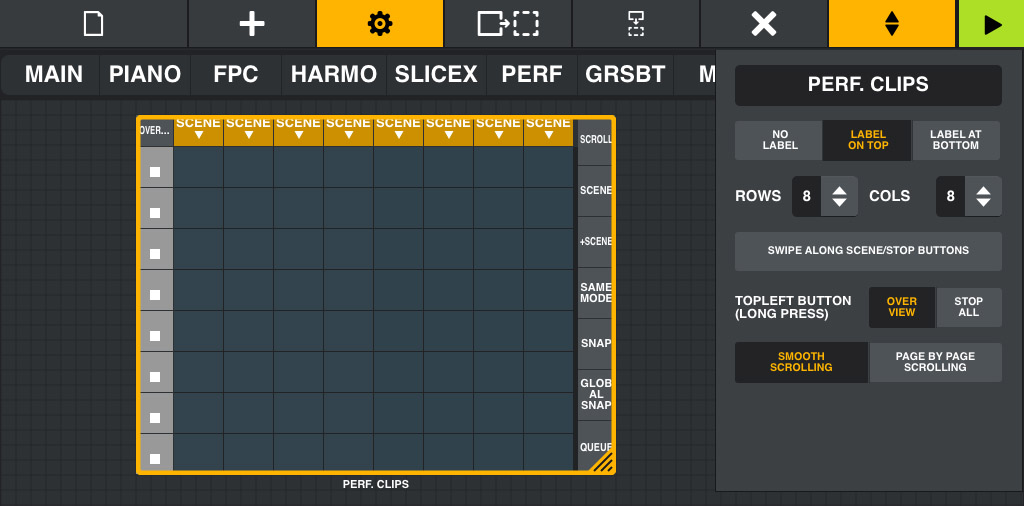
- PERF.CLIPS (label) - Tap here to edit the Clip Launcher name.
- Label position - Choose No Label, Label On Top, Label At Bottom (Shown above).
- Rows/Cols - Choose from 3 to 12 rows and columns (9 to 144 clips).
- Swipe on Scene/Stop Buttons - Swiping quickly along the Scene or Stop buttons will stop all Clips.
- Top Left Button (Long Press) - Set to perform the following functions:
- Overview - Switch to Playlist overview mode so you can scroll around the available Clips.
- Stop All - Stop all Clips.
- Smooth Scrolling - When Scroll mode is engaged (see below) the clip area moves smoothy in proportion to swiping movements.
- Page by Page Scrolling - When Scroll mode is engaged (see below) the clip area jumps in page units.
NOTE: Double tap the clip launcher to maximize it in Edit mode.
Using the Clip Launcher
With FL Studio in Performance Mode the following controls are available:

- Start/Stop Scenes or Tracks - Tap Scenes to start all clips in the column. Tap Clips to trigger individual clips. NOTE: You can only play one clip per Playlist track at the same time.
- System buttons (right) - Double tap to lock the mode where appropriate.
- Scroll - Allows you to slide the Clip Area displayed. Tap and hold (or double-tap to lock) the button then drag on the Clip area to move the displayed Clips. This is similar to Overview without a visual preview of the surrounding clips. NOTES: 1. There are two scroll behaviors available from the edit properties dialog (Smooth & Page by Page). 2. Scrolling only works when the Clips in the FL Studio Playlist fall outside the area available in the Clip Launcher.
- Scene - Triggers vertical columns of clips. For more details on how Scenes work click here.
- +Scene - Adds any Clips to the currently playing Scene.
- Same Mode - Used in conjunction with Scene, triggers only clips in tracks that are set to the same Press mode (set by right-clicking tracks in the Playlist).
- Snap - Disable Trigger Sync settings.
- Global Snap - Will use FL Studio's Global Snap setting instead of the per-track Trigger Sync setting (set by right-clicking tracks in the Playlist).
- Queue - Activate Queue mode. Clips can be queued by selecting any number of Clips/Markers in any order. Playback will follow the order they were selected.
- Overview - Use a long press to activate. In overview mode, you can either tap to jump directly to a specific performance area, or touch and drag to have a more precise
selection.
NOTE: The overview is only available when the Clips in the FL Studio playlist fall outside the area available in the Clip Launcher.
X/Y Control
X/Y control to link to interface and other targets.
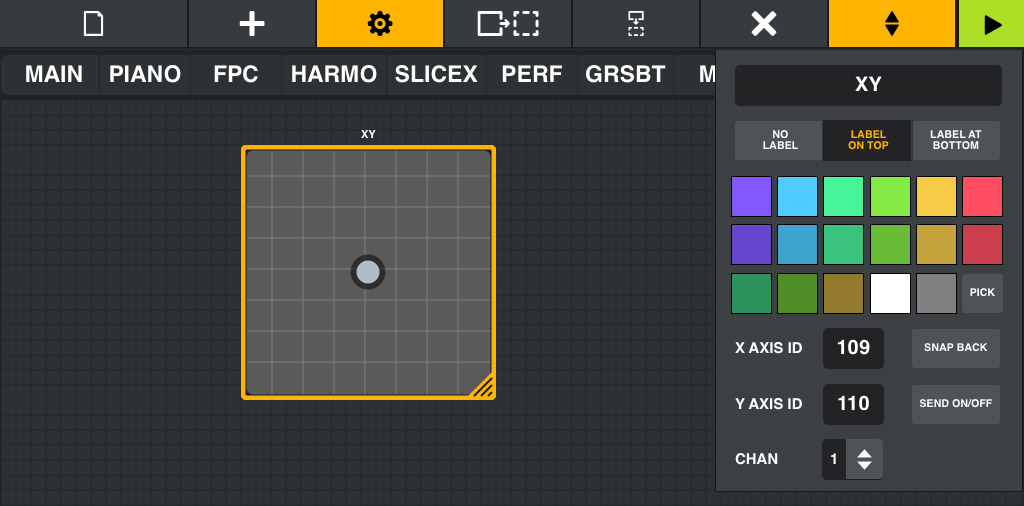
- XY (label) - Tap here to edit the Clip Launcher name.
- Label position - Choose No Label, Label On Top (Shown above), Label At Bottom.
- X/Y Axis ID - Set the CC MIDI number for the X and Y axes.
- Chan - MIDI Channel (1 to 16). NOTE: MIDI Channel is used as part of the link-address, so set the MIDI Channel first, then make any links to target controls.
- Snap Back - The pointer will snap back to the central position on release.
- Send On/Off - Sends an additional Note ON/OFF message when the control is touched and released. This is useful for targets where there is an additional control that should be switched on when the control is being touched and off when it is released. For example: Use it with Effector to activate the effect when the control is touched and deactivate it when released.
Linking Instructions and Tips
Standard X/Y Links:
To link a X/Y control, you'll need to link each axis separately. With 'Send On/Off' disabled:
- Drag the X/Y control so your finger is past the top or bottom of the X/Y rectangle and you can only move horizontally (X axis) and keep hold of the handle...
- Link the X parameter in FL Studio and move the handle along the horizontally then release.
- Repeat for the Y axis, drag past the left or right border, so you can only move the handle vertically (Y axis) and keep hold of the handle...
- Link the Y parameter in FL Studio and move the handle vertically and then release.
Link with 'Send On/Off' commands:
When using 'Send On/Off' there is a third parameters to link to a target. Touching the handle now sends a note on message when touched and note off when released, just like a keyboard key. The On/Off commands can be linked to controls such as Effector's 'Bypass' switch so the effect only turns on when the X/Y control is touched and turns off when released.
- Link the X/Y parameters - With 'Send On/Off' disabled, link the X & Y parameters separately to their respective targets as shown above.
- Send On/Off link - With 'Send On/Off' enabled, Link the parameter to be controlled by the On/Off note switch in FL Studio then touch
and release the handle.
NOTE: You can do this in the reverse order, link the switched parameter first, then disable the switch and link the X/Y controls and then turn on the switch again.
Piano Keyboard
MIDI Keyboard.
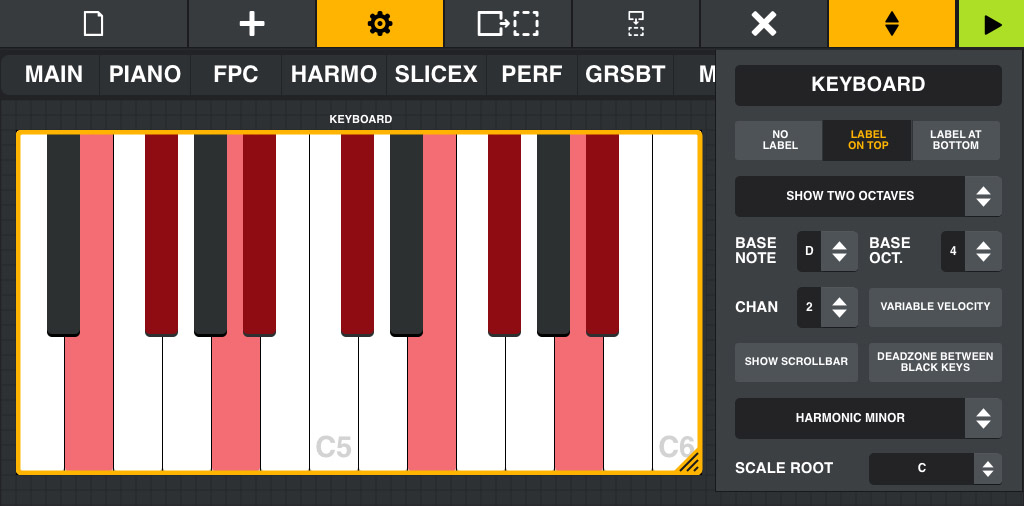
- KEYBOARD (label) - Tap here to edit the name.
- Label position - Choose No Label, Label On Top, Label At Bottom (Shown above).
- Show Octave/s - Offers several ranges for the keyboard, between 1 (min) and 4 (max).
- Base Note - Lowest note on the Keyboard.
- Base Octave - Starting octave for the Keyboard.
- Chan - MIDI Channel (1 to 16). NOTE: MIDI Channel is used as part of the link-address, so set the MIDI Channel first, then make any links to target controls.
- Variable velocity - Velocity is encoded by the vertical position on the note. High velocity is at the bottom of the note.
- Show scrollbar - Change the playable keyboard range by dragging horizontally on the Scrollbar.
- Deadzone between black keys - Disables the touch for the white key region between the black keys, making it easier to play chords.
- Scale - Select the scale mode from the list. Out-of-key notes will show in red, although they can still be played (should you dare to touch a red note). To Create a Custom Scale - Use the Layout Menu > Layout Settings > Show Custom Scale Editor option and then select Custom from the Scale list.
- Scale Root - Root (starting note) for the chosen scale.
NOTE: Double tap the clip launcher to maximize it in Edit mode.
Harmonic Grid
The Harmonic Grid is similar to a MIDI keyboard but with a special layout and features. The Harmonic Keyboard allows you to set a musical 'Key' that then makes it impossible to trigger notes outside that scale for that key.
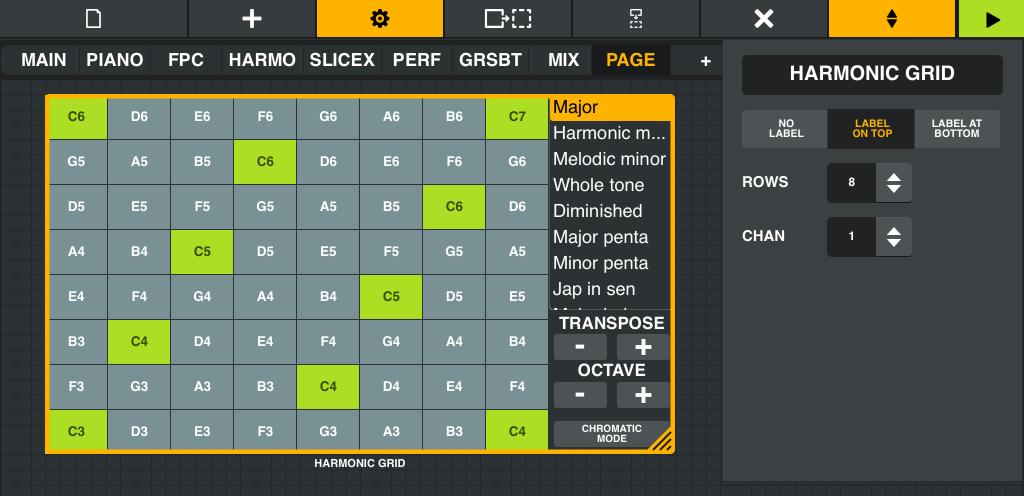
- HARMONIC GRID (label) - Tap here to edit the name.
- Label position - Choose No Label, Label On Top (Shown above), Label At Bottom.
- Rows - Choose between 4 to 8 rows of notes.
- Chan - MIDI Channel (1 to 16). NOTE: MIDI Channel is used as part of the link-address, so set the MIDI Channel first, then make any links to target controls.
NOTE: Double tap the clip launcher to maximize it in Edit mode.
Using the Harmonic Grid
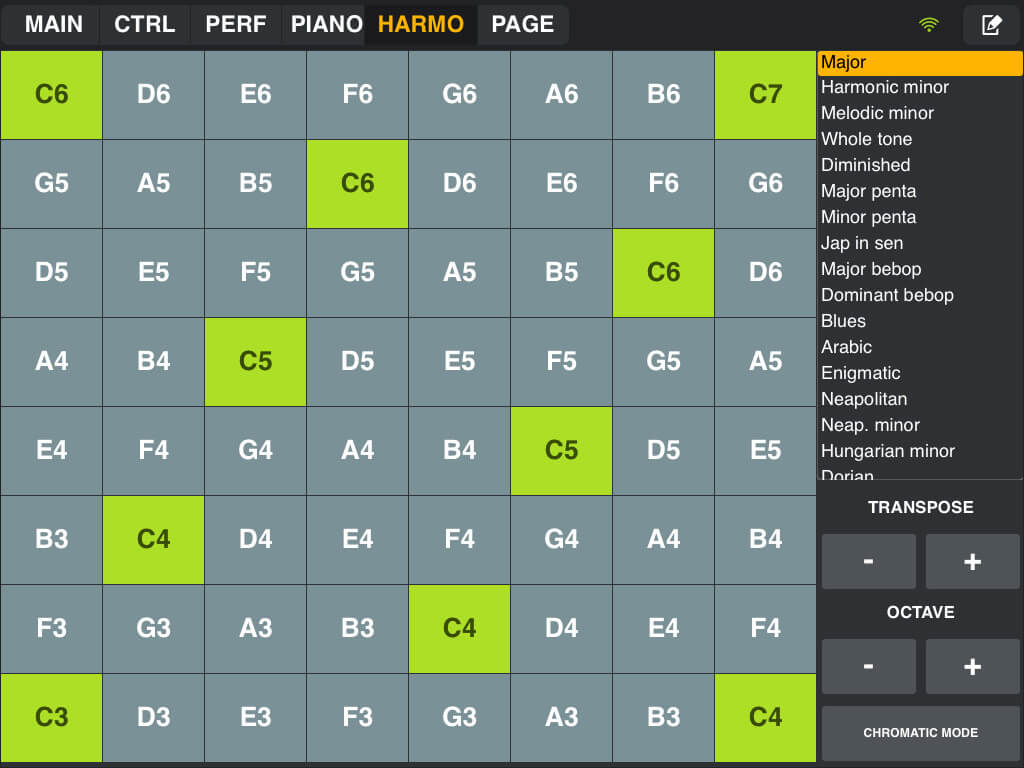
The default mode is a C Major scale. Octave notes are shown in highlighted cells for easy reference. Accidental notes are not available (use Chromatic Scale mode for these).
- Scale - Select the scale mode from the list. To Create a Custom Scale - Use the Layout Menu Layout Settings > Show Custom Scale Editor option and then select Custom from the Scale list.
- Transpose - Transpose the grid in semitones.
- Octave - Transpose the grid in Octaves.
- Chromatic Mode - All semitones will be shown, while graying notes out of scale.
Container (Presets)
Containers are designed to hold other controls allowing you to move/resize them together or load them as a Preset. To add a control to a Container, make sure the Container is selected before adding a new control. Load Container Presets from the Layout Menu. Use Edit Content mode to select and customize the controls you add to the Container.
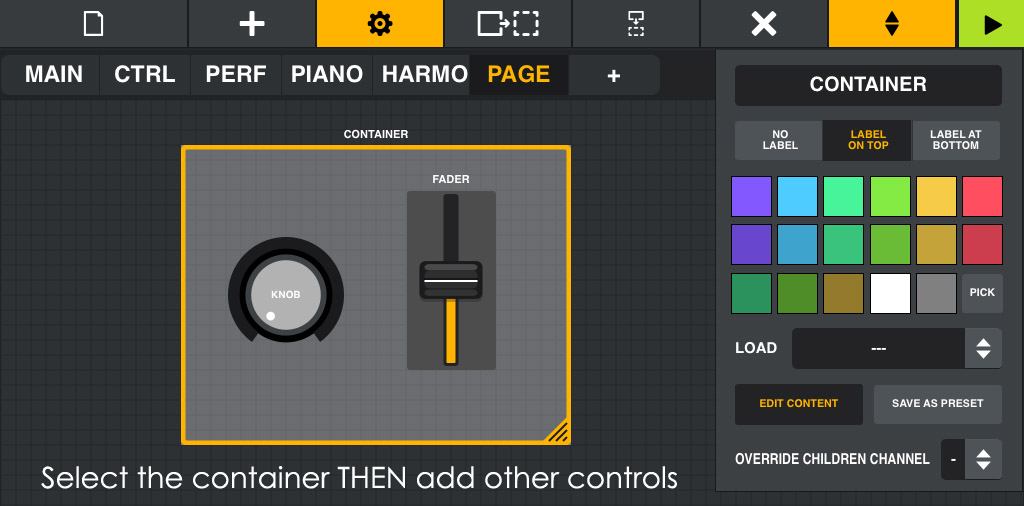
- CONTAINER (label) - Tap here to edit the name.
- Label position - Choose No Label, Label On Top (Shown above), Label At Bottom.
- Load - Load an existing preset into the Container. If not empty, you'll be asked to overwrite its content. If empty, you'll be asked if you want to resize it to match the original preset size. If you choose not to resize the Container, the content itself will be resized to match the Container size.
- Save as Preset - Save the containers as a reusable Preset.
- Edit content - Allows you to edit the controls in the Container.
- Override children channel - Changes the MIDI Channel for all controls in the Container (children) to that of the Container. There is no undo so you will be asked for a confirmation. NOTE: If your Container has system pads/cogwheels, channels for these controls will remain unchanged.
NOTES: 1. Double tap the Containers to maximize them while in Edit mode. 2. If you resize a Container while stretching its content (edit children OFF), controls won't be snapped to the grid and you can't edit child controls without moving them to the nearest grid position. So place your controls carefully and be sure to save your preset before stretching it.
Working With Containers
- Container Names - The name of a Container is also used when you save it as a Preset, so ALWAYS name Containers before saving a Preset.
- Naming Container - Remember to give your Container a unique name BEFORE saving it as a preset. Best to name the Container as the first step so you don't forget.
- Adding Controls to a Container - Drag a control inside a Container until it fits entirely in the Container and it will be added OR select a Container before adding a new control.
- Removing Control from a Container - Tap on the control and drag it outside the Container for more than 1 second.
- Edit Content- This function serves 2 purposes:
- Off - You can't select children controls, and resizing the Container will resize its children too.
- On - You can resize the Container without affecting the children, AND more importantly select/edit controls inside the Container.
Plugin Credits:
Code: Pierre M. (ShiniKnobz).
Presets: Pierre M. (ShiniKnobz), Arlo (nucleon).
Debugging and testing: Sylvain R. (Sickness).