PLAYLIST PERFORMANCE MODE
The Playlist - Performance Mode 
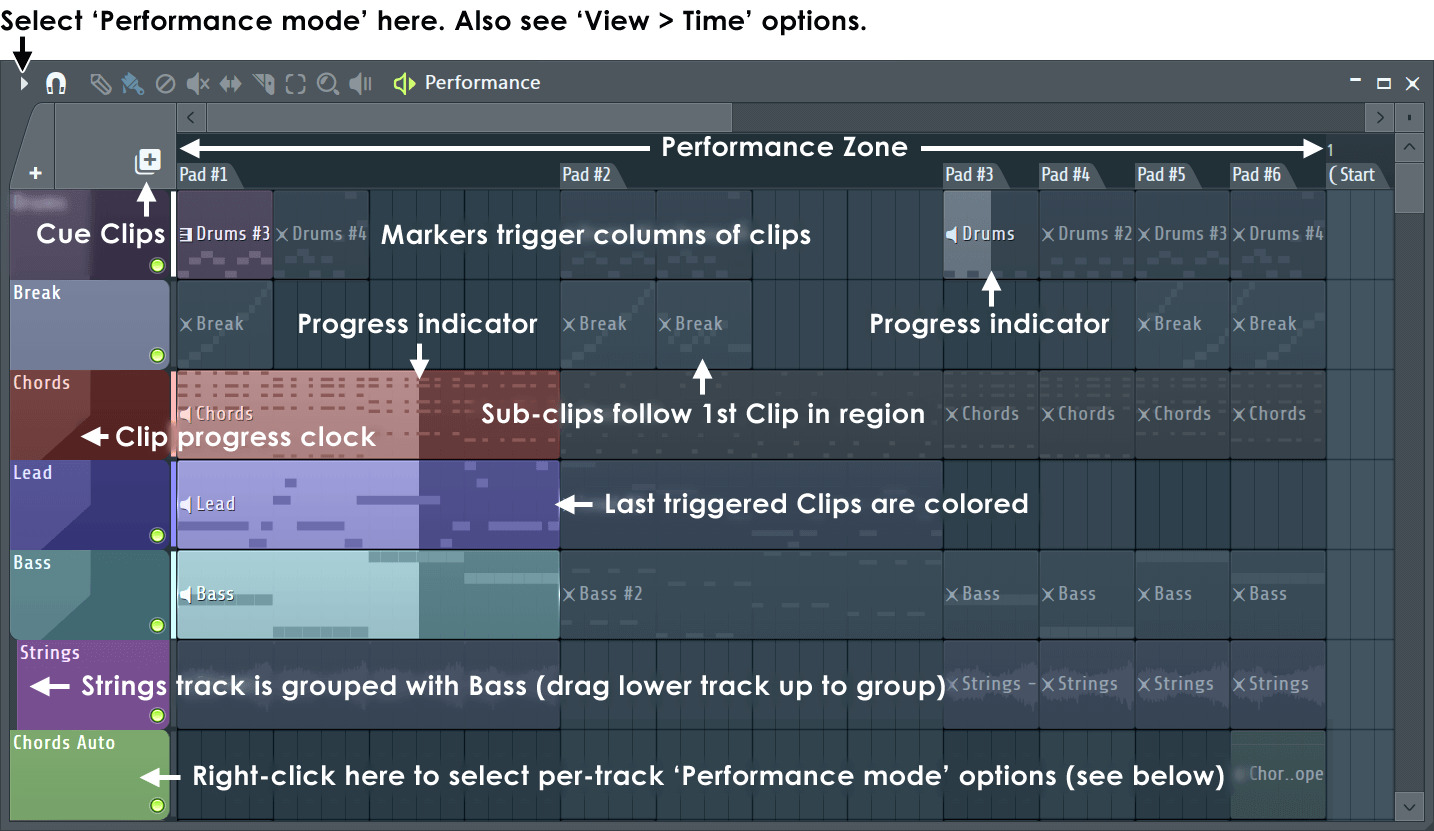
Performance Mode is saved per-project and lets you trigger Clips from the Playlist to play in any order. When the project is playing use a mouse or touch on the Playlist, the typing keyboard or a controller to trigger Clips. The purpose is to create 'remixes' of a projects Clip content (Audio, Pattern & Automation). Performance mode works by designating the area before the Start Marker as a 'Performance Zone' from where Clips can be triggered, out of sequence, between tracks. One Clip can play per track, so if you need more simultaneous Clips, use more tracks. Enabling Record mode will capture performances and lay out triggered Clips after the Start marker for later rendering.
See the ![]() Performance Mode
Video Playlist here.
Performance Mode
Video Playlist here.
The main areas covered are:
- Working with Performance Mode
- Setting up a Performance Mode project
- Useful options and settings for Performance Mode
- MIDI Controllers & Setup
- Playlist Menu Performance Related
- Performance Mode Guidelines
Track Performance Mode Options
Each track can be independently set to respond to Clip triggering as follows:
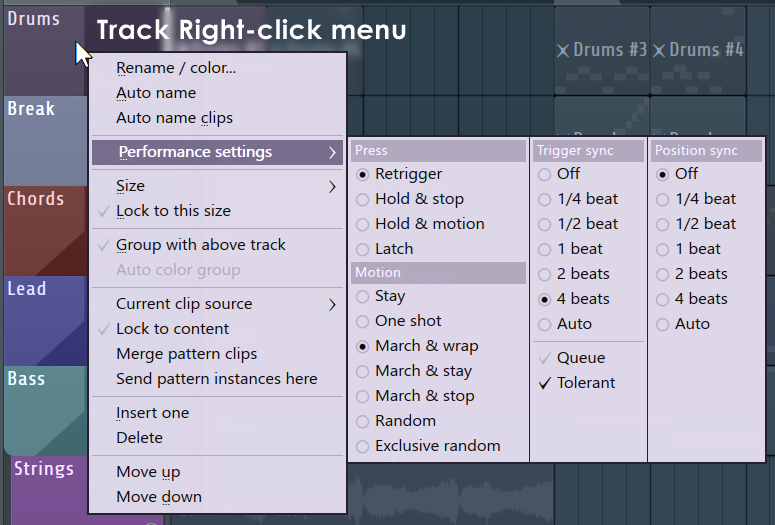
Playlist track header - Right click Menu > Performance settings - These options are per Playlist track (not per Clip) so track settings will apply to all Clips on that track. Each track have any unique combination of the following:
- Press - Options define how Clips respond to being triggered either by mouse/touch-screen, typing keyboard or via controller buttons.
- Retrigger - Clip triggers on each press (the track Trigger sync setting determines immediacy).
- Hold & stop - Clip triggers on press, plays while held and stops on release.
- Hold & motion - Clip triggers on press, plays while held and proceeds one 'Motion' step on release, as defined by the Motion setting for the track.
- Latch - Repeated presses cycle between play and stop.
- Motion - Determines if the next Clip/Group/Marker Group on the track will play. Sub-Clips are ignored.
- Stay - Play selected only.
- One shot - Play once and stop.
- March & wrap - Play then march to the next Clip, at the end wrap back to the first Clip. Sub-Clips are not played. NOTE: Horizontal groupings will define which Clips 'March' on the track when a member of the group is triggered. This also leaves the ungrouped Clips to march if any of this category is triggered on the track. You may have any number of mutually exclusive groups on a track.
- March & stay - Play then march to the next Clip and stay on the last.
- March & stop - Play and march to the next Clip then stop at the last.
- Random - Play random Clips on the track (repetition allowed). Sub-Clips are not included.
- Exclusive random - Clips are randomly played without any Clip playing twice in a row. Sub-Clips are not included.
- Trigger sync - Controls the trigger-timing for Clips.
- Off - Clips start as soon as triggered.
- 1/4 beat to 4 beats - Clips are triggered on the next 1/4 to 4 beats.
- Auto - Defined by the length of the Clip being triggered (up to 4 beats).
- Queue - Clips can be queued by selecting any number of Clips/Markers in any order. Playback will follow the order they were selected.
- Tolerant - Clips normally missed when triggered slightly late will be triggered immediately, so a small part at the beginning of the Clip will be truncated (this is usually preferable to delaying the Clip until the next bar).
- Position sync - Controls from where within the bar Clips start playing.
- Off - Play starts from the beginning of the Clip.
- 1/4 beat to 4 beats - Playback starts within the Clip to the nearest 1/4 to 4 beats.
- Auto - Playback starts from the current song position. This allows you to start playback from the correct point inside a Clip regardless of when it was triggered.
NOTES: Menu - Right-Clicking to select options leaves the menu open for further selections. Keep the left side of the Playlist away from the edge of the screen to prevent Windows repositioning the menu when you open it, leaving the Performance Mode options open. Multi-touch support - There are some additional functions available when using a multi-touch monitor or interface, see here.
Working with performance mode
Performance mode works by triggering Clips from the Performance Zone. The following rules and principles apply:
- Performance Zone - This is defined by the area between the start of the Playlist and the 'Start' Time Marker. Only Clips in the Performance Zone can be triggered in Performance Mode.
- Clip per-track playback - Only one Clip per Playlist track can play at a time. To simultaneously play more Clips trigger Clips on other Playlist tracks.
- Playback modes - Right-Click a Playlist track header area to show the automated playback modes and triggering options as shown above.
- No time-markers used - Columns are defined by each bar of the grid.
- Time markers & regions - Time Marker grid positions and the regions between time markers are used as follows:
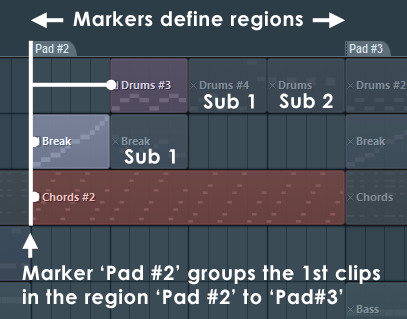
- Overlapping Clips - It only matters what Time Marker region a Clip starts in for it to be assigned to a key/button. A Time Marker region is defined by any two Time Markers. Clips that start in a preceding Marker region and overlap the following Marker region will be ignored for the following region.
- Round robin - Where more than one Clip is placed between time-markers, Clips play in a round-robin.
- Scenes - are groups of Clips that can be triggered together (more details here). Time markers are one way to create
scenes as they vertically group Clips on the same bar/grid position.
Most supported Clip-launching controllers have the ability to
trigger Scenes and may also have +Scene buttons. These allow you to add or take away scenes from the currently playing Clips. Scene launching is not possible from a generic MIDI keyboard.
Sub-Clips will cycle in a round-robin, each time the Scene is re-triggered the next Clip in the group plays, then back to the beginning again.
- Clip limit - There is no limit to the number of Clips placed in the Performance Zone. Move the Start Marker to the right to add more Clips if you run out of room.
- Stacked clips - While Clips can be stacked, it's not be possible to see/predict/control which Clip will be triggered first in the round-robin.
You can trigger Clips from your Typing keyboard, a MIDI keyboard or other controllers. Most popular 'Clip-launching controllers' controllers are supported.
Setting up a performance mode project
From an existing project:
- Save your project (the following steps will make destructive changes to the original layout).
- Select Tools > Misc macros > Prepare for performance mode
- Add or delete Time Markers as required. Remember, the time markers are used to define columns/rows of buttons, depending on your controller.
- Place Clips in the Playlist tracks in related rows aligned with Time Markers as needed. For example; Melody progressions on one track, Bass progressions on another, percussion on yet another.
- Per track, set the Performance settings as desired.
From a new project:
- Select Tools > Misc macros > Prepare for performance mode.
- Add or delete Time Markers as required. Remember the time markers are used to define columns/rows of buttons, depending on your controller.
- Place Clips in the Playlist tracks in related rows aligned with Time Markers as needed. For example; Melody progressions on one track, Bass progressions on another, percussion on yet another.
- Per track, set the Performance settings as desired.
Useful Options and Settings
The following options & settings are useful for Performance Mode:
- Options > Audio settings > Play truncated notes on transport* - Plays notes when playback is started mid-note in a Pattern Clip.
- Options > Project general settings > Play Truncated notes in clips* - Ensures notes in Clips, on the same track, cut each other and themselves. It also plays notes overlapping slice points in Pattern Clips.
- Audio Clip Declicking - Use 'Generic (bleeding)' as a starting point. This will preserve drum transients while minimizing clicks at the end of sliced Audio Clips.
- Playlist Menu > View > Precise time indicator, Performance clip progress & Performance track progress - Show visualizations to aid in identifying Clip progress.
- Vertical Playlist Zoom* - Zoom levels of 24 or less (see Hint-bar) display clips as 'tiles', as shown above. This system allows you to edit Automation Clips and see other Clip types in more detail by increasing the Zoom. If Performance mode is not selected, tiling starts at a vertical zoom of 10 or less.
- Options > General settings > Auto select linked modules - Set to OFF. Channel buttons will select the plugin interface for editing, without MIDI control take-over of the plugin. This lets you play one plugin while editing the interface of another. To change the target of your MIDI controller - Left-click the Channel selector LED.
- Auto-fit (Shift + 6) - Will fit the Performance Zone in the horizontal width of the Playlist. NOTE: Use the numbers above the keys not the number-pad.
* Set automatically by the Tools > Misc macros > Prepare for performance mode macro.
Scenes - Clip Groups, Marker Groups, Track Groups & Sub Clips
A 'Scene' is any group of Clips, on independent tracks, that can be triggered to start playing together. There are three ways to group Clips:
- Marker Regions - These automatically group the first Clip on each track following the Marker position. Any subsequent Clips, within the region defined by the marker and the next, are
treated as 'Sub Clips'. Trigger a Marker Scene/Group - Click anywhere along the Marker region defined by two Markers.
- Clip Groups - Clip Groups don't need to be time-aligned as you can group any collection of Clips by holding (Ctrl + Shift) and click on Clips to be included in the group, then press (Shift + G) to group them. Trigger a Scene/Clip Group - Hold (Ctrl + Left-click) any member of the group.
- Track Groups - To create, click on the track divider, below the track you want to group with, then drag upward until a Track Group is created. To Ungroup Tracks repeat the process dragging up until the group is undone. Trigger a Scene/Track Group - Hold (Ctrl + Left-click) any Clip in the Folder group. Track groups are a good way of creating Scenes that span a limited number of tracks s opposed to Marker regions that trigger all Playlist tracks.
Using Scene & +Scene functions on controllers - For example:
In the following case:
- Column/Scene 1 - Bass A (track 1), Drums A (track 2), Vocal A (track 3).
- Column/Scene 2 - Bass B (track 1), no clip (track 2), Vocal B (track 3).
Scene button - If Scene 1 is playing (Bass A, Drums A & Vocal A) and Scene is used to trigger Scene 2, FL Studio will replace Scene 1 with Scene 2 and play Bass B, none & Vocal B. No surprises there.
+ Scene button - If Scene 1 is playing (Bass A, Drums A & Vocal A) and +Scene 2 is triggered FL Studio will play Bass B, Drums A & Vocal B. Since, Drums A (track 2) is not replaced by anything in Scene 2. Remember only one Clip per Playlist track can be triggered at a time, so +Scene will replace playing Clips with any new Clips on the same track in the next Scene but leave any Clips on unused tracks (in the new scene) playing.
NOTE: Sub Clips - are any grouped Clip/s, following the first Clip on a track, that follow in the same Scene/Group. Sub Clips can be triggered by repeated presses OR by velocity if the controller supports it (velocity triggering auto-mapped by the number of Sub Clips into the MIDI velocity range).
How to
- Record a performance - Right-Click the Record button and select 'Clips'. Then press Record and Play to start your performance. Clips will be saved after the start marker as triggered.
- Trigger two Clips on the same key/pad - Group Clips as described in the section above then (Ctrl+click) any Clip that is part of the group. Pad controllers automatically trigger Grouped Clips when used with Scene or +Scene.
- Mute / Unmute all track groups - (Alt + Left-click) any group member's mute button.
MIDI Controllers
Any MIDI controller that sends MIDI notes can be used to trigger Clips in Performance Mode, however 'Pad' style controllers are particularly well suited to live performance. NOTE: If your controller has been auto-detected by FL Studio it's best to use the default MIDI port settings as this will allow you to share your projects easily with others using the same controller/s. The port number is just a unique internal 'address' used to differentiate one controller from another, including two or more of the same type.
- Mouse/Touch-screen - See also Multi-touch performance mode controls.
- Pre trigger Clips - Prior to pressing play use the
 Mute tool to activate/deactivate Clips. Remember only one Clip per track can play simultaneously.
- Trigger Clips/Markers (Left click) - Click on a Clip/Marker (or anywhere above the Marker group).
- Trigger Scenes/Groups (Ctrl+click) - Any Clip that is part of the Scene.
- Stop Clips/Scenes/Groups - (Right click) - Any Clip, Group member or Marker region.
- Bypass snap (Alt+click) - Bypass snap.
- Queue(Shift+click) - Queue Clips/Groups/Marker Groups.
- Add Marker group (Ctrl + Left click) Marker or anywhere above the Marker group. except that Ctrl+click adds the scene (+Marker groups)
- Stop a Playlist track (Left click) - a Playlist track header.
NOTE: These actions can be used in combination. For example, (Left-clicking) a Playlist track header with (Alt) held will stop it immediately rather than waiting for the next snap period.
- Pre trigger Clips - Prior to pressing play use the
- Piano Keyboards / Note mapping - Each octave maps to a row of 12 Clips/Groups (one Clip per note in the octave). The lowest octave C0 is the first Playlist track, the highest octave C10, the 10th track. Use the octave switch on your controller to access Playlist tracks outside your controllers range. There are additional functions explained in the setup and mapping section, see Mapping non-configured controllers.
- Pad style - Your controller will either be preconfigured, linked below, with customized keys/pads for performing all the functions listed under the Mouse/Touch-screen section above (and more) OR not pre-mapped so you can custom configure it by mapping pads to MIDI keys as explained below. Generic setup: If you are using a pad-style controller not pre-configured to work with Performance Mode, see Mapping non-configured controllers.
- Typing keyboard - Right click the Typing keyboard to Piano keyboard switch and select 'Performance mode'. Set 'Performance mode MIDI channel'
to 1. Keys are grouped to trigger 5 Clips on the first 8 Playlist tracks as shown below:
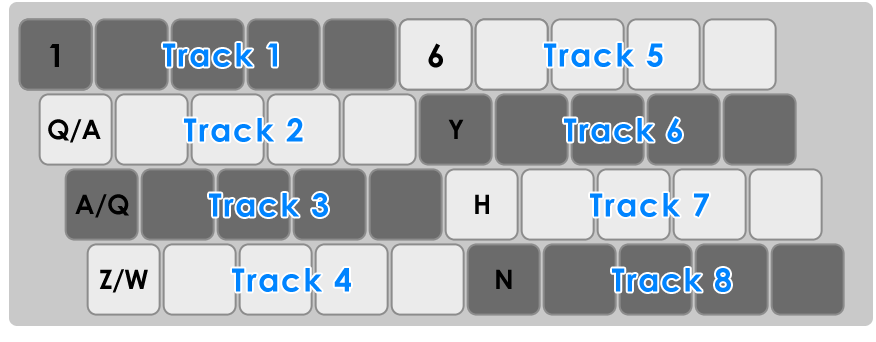
NOTE: The keyboard does not become linked to the Playlist tracks/Clips until Play is pressed & Performance mode MIDI channel is set to 1.
Setting up a MIDI Controller
Any MIDI controller that sends MIDI notes can be used to trigger Clips in Performance Mode.
- Select your controller - Make sure your controller is selected and enabled in the F10 > MIDI options.
- MIDI Channel
- Pre-configured controllers - The device should be detected and pre-set.
- Non pre-configured controllers - Set your MIDI controller AND MIDI options 'Playlist performance mode MIDI channel' to Channel 1. Any additional controllers not on this channel will still be available for normal controller duties for playing Instruments or modulating Effects & FL Studio parameters. Remember the lowest MIDI channel controls the upper-most active Instrument Channel.
- MIDI Ports- If your controller is specially supported as a Performance Mode controller (and has visual feedback), set your MIDI controller INPUT and OUTPUT ports to match (something other than the default '---'). Set one and double-click to set the other port.
- Multiple controllers - Set each controller's INPUT and OUTPUT ports to matching and unique values for each controller.
Pre-configured controllers
There is a list of controllers dedicated to Clip launching, typically feature more pads (often 4x4 or 8x8) and usually include controller feedback and full functionality:
Non pre-configured controllers
MIDI notes pre-map to the first 10 Playlist tracks. Starting from C0 (MIDI note #0) each note in the octave maps to 12 Clips/Groups per Playlist track. The lowest octave C0 (#0) to B0 (#11) maps to 12 Clips on the first Playlist track, C1 (#12) to B1 (#23) maps to 12 Clips on the second, and so on (see below). Where no Time Markers are used, the 12 Clips-per-track are defined by the first 12 bars OR if Time Markers are used they will be defined by the bar starting with each marker.
| Note Number / Note Name | Action |
|---|---|
| 0 to 11 / C0 to B0 | Playlist Track 1, Clip 1 to 12 |
| 12 to 23 / C1 to B1 | Playlist Track 2, Clip 1 to 12 |
| 24 to 35 / C2 to B2 | Playlist Track, 3 Clip 1 to 12 |
| 36 to 47 / C3 to B3 | Playlist Track 4, Clip 1 to 12 |
| 48 to 59 / C4 to B4 | Playlist Track 5, Clip 1 to 12 |
| 60 to 71 / C5 to B5 | Playlist Track 6, Clip 1 to 12 |
| 72 to 83 / C6 to B6 | Playlist Track 7, Clip 1 to 12 |
| 84 to 95 / C7 to B7 | Playlist Track 8, Clip 1 to 12 |
| 96 to 107 / C8 to B8 | Playlist Track 9, Clip 1 to 12 |
| 108 to 119 / C9 to B9 | Playlist Track 10, Clip 1 to 12 |
| 120 / C10 | Scroll Up |
| 121 / C#10 | Scroll Down |
| 122/ D10 | Scroll Left |
| 123 / D#10 | Scroll Right |
| 124/ E10 | Per-page navigation ON/OFF (scrolling by 12 Clips instead of 1 Clip) |
| 125 / F10 | Scene Mode (while held) |
| 126 / F#10 | +Scene Mode (while held) |
| 127 / G11 | Global Snap ON/OFF (while held) |
NOTES: For keyboards, use the octave switch on your controller to access Playlist tracks outside your controllers range. Most pad-style controllers can be configured to send any MIDI note from any pad.
Playlist Menu - Performance Related
- Performance mode - Activates performance mode as described above.
- View - Progress and Clip content helpers.
- Content in title bars - Selects whether you see notes, audio or envelopes in the larger tiled Clips.
- Precise time indicator - When selected the Clip progress and Playlist clock are continuous. When off progress is 'steppy' dependent on horizontal zoom level.
- Performance clip progress - Shows a progress indicator on individual Clips, either in the Clip title-bar or over the Clip in 'tile' mode (set by vertical zoom 24 or less).
- Performance track progress - Shows a progress clock on the Track title area.
NOTE: Turn these off if you have an older PC struggling for graphic resources, if you simply prefer a different look OR you are using a controller and not looking at the Playlist on a screen and want to keep processor load to a minimum.
Performance Mode Guidelines
The following suggestions will minimize the probability of audible glitches during a performance:
- Don't load plugins or change presets - during a performance.
- Optimize CPU and memory settings - See Optimizing FL Studio performance. Pay particular attention to ASIO buffer length (10+ ms), Multithreading on, Smart disable for all plugins & use Polylimit on plugins to keep voice counts down.
- Burn in plugins - Some plugins can cause hiccups when voices/features are used for the first time. Try running your project with the Master volume down to make sure all plugins have been exercised. This will mean any calls to cache memory and/or software features/libraries are likely to have been made.
- Keep on disk - Turn it off and keep total loaded audio below 4 GB. If 'Keep on disk' is used, at least make sure you have more RAM than audio in the project AND exercise the project (as per Burn in) to improve cache performance. This means making sure to scroll (horizontally and vertically)the Playlist so ALL the Clips and their contents have been displayed at least once.