MIXING & EFFECTS
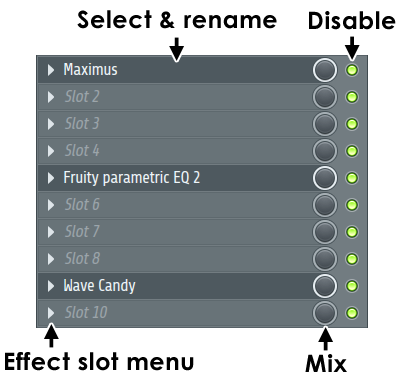
Effect slots 1 to 10
This section covers the Mixer effect slot functions and interface. Each mixer track can have up to 10 independent effect plugins hosted in slots 1 to 10.
- For a list of FL Studio effects plugins, see Effects Plugins page.
- For a list of supported plugin standards, see Supported Effects Standards.
BUT WAIT! If you need to use more than 10 effects on a single mixer track you can load an instance of Patcher in one of the slots and chain as many effects as you like inside that OR Send from one track to another.
|
Using Effects
Audio enters at the top of the Effects stack and passes through slots in order from 1 to 10, leaving at the bottom (the only exception to this is if a Fruity Send plugin is loaded into one of the slots, then a copy of the audio can leave the mixer effects stack from that point). After the effects stack, the audio passes to the inbuilt Mixer Track Properties section where further sculpting and manipulation of the sound is possible.
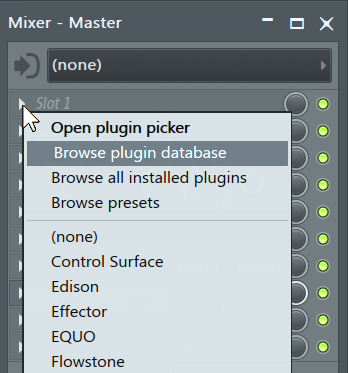
- Loading effects - To load an effect plugin choose a free slot and open the effect slot menu on that slot and select a plugin from the Favorites list. At the top of the menu there are also options to Open the plugin picker (FX are on the right), Browse plugin database etc, if you need to access plugins not yet set as Favorites. NOTE: Once an effect is loaded on any slot in a mixer track the FX icon
 will light on that track to let you know effects are active (clicking on the icon will disable all effects in the track).
- Delete an effect - Open the effect slot menu on the slot of the target effect and select "None" in the Select submenu.
Edit effect parameters - The effect interface can be opened by clicking on the effect name label, to close the effect interface click on the label again.
- Bypass an effect - Use the disable switch to disable an effect (this switch is automatable). Note that the audio will still pass through the mixer track and any other active effects in the stack. The FX icon will light orange on any mixer track with effects. Click on the FX icon to disable all effects in the mixer track.
- Effect mix - Adjust the wet/dry mix of each effect using the Effect Mix Level knob. Fully left = 0% effect, fully right = 100% effect mix. NOTES: 1. Effects usually have their own internal wet/dry mix so adjusting the Effect Mix level to 100% does not guarantee a 100% wet signal. 2. Normally leave this at 100% and control the Wet/Dry mix from within the plugin.
- Reorder / move effects within a track - Place the mouse cursor over the effect to be moved and scroll the mouse-wheel, the effect will move up/down depending on the direction of rotation. Don't move the mouse while performing this action as the effect will be released. Alternatively: Select the Effect slot menu and use the Move Up/Down commands. Simply open the menu and press the 'u' or 'd' keys on your keyboard. NOTE: The order of effects can have a dramatic impact on the sound so think carefully about the order in which effects are applied.
- Copy / move an effect - Including its current settings, to another Mixer track, select the pop-up menu associated with the effect to be copied and then click + drag the 'Save preset as...' menu item to the destination Mixer track.
Effect Slot Menu:
- Select / Replace (Select when slot empty, Replace when slot occupied) - Contains a list of all effects selected as favorites. Selecting an effect from this menu will assign it to the corresponding plugin slot. Click More... to open the Select plugin window, which contains a list of all effects available to FL Studio. Double-click a plugin name to assign it to the effect slot. Click the check box preceding each plugin to mark it as a favorite (all effects preceded by a check mark will appear in the favorites list). NOTE: See Installing & Using VST / AU Plugins for information on how to install 3rd party plugins.
Presets
- Presets - Contains a sub-menu with preset handling options for the effect:
- Randomize gives random values to the published (i.e. known to FL Studio) effect settings. When enabled, selecting a preset will load a random 50% of the settings, so you can quickly mix different presets and create new effects.
- Hybridize blends between the previous and next selected settings.
- Tree Display displays the settings in a 'tree' view. The Presets menu is disabled if there is no effect assigned to the plugin slot.
- Browse presets - Opens the presets menu in the Browser (the Browser may not have any presets for the plugin, however).
- Save Preset as - Allows you to save custom presets for the plugin assigned to the plugin slot. Presets are saved as FST files. It is recommended that you save preset files in the default location FL Studio chooses, so they can be properly detected and added to the Presets menu. NOTE: You can also click on and drag this menu item to a compatible location in FL Studio to copy the effect or save parameters. For example, to copy an effect, including its current settings, to another mixer track.
- Add plugin to database - Adds the plugin to the Browser Plugin database folder that organizes the Plugin picker (F8) items.
Spare state
These options are useful for saving plugin settings, making edits, then comparing the original vs edited versions.
- Store in spare state - Saves the plugins current settings in a temporary buffer (spare state).
- Flip with spare state - Swaps the plugins current settings with those in the spare state.
Parameters
- Last tweaked parameter - This command has moved to Menu Tools > Last tweaked parameters.
- Link all parameters... - Opens a dialog designed to link automatable parameters to 'tweaked' hardware controllers and then automatically move to the next parameter in the 'parameter list', ready for the next link. There are several options available for skipping parameters or jumping to new locations in the list include. Basic operation - Select 'Link all parameters' from the menu, and move the first hardware controller to be linked (the link is made to the first item in the 'Current parameter' list). When you move the second hardware controller it will be auto-linked to the next parameter and so on, until the end of the parameter list is reached or the link dialog is closed. To skip a link, Left-click the Skip button at the bottom of the link dialog (immediately left of the 'Accept' button). To jump directly to a parameter, use the Current parameter menu (top most in the link dialog) and select the target parameter you are interested in. You can then continue auto-linking from that point in the list by moving hardware controllers as before OR jump to another parameter in the list using the 'Current parameter' menu as previously described.
- Browse parameters - Allows you to see the list of automatable parameters in the browser. Embedded CC Parameters: Every instance of the Wrapper has 128 CC (MIDI Control Change) parameters in a parameter list. These parameters transmit CC data directly to the plugin (for plugins that read CC data directly) and can be linked like any other parameter to a MIDI or internal controller. Thus, you can send CC data directly to the plugin instead of linking to a specific knob on the plugin interface. These parameters can also be set in conjunction with the Omni mode associated with the Remote control settings 'link' dialog to send CC data to any selected plugin and to save MIDI controller assignments (see the Omni and VST Control section for more details).
CPU
- Allow threaded processing - Improves multithreading and multi-core CPU performance. NOTE: Some VST plugins may perform worse with multithreading on. If you are experiencing choppy or broken sound, try turning this off.
- Smart disable - Stop processing the plugin when inactive. Reduces CPU load. There is a global Smart disable on the F10 Audio settings panel OR 'Smart disable' Tools > Macros > Misc > Switch smart disable for all plugins. NOTE: Smart Disable is active only during live playback, it is temporarily disabled when rendering.
- Move Up - Moves the effect one slot up. Alternatively: Place your mouse cursor over the effect slot name and roll your mouse-wheel upward.
- Move Down - Moves the effect one slot down. Alternatively: Place your mouse cursor over the effect slot name and roll your mouse-wheel downward.
- View editor - Opens the plugin interface. Alternatively: Click on the name shown in the Plugin slot.
- Rename - Rename the plugin slot.
You can also access this slot menu from the effect's own options:
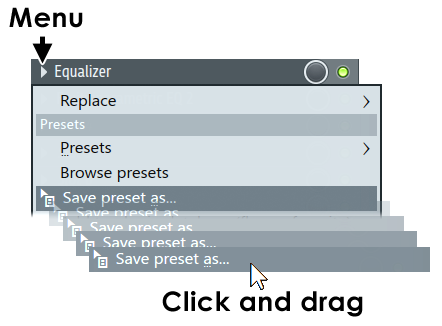
NOTE: The 'Save preset as...' option can be dragged to another Mixer track or FX slot to duplicate the current effect and settings.
Mixer reference diagram
A full description is available on the main Mixer page.

NOTE: Most controls are automatable (Right-Click and select 'Create automation clip').