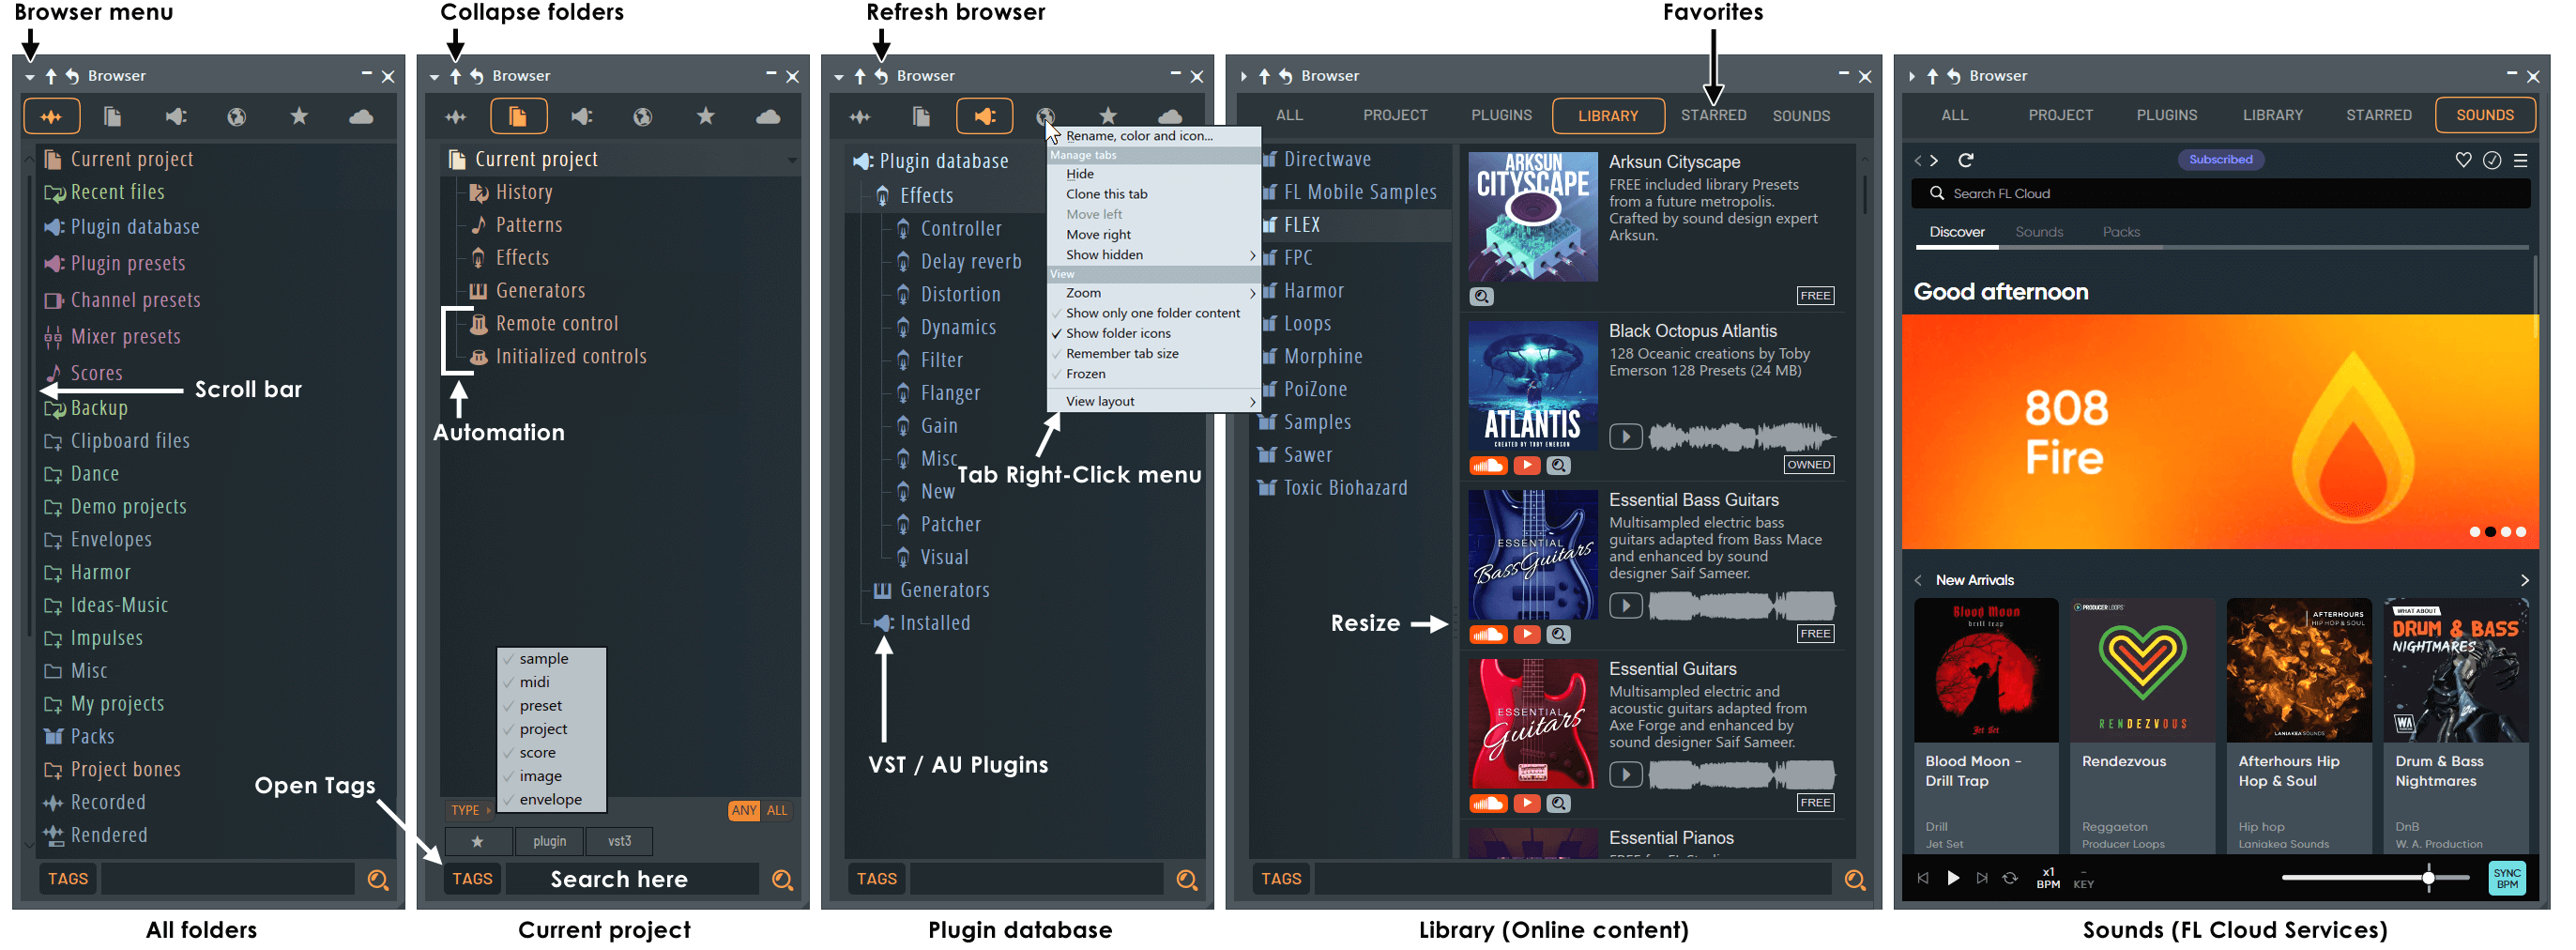
BROWSER
Browser
The File Browser provides access to projects, samples, local and online content libraries plus VST/AU plugins. There are several (user editable) tabs along the top. By default these include All, Current Project, Plugin Database, Online Content and Starred (Favorites).
Can't see the Browser? - Show it using the Shortcut panel or press (Alt+F8).
NOTE: FL Studio will only search for files in folders you have added to the Browser. By default FL Studio does not include any of your personal folders. The simplest way to add folders is drag and drop folders from your Operating System browser to the FL Studio Browser. Searches include sub-folders so you only need to add parent folders you want to use.
- Browser controls
- Using the Browser (working with content)
- Adding your own folders
- The Current project data
- The Plugin Database (VST/AU s and favorite plugins lists)
- Sounds (FL Cloud)
NOTES:
- The browser can be detached to a separate window or docked on the right side of the FL Studio desktop.
- The Tab menu option 'View > Show only one folder' should be deselected if you want to keep several folders open at the same time.
Tutorial Video
INDEX:
- 00:00 - Introduction
- 00:30 - Browser Basics
- 03:46 - Browser Main Menu
- 06:34 - Adding Extra Folders
- 07:08 - Browser view / size options
- 07:45 - Collapse/Reread Structure
- 08:06 - Tab Menu
- 10:41 - Folder Options and Menu
- 11:31 - File Menus
- 13:19 - Tagging Files
- 14:08 - Working with Project Files
- 14:50 - Browser Preview Player
- 15:51 - Advanced Search
- 16:09 - Project Tab | Everything in your project
- 18:03 - Plugins Tab | Adding VST/AU plugins
- 19:58 - Library Tab | Downloading Content
- 20:54 - Starred Tab
Browser Controls
|
|
Browser Menu - Options menu including search functions. The options here are discussed in more detail in the 'Browser Menu' section below. |
|
|
Collapse structure - Collapses all expanded folders in the Browser window. |
|
|
Refresh content - Rereads the contents of all folders in the Browser. Click this button to see any new files and folders that were created after FL Studio was started. |
|
|
Minimize - Reduces the Browser to the Caption bar. See also Menu > View > Auto hide browser. |
|
|
Close - Closes the Browser, as does (Alt+F8). |
|
|
Search (Ctrl+F) - Search all folders for files. Use (F3) to skip to the next matching item. |
NOTES: The Divider - Left-click to drag the divider to change the width of the Browser. The divider can snap to a second position, move the divider to the desired location then Right-Click to swap between the new and/original location. Pop-out file-name view - File names obscured by the right edge of the Browser can be read by placing the mouse cursor over the item. Scroll bar - Click & drag or click to focus and scroll mouse-wheel. Quick Zoom - Hold Shift + Scroll -wheel.
Browser, Tab, Folder & File Menus
NOTE: Options shown in these menus will vary depending on the location from where they are accessed, preceding actions, current settings or content type.
Browser Options Menu
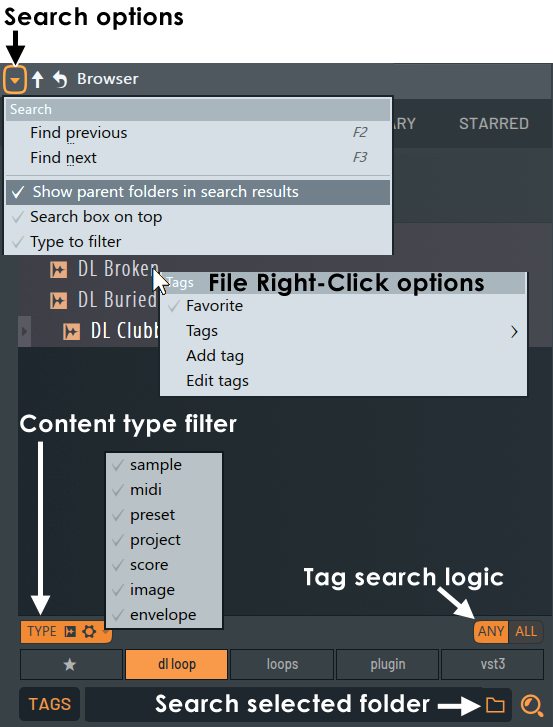
Use the Menu arrow on the upper-left of the Browser to access:
- Search:
- Find previous / next - Jump forward and backward in search results.
- Show parent folders in search results - When selected the parent folder for content is shown.
- Search for folders - Includes/excludes folders from search results.
- Search box on top - Moves the content search toolbar to the top of the Browser.
- Type to filter - Starts filtering as you type.
- Load plugin tags - When unchecked, plugins won't have any automatic tags assigned.
- Enable indexing - Indexing builds a file to improve the speed and depth of searches. NOTE: When this is disabled, only the selected folder will be searched.
- Navigation history:
- Previous (Backspace) - Return to the previous folder/item.
- Next (Shift+Backspace) - Jump to the next folder/item.
- Actions:
- Send previous / next to selected channel - (Shift+Up-Arrow) / (Shift+Down-Arrow). You can also (Right-Click) content to:
- View:
- Auto-hide - The Browser will auto hide and pop out when you move your mouse to the Browser location (usually left of the screen). To stop the FL Studio workspace moving you can click on the Browser header area and drag it to the right side of the screen. You can also use this method to undock the Browser and drop it anywhere on the screen.
- Hide while dragging (when detached) - When selected, and the Browser is detached, the Browser disappears after dragging content to FL Studio, so that it is out of the way. Disable this, and the Browser will remain visible.
- Auto contrast text - Visual aid controls. Makes Browser text higher contrast and provides additional folder open/close controls.
- Show icons and text on tabs:
- Auto - Will automatically swap between icons and text depending on the width of the tabs.
- Icons - Always show Icons (Tab Icon). (Right-Click) Tabs to set Icons.
- Text - Always show Text (Tab name). (Right-Click) Tabs to Rename.
- Full sample preview - By default audio files clicked in the Browser will play for 5 seconds. Use this option or press Play on the Preview Player to override this and play the full sample.
- Structure:
- Collapse structure (Ctrl+Up) - Collapses all expanded folders in the Browser window.
- Reread structure (Ctrl+R) - Rereads the contents of all folders in the Browser. Click this button to see any new files and folders that were created after FL Studio was started.
- Content:
- Configure extra folders - Opens the 'File Settings' Options (F10). Use this to specify folders outside the FL Studio Installation path that hold your plugins, samples, projects, etc. You can also drop any folder from an external File Browser onto the FL Studio Browser and it will be added to the list.
- Refresh plugin list (fast scan) - Scans for newly installed plugins, see here for more details on installing 3rd party VST & AU plugins.
Tabs & Tab Menu (Right-Click / Control-Click) on Tabs
These options can be applied independently for each Tab.
- Rename, color and icon ... - Edit these Tab properties.
- Manage tabs:
- Hide (for user Tabs) - Hides the Tab. To show again use 'Other tabs > Show hidden' (see below).
- Show hidden - Will show a menu of all hidden Tabs.
- Delete (for user Tabs) - Deletes the selected Tab.
- Clone this tab - Make a copy of the selected Tab. Useful to edit the contents for your own workflow while preserving the default one.
- Move right / left - Move the Tabs location.
- Save search result as tab - Search result and path will be saved as a new Browser tab. This option is available only after a search.
- View:
- Zoom - Changes the size of the font and spacing according to Compact, Normal, Large, Huge & Massive options.
- Show only one folder content - Only one folder will be open at a time. Deselect this if you want to have several folders open at the same time.
- Show folder icons - Displays an icon for each folder in the Browser tree.
- Show images - Shows the Plugin database plugin icons.
- Show preview - Show the preview panel at the bottom of the Browser. Becomes visible when previewable content is selected.
- Show parent folders (Favorites Tab) - Shows the folders containing the favorited content.
- Show file extensions - Shows file extensions such as .wav, .mp3, etc.
- Show unknown file types - Displays files not natively supported by FL Studio. You may be able to drag and drop these on VST/AU plugins for example.
- Frozen - Freezes the currently selected slot and protects it from change. The slot will display a tick mark when frozen.
- Sort files by:
- Name - Alpha-numerical name sorting.
- Type - File extension type e.g. .mp3 or .fst
- Date - Files creation date.
- Group - Files Group. This option sorts folders or files according to the order specified by XYZ.nfo files in the ..[FL Studio installation folder]\FL Studio\Data\Patches\ folder, where XYZ = any folder or file name. Inside the .nfo file put the command SortGroup=1 to N. 1 will appear at the top while N is the last file to be sorted toward the top of the Browser. Unsorted files will appear below these as usual.
- View layout:
- Standard - Shows the folder structure and content in a single column.
- Columns - Opens a second column to show the content in folders when selected.
- Samples - Same as 'Columns' but shows audio files as playable and visualized content.
- Plugins (Plugin Database) - Same as 'Columns' but shows plugins in a separate grid.
Folder Menus (Right-Click / Control-Click) on Folders
- Expand all / Collapse all - Show or hide all sub folders.
- Open in new tab - Open the selected folder as its own tab.
- Add folder to tab - When you have added your own Tabs, these will show as options here. NOTE: This does not duplicate files on your hard drive, it's just a shortcut to the original data.
- Change color - Change the color of the selected folder.
- Change icon - Change or set an icon for the selected folder.
- Windows shell menu (Windows only) - Opens the Operating System (Right-Click) folder options associated with the folder.
- Open - Opens the folder in the Operating System Browser.
Browser Folders
- Left-click a folder to expand/collapse it.
- Right-Click and select Open to open a standard file browser.
- Hover the mouse over the name of a folder for a short description in the hint-bar. The folders seen by default in
the Browser window include:
- Channel presets - Contains a collection of instrument/effects presets, scores, etc.
- Projects - Contains a collection of sample projects (.flp files).
Adding your own folders
There are two ways to add your own folders to the Browser:
- Drag and drop... - Open an external File Browser and then drag-and-drop the folder you want to add from the File Explorer onto the FL Studio Browser.
- File options - Use the File options 'Browser extra search folders' list to add up to 30 custom folders. Custom folders appear in the Browser in green font.
NOTE: Custom 'Extra search folders' and their sub-folders are scanned for samples and content when loading projects. So, it's not advisable to set the root of any drive as a search folder since it can make load-times for projects very long (while the whole drive is searched). On the other hand, this is a good trick for locating missing files you have moved somewhere and forgotten about.
File Menu (Right-Click / Control-Click)
NOTE: The options shown depend on the content type acted upon:
- Send to selected channel or focused plugins - Content will be sent to the selected Channel or Plugin as noted.
- Open in new channel - Opens the content in a new Channel.
- Add to plugin database (flag as favorite) - Where the content is a Plugin Preset.
- Edit in audio editor - Where the content is audio, open in Edison.
- Edit in pitch corrector - Where the content is audio, open in Pitcher.
- Edit in tine warper - Where the content is audio, open in NewTime.
- Open in new sampler channel - Where the content is audio, open in a Sampler Channel.
- Open in new Fruity Granulizer channel - Where the content is audio, open in Granulizer.
- Open in new Fruity Slicer channel - Where the content is audio, open in Slicer.
- Open in new Slicex channel - Where the content is audio, open in Slicex.
- System:
- Windows shell menu (Windows only) - Opens the Operating System (Right-Click) folder options.
- Open parent folder - Opens the content's containing folder in the Operating System Browser.
- Locate file - Opens the content's parent folder in the Operating System Browser.
- Delete file - Don't come complaining to support when you delete your important files there is a pop-up warning!
- Tags:
- Favorite - Adds the content to the Starred / Favorite Tab.
- Tags - Show existing tags to select one for the content.
- Add a tag - Type in a Tag to add to the file. You can add multiple Tags by separating them with a comma, e.g. typing - Kick,808,C# will give the content 3 tags.
- Edit tags - Edit any existing Tags.
Working with files (content)
- Load files - Most items can be dragged from the Browser onto a compatible location in FL Studio (FL desktop, Plugin, Channel, Mixer, Edison, etc). Alternatively, Right-Click an item to
'send' it to a particular location. See below for details:
- Drag and drop - Most items may be dragged from the Browser (Left-click, hold & drag) to the desired target in FL Studio and they will be loaded automatically. For example;
- Instrument presets from folders or Instruments from the Plugin Picker can be dragged to Channels OR better, Mixer tracks to automatically set a routing to that track.
- Effects to Mixer tracks or FX slots.
- Samples to the Playlist to create Audio Clips or to Instruments that support samples (see note below). To load multiple samples at once, Right-Click the parent Browser folder and select 'Open' to open the Operating System File Browser. Now you can make a multiple-selection and drag and drop these files onto the Playlist Track header area or Channel Rack, for example.
- Projects onto the FL Studio desktop to open them.
NOTE: Hold (Alt) when dragging and dropping content and the Channel Window wont open when the Channel is added.
- Open with selected plugin - (Right-Click) the item in the Browser and select either 'Edit in ...' audio editor, pitch corrector etc. OR 'Open in new ...' Sampler Channel, Granulizer, Slicer or Slicex Channel.
NOTE: Hold (Alt) when using this function and the Channel Window wont open when the Channel is added.
- Step through items in a folder - The (Shift + Up / Down Arrow) keys will step forward and backward through the items in the folder and send them to the selected Channel or selected Plugin Window. This is particularly useful for trying out various samples in the Channel Sampler, more so if you have content sorted into folders of a particular type, e.g. Kicks, Snares etc. Swap samples while the Project is playing. Method:
- 1. Select the Channel, plugin or click on the window.
- 2. Click on the first item in the Browser list, then start stepping using the (Shift + Up / Down Arrow) keys.
NOTE: If you wish to replace a Channel with a particular item instead of stepping through a list, select the item and press (ENTER) key.
- Drag and drop - Most items may be dragged from the Browser (Left-click, hold & drag) to the desired target in FL Studio and they will be loaded automatically. For example;
- Delete files - Right-Click the file and select 'Delete'.
- Docking - The Browser can be docked to either the left or right side of the main window, by dragging it to either side of the screen. Click and drag on the word 'Browser' in the header bar.
 See video here
- Add folders - See how to add folders here.
- Initialized controls folder - The Current project folder will show all data associated with the currently loaded project. Useful for finding unwanted automation or initialized controls. The symptoms of (unexpected) initialized controls are controls that jump to some position every time play is pressed. This can happen when an automation clip is deleted, but the initial value still remains. You can delete these (see below).
- Backup - The Backup settings are on the FILE tab on the System Settings dialog.
- External file browser - Right-Click folders and select Open. See video here.
More tutorial videos here - ![]() The Browser Video Tutorial Playlist.
The Browser Video Tutorial Playlist.
FL Studio project files
FL Studio project files can be saved to one of two formats:
|
|
FL Studio project file (*.flp) - To open Right-Click and select 'Open', middle-click the mouse-wheel or drag-n-drop on the FL Studio desk top. Project files contain the data that belongs to your project, including notes and sequencer data, patches and settings for all instruments, FX and Channels, but does NOT include sample data (use .zip project files for that). Sample data locations are saved, and these will be scanned when the project is opened for the correct sample data. If the samples can't be found there FL Studio will search all custom folders added to the Browser. If you want to skip this extended search, press and hold ESC when you see the loading icon in the Hint bar. |
|
|
Zipped project file (*.zip) - To open Right-Click and select 'Open', middle-click the mouse-wheel or drag-n-drop on the FL Studio desktop. Zipped project files include all the data of the .flp file (see above), plus samples used by Audio Clips, Channel Samplers etc. It does not save VST/AU plugins OR samples used by VST/AU plugins in the .zip. The .zip format is the same compression standard as used by 3rd party applications. The file contains the .flp project plus sample data. When opening a .zip file, FL Studio will automatically decompress it, load the .flp project and any samples. Zipped files are a great way to archive an important projects or to share them with collaborators, even if the project uses non-FL Studio samples. |
NOTE: To export your project as an audio file (.wav, .mp3 or .ogg) use the File menu > Export option.
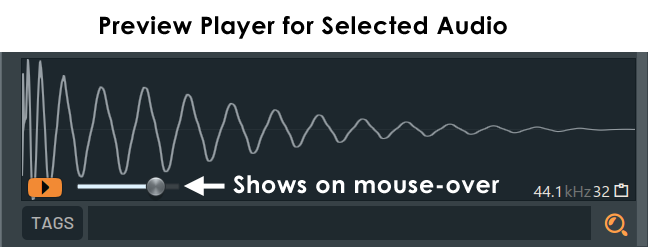
Preview Player
When you select audio content, the Preview Player will appear in the Browser. On mouse over there is a volume control as shown below:
Working with Audio Previews:
- Preview samples - Left-click items (.mp3, .m4a, .ogg, .wav files) to play. By default the preview will be up to 5 seconds unless Browser Menu > 'Full sample preview' is selected.
- Play to end - Press the play button on the Preview Player. Alternatively, (Alt+Click) samples in the Browser or select the Browser Menu > 'Full sample preview'. Click Stop on the transport panel to end early.
- Play from mouse position (Shift+Click) - On release playback will start from the mouse position.
- Sync to tempo & pitch - Wav files may contain tempo and tempo-sync meta-data. This will be read by FL Studio if the General settings > 'Read sample tempo information' option is selected. If this information is used the preview will be time-stretched to match the tempo of the project and the sample may be similarly stretched when loaded into the Playlist. This can cause unexpected behavior if the tempo data saved in the sample is wrong. You can load any samples into Edison and open the File properties dialog to change the value of any incorrectly tagged samples.
Search
The search tools are located at the bottom of the Browser by default. You can use the Search Options in the Browser menu to move them to the top. The controls are as follows:
- Search bar options - See here.
- Type (filter) - Search results will show only content of the type selected. The filter button will show the selected type icons.
- Any / All (Tag search logic) - Will show content with 'Any' of the selected tags, or only that with 'All' the selected tags.
- Tags - Shows / hides the available content Tags. The following (Right+Click) options are available for content (files):
- Star (icon) - Adds the content to the Starred / Favorite Tab.
- Tags - Show existing tags to select one or more to filter content to the tagged categories.
- Add a tag - Type in a Tag to add to the file. You can add multiple Tags by separating them with a comma, e.g. typing - Kick,808,C# will give the content 3 tags. NOTE: To remove existing tags select files and (Right+Click) > 'Delete' Tags.
- Edit tags - Edit any existing Tags.
- Search - Type searches into the text filed to the right of the 'TAGS' switch. Searches for files and folders using non-case sensitive searching. To cancel a search, press Esc.
- Find (Alt+F) - Type in a search string after selecting this option. The exact phrase will be searched.
- Browser find (Ctrl+F) - Allows the use of advanced search functions. Wildcards: 'sytr*' will find 'sytrus', 's*us' will find 'sytrus' or 'stylus' and Boolean search (AND, OR, NOT) also work. TIPS: Don't forget to use the content 'Type' filter to find only samples (audio) or projects for example.
- Browser find in the selected folder... (Shift+F) - As above but for the selected folder.
- Find previous (F2) - Jumps to the previous item of the same search type.
- Find next (F3) - Jumps to the next item of the same search type.
Current project
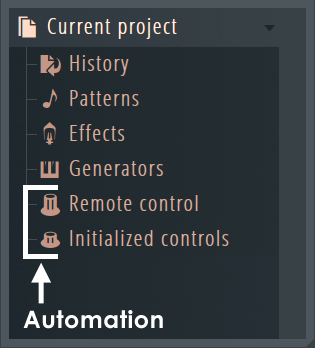 The Current project folder contains information and data associated with the currently loaded project, such as a list of patterns, automated controls, instruments and an undo history list.
NOTE: For direct access to MIDI CC parameters for Automation purposes, open the Effects or Generators folder (see below). Although the Tools menu > Last Tweaked automation linking process is usually faster. |
|
|
History - Contains the set of possible undo steps ('undo history'). The last action you performed is at the bottom of the list. See General Settings > Undo history for options.
|
|
|
Patterns - Contains a list of Patterns, Initialized controls & Automation. The item sub-folders contain the automated controls themselves.
|
|
|
Effects - The Effects folder lists all effects used in the project. For direct access to MIDI CC parameters, for Automation purposes, open the Effects folder where each effect is listed as a folder containing all automatable controls for the plugin.
|
|
|
Generators - The Generators (instruments) folder lists all generators (instruments) used in the project. It does not include the Channel Sampler, 3x Osc or Layer. For direct access to MIDI CC parameters, for Automation purposes, open the Generators folder where each Instrument is listed as a folder containing all automatable controls for the plugin.
|
|
|
Remote control (Automation) - Contains the list of controls that are linked to external (MIDI) or internal controllers. NOTE: When controls are automated they are usually initialized (see Patterns > Initialized controls for more information).
|
|
|
|
Plugin Database
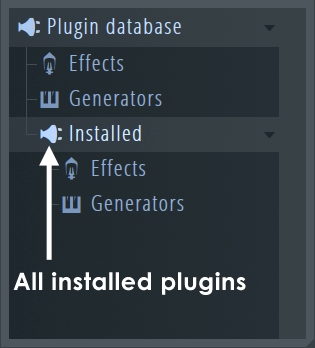 The Browser Plugin Database is one place to manage your plugins and to create favorite lists, another is to use the Plugin Manager that interacts with this database filling categories. About the folders: The Browser Plugin Database is one place to manage your plugins and to create favorite lists, another is to use the Plugin Manager that interacts with this database filling categories. About the folders:
The Plugin database > Effects / Generators folders are your 'favorites' list. This is the data used to generate the Plugin Picker (F8) pop-up and various 'add plugins' menus in FL Studio. The Plugin database > Installed > Effects / Generators folders show ALL VST/AU plugins you have installed. See the |
Managing the Plugin Database
- Adding favorite plugins to the Plugin database with thumbnail image. These images will show on the Browser and Plugin Picker ( video tutorial here).
- Open the plugin from the 'Installed' sub-folder.
- Open 'Plugin database > Effects' or 'Plugin database > Generators' AND sub-folder if required (Shift+F8) to the category where you want to 'favorite' the plugin. NOTE: Plugins may be saved to more than one location in the database, just repeat the method with a new location open.
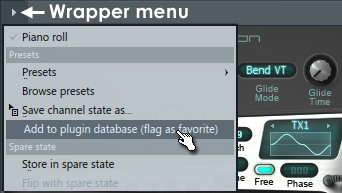
- Save the plugin to the database by selecting the Plugin Wrapper menu option 'Add to plugin database (flag as favorite)'.
- Click OK to the popup and a thumbnail screenshot will be saved to the database at the currently opened location.
NOTE: If you set a Channel Color and Icon for the Plugin prior to adding as a favorite to database, these will be remembered next time you load the plugin from a favorite location.
- Adding favorite plugins to the Plugin database for use in menus including the Channel Rack > Menu > Add one option, Channel Rack + button and Main menu > Add option, FX slot menu etc.
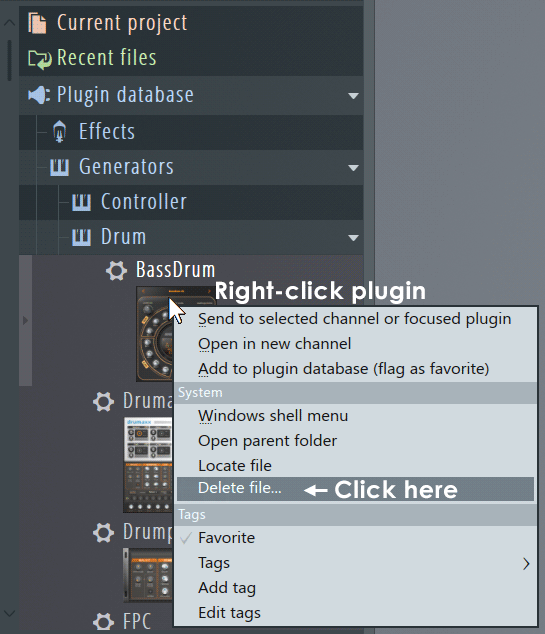
- Open the plugin from the 'Installed' sub-folder that you want to add to the database.
- Right-Click the plugin - Select 'Add to plugin database (flag as favorite)'.
- Click OK to the popup and a thumbnail screenshot will be saved to the database at the currently opened location.
NOTE: You can also 'favorite' plugins from a list using the FL Studio Plugin Manager tool if you are not interested in creating plugin thumbnails.
- Remove plugins from the Plugin database - Right-Click the item in the Plugin database > Effect or Generators folder/s where it exits and select Delete file... NOTE: This does not delete the plugin from your system. To do that you will need to uninstall the plugin as per the developers instructions.
- All that's for babies, I want to hack your code! - Advanced users can manually edit the plugin database, it is located in your User data folder "...\[Your Account]\Documents\Image-Line\FL Studio\Presets\Plugin database":
- Right-Click on the Plugin Database category - to see the context menu.
- Select 'Open' - This will open a standard external file browser.
- Edit stuff - Notice the file structure matches what you can see in the Browser, amaze at that for a while. Then notice that there are three files for each item (or two if you didn't save a thumbnail). Plugin name.bmp (the thumbnail image, 8 bit RGB color bitmaps), Plugin name.fst (the default preset plugins open with) and Plugin name.nfo (information for FL Studio, you can open this in any text editor).
- Backing up your database - If you have extensively customized the list you may want to make an external backup copy of this folder as a precaution against loss of data during future FL Studio installations.
- +1 up your file management skills - Check this page.
Plugin Picker
The Plugin Picker (F8) displays the plugins in the database as an array (generators left, effects right, as shown below). To use the Plugin Picker, click, hold & drag the icon of the plugin you want to use. The picker interface will close leaving you holding the plugin ready to drop on the desired location inside FL Studio. Alternatively double-clicking a plugin will load it into a new channel or double-clicking an effect will load it into the currently selected mixer track.
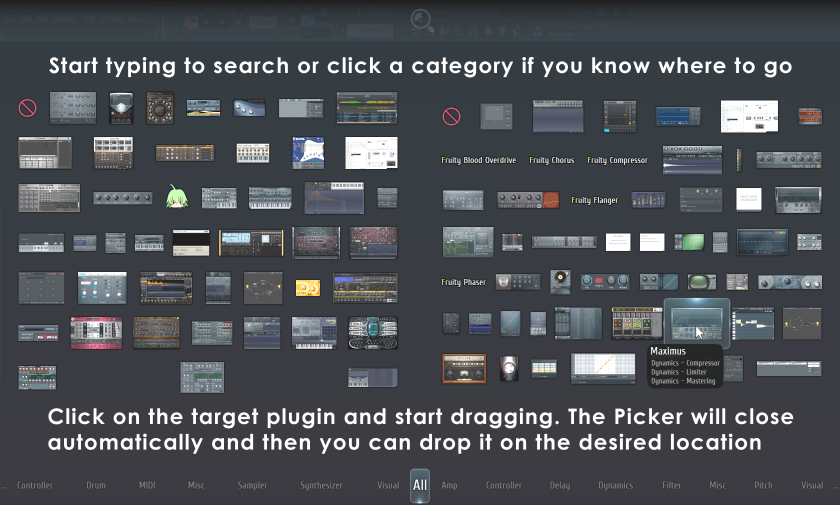
TIP: Start typing the name of plugins to concentrate the Picker panel options.
- To open the Plugin picker:
 Press (F8), use the Shortcut Toolbar, (Middle-click) on the FL Studio Desktop or from the Add menu. There is also a related Project picker (Ctrl+F8).
- Adding plugins to the picker - Favorite the plugins as shown in the VST/AU section.
- Keyboard & Mouse shortcuts:
- Select Plugins - (Up Arrow) / (Down Arrow) or (Ctrl+Mouse-wheel).
- Select Plugin categories - (Left Arrow) / (Right Arrow) or (Mouse-wheel).
Library
The library shows online content. Some will be free and some is available to purchase as indicated. Where content is associated with a plugin, it will be automatically downloaded to the correct location and does not need to be manually installed (see 'Locating Downloaded Library Content' below).
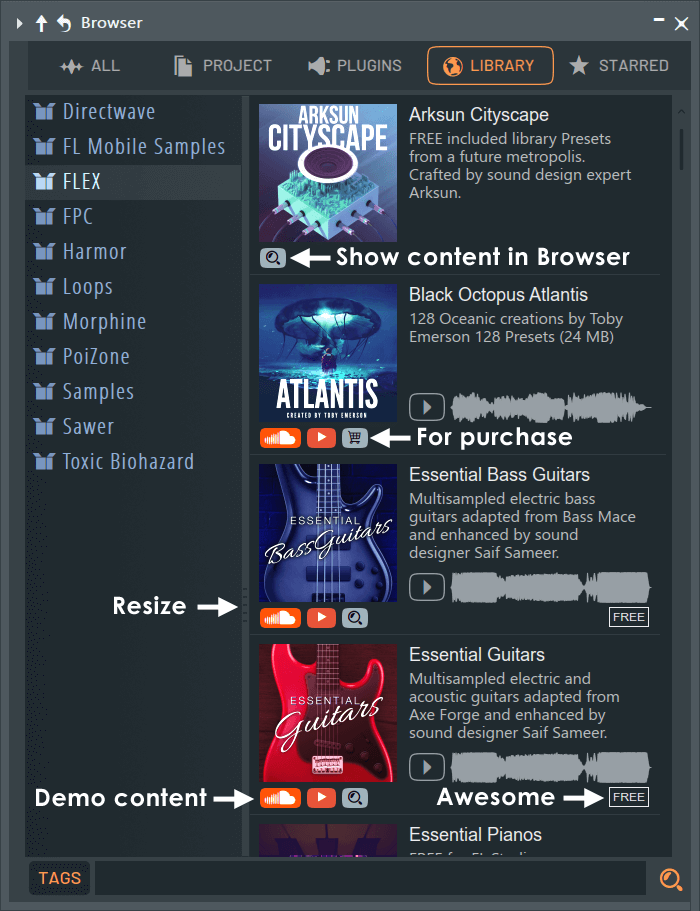
- Purchase content - Click the cart icon and the integrated FL Studio Shop will open.
- Show in browser - Click the magnifying glass icon and the Browser will open to the installed location. NOTE: Content will install to a location where associated plugins can find it.
- Preview content - Click the demo icons below the product image.
- Owned / Free / Installed - Badges show when content is Free, Owned or Installed (in Documents > Image-Line > Downloads)
Locating Downloaded Library Content
NOTE: Content downloaded from the library will always be visible to plugins and tools that can use it. For example, FLEX or FPC content will be immediately available in the respective plugin browsers. Regular 'Sample' content will appear under the 'Packs' folder in the main Browser. All downloaded content (samples, presets, themes etc.) is saved to your User data folder under ... Documents > Image-Line > Downloads.
Starred (Favorites)
The Starred Tab shows your selected 'Favorite' files. 'Favoriting' is achieved by selecting the star that appears after files on mouse-over or from the file (Right-Click) file menu.

- To add to favorites - On file mouse-over, a favoriting star will appear at the end of the content. Click it to add to the Starred tab. Use standard multi-selection shortcuts to favorite a group of files inc. (Shift), (Shift+Ctrl) when using 'Favorite' from the (Right-Click) file menu.
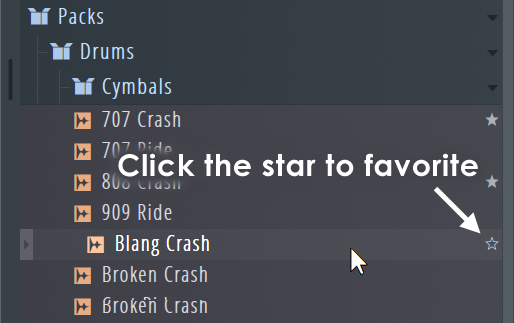
- To remove from favorites - Deselect the star wherever you see it.
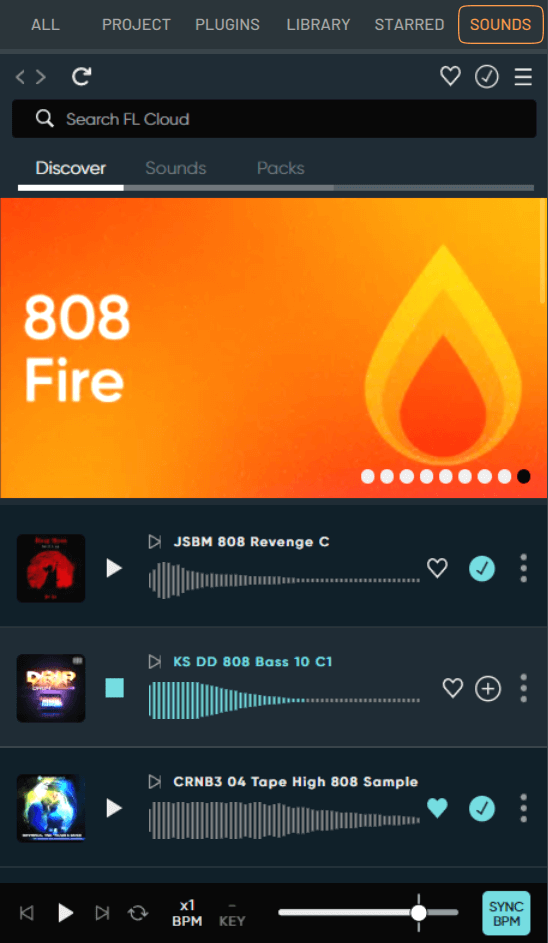
Sounds (FL Cloud)
The Sounds Tab provides access to an extensive and growing library of samples, sounds and other content designed for FL Studio under the 'FL Cloud' service. As the contents of the Sounds Tab are hosted online, the items shown, layout and design may change from time to time as the service is improved.
You can access the content on the Sounds Tab in the following ways:
- Free - FL Cloud includes access to a library of free sounds in the Sounds tab with monthly updates, so check back. To access the Free content you must be logged into your FL Studio Account.
- One-off purchases - Buy credit-packs as a one-off purchase and gain complete access to the entire sound library with credits to download any sounds you like. Credits do not expire so there is no rush to use them.
- Subscription - Complete access to the full, and constantly growing, sound library along with the extended feature set of FL Cloud. Download all the sounds you need. NOTE: FL Cloud users may experience a slowdown of the download rate from the Sounds feature if they exceed fair and reasonable usage in comparison to the majority of the users. This is to ensure an equitable performance experience for all.
NOTE: FL Cloud and any optional subscriptions to the content and services it provides will not replace FL Studio’s Lifetime Free Updates, now or in future. No one will be forced into a subscription to use FL Studio and FL Studio will always be available for outright purchase with Lifetime Free Updates. That's our promise to you!
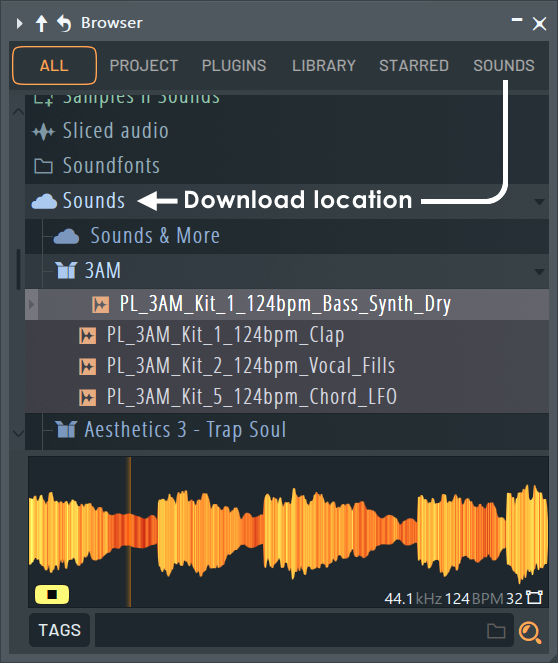
Downloaded Sounds
Downloaded sounds are saved to your User data folder under ... Documents\Image-Line\Downloads\FL Cloud Sounds. This folder is directly available from the main FL Studio Browser under 'Sounds'. Downloads are also logged to your FL Studio Account for future reference.
NOTES:
- Download actions - Clicking the (+) icon, dragging and dropping a sample on any part of FL Studio, or using the (Right-Click) options to send, edit etc, will initiate a sample download.
- Download location - You can Right-Click downloaded content on the 'Sounds' Tab and select 'Show in FL Studio Browser' to open it in the local folder.
- Bi-directional location of downloaded content - Choose one of the following:
- Find in the Sounds Tab from the Browser - (Right-Click) files in the Browser and use 'Show pack in sounds tab' to open the 'Sounds' Tab with the parent pack open from where the sample was originally downloaded.
- Find in Browser from the Sounds Tab - (Right-Click) downloaded files in the 'Sounds' Tab and use 'Show in FL Studio browser' to open the sound in the Browser.
- Saved Sample Time and Pitch settings - Regardless of the Sounds Menu > Enable auto time stretch and Enable auto pitch shift settings, saved samples will always retain their default Time and Pitch settings. For example, if 'Enable auto pitch shift' is selected and you change a sample with a Key of A to D in the Sounds Tab preview, then use it in your project, it will be set to the key of D. If you open a new project and use the same sample from your local Browser > Sounds folder, it will be set to a Key of A.
- Licensing & user rights - All sounds downloaded from the FL Cloud are copyright cleared, royalty free, and yours to keep for use in your music or audio works, even if your subscription expires. See here for more details about copyright and content in FL Studio. NOTE: You may only use sounds downloaded from the FL Cloud in music or audio works. Sharing or redistributing the content downloaded from this library, or their exposed audio outside of a musical or audio work, is strictly prohibited. Simply playing or recording pre-existing sounds does not create a new musical or audio work.
Menu Bar
- Heart icon - Shows all favorited content that has not been downloaded. NOTE: This is a separate list to the 'Starred' (favorites) Tab which shows only downloaded content.
- Tick icon - Shows all downloaded content. To locate downloaded content on your computer you can either Right-Click and choose 'Open parent folder' to show the download location in the Operating System Browser or use the context menu (3 vertical dots) and choose 'Show in FL Studio browser'.
- Hamburger icon (3 horizontal bars) - Access FL Cloud settings:
- Sign out - Log out of FL Cloud. Useful to keep your younger sister from messing with your Cloud.
- My account - Opens your Image-Line Account focused to FL Cloud related information.
- FL Cloud Settings:
- Upgrade options - Shows unless you have a Yearly subscription. This button is just cluttering up the place, so you know what to do.
- Follow FL Studio color theme - Follow FL Studio's Theme.
- Enable auto time stretch - Samples dragged and dropped from the 'Sounds' Tab to the Playlist will automatically sync to project tempo. NOTE: This feature uses the Audio Clip / Sampler Channel Time Stretching settings, automatically setting them to time-stretch the sample. These settings are per-project and are not saved with the sample on your local drive.
- Enable auto pitch shift - Samples dragged and dropped from the 'Sounds' Tab to the Playlist will automatically apply the key setting. NOTE: This feature uses the Audio Clip / Sampler Channel Time Stretching settings, automatically setting them to pitch-shift the sample. These settings are per-project and are not saved with the sample on your local drive.
- Set Sounds as my starting tab - Always open FL Studio with the Sounds tab selected as the defaut.
- My favorite genres - Choose music genre preferences to improve the relevance of content displayed in FL Cloud for your musical style.
- Sync my sounds - Bulk download of all your previously downloaded content. Use this when setting FL Studio up on a new machine or when you are missing sounds because they were deleted. Don't forget, your FL Cloud content is saved to '... Documents\Image-Line\Downloads\FL Cloud Sounds'. You can always back this folder up and or copy it to a new machine rather than downloading it.
- Search bar - Text search field. Responds to boolean logic.
- Clear All - Clears text search and tags applied.
- Browser Tabs
- Discover Tab - Sample packs and collections based on your genre preferences (where available).
- Sounds Tab - Individual samples.
- Packs Tab - Thumbnail list view of sample packs.
Featured Content (Discover Page)
Sample packs & collections will rotate on hover. You can manually cycle through the featured content by clicking the dots on the bottom right.
- Pack thumbnails - Hold the mouse over packs and click the Play icon for an audio demo. Click the artwork or pack name to view pack contents.
- Pack contents - Click label name to see all packs from that label in Packs Tab.
- Menu (vertical dots) - Options to report issues with a pack or view the full pack. Select a category and enter a note to describe the issue.
- Charts - Most popular packs based on downloads. Audio demos available through play button.
Tags (Filter Content)
- Type - Choose content based on type: Loops, One-shots, Stems etc.
- Genre - Genre refers to musical styles (e.g. Rock), although don't restrict yourself to exploring only sounds tagged for your favorite Genre/s, experimentation is rewarded! Use the second level Sub-Genres to further refine search results e.g. 'House / Techno' > 'Deep House'. Use 'Reset' to clear the Genre selections.
- Instrument - Filter sounds via instrument tags. Use the second level of the instrument hierarchy to further refine search results e.g. 'Keys > Electric Piano'. Use 'Reset' to clear the instrument selections.
- BPM (Tempo) - Filter sounds by Tempo:
- Exact - Results must exactly match the specific BPM.
- Project - Will match the BPM of the current project Tempo.
- Range - Set a lower and upper limit for BPM in the search results.
- Project % - Set a % +/- range for the search results relative to the Project Tempo.
- Key - Use the pop-up keyboard to select a specific musical key to filter sounds.
- Major / Minor / Both - Show only keys that match the setting. Use 'Reset' to clear the key selections.
NOTES: All filters can be used independently or in conjunction with each other. However, it is not possible to search for multi Types, Genres, Instruments, BPMs or Keys in a single search. Once filters are applied, they appear as 'teal' colored tags below the Type filters. You can remove applied tags using the 'X' next to each of the used tags. Search results will update immediately tags are removed. When a search is performed using a text search or with filter tags you will see the total number of search results returned.
- Sorting:
- Most popular - Most downloaded, highest to lowest.
- Hidden gems - Least downloaded, lowest to highest.
- Newest arrivals - Most recently released to FL Cloud, latest to oldest.
- Shortest first - Sample length, shortest to longest.
- Longest first - Sample length, longest to shortest.
- Random - Surprise yourself!
- Working with sample content:
- Sample lists - Search results are displayed on a per-sample basis. This includes a thumbnail image of the pack the sample is from. Click the image to jump directly to the pack.
- Waveform preview - The preview waveform will be 'characteristic' of the actual waveform and includes text showing the Length of the sample in seconds, Name, Type (loop, one-shot, stem) and any tags applied (e.g. Piano, House).
- Preview - Users have the ability to trigger an audio preview of the sample using the play button. You can preview from any point in the sample by clicking at that specific point.
- Favoriting (Heart icon) - Click the heart icon to add to your Sounds 'Favorites' list. Use this as a 'wish-list' of sound not yet downloaded. It applies only to the Sounds Tab content that you have not yet downloaded. The Favorites (Starred) Tab in the Browser applies only to downloaded content. You will need to Favorite content after downloading from the Browser for it to appear there.
- Download / Send - Click the (+) Plus button or by drag and drop directly into their project (anywhere dragged samples normally work). It will take a while before a dragged sample will appear at the destination. Right-Click to show the usual Browser options such as Send to ..., Open in ..., Edit in ..., etc.
- Content menu (3 vertical dots) - Includes options to Download the sample, Open it in a specific device or location, Add it to favorites, view the full pack the sample comes from or report the sample. Show in browser will open the sample in the File Browser where it is downloaded on your local machine.
- Downloaded content - When content is downloaded the plus icon is replaced permanently by a solid tick icon.
- Search results list - If the search results span more than 1 page, you can use the up/down arrows at the bottom of the page to browse more results.
Transport Bar
- Previous - Preview of the sample above the last previewed sample in the Sounds Tab
- Play - Play the first or selected sample in the Sounds Tab.
- Next - Preview of the sample below the last previewed sample in the Sounds Tab.
- BPM - Change the playback speed of loops (1/2, x1, x2) this is a persistent control when applied and changes from white to colored when active. NOTES:
- FL Studio Project Use - If the BPM button is active and General Settings > 'Read sample tempo information' selected, the Tempo adjustment will be applied to the sample when sent to or drag-and-dropped to FL Studio. One-shot samples are not affected by the BPM multiplier.
- Related Sounds Setting - If you don't want the preview settings to affect the sample when it is used in the Project, deselect Enable auto time stretch in the Sounds Menu Bar.
- Changing Settings - You can always use the Channel Sampler Stretch options with melodic content and SliceX to sync content to the project.
- Key - Change the pitch of the sample playback where 'Key' information is attached to the sample. The Key button will change from white to colored when it's active. The keyboard allows you to further select alterative preview-keys. The 'Semitone' control allows you to set an offset to whatever key is active, whether that is the original key or another selected key. 'Original key' resets the key to the default for the sample. NOTES:
- FL Studio Project Use - If the Key has been changed from the sample's default, and General Settings > 'Read sample tempo information' is selected, the Key change will be applied to the sample when sent to or drag-and-dropped to FL Studio,
- Related Sounds Setting - If you don't want the preview settings to affect the sample when it is used in the Project, deselect Enable auto pitch shift in the Sounds Menu Bar.
- Changing Settings - You can always use the Channel Sampler Pitch options with melodic content to change the pitch after sending to FL Studio.
- Loop - Loop sample previews. When auditioning a loop with this deselected, the loop will play once. When selected the loop will repeat until it is stopped with the Transport control, either on the Sounds Tab or FL Studio. When auditioning a one-shots Loop and BPM options are disabled.
- Volume slider - Global volume control for the Sounds Tab.
- Sync - Preview of samples synced to the tempo of your project. When deselected loops will play back at their original tempo. When selected loops will play back at the tempo of the project. One-shots are not affected by this setting.
- Major / Minor / Both - Show only keys that match the setting. Use 'Reset' to clear the key selections.