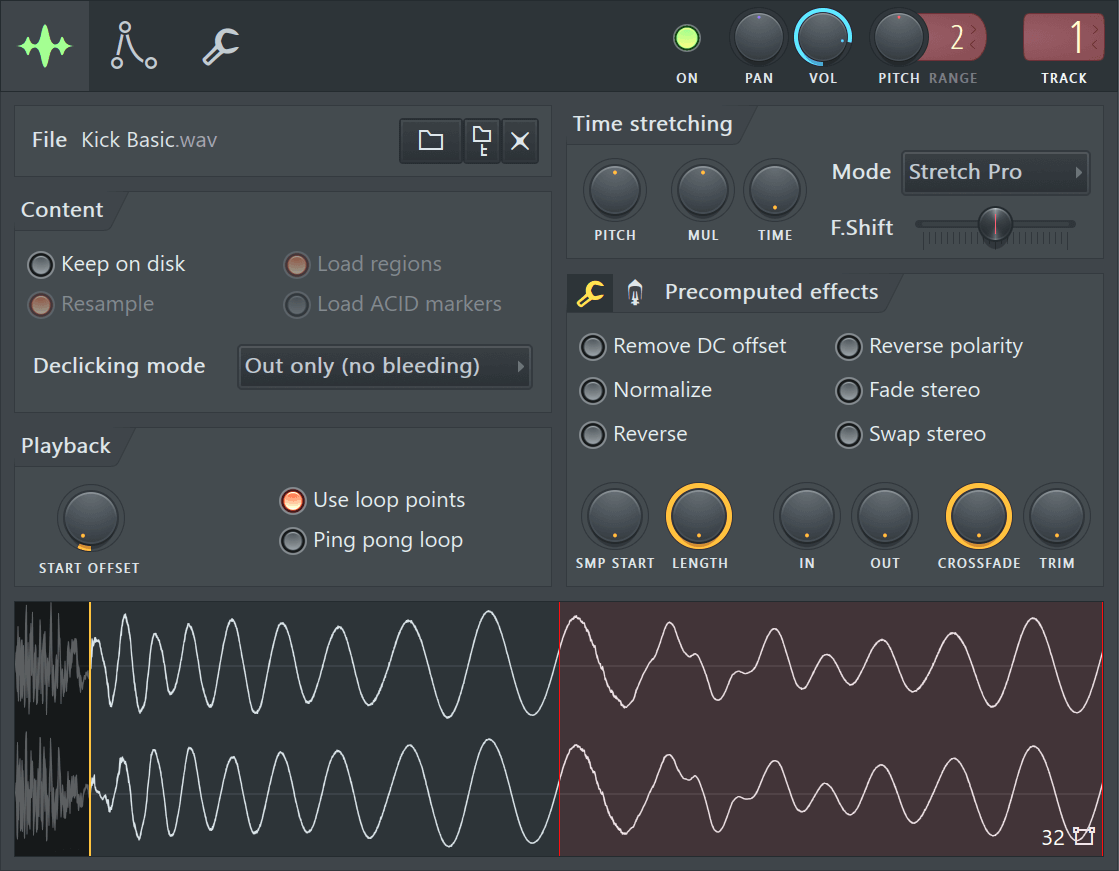
CHANNEL SETTINGS
Sampler Channel Settings (SMP)
The Channel Sampler is an integrated, single-sample, sampler instrument useful for percussion and related one-shot sounds. To load a sample drag and drop the sample from the Browser or Windows Explorer onto Channel Rack. If you drop the sample on the Playlist you will create an Audio Clip, a related, but different instrument type.
NOTES:
- ADSR & Filtering - Channel Samplers have a number of useful controls under the Channel Settings Tab controls that include the integrated ADSR vol, pan, filter, pitch & LFO envelopes. For example, samples will continue to play after note release unless you activate the Volume envelope.
- Disabled options - You may notice that some of the options in your Sampler Channels are disabled (grayed out), however you can still toggle the switches on/off. This improves workflow when trying out different samples in the same Sampler Channel, so that if a selected option becomes possible it will become activated automatically.
File
Load and locate samples. Clicking on the sample name will open a File Explorer to the location of the currently loaded sample. Use the icons to the right to:
|
|
Load sample file - Opens a file explorer window. Right-Click - To open the history of samples loaded. |
|
|
Locate sample in browser - Opens the Browser to the location where the sample is saved. |
|
|
Remove sample - This only removes sample from the selected Sampler Channel, it does not delete the original sample data file. |
Content
These options control how the sample and meta-data within it are handled:
- Keep on Disk - For FL Studio 32 Bit this can be used to free virtual memory allocation allowing more and/or larger Audio Clips / Sampler Channels to be used in the project. Sample data is moved from FL Studio's virtual memory allocation to a separate memory allocation. For FL Studio 32 & 64 Bit - It can significantly speed load times for multi-GB projects. When 'Keep on disk' is selected the maximum memory available to each Audio Clip / Sampler Channel will be 2 GB. Your Windows OS version (32 or 64 Bit) and installed RAM will determine how smoothly your sample playback works (if you load more samples than you have RAM then disk-swapping may cause buffer underruns as the data is read off disk).
IMPORTANT:
- Samples must be in 16 or 32-Bit .wav format. Keep on disk won't work with compressed formats such as .ogg or .mp3, otherwise the option will be grayed out.
- Automatically 'Keep on disk' with the 'Auto keep long audio on disk' on the F10 General Options, then re-load your project.
- 'Keep on disk' precludes the use of precomputed effects, that require the whole sample is loaded in memory.
- For smooth operation without underruns or glitches, your physical RAM should (at least) match the project's total sample-space demand. It may also take a while for very large projects to load so be patient. TIP: Zoom out on the Playlist, (Ctrl + Right-Click) on a blank area, so all Audio Clips are visible in their entirety prior to pressing Play for the first time. This forces Audio Clip data to be cached into RAM.
- Resample - If your sample is not recorded at the same sample-rate as your audio device is currently set to (e.g. Sample rate = 44100 Hz), this option can improve audio quality. NOTES: 1. Loop points - are often carefully sample-aligned so resampling can cause loops to 'click'. 2. CPU - Resampling requires additional CPU and memory as resampled waves are generally larger. See Audio Settings > Mixer > Resample quality for more details.
- Load regions - Loads the region markers embedded in some wave samples including ZGR/REX loop files. This data is used for time-stretching (Slice stretch & Slice map) options, and for more accurate sample processing (e.g. Tempo detection). If this data is not loaded then FL Studio will do on-the-fly analysis which may not be as accurate as the embedded data. Or if the embedded data is incorrect, deselecting this may improve results.
- Load slice markers - Load beat/slice markers if embedded in the sample data. This data is used for time-stretching (Slice stretch & Slice map) options, and for more accurate sample processing (e.g. Tempo detection). If this data is not loaded then FL Studio will do on-the-fly analysis which may not be as accurate as the embedded data. Or if the embedded data is incorrect, deselecting this may improve results.
Playback
Looping replays the sample or parts of it while a note is held for the Sampler Channel:
- Start Offset - Offsets the sample start point relative to the start of the sample data (automatable). There is also a 'Sample Start' on the Precomputed tab that trims the sample data to create the new start point. NOTE: The Declicking options work with Start Offset to remove unwanted clicks when non-zero, sample data start points are used.
- Use loop points - Select this option to make the sample loop, when the sample contains loop points (see Sample view below). The play position starts at the sample beginning and when it reaches the loop-end point, jumps back to the loop-start point and repeats this process while the note is held. NOTE: The Precomputed Processes allows you to create a Crossfade Loop.
- Ping pong loop - The play-position bounces back and forth between the loop start and loop end points (forwards then backwards through the loop region).
Declicking
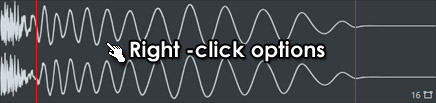
These options help to remove 'clicks' at the start (in) or end (out) caused by sharp level discontinuities when you slice Audio Clips. That is, where the sample starts or ends with a value significantly different from another sample in close proximity, the sudden jump from one value to the next causes a 'click'. The default setting is 'Out only' (10 ms fade), this will not cause audible artifacts. Set by ear. NOTE: Alternatively you can use Audio Clip Fades. These allow you to set the length and shape of the fade-in and fade-out section of an Audio Clip.

NOTE: The fade-markers, shown above, only display when a 'bleeding' type declicking option has been selected. Bleeding means the audio will extend beyond the slice point to complete a, very short, click reducing fade.
- Out only (no bleeding) - No in-declicking, declicking-out is a 10ms (cosine S-shaped) fade-out.
- Transient (no bleeding) - Useful for drum samples as the attack transient is fully preserved (only the first few samples are ramped). The declick-out uses a no-bleeding, short (10ms), filtering fade-out.
- Transient (bleeding) - Same attack processing as above, with a declick-out based on a 20 ms (cosine S-shaped) fade-out.
- Generic (bleeding) - A 20ms cosine S-shaped fade-in and fade-out.
- Smooth (bleeding) - A 100ms cosine S-shaped fade-in and fade-out.
- Crossfade (bleeding) - A 200 ms attack/release that is designed to crossfade contiguous (touching) Audio clips. This is not a true crossfade, where clips overlap, the fade start and end is designed to work well with another clip with the same settings butted up against it. NOTE: Both Audio Clips need to have been sliced to use this setting, as data before and after the slice points is used to create the Crossfade.
Time stretching / Pitch shifting
The Time stretching / Pitch shifting algorithms can synchronize pitch and/or tempo with your project, since pitch and playback speed can be adjusted independently. These are the same algorithms used by the Edison Time Stretch / Pitch Shift tool. There are off-line (computed then applied) and realtime (computed on-the-fly) stretching options. Off-line provides the highest quality but can't be used with Tempo changes. See a ![]() video here.
video here.
Video Tutorial
Options
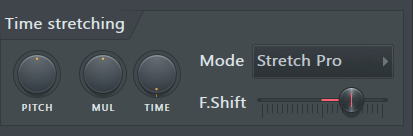
- PITCH (Pitch Shift) - Change sample pitch while preserving its length. If the 'resample' method is selected it will be automatically changed to 'Auto' after tweaking this knob.
- MUL (Time Multiplier) - Use this knob to modify the sample length. For example, you can quickly stretch the sample to twice its original length without needing to modify the Time setting.
- TIME (Sample Duration) - The time it takes to play the sample from start to end. Depending on the Stretch Mode, the consequences of adjusting 'Time' will be different. NOTE: To maintain a constant pitch as Project Tempo is automated, use Mode (menu) > Realtime > Stretch.
TIME (Right-Click) options:
- (none) - Default (no stretching). The sample is transposed according to Channel pitch as normal. Audio Clips maintain a constant pitch and duration regardless of Project Tempo. NOTE: If an Audio Clip is stretching OR a Sampler Channel is not responding to pitch then select '(none)'. See the F10 > Settings > General > Read sample tempo information section for more details on global changes that can avoid this problem in future.
- Autodetect - The sample's tempo (BPM) is autodetected and the Channel stretched accordingly. Audio Clips will adjust the Time setting when physically stretched in the Playlist.
- Project tempo - The sample duration is set to the original length when the project is at the current tempo. 'Project tempo' also locks the sample to Tempo so any future changes to Tempo will automatically stretch the sample to maintain rhythm/timing with the project, according to the Stretch Mode.
- Beat/Bar # - Use these options when you know the exact number of Beats/Bars the sample is stretched to.
- Mode (Stretch Method) - These options allow you to change sample pitch (resample) or to maintain pitch and change tempo (see the remaining time-stretching options). Time-stretching uses ZPlane Elastique Pro version 3 (e3 algorithms, e2 is included for compatibility with pre FL Studio 12 projects). The same algorithms are used in Edison Time Stretch/Pitch Shift Tool. Channel Settings options include:
Realtime - Realtime options are applied, on-the-fly and are suitable when Project Tempo or Sample Length is automated.
- Resample - Standard pitch shifting that varies sample length with sample pitch. When the 'TIME' knob is set to anything other than '(none)', for example locked to Project Tempo, shown above, this option behaves like a tape or record, where pitch changes with play-speed. Audio Clips - Will change pitch as Project Tempo is changed or Clip length physically stretched. Piano roll - If you play a chord, each note will play back at a different speed according to the pitch of the note.
- Stretch - Vocals and other rhythmic samples stay in-key and in-time as the project tempo is automated AND OR maintain the original sample duration when playing a MIDI keyboard / changing pitch in the Piano roll. For example, 'Stretch' will allow you to play a chord and keep all voices in-sync. 'Stretch' works for both Audio Clips and Sampler Channels. NOTE: When 'Stretch' is selected for the first time, the TIME knob (sample duration) is locked to the current Tempo. To default TIME to a new tempo: Right-Click the TIME knob and select 'Project tempo'.
- Stretch pro - Enhanced version of 'Stretch' with Formant control:
- F.Shift (Formant Shift) - Formants are peaks in the frequency spectrum caused by resonances, natural frequencies of vibration, of an instrument. See here for a full explanation. NOTE: Automating the Formant is a great way to add some motion and interest to sampled sounds.
NOTE: The 'Tools menu > Macros > Misc > Switch realtime stretching for all audio clips' sets 'Stretch' mode for all Audio Clips in the project. Useful when you decide to automate tempo after having added many Audio Clips. Sampler Channels are not affected.
Elastique - These are off-line stretch methods. They are detailed calculations that take some time to complete and are applied to the whole sample. They have the highest quality but don't work with Tempo changes.
- e3 Generic - A 'Default' mode is designed to work with the widest range of input signals. As usual, experiment with other methods if you hear unwanted artifacts.
- e3 Mono - Specialized for monophonic input signals such as vocals or solo instruments. Uses automatic formant preservation techniques.
Special - These options are designed to work with percussion, specifically to preserve attack transients. The important 'click', 'thwack' and 'tshhhh' sounds that start most percussion samples.
- Slice stretch - Use for drum loops, that include slice markers aligned with the drum hits, that have a tempo lower or equal to the project. Slice markers are used for transient preservation and each slice is stretched according to e3 Default. NOTES: Use Slicex for more advanced loop slicing and processing options. If your samples already contain Slices or Regions and 'Load Regions' / 'Slice Markers' is selected. These will be used to stretch the sample and preserve transients. The markers are assumed to be on the beat. Otherwise FL Studio will perform an on-the-fly analysis. This may be more or less accurate depending on the slice data contained in the sample (sometimes samples contain unhelpful slice or region data).
- Slice map - Use for drum loops, that include slice markers aligned with the drum hits, that have a tempo higher or equal to the project tempo. Slices are moved (unstretched) to map to the positions each slice would play at the selected pitch/tempo NOTES: Use Slicex for more advanced loop processing options. If your samples already contain Slices or Regions and 'Load Regions' / 'Slice Markers' is selected. This data will be used to stretch the sample and preserve transients. The markers are assumed to be on the beat. Otherwise FL Studio will perform an on-the-fly analysis. This may be more or less accurate depending on the slice data contained in the sample (sometimes samples contain unhelpful slice or region data).
- Auto - Selects the best stretch algorithm in light of the other options and settings you have selected. You trust us don't you?
Legacy Elastique (Pre-FL Studio 12 projects will map to the presets indicated):- e2 Generic (Pro default & Pro transient) - Older version of e3 Generic.
- e2 Transient (Transient & Tonal) - Transient and formant preserving stretch method.
- e2 Mono (Monophonic) - Older version of e3 Mono.
- e2 Speech (Speech) - Optimized for spoken words. For singing, use the 'e3 or e2 Mono' mode).
NOTE: Names in brackets show pre FL Studio 12 nomenclature. Old projects will re-map to the presets indicated.
Working with the stretch/pitch functions
To perform dynamic tempo changes during the song (tempo automation), use Time stretching > Mode > Stretch to keep samples in sync (otherwise with Resample, pitch and duration will change with tempo). See a ![]() video here. Alternatively for a more creative option try Fruity Granulizer.
video here. Alternatively for a more creative option try Fruity Granulizer.
Following are common actions you may need to use when working with stretched samples:
- Disable time stretching for a sample, turn the Time knob maximum left (right-click to select 'none'). This is the default mode when samples are dropped on the Playlist.
- Manually lock a sample to the project tempo: If your samples are not being automatically stretched when you make a change to the project tempo. There are two methods, either Right-Click the 'Time' knob and select 'Project' OR for more control you can sync to the project as follows:
- 1. Select the Audio Clip's menu (top left hand corner of the Audio Clip) and choose 'Fit to tempo'.
- 2. On the pop-up dialog choose the tempo marked '(project)'
- 3. The clip is now synced (or locked) to the project tempo. Further tempo changes will automatically stretch the clip so that it stays in time and with the original pitch. At any stage you can change the stretch method to one that sounds best and/or alter the pitch using the sample options tab.
NOTES: This method will perform offline (non-realtime) high quality stretching for Audio Clips. It's not intended to work with real-time Tempo Automation. In this case use the Realtime > Stretch mode. If you load an Audio clip and it does not play at the correct speed, see 'Automatically beat-match/stretch' below.
- Unlock a sample from the project tempo, follow the above and select the 'no tempo' option.
- Automatically beat-match/stretch samples dropped on the Playlist, FL Studio needs to know the sample's original tempo and receive a command to auto-stretch the sample.
This information is contained in the sample's 'meta-data', only saved in .wav files:
- 1. Open the Sample Properties with Edison.
- 2. Make sure the original sample tempo (Tempo (BPM)) is set correctly, you may need to use the 'Autodetect tempo' feature.
- 3. Turn Tempo-sync ON.
- 4. Save the sample with these settings (only .wav files can contain this meta-data, it will be discarded if you convert to mp3 for example).
- 5. Make sure the F10 General Settings, 'Read sample tempo information' option is ON.
- 6. Drag the audio file from the Browser and drop on the Playlist. It will then auto-stretch to match the current BPM of FL Studio.
Precomputed Processes
Precomputed processes include the Tools (Wrench icon) and Effects (Valve icon) tabs. These are not realtime effects, they rely on processing the sample data and replacing it. This is a low CPU approach as no realtime processing is required. However, as the processes are pre-applied, automation of these parameters isn't possible (see Automation). If you play the sample while making manual edits it will glitch when the sample data is updated. Normally on the release of a control. This is normal and why we don't allow these controls to be automated.
|
|
Sample View
The sample view displays the loaded sample (with all pre-computed effects applied). Information and icons in the lower right section indicate bit-depth (e.g. 16-Bit, 32-Bit) and stereo configuration (![]() : e.g. mono, stereo), respectively. NOTE: MP3, OGG, .WV and 24 bit source samples are converted to 32 bit on loading, so don't use this display to determine the source sample format. Check in the Windows browser.
: e.g. mono, stereo), respectively. NOTE: MP3, OGG, .WV and 24 bit source samples are converted to 32 bit on loading, so don't use this display to determine the source sample format. Check in the Windows browser.
The display also shows loop points (vertical red lines) and region markers (orange triangles along the top of the display) if these 'meta data' are present within the sample. Loop points and regions can be edited, added or removed using Edison.
Left-click - the sample view to preview the sound (if time stretching is enabled, the preview is tempo-synchronized).
Right-Click - to open a menu with additional commands:
- Reload - Use this command to reload samples when they were altered in external applications (wave editors, etc.), after FL Studio was started. This command appears only in channels that hold Sampler instrument.
- Save as... - Allows you to save the sample with all precalculated effects applied to it (see Sampler Channels Settings).
- Copy audio to clipboard (Ctrl+C) - Copies the audio from the Channel to a Clipboard.
- Paste audio from clipboard (Ctrl+V) - Pastes the Clipboard audio to the Channel. NOTE: This action creates a new WAV file. You will be presented with a save dialog on Paste, where you can rename the Clipboard Audio prior to proceeding. This is a fast way to replace all instances of an Audio Clip in the Playlist, or to create new samples from Edison or other Editor copy actions.
- Edit in audio editor (E) - Opens the integrated Wave Editor with the current sample, or the custom wave editor you have selected in the Tools window.
- Edit in pitch corrector - Opens the integrated Pitch Correction plugin, NewTone with the current sample. After editing, drag the sample from the editor and drop on the Channel Preview window.
- Edit in time warper - Opens the integrated Time Warping plugin, NewTime with the current sample. After editing, drag the sample from the editor and drop on the Channel Preview window.
- Open in new sampler channel - Opens the sample in another instance of this Channel type. Similar to cloning the Channel.
- Open in new Fruity Granulizer channel - Opens the sample in Fruity Granulizer.
- Open in new Fruity Slicer channel - Opens the sample in Fruity Slicer.
- Open in new Slicex channel - Opens the sample in Slicex.
- Detect tempo - Opens the Tempo Detection Wizard which asks you to select one of several tempo ranges the sample might be in. Select a range and the Time property of the channel will be automatically adjusted (see Sampler ). Note that the accuracy of the auto detection depends on the source material and might not always match the real sample tempo. The best practice in this case is to know in advance the real loop tempo and embed that information in the sample by using a wave editor.
- Get properties - Opens the Windows properties dialog for the sample file.
- Spectrum view - Displays all waveform previews for the sample in spectrum mode, includes the Playlist. NOTE: If this is selected the Multichannel waveform view option (below) is ignored.
- Multichannel waveform view - Displays all waveform previews for the sample in stereo mode (upper left, lower right), includes the Playlist. NOTE: Spectrum view overrides this setting.
- Tools - Will show any other Tools set in FL Studio.
Drag and Drop - You can also Left-click on the sample view and drag it to other compatible locations in FL Studio such as the Playlist (to open a new Audio Clip instance), Fruity Slicer, DirectWave, Edison, etc.