PANELS
Toolbar Panels & Icons
FL Studio Toolbar, by default, is located at the top of the screen and provides quick access to many commands and options. Many of these commands are also available, contextually, in FL Studio menus and windows.

NOTES: Click on the above image for help on that panel. Dragging content over the main window buttons (Playlist, Channel Rack, Piano roll) will bring these windows to the front if they are not already visible. For example, drag a sample onto the Channel Rack button to automatically reveal it. To see how to edit the Toolbar click here.
Toolbar Controls
- Editing the Toolbar - The panels and Icons can be reordered and hidden individually. Start by Right-clicking on an empty area on the Toolbar to access the Toolbars menu:
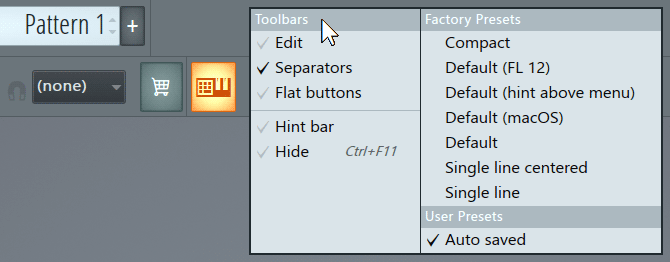
- Edit - Open Toolbar Editing to rearrange/hide items and save presets.
- Separators - Show/hide visual separators between sections.
- Flat buttons - Remove shading and highlight color from Toolbar buttons to get a flat look.
- Hint bar - Show/hide Extended Hint Panel at the lower left corner.
- Hide (Ctrl+F11) - Hide all Panels and the Toolbar itself.
- Presets - Choose a Factory preset, or revert to the last edited layout by selecting 'Auto saved'. User presets made in the Toolbar Editing view will be visible here.
Toolbar Panels
Menu Bar
The Menu bar provides access to the main menus of FL Studio. Click the menu image to access help for that item:

Title & Hint Bar

- Title Bar (Upper) - Shows the name of the project currently open in FL Studio.
- Hint Bar (lower) - If you place your cursor over any control a short description of it will appear here. The hint bar will also display the value of a wheel or slider during adjustment. There is an additional Extended Hint Panel, that displays the same information in a larger format. To select it, use the View Menu > Toolbars > Hint bar option.
The Hint Bar is particularly useful. Position your cursor over any control and a short description will appear. If you click on a control, the value will be displayed (Right-Click and copy any value from a control if desired). Similarly 'hovering' your cursor over most peak meters will show the value at the pointer position. On the right you will find different icons explaining what the hovered item is capable of:
Icon display - From time to time you will see various icons:
- Sync indicator - Used to indicate various controller and MIDI activity. MIDI Activity colors: The control blinks when MIDI data is received from a controller/MIDI input device (see Linking Controllers). Colors:
- Orange - MIDI input handled. Input was received and was assigned to a Project volatile link target.
- Blue - MIDI input received and was assigned to a Global permanent link target.
- Green - MIDI input unhandled. MIDI input received but was not used by anything (the futility!).
- Grey - Nothing detected.
- MIDI Sync - Blinks at the beginning of each beat and signals blue at the beginning of each bar. Note: The Sync LED works only when the Enable MIDI Output option in Options menu is checked.
 Recording - The parameter can be automated, recorded, respond to an envelope controller.
 MIDI plug - The parameter can be linked to anything (a MIDI control, an internal controller etc)
 Right mouse button - Whenever you see this, it means that you can Right-Click the control in order to access a popup or other feature. However, the lack of this icon doesn't necessarily mean that there is no Right-Click feature. Always try clicking a control with every mouse button.
 Happy face - Shown when things went fine (such as a successful search in the Browser).
 Sad face - Shown when things went wrong. Rarely seen.
 Attention/warning - Shown when the hint is important and you shouldn't miss it.
 Clock - Shown for some lengthy operations. Rarely used, as the hourglass mouse cursor is used instead.
 Fast forward - Shown when holding a fast-forward key (Playlist, Edison)
 Rewind - Shown when rewinding/scrubbing (Playlist, Edison etc)
 Arrow to the left - To be honest we can't remember where we used this one, or if it was *ever* used. Tell us if you see it, and what you were doing, we want to know! :)
 Group - Shown for 2 events that are linked (grouped) together.
NOTE: There is an optional, larger, floating Extended Hint Panel revealed by the View > Toolbars > Hint bar setting.
- Sync indicator - Used to indicate various controller and MIDI activity. MIDI Activity colors: The control blinks when MIDI data is received from a controller/MIDI input device (see Linking Controllers). Colors:
Extended Hint Panel
The extended Hint Panel appears in the lower-left corner of the FL Studio desktop. It relays the same information shown in the Main Hint Bar including knob/slider values as the targets are manipulated and help-hints for objects when the mouse cursor is placed over them. The extended Hint Panel is transparent to mouse clicks so that objects beneath it can be manipulated.

Controls
- Information - If you place your cursor over any control, a short description will appear in hint area. When a control is moved its value will be displayed.
- To open/close the Hint bar, select the View Menu > Toolbars > Hint bar option. Alternatively, Right-click on the Toolbar to access menu and select 'Hint bar'.
- To move - Move the mouse cursor to the center of the progress circle (the panel will fade slightly when you move over it and a cross cursor should appear). Next, click hold and drag the panel to a new location. On larger displays the empty tool-bar area along the top has proven popular.
Transport & Recording Controls
The Transport Panel contains controls for playing, recording and setting song tempo:
![]()
|
|
|
|
Play/Pause (Space / Ctrl + Space) - Press the button once to play, again to stop and rewind. To Play/Stop use (Space). To pause use (Ctrl + Space). When the record button is armed, pressing Play starts the recording process. macOS: To avoid a conflicts with the macOS 'Spotlight' command, (command + Space) change or disable it from the System Preferences > Spotlight > Keyboard Shortcuts section. NOTE: There are also play buttons on the top bar of the Piano roll, Channel Rack / Step Sequencer and Playlist to aid workflow. |
|
|
Stop (Space) - Stops playback or recording. Double-click to stop all notes (panic mode). To pause playback use (Ctrl + Space). Right-Click the Stop button to show the start location option:
|
|
|
Record (R) - Switches between record and play mode. You can automate the button with Start/Stop recording Time Markers.
NOTE: (Alt + Click) the Record Button to show the Recording Options popup: 'What do you want to record', when it has been disabled. Right-Click the Record button to show the Recording Filter options (all items with a tick will be recorded, Left-click to select items):
|
|
|

Song Position

- Song position - Shows/sets the playhead position in the Playlist or Piano roll, depending on the Song/Pat selector. Click and drag to move.
Window Control Icons
Window control icons - Minimize, Restore (over task bar), Close controls for FL Studio's window:


Windows (left): Minimize, Restore, Close. Mac (Right): Close, Minimize, Restore
- Minimize - Minimizes FL Studio to the Windows Task-bar or Dock. Click the icon there to restore the window.
- Restore - Right-Click (Alt/cmd+Enter) to Show/hide the Windows task bar / Dock.
- Multi-monitor mode - Click the center control then click on the right-most edge of the FL Studio desktop and drag across the screens you want to occupy. Alternatively, a number of FL Studio windows can be detached from the desktop and moved to a different monitor. See the menus associated with the main FL Studio windows (e.g. Playlist, Piano roll, Mixer, etc.) and look for the 'Detached' option.
- Close (Alt/cmd+F4) - Closes FL Studio. Right-Click menu:
- Stop playback
- Restore - Restores FL Studio to the maximized state.
- Minimize - Minimizes FL Studio to the task bar / Dock.
- Maximize - Maximizes FL Studio to fit the current monitor.
- Maximize for all monitors - Spreads FL Studio across all monitor screens.
- Exit - Exit FL Studio.
Monitor Volume & Pitch Controls
For your convenience:

- Monitor Volume - Main output volume from FL Studio. The main volume control provides quick level adjustments while listening to projects. Most importantly, it allows you to make volume changes without messing with your carefully crafted Master Fader level. Monitor Volume changes are not reflected in renders and it can't be automated. See the help section on Levels and Mixing to learn how to set mixing levels in FL Studio.

- Master Pitch - Sets the main pitch of instruments & Audio Clips. To change global tuning - Right-click and choose Type in value to set the tuning of note A in Hz (default is 440 Hz). NOTE: For this control to be effective 'Enable main pitch' must be selected in the Channel Settings for each Channel. Select 'Add to Key' if you want this control to change the note played, rather than changing pitch. If you select When pitch-shifting Audio Clips, 'Stretch' mode is normally preferred. The control is snapped to 100 cent pitch units, to override snapping hold (Shift).
Global Snap Panel
The Snap Panel sets the global snap options.

Global Snap Selector - Selects the Snap value applied to the Piano roll, Playlist and Event Editor when the local Snap (found on each of these windows) is set to 'Main'. Right-Click the selector to select the default note length from the popup menu. Input quantizing - The settings on the Global snap determine MIDI input quantizing. That is notes played on a controller keyboard will snap to the value selected here during a MIDI recording. NOTE: The snap options (none), Line & Cell are not input quantized. The snap options are:
- Line - Events snap to the nearest grid-line, notice that the grid changes resolution as the Piano roll, Playlist or Event Editor are Zoomed horizontally.
- Cell - Events snap to the start of the grid-cell they fall in.
- (none) - No snapping. Movement is limited only by the Project Timebase (PPQ) setting (F11). NOTE: Snapping can be temporarily disabled by holding the Alt key when dragging events.
- Steps 1/6 to 1 (step) - Absolute grid values equal to the nominated fraction of a step.
- Beats 1/6 to 1 (beat) - Absolute beats values equal to the nominated fraction of a beat.
- Bar - 1 bar.
Converting from Steps/Beats to note values:
| Snap Setting | Notation |
|---|---|
| 1/4 Step | 64th notes |
| 1/2 Step | 32nd notes |
| 1/4 Beat | 16th notes |
| 1/3 Beat | Triplets |
| 1/2 Beat | 8th notes |
| 1 Beat | Quarter notes |
| Bar | Whole note |
NOTE: For full details on MIDI input quantization in FL Studio, including the Record button (Right-click) options, see Input Quantization.
Add Panel

See ADD menu.
Multilink To Controllers Panel

- Multilink to controllers (Ctrl+J) - This allows you to link multiple interface controls to MIDI hardware or internal controllers. You can also use it to create automation clips in bulk for multiple controls, or create links and automation clips for VST/AU-plugin controls that don't have the same Right-click options as FL Studio native plugins. For instructions, see bottom of this section. To learn more about the types of links you can create in FL Studio see 'Linking & Using External Hardware Controllers'.
- Permanent links - Multi-links can be permanently remembered by FL Studio using the 'Override global links' option (see below).
- Browser linking - When 'Multilink' is checked, selecting plugin parameters in the Current project browser adds them to the multilink.
- As the panel is active (light on), the Right-Click menu provides the following multi-target options:
- Edit events - Opens an Event Editor for each interface control tweaked. Turn on the switch, tweak controls then select this option.
- Init song with these positions - When play is pressed each tweaked control will adopt the value it was set to. Turn on the switch, tweak controls, then select this option.
- Init pattern with these positions - Same as above, but for individual Patterns.
- Create automation clips - Creates Automation Clips for each tweaked controller. Turn on the switch, tweak controls, then select this option.
- Link to controllers - Starts the linking process.
- Override global links - Creates permanent global links between your controller, FL Studio and plugins. Established links will become active only when the window or plugin hosting the software control is focused (click anywhere on the window / plugin to focus the interface).
NOTES:
- Formulas & smoothing: Global Links do not support mapping formulas & smoothing.
- Temporary links have higher priority and will replace the global links for the current session/project.
- Controller type: Links made with the multilink function will only work as expected from a controller of the same type. Selecting a new controller may result in unexpected links between the controller, FL Studio & plugins.
- MIDI channels: Up to 16 separate MIDI controllers can be used simultaneously. To link multiple controllers select unique MIDI channels for each controller prior to initiating the multilink process (don't forget to enable each controller in the MIDI settings). The multilink process remembers both the MIDI CC and MIDI channel of the link.
- Randomize - Randomizes the values of any tweaked controls. Turn on the switch, tweak controls, then select this option.
- Humanize - Adds a small random variation to any tweaked controls. Turn on the switch, tweak controls, then select this option.
- Cancel - Stop the linking process and forget all links.
- After the linking process (light off), the Right-Click menu will function as a quick access to show options for the last tweaked control, as well as multi-target options for the last two tweaked controls.
- How to...
- Link multiple controls - 1. Select the Multilink-controllers icon shown at the top to start the multi-link process. 2. When the icon lights up, tweak some software controls. 3. Tweak the same number of hardware knobs/sliders/buttons on your controller and they will link in the same order the software controls were tweaked. Controller movements can then be recorded.
- Create automation clips in bulk - 1. Select the Multilink-controllers icon. 2. When the icon lights up, tweak all the controls you wish to automate. 3. Right-click on the icon to access menu and select 'Create automation clips'.
- Link multiple controls to the same automation clip - 1. Create an automation clip for the first control, as you would normally. 2. Select the Multilink-controllers icon. 3. When the icon lights up, tweak the rest of the controls you wish to automate. 4. Right-click on the icon to access menu and select 'Link to controller'. The Remote control settings window pops up, and you can select the same automation clip source for each clip from the 'Internal controller' dropdown (make sure 'Remove conflicts' is deselected). Tip: Name the automation clip descriptively to easily find it on the list.
- Automate a VST/AU-plugin control - 1. Select the Multilink-controllers icon. 2. When the icon lights up, tweak the control you wish to automate. 3. Right-click on the icon to access menu and select 'Create automation clips'. You can also use this method to link VST/AU-plugin controls into internal controllers. For more help on linking see here and here.
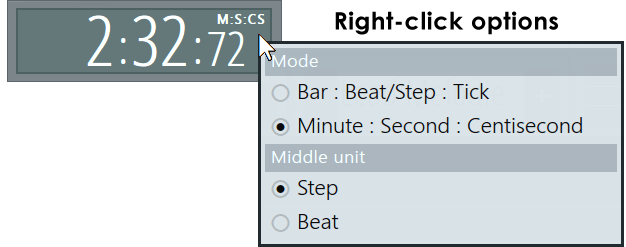
Time Panel
The Time panel displays the song time in bars or real-time.
Options
- Mode
- Bar : Beat/Step : Tick - Time is displayed in Bar format. NOTE: The number of beats-per-bar, steps per beat and PPQ (tick length) is set in the Project General Settings.
- Step/Beat switch (S/B) - Choose what the center digits display. This option applies to bar display mode only.
- Minute : Second : Centisecond - Time format. Note: Centiseconds are 1/100th of a second.
- Bar : Beat/Step : Tick - Time is displayed in Bar format. NOTE: The number of beats-per-bar, steps per beat and PPQ (tick length) is set in the Project General Settings.
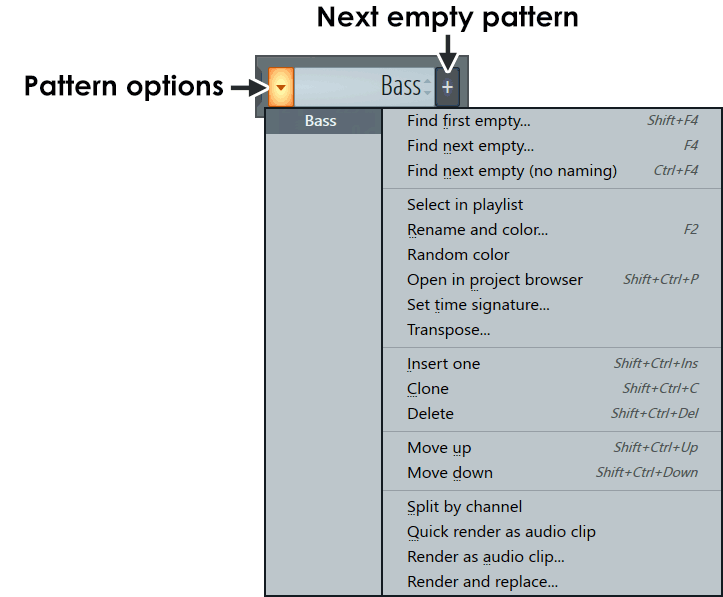
Pattern Panel
The Pattern Selector, located on the Toolbar, is used to manage Patterns. Note that the functions of the Pattern Panel are conveniently replicated in the Picker Panel, attached to the Playlist.
Controls
- Pattern options select from:
- Find first empty (Shift + F4) - Find the first unused pattern the list.
- Find next empty (F4) - Find the next unused pattern the list. The (F4) is a good workflow habit when making new patterns.
- Find next empty (no naming) (F4) - Same as above without the name field popping up.
- Select in playlist - Selects all instances of the Pattern in Playlist.
- Rename / recolor (F2) - Opens the Pattern naming window. Press (F2) again to cycle Pattern colors. The selector can be opened by clicking the square on the end of the rename window. NOTE To Gradient Color Channels make a selection by left-clicking and dragging down on the Channel Selectors (8) and select from the Channel Menu Channels > Color selected > Gradient
- Open in project browser (Shift+Ctrl+P) - Open in Project Browser. Opens the Browser Project Folder to show the current pattern.
- Set time signature (Shift+Ctrl+P) - Set individual time signatures for patterns.
- Insert one (Shift+Ctrl+Ins) - Inserts a new empty Pattern before the selected pattern.
- Clone (Alt/cmd+C) - Makes a copy of the selected pattern after it.
- Delete (Del) - Deletes the selected pattern.
- Move up (Shift+Ctrl+Up arrow) - Moves the selected pattern up one number in the Pattern selector list.
- Move down (Shift+Ctrl+Down) - Moves the selected pattern down one number in the Pattern selector list.
- Split by channel - Creates a new pattern for each active Channel in the selected pattern. Patterns will be named according to the split Channel. To undo a split by channel - 1. Stack the Pattern Clips in an empty area of the Playlist making sure they are correctly aligned. 2. Select all patterns in the stack. 3. Use the 'Playlist Menu > Edit > Merge selected clips' 4. Delete the merged clip from the Playlist.
- Quick render as audio clip - Renders the selected Pattern/s to an Audio Clip (.WAV only) using the current Render Settings. Pay attention to the Miscellaneous section > Insert and Master FX options, depending on how you plan to use the Audio Clip. Song start, or selection, is used to set the automation values that will be fixed for the duration of the Pattern/s (see Bouncing Patterns to Audio for more details). If you want to bounce a Pattern Clip to audio, with in-situ Automation, use inline Playlist bouncing.
- Render as audio clip - Renders the selected Pattern/s to an Audio Clip (.WAV only) allowing you to set Render Settings. Pay attention to the Miscellaneous section > Insert and Master FX options, depending on how you plan to use the Audio Clip. Song start, or selection, is used to set the automation values that will be fixed for the duration of the Pattern/s (see Bouncing Patterns to Audio for more details). If you want to bounce a Pattern Clip to audio, with in-situ Automation, use inline Playlist bouncing.
- Pattern name - Left-click to open the Playlist with the pattern selected for editing. Right-Click to show all pattern in the project for choosing.
- Pattern selector (+ /for next pattern/; - /for previous pattern/) - Shows/sets the current pattern. Right-Click to show a pop-up menu of all patterns in the project. A maximum of 999 individual patterns can be created.
Output Panel
The Output monitoring panel contains controls for monitoring the audio output of FL Studio.

NOTES: Resizing requires Toolbar edit mode to be enabled (Right-click on the Toolbar to access it). For more visualization options see Wave Candy.
Options
Right-Click the Oscilloscope area to set the following options:
- Oscilloscope - Shows the waveform output from FL Studio.
- Stereo - Stereo or Single line display.
- Long - Stationary or scrolling oscilloscope.
- Spectrograph - Shows the frequency spectrum output from FL Studio. Low frequencies left, high frequencies to the right. NOTE: The output is scaled so that Pink noise produces a flat spectrum. Pink noise has equal power for each octave. Mixing to this principle is considered to create a 'balanced' mix.
- Peak Meter - Monitors the final output of FL Studio (place your mouse over the peak meter to read the values in the Hint Bar). If the bars turn red your project is clipping, not good. To learn more about clipping and setting levels in FL Studio see the section on Levels and Mixing.
CPU & Memory Panel
The CPU & Memory Panel displays the CPU, polyphony & memory usage for the project. See the ![]() CPU Panel videos here.
CPU Panel videos here.

NOTE: Double-Click the CPU panel to open the Plugin Performance Monitor. This shows a detailed breakdown of CPU usage per-plugin.
Controls
-
CPU Meter - When this meter nears 100%, FL Studio's audio output will glitch or crackle, this is known as an underrun. The meter shows the percentage of time required to fill each audio buffer, compared to the buffers length. For example; 20% means FL Studio created the audio for the buffer in 20% of the time available. 90% means FL Studio required 90% of the buffers time to fill it with audio. Very close to running out of time to complete the task. Once FL Studio needs the same, or more time than is available, there will be gaps in the audio (heard as glitches or stuttering). For tips on reducing CPU usage see the Optimization section. To learn why the FL Studio CPU meter is not the same as the Operating System CPU meter see the section below on Multi-core CPU Processing.
Right-Click to access the following options:
- Refresh - Slow, Medium or Fast update rate for the information displayed.
- View voice count - Show Voice count in place of FPS.
- View FPS (Frames Per Second) - Show FL Studio user interface screen refresh rate in place of 'Voice count'.
- Misc - 'Handles', 'Threads' and 'Fonts'. Techsupport may ask to see this when troubleshooting. You don't cause trouble do you?
-
Memory Meter - The options for this meter depend on which version of FL Studio you are using. NOTE: See the section 'RAM vs Address Space' below, it's important stuff! Memory address space is not RAM.
- FL Studio 64 Bit - The meter shows the memory address space in use. You can use up to 8 TB for 64 Bit programs depending on your version of 64 Bit Windows.
- FL Studio 32 Bit - The Memory meter shows how much of the (2 GB to 4GB) of memory address space available to FL Studio remains unused or used (Right-Click the panel to change mode between 'Show available' & 'Show used'). 32-Bit programs can access a maximum of 4 GB 'memory address space'. If you run out of this memory you can get errors such as access violations or buffer overflows. If so, see 'FL Studio 32 Bit Memory Management' below.
- CPU Graph - Shows the CPU usage as a running graph, so that you can track changes and observe spikes. Right-Click to change the update speed. NOTE: See the section 'multi-core CPUs' below.
- Polyphony - Shows number of voices (independent sounds) being mixed at the same time. The Miscellaneous Channel Settings have some per-channel controls to set maximum polyphony.
RAM vs Memory Address Space
RAM does not limit program memory - The values shown in the CPU panel are not RAM in use, physical memory, they are memory address space in use. FL Studio 64 Bit can use up to 8 TB of memory. Your RAM is just a place to put this data so FL Studio has fast access to it. If the program memory is bigger than your RAM, your Operating System puts the excess data in a file on your operating system drive (disk or SSD). When this happens you will be more likely to experience buffer underruns as data is read (slowly) off SSD/disk and swapped back into RAM while other data is shuffled out. ![]() See a video on this topic here.
See a video on this topic here.
How to use the memory meter - The display shows how much memory is used, so you can compare that to how much RAM you have. So long as the value shown is less than your total RAM, you should generally be OK. Although, remember other programs may also be using your RAM, so check your system Memory meter for the full picture.
CPU Meters & Multi-core CPU Processing
It's common for people to open the Windows Task Manager or macOS Activity Monitor and notice not all cores are in full use OR the FL Studio CPU Meter and Operating System CPU meter don't match. This can be frustrating if you experience audio glitches and you see the Operating System CPU usage is nowhere near 100%. Let's look at the FL Studio CPU meter vs the Operating System CPU meter to see why this is expected and normal. We'll consider Metrics, time and logic:
- Different metrics - Realtime audio is generated in short segments known as 'audio-buffers' (about 5-20 ms in length depending on your settings). When you press Play, no sound is heard until the first audio-buffer is filled and work starts on the second buffer. In other words, you are always listening to audio created 1 buffer in the past. The FL Studio CPU meter measures how quickly each audio-buffer is filled. Specifically - (Time taken to fill the Buffer / Buffer length). 50% means the audio for the buffer was generated in half the time available. On the other hand ...
The Operating System CPU meter measures overall CPU 'utilization'. Utilization is the percentage of processing-units on the CPU in use. Think about these like calculators, and imagine your CPU has 16 calculators available. Specifically - (Processing-slots in use / Processing-slots available). 50% means half the processing units were in use or for our example, 8 out of 16 calculators are in use. Utilization therefore, is about processing capacity not how quickly it is processing a given task, such as the FL Studio audio. Put simply, FL Studio's meter measures time (processing speed), the Operating System measures capacity (processing slots in use). The two measures are not the same, even if they are both reported in percent! But wait, there's more: time-scales and logic.
- Time-scales - The FL Studio CPU meter is relative to the audio buffer size ~ 10 ms. The operating system CPU meter works on a fixed ~ 1000 ms interval. The difference in time-scales is around 100 times! While the operating system CPU meter may show 30% utilization, over the last 1000 ms, there may have been multiple occasions during that period where real-time audio processing experienced interruptions. Why? If the real-time audio stream has to wait for input streams to finish, you may experience audio glitches, or at least very high FL Studio CPU meter readings. At the same time, Operating System may report low overall and or individual CPU utilization. The CPU may have lots of free processing units. It's just the case the units in use, weren't able to keep up with the realtime output. It's common with audio generation, that the CPU must wait for program and system related tasks to complete before it can continue, and so, may struggle to keep up with realtime audio output. Generating ~ 44100 samples per second, on an ongoing basis, without an interruption is not a simple task. The reason why the CPU must 'wait' is all to do with logic:
- The logic of audio processing - There is a long list of tasks that must be processed in sequence, and this means logically can't be processed in parallel (multithreaded). For example: Plugins must wait for instructions from the Piano roll and Playlist before they make sound. Effects must wait for the audio from upstream instruments and FX before they can process it. Further, it's not possible to parallel-process (multithread) instruments and FX that are on the same Mixer channel (where the audio is mixed together), or even in the same Mixer routing pipe-line (when one Mixer track is linked to another and another). Even FX processing has an order from top to bottom in the FX stack). Then, the Master Mixer track must wait for every instrument > Mixer track > effect to be processed before it can process the audio through the Master effects. So logically, there is a lot of waiting that's a natural and unavoidable fact of sequential audio processing. Think of audio generation as a production line. This means the CPU may not be particularly busy, using all its processing units and cores, yet it runs out of time to fill the audio-buffer. Why? Because there was a lot of waiting for things that needed to be processed in sequence and waiting is basically wasting buffer time. It should be clear that fast processing is very important and this is not the same thing as multi-core / multi-thread processing.
NOTE: The best CPU is one that has enough cores to spread the work around AND can do the most work on a single core during each buffer time-slice. Because, if any single core can't keep up, it does not matter how many other cores you have running at less than 100%, you will experience audio glitches in real-time playback. This leads us nicely to our TIP: When comparing CPUs, look for the fastest single-core performance scores in a package with at least 8 physical cores. Most CPU benchmarks list single core performance. For example, the CPU Benchmark website lists the single core scores.
So what can you do to minimize 'CPU waiting' and improve multi-core performance?
- First, make sure to work carefully through this page in the manual - Optimizing FL Studio performance.
- Specifically, in terms of multi-threading, make sure that your highest CPU using plugins are routed to independent Mixer Tracks without shared 'Send' Channels. Each Mixer Track represents an 'opportunity' to create these independent, parallel, processing paths. In summary, here is how multi-threading works:
- Generators will be processed in multiple threads (if 'Allow threaded processing' is activated and the plugins allow it).
- Any Mixer tracks that don't depend on one another for audio input, can be processed at the same time, i.e. in multiple threads (if 'Allow threaded processing' is activated).
- Mixer tracks that depend on the output of other mixer tracks will be processed after those other mixer tracks and probably on the same core.
Testing - If you are testing and comparing CPU loads it is the number of plugins and/or effects that can be processed without buffer underruns. Don't obsess about how cores are used, particularly at low CPU levels, since the Scheduler will try to reduce power consumption by parking (switching off) cores at low CPU load, then turn cores on and even out this distribution as CPU load approaches 100%. See some more information here.
See the ![]() tutorial video here.
tutorial video here.
FL Studio 64 Bit Memory Management
All FL Studio releases since 20.8.4 are 64-bit only.
- Memory - You can use up to 512 GB depending on your version of 64 Bit Windows without any bridging or other work-arounds as used in the 32 Bit version of FL Studio (shown in the section above).
- Audio file size - This release will allow you to record or load a single audio file (including Edison) that exceeds 2 GB.
- 32 Bit bridge - FL Studio 64 Bit will automatically 'bridge' 32 Bit plugins. Bridging loads the 32 Bit plugin in a special 'wrapper' that translates between the 32 Bit and 64 Bit
memory standard of the plugin and host (FL Studio).
NOTE: - Ideally you should restrict use of 32 Bit plugins to FL Studio 32 Bit and 64 Bit plugins to FL Studio 64 Bit. In practice we know this isn't always possible, but keep in mind that bridging adds a small CPU load and the bridge can be another point of failure where a plugin can crash. If you have trouble with a 32 Bit bridged plugin, please report it to Tech Support and try to use the 64 Bit version if one is available.
NOTE: You must be using Windows 64 Bit to run FL64.exe, meaning any new release of FL Studio. By default, the 64 Bit executable is installed to 'C:\Program Files\Image-Line\FL Studio N\FL64.exe'.
FL Studio 32 Bit Memory Management
NOTE: FL Studio 20.8.4 was the last version to support 32-bit Windows Operating Systems. If you are using the 32 Bit version of FL Studio, the following options will allow you to use more than 4 GB of memory, according to your Windows version:
1. Remove samples & instruments from FL Studios memory allocation
'Keep on disk' and 'Bridged mode' will significantly lower the memory required by FL Studio. Together they will allow you to run projects to the limits of your PC's capability and operating system (32 or 64 Bit).
- Keep on disk - Open large Audio Clips and/or Sampler Channels and select 'Keep on disk' located on the 'SMP' tab. To automatically 'Keep on disk' select 'Auto keep long audio on disk' on the F10 General Options, save then re-load your project. NOTE: The sample data must be 16 or 32 Bit format for the 'Keep on disk' option to be available. When selected the maximum memory available to each Audio Clip / Sampler Channel will be 2 GB.
- Bridged mode for VSTs - Open the Wrapper PROCESSING tab and select the 'Bridged' option. Bridging moves the plugin, along with its memory requirements, to a separate process from FL Studio. The maximum memory available to the plugin will be at least 2 GB for 32 Bit Windows and up to 8 TB depending on your version of 64 Bit Windows.
This mode is most beneficial for samplers and/or ROMpler plugins that consume large amounts of memory loading their sample-banks.
NOTE: Ideally you should restrict use of 32 Bit plugins to FL Studio 32 Bit and 64 Bit plugins to FL Studio 64 Bit. In practice we know this isn't always possible, but keep in mind that bridging adds a small CPU load and the bridge can be another point of failure where a plugin can crash. If you have trouble with a 64 Bit bridged plugin, please report it to Tech Support and use the 32 Bit version if one is available.
2. Increase FL Studios working memory allocation (a Windows setting)
Increasing FL Studio working memory allocation - There is an 'FL.exe' file in the FL Studio installation folder. Using this to start FL Studio after making the following changes to your Windows operating system will give FL Studio access to 3 GB or 4 GB (up from 2 GB) depending on your OS:
-
Windows 10, 8, 7 & Vista - 64 Bit: FL Studio will automatically have access to 4 GB of RAM when the '..\Program Files (x86)\Image-Line\FL Studio\FL.exe' is used to start FL Studio.
- 1. Make a Windows Desktop shortcut to the extended memory FL Studio executable '..\Program Files (x86)\Image-Line\FL Studio\FL.exe' and use that to start FL Studio in future.
- Windows 10, 8, 7 & Vista - 32 Bit - Use the 3 GB switch
to access 3 GB of RAM.
- Enable the 3 GB switch:
- 1. From Windows Start browse to Programs > Accessories and Right-Click the Command Prompt file. Click 'Run as Administrator'.
- 2. In the Command prompt window, type bcdedit /set IncreaseUserVa 3072 and press enter on your keyboard. Allow the change to be made when security windows appear.
- 3. Restart the computer.
- 4. Make a Windows Desktop shortcut to the extended memory FL Studio executable '..\Program Files\Image-Line\FL Studio\FL.exe' and use that to start FL Studio in future.
- Disable the 3 GB switch:
- 1. From Windows Start browse to Programs > Accessories and Right-Click the Command Prompt file. Click 'Run as Administrator'.
- 2. In the Command prompt window, enter bcdedit /deletevalue IncreaseUserVa and press enter on your keyboard. Allow the change to be made when security windows appear.
- 3. Restart the computer.
- 4. Remember to use the original FL Studio executable '..\Program Files\Image-Line\FL Studio\FL.exe' in future.
- Enable the 3 GB switch:
- Windows XP 32 Bit - Use the 3 GB switch in XP
to access 3 GB of RAM.
- 1. WARNING: Don't attempt the following unless you are confident working with Windows system files. Edit the Boot.ini file. The Boot.ini is an essential system file so we strongly recommend saving a copy of the 'Boot.ini' file as 'Original-Boot.ini' prior to mucking about with it. Add a '/3GB' switch command to the end of the boot-script in the 'Boot.ini' file and save.
- 2. Restart the computer.
- 3. Make a Windows Desktop shortcut to the extended memory FL Studio executable '..\Program Files\Image-Line\FL Studio\FL.exe' and use that to start FL Studio in future.
-
32 Bit Troubleshooting:
- Driver conflicts - Driver may not be loaded with the /3GB switch
- Tuning of user memory space - How to use the /userva switch with the /3GB switch to tune the User-mode space to a value between 2 GB and 3 GB
NOTE: From FL Studio 11 onward the 'FL (extended memory).exe' has been renamed 'FL.exe' and is the default executable after installation.
3. Use the FL Studio 64 Bit version
Open the ..\FL Studio\FL64.exe executable file and load your project. The 64 Bit version of FL Studio has no memory limitations, apart from those that apply to 64 Bit Windows. 32 Bit plugins will be automatically bridged to 64 Bit, although we recommend using 64 Bit versions of plugins in the 64 Bit version of FL Studio, where possible. NOTE: If you are using Windows 32 Bit then FL Studio 64 Bit won't run on your computer.
Online Panel

Controls
The Online panel has two functions:- Online news-feed - The panel will display news and announcements from Image-Line but will not activate until it is clicked for the first time. Windows / macOS may warn you that a program is trying to access the internet. This is normal as the News Panel works by displaying an Image-Line managed RSS (internet) feed
 inside FL Studio. Keep an eye on the News Panel for updates and new content. The News Panel will not communicate with the RSS feed when the panel is
hidden or disabled (see below). Of course, you need an active internet connection to use this function.
inside FL Studio. Keep an eye on the News Panel for updates and new content. The News Panel will not communicate with the RSS feed when the panel is
hidden or disabled (see below). Of course, you need an active internet connection to use this function.
- To open the panel - Left-click the panel menu to display the drop-down menu of news and announcements from Image-Line. The newest item is displayed at the top of the list and is visible in the panel when the menu is closed.
- To select an item - Left-click it.
- To activate/deactivate the panel - click the 'Enable online news' option at the bottom of the list.
- Content Library - Open the Content Library by clicking the icon as shown above. For more information see the dedicated Content Library help.
Toolbar Shortcut Icons
Each icon below can be added or removed as suits your workflow and space.

NOTE: Dragging content over the main window buttons (Playlist, Channel Rack, Piano roll) will bring these windows to the front if they are not already visible.
Options
Right-Click panels to select options. NOTE: Some buttons also have Right-Click alternative actions these are indicated after the /.
- Continuous scrolling (Right-Click) - The window continuously scrolls, click on the Editor background to reposition the Playhead/scroll center for the window.
NOTE: Adding a Note to the Piano roll or Clip to the Playlist, while Auto Scrolling, will automatically disable the option to allow precise editing.
- Change metronome sound - Right-Click the switch and select from the menu.
- Customize metronome - Replace [FL Studio install folder]\FL Studio\Data\System\Metronome.wav, Metronome2.wav and/or Metronome3.wav with your own samples. If you do, make sure to back up the originals since you are likely to suck at making good metronome sounds, unlike us of course. NOTE: This folder is normally hidden, so you will need to display hidden folders to access it.
- Set Metronome Mixer channel - The metronome is routed to the 'Metronome track', set in the Audio Settings. The default mixer track is the Master (--). Re-routing the Metronome sound can be useful to adjust the metronome volume or send a separate click-track to performers via a Mixer track external mixer output.
- Root Note - Change the note or scale starting on the Z/W key.
- Octave - Base octave for mapping the keyboard keys. NOTE: If you are using multi-sample based instruments make sure the Channel Settings option 'Add to key' is selected.
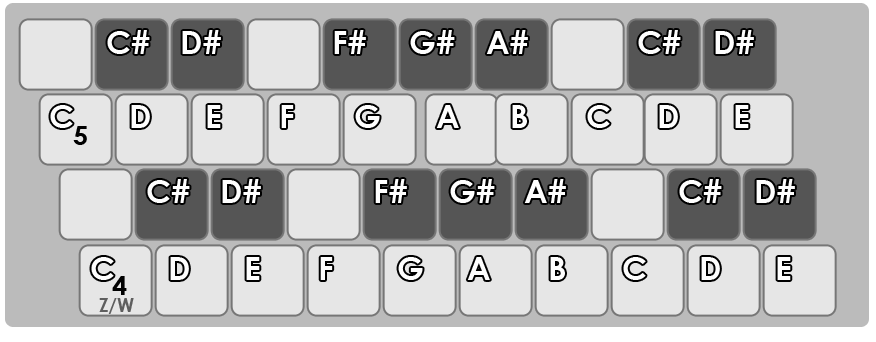
- Standard keyboard layouts - Piano or others such as Janko. The first image below shows the standard 'Piano' layout. If you have a Razer Chroma keyboard use the Razer Chroma FX plugin (Typing Piano mode) to illuminate the Piano keys.
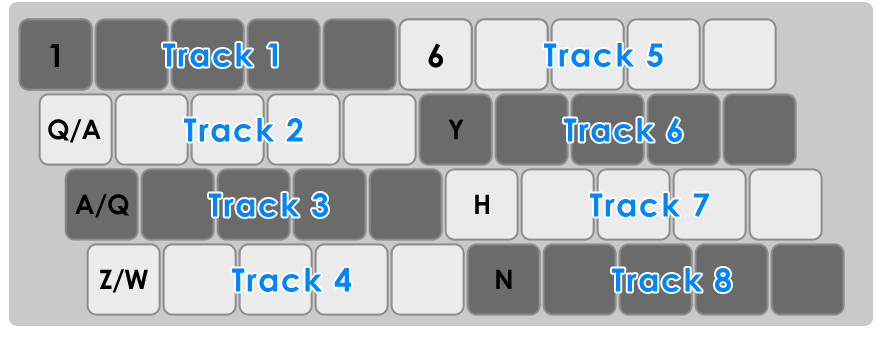
This is the Performance Mode layout used to trigger Clips, tracks refer to Playlist tracks.
- Snap to scale - Select a 'Root note' and 'Layout'. The input will snap to the selected scale, not allowing notes that are out of key to be played. Where 'Layouts' say '+ Chords' these include single-key Chords on the Number Keys (above the typing Keys). 'FPC (C4)' and 'Slicex (C4)' are designed to work with the respective plugins.
Key changes - Use the Channel Settings > Misc > Root note options. If you are using samples you may also want to use the Add to key option.