PLAYLIST
Audio Clips 
Audio Clips are a special version of the Sampler channels. The purpose of Audio Clips is to hold the samples displayed & triggered in the Playlist where they can be sliced and arranged as required. If desired, Audio Clips can be triggered from the Step Sequencer or the Piano roll, although this does raise the eyebrows of the program developers who prefer you use Sampler channels for that. To load samples as Audio Clips drag and drop your samples on the Playlist.
|
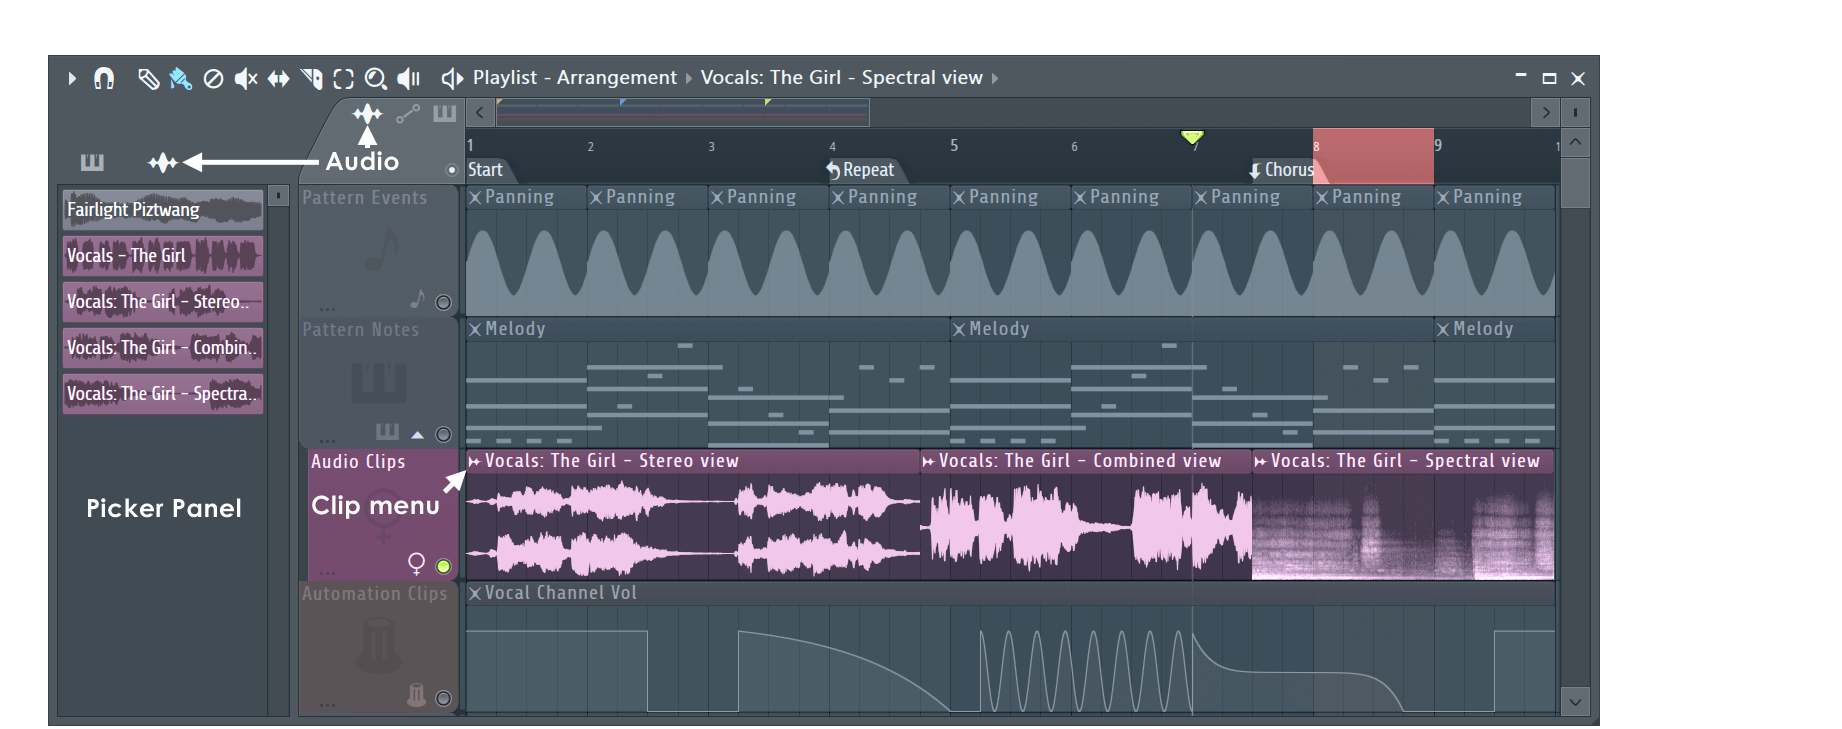
NOTE: The view modes (Stereo, Combined and Spectral) are set from the Channel Settings, Preview window, Right-click options.
Audio Clips
To load a sample in an Audio Clip Channel drag and drop your sample from the Browser (or external File Browser) and drop it on the Playlist. If you drop your sample on the Channel Rack you will create a Sampler Channel. While both Audio Clips and Sampler Channels look similar Audio Clips only have the SMP and MISC tabs on the Channel Settings due to their main purpose being to feed the Audio Clips visible in the Playlist.
See the Audio Clip Menu section for more on-Clip options.
Audio Clip Focus
The clip focus selector (shown below) is used to focus various clip types. This is particularly useful when clips are stacked, the focused clip will be brought to the top for selection and editing. Selecting (Ctrl+Click) will focus all clips so they can be moved together.

|
Icons & functions from left to right:
- Audio Clip Focus Icon (Wave) - (Right-Click) to show Audio Clip menu.
- Show crossfade controls (Shift+F) - Show Audio Clip Volume Envelopes & Controls. NOTE: (Right-Click) the icon for quick access to Playlist Menu Edit and View options relevant to Fades:
- Automatic crossfades - See Project Settings > Playlist
- Create new clips with manual fades - Set all newly created Audio Clips with a manual Crossfade setting.
- Snap fade handles - Fade handles move and snap to the Playliust grid (snap setting).
- Show fade previews / gain previews - Shows the effect of the Fades and Gain controls on the waveform.
- Zero-crossing edits - Slicing & resize edits will be made at the nearest zero-crossing to the slice point. Useful for avoiding clicks at the slice location. NOTE: This option can interfere with your ability to slice at specific locations, as the nearest 'Zero Crossing' will be used.
- Stretch clips - When the left or right edge of the clip is selected and dragged the clip will be stretched according to the Audio Clip Time stretching settings. See the section Working with the stretch/pitch functions for more details on synchronizing/beatmatching audio clips to the project tempo.
Working with Audio Clips
In addition to the standard editing options common to all clips as discussed in the Playlist section on editing clips. Audio Clips provide the following features:
- Make unique & Make unique as sample - With Audio Clips the original audio file is re-used in the new Audio Clip channel. Alternatively use 'Make unique as sample' Clones the original Audio Clip AND clones the sample file on disk. Use this when you want to physically edit the sample data and change it in some way.
- Autodetect slicing - To split an Audio Clip into beats using its integrated BeatSlicer, open the clip menu (see the mouse pointer in the main screenshot above) and select Chop > Dull / Medium or /Sharp to auto-detect beats.
- Region slicing - To split an Audio Clip into regions, open the clip menu and from the Chop into menu select Regions (if the wave doesn't contain regions, this command is disabled).
Audio Clip Channel Settings
You can open Audio Clips in the Channel Rack to access individual settings. The two tabs that appear on the Audio Clip Channel are described in detail in the Channel Sampler/Settings sections:
Volume Envelopes & Controls
Audio Clips include integrated Volume envelopes. Controls work per-instance of any given Audio Clip. This means you can slice an Audio Clip many times and each slice will include unique Volume Envelope controls.
Controls:
These controls appear when 'Show fade editing controls' is selected.
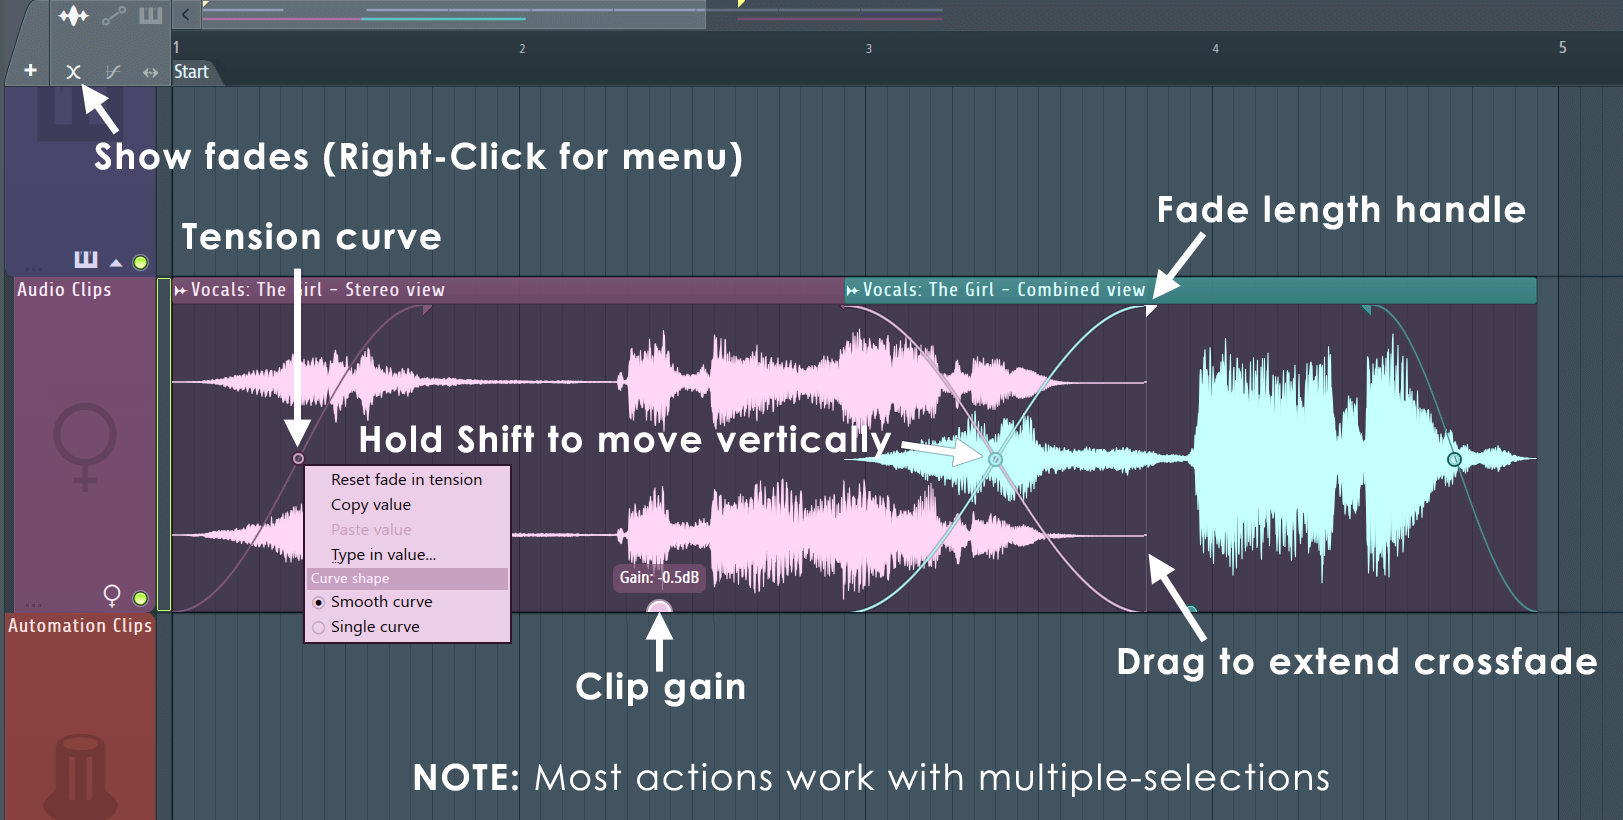
- Fade Length - Fade handles are the triangles on the upper edge of the Clip. Drag horizontally to change the Fade-in or Fade-out duration. NOTE: Where overlapping Clips can be extended (there's data outside the visible Clip), click and drag on the lower part of the vertical line that appears on mouse-over of the Fade Handle or in vertical line with it. This control allows you to extend the Audio Clips length, and so fade duration. Right-Click options:
- Reset fade in - Returns the fade handle to the default, no-fade.
- Create crossfade - If the selected Clip is overlapping with another one, will crossfade both.
- Copy / Paste value - Allows you to duplicate Fades across Clips.
- Type in value... - Type in a fade value in milliseconds (ms).
- Manual - Prevents the fade from being changed by any automated process.
- Smooth curve - S shaped curve.
- Single curve - Use for creating straight or single-curved segments (depending on the tension).
- Fade Curve Shape - Tension handles are the circles on the Envelopes. Drag vertically to change the shape of the fade-in and fade-out curves. (Right-Click to choose from Smooth (s-shape) and single (linear or curved). When fades are set to the default, Automatic Crossfading will occur when Audio Clips are overlapped. The default cross-fade curve will maintain 0 dB levels. Reset - (Alt+Click).
- Audio Clip Gain - Gain controls are the semi-circles on the lower edge of Clips. This is a unique Gain control, independent of all other gain-stages FL Studio. Click and drag vertically for +36 dB to -∞ gain (silence). Gain control move along the bottom of the Clip, as the Playlist moves, to remain visible. NOTE: Below -96 dB the level snaps to -∞. Reset - (Alt+Click).
- Audio Clip Menu - Access controls including:
- Reset fades - For selected Clips.
- Fade in / Fade out curve - Choose type and shape.
Working with Clip Envelopes
- Fade handles - Handles snap to the grid. Hold (Alt) after clicking the handle to disable snap. If you hold (Alt) then click, it will reset the handle.
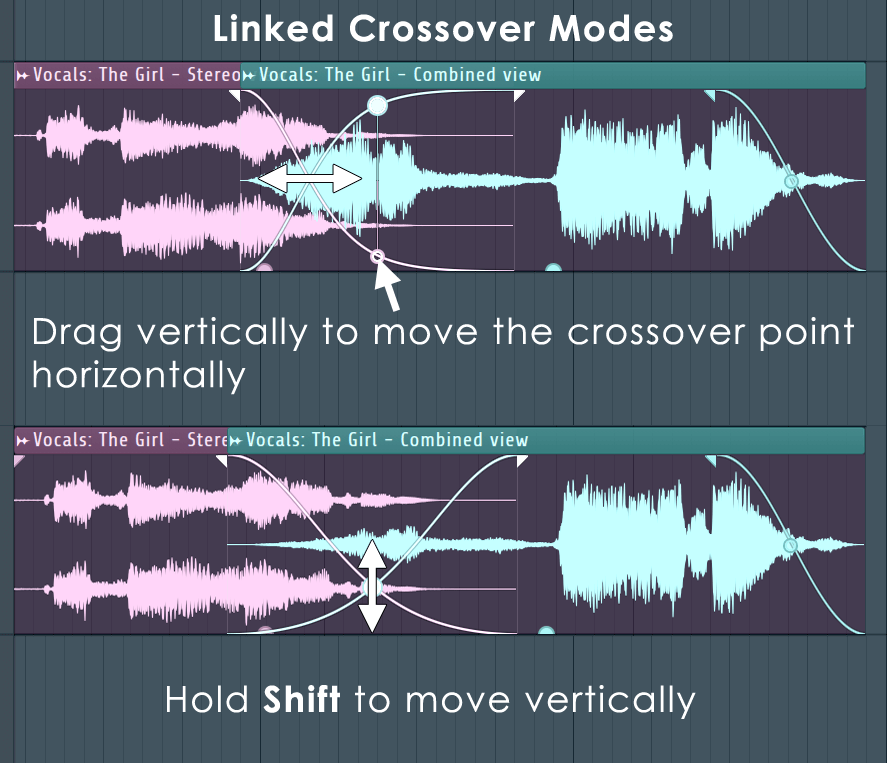
- Crossfade tension (linked & unlinked modes) - When crossfade tensions of overlapping clips are set to the same value, the handles become linked and move together in special ways. Drag vertically to move the crossover-point left (down) and right (up), maintaining equal volume. Hold (Shift) to change the vertical position of the crossover. Hold (Ctrl) to de-link the crossover handles. You will need to reset the tensions to re-link them if needed.
- Automatic Crossfades - When the Project Settings > Automatic crossfades option is selected, overlapping Audio Clips will crossfade. NOTE: If Automatic Crossfades are not working there are two reasons. 1. One of more of the Audio Clips is set to Manual Fades (see below). Select all the Clips involved, open any Audio Clip Menu and use the Reset Fades option. 2. The Project Settings > Automatic crossfades option is de-selected.
- Manual Fades - When the Automation Clip (Menu) > Fade in / Fade out curve > Manual is selected or you manually change the length of either the Fade-in or Fade-out handle, that fade will be set to Manual mode. In manual mode fade length will remain as set. NOTES: Even if there is no fade showing, the fade may still be set to Manual mode. The purpose of this feature is to prevent you overlapping Audio Clips and losing carefully set fade lengths or creating fades were none is desired.
- Show fade previews / gain previews - Find these option under Playlist Menu > View. When selected the waveform preview will reflect level changes caused by the envelope or gain settings. Deselect these if the preview interferes with your ability to see important information in the waveform. E.g. To see transients at the start and end of fading Audio Clips or at very low or high gain settings. TIP: When previews are deselected hold (Alt) for temporary previews.
NOTE: Audio Clip fades replace Declick modes when active. Fade-in and Fade-out are independent, so it is possible to have both Audio Clip fades and Declick fades active at either end of the same Audio Clip. As multiple 'Child' Audio Clips share the same Channel Settings, the Declick mode shown there may not always reflect the actual state of every Child Audio Clip. Inspect the Clip visualizations in the Playlist to determine the actual state. Learn more about Declicking below ...
Declicking Options
See the Sampler Channel Settings - Declick options to learn more about the special declick features that are available when an Audio Clip is sliced.

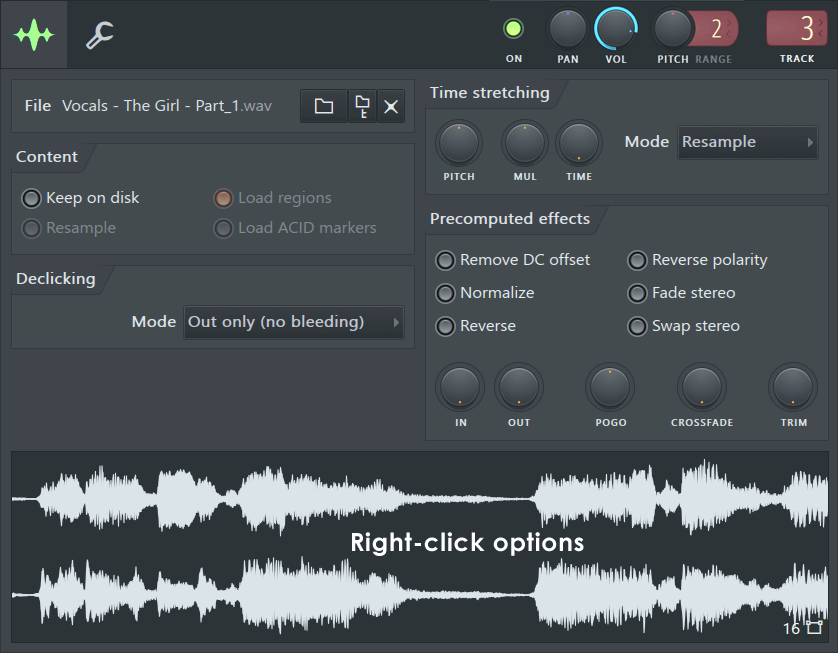
Channel Settings Waveform Preview (Right-Click) Options
- Reload - Reload sample.
- Save as - Save the sample with the option to rename.
- Edit - Open in Edison Audio Editor.
- Spectrum view - Display waveform in Playlist and Preview panel in spectral mode. In this view frequency (20 Hz to 20 kHz) is displayed on the vertical axis, brightness represents intensity of the specific frequencies with time plotted on the horizontal axis, as normal for waveform views. For more detailed spectral waveform analysis use Edison.
- Multichannel waveform view - Display waveform in Playlist and Preview panel in stereo mode (assuming the sample is in stereo). NOTE: This mode is incompatible with Spectrum view.
Audio Clip Notes
- Loading - Each time a new sample is dragged and dropped on the clip-track area of the Playlist, a new Audio Clip channel is created. NOTE: Drag an audio file (from the Browser, for example) and drop it on the Track label area to auto-create an Audio Clip and
auto-name the Clip track to match the file.
- Clip selector - Each sample placed in an Audio Clip channel becomes available in the Clip selector, list of items that can be inserted into the Playlist.
- Auto alignment - The Audio Clip will be aligned to the Playlist bars if a Downbeat marker is set in the source .wav file (see Edison region markers for details on adding a downbeat marker).
- Stretching & tempo-sync - Tempo information included in the .wav file may cause the clip to be stretched to fit the current project. The tempo information can be set/deleted using Edison's Sample Properties dialog. The load behavior also depends on the Read sample tempo information option in the General settings. If this information is incorrect, as often happens with random files downloaded from the internet, you will be scratching your head wondering why your Audio Clips sound like a 'dying duck in a thunderstorm'.
- Channel Grouping - All new Audio Clips are inserted in the dedicated Audio Clips group (for more information on groups, see Step Sequencer). It's a good practice to keep the Audio Clips in separate groups, as you will normally not use the grid or Piano roll to trigger them.
- Controls - Some features supported by the standard Sampler channels are not supported by the Audio Clip channels. The unsupported features and settings include: